
-
Happy Birthday ICMag! Been 20 years since Gypsy Nirvana created the forum! We are celebrating with a 4/20 Giveaway and by launching a new Patreon tier called "420club". You can read more here.
-
Important notice: ICMag's T.O.U. has been updated. Please review it here. For your convenience, it is also available in the main forum menu, under 'Quick Links"!
You are using an out of date browser. It may not display this or other websites correctly.
You should upgrade or use an alternative browser.
You should upgrade or use an alternative browser.
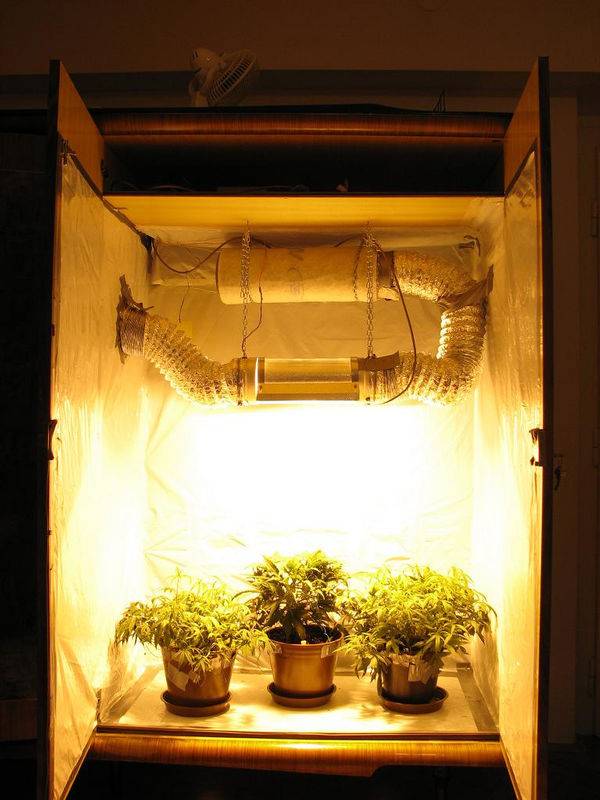
250watt Stealth Medical Cabinet
- Thread starter TheGhost
- Start date
Thank you so much for all this information, this thread has been extremely helpful. Just a few more questions, I promise! Did you follow the design from the thread here? If so, what size of ducting and caps did you use? Also, I'm trying to find this fan you're talking about, I can't imagine a 75cfm fan keeping temps that cool and pulling air through a carbon filter. Where did you get it? If you could give a link to something similar online or perhaps the same one, that'd be so useful. Again, thank you so much for your time, pictures, and knowledge!
TheGhost
Member
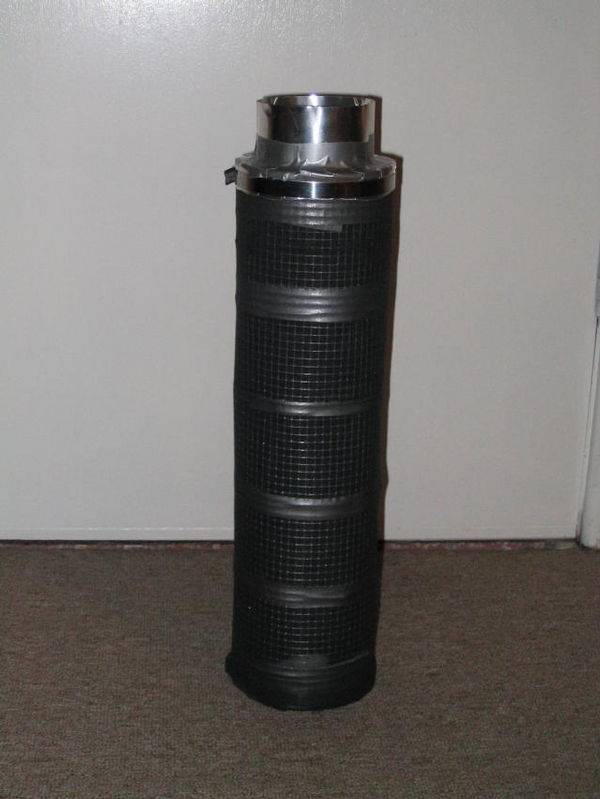
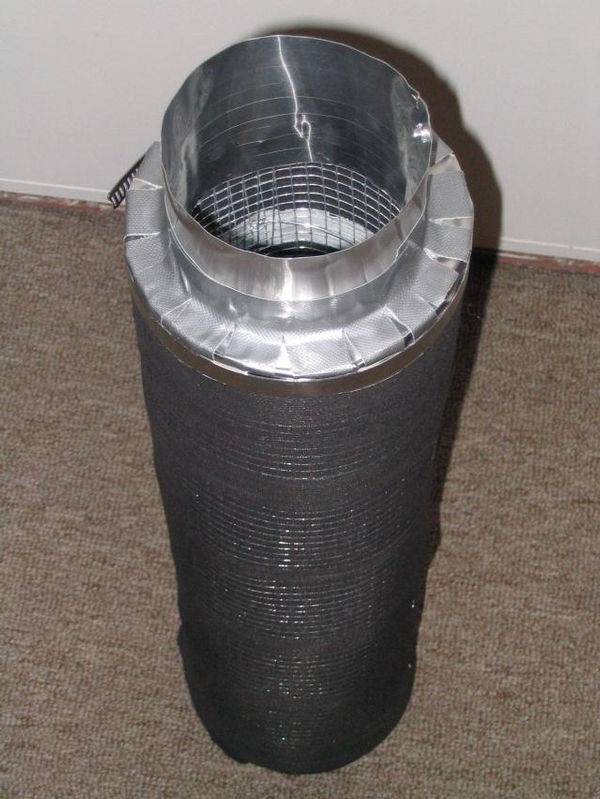
Hey bounty29, no I didn't follow the design from that thread, but mine is very similar. I did not buy the caps or reducer, I manufactured them from sheet aluminum (off cuts from the hood). The outlet of the scrubber is 4".
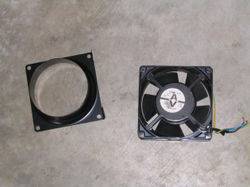
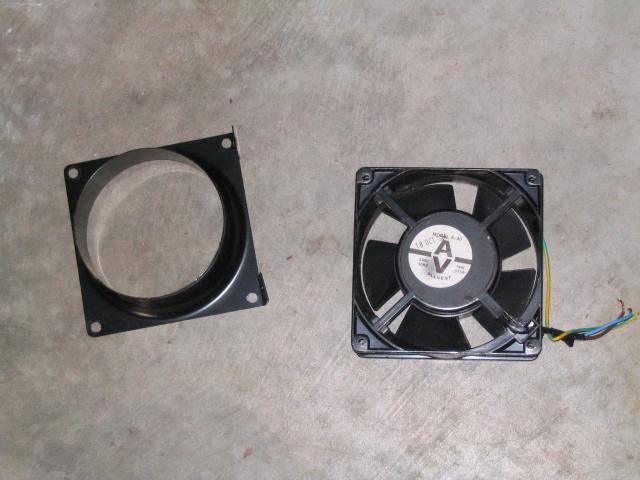
I get my fans from the local hydro shop, they cost $50 and are very effective. they also include two 4" round reducers so they can be mounted inline. I have attached a pic of one of the fans.
The area that needs venting in my cab is about 22 cubic feet. My fan is 75 cubic feet per minute, that means that under ideal circumstances the fan will turn over all the air in the cab more than 3 times every minute. Now, the biggest mistake I see people make with cabs is that they make the intakes too small.
There is no point buying a big fan and then restricting it. My fans exit duct size is 4" but my cabinet has a combined intake area of 14". Such a large intake area helps to compensate for the bends in my light traps.
So lets assume that the carbon scrubber reduces the fan's capacity to 40 cubic feet per minute (which it dose not) the air in my cabinet will be totally changed over about twice per minute, which is more than adequate in my situation especially when you consider that my hood is air cooled.
I hope that helps.
Later
Ghost.

Can you get a detailed shot of the sticker on that fan? Sorry to be such a nuisance but if I could find that fan it would save me a good bit of money and hassle. And just to make sure I understand this correctly, you use one of those for the carbon scrubber and one for the light hood exhaust, with a passive intake?
I was looking more closely at the pictures of your scrubber, and it doesn't look like you use the carbon fill that most people suggest. Is that just a sheet of carbon, actually made for filtering air, as opposed to the carbon grains that are used for filtering water? I've seen people mention something like that, used for furnace filtering or something. Where abouts did you get that, and in what size sheets? Thanks again!
0p0rat0r
Member
Nice cabinet! I especially like your relatively small fan and carbon filter setup. I'm designing a cabinet now that is 54" tall and a little over 2 square feet. I just went out and bought a centrifugal inline fan for 200 bucks that is really large and rather noisy. It takes up 1 foot of height in my cabinet. You've inspired me to give muffin/pc fans a second look. I've seen people put boxes around to conceal their grows before but you've got yours insulated too... well thought out design. Thanks for sharing.
TheGhost
Member
Hey Guys,
bounty29: Nope, I use standard granular activated carbon that i get from an aquarium store. The top comes off the scrubber and I pour in the new carbon.
OpOratOr: Thanks man, Yep if you design the ventillation system properly to suit the ambient temps in your area and make the intake area large enough you would be surprised how little cfm you really need. Just remember to make sure the cabinet is as air tight as possible, and your fan is capable of completely turning over the air in the cabinet approx. 3 times per minute. This formula has always worked for me, but I do have an air cooled hood.
I insulate the boxes to help contain noise...Safty First.
Later Ghost.
TheGhost
Member
Hi Guys,
well I guess its time to post some pics of the hydro system in this cabinet.
I have used DWC for quite a few years now ever since I saw Highgrades results in buckets. DCW has worked very well for me over the years, providing great growth rates and yields in an easy to handle system. That said, I do understand all too well the shortcomings of DWC and for that reason I would not recommend the use of DWC in an enclosed cabinet such as this unless you have a good handle on the temps in the cabinet.
I decided to use a recirclulating system this time around for the simple reason that I haven't used it before and I was curious to see if there would be any difference.
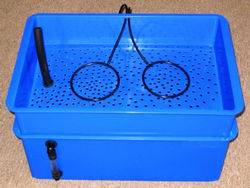
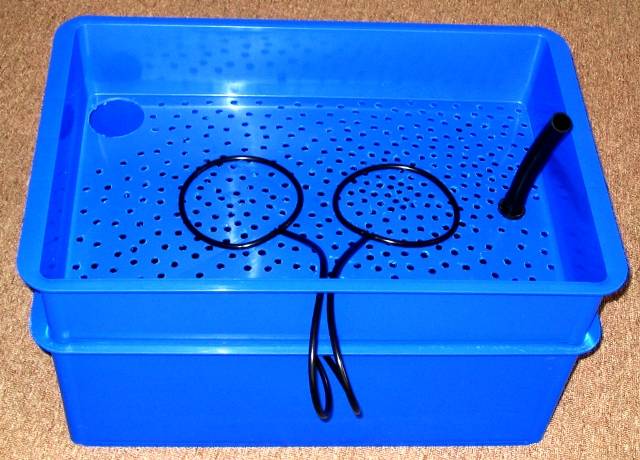
I also decided to use a single res and a single planting tray so i could vary the numbers of plants into the future.
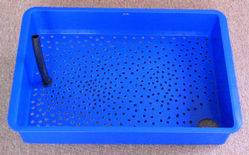
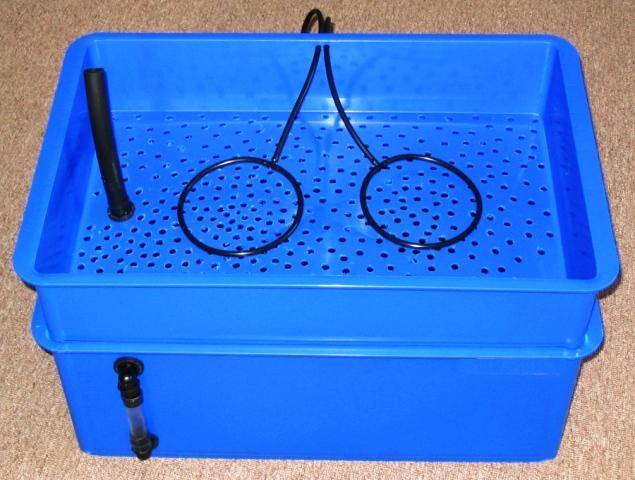
I drilled a bunch of small holes in the lid for good root penetration, I also drilled a larger hole in one corner for an exit for the pump out hose. The black tube that penetrates the lid is for an auto topping system. The hose extends 4 inches below the lid to the top of the nutes. The top of the tube attaches to a 1 gallon res, when the nute level drops the res is topped up with fresh water from the topping res.
This top lid section is 4 inches deep.

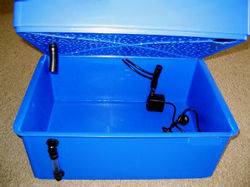
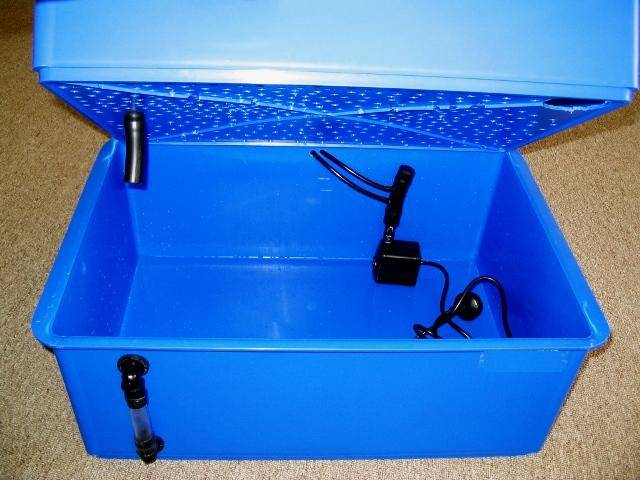
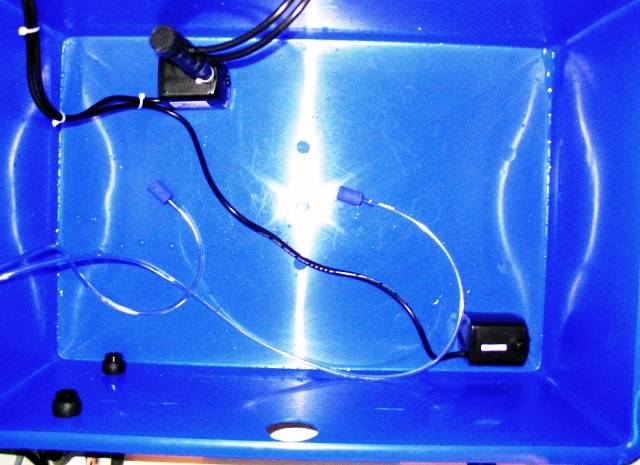
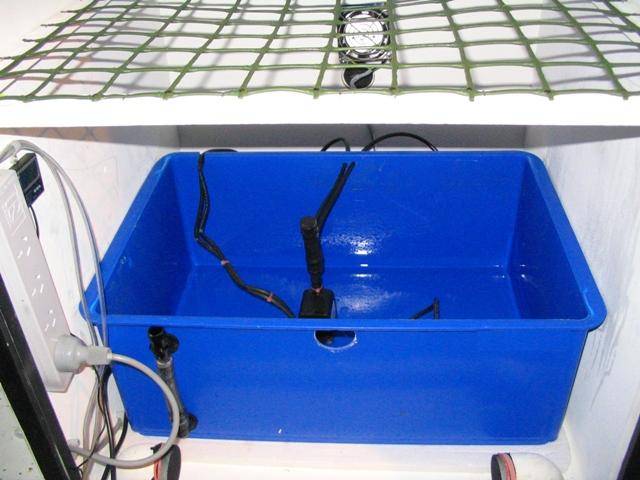
Now the res its self.
The pump at the rear is for recirculating, it runs 24/7. The hoses exit through holes on the back of the res. On the front of the res you can see my nute level indicator.
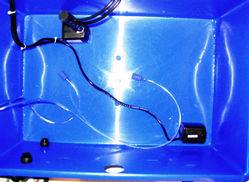
In this pic you can see the second pump, this one is attached to a hose and is used to pump out the res at nute change time. I also run two airstones, one under each plant. You can also see the small hole in the front of the res which I use to ph test and for minor adjustments to the nutes.
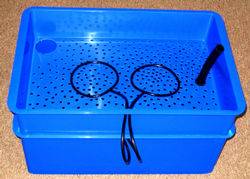
So here it is all together front and back.
well I guess its time to post some pics of the hydro system in this cabinet.
I have used DWC for quite a few years now ever since I saw Highgrades results in buckets. DCW has worked very well for me over the years, providing great growth rates and yields in an easy to handle system. That said, I do understand all too well the shortcomings of DWC and for that reason I would not recommend the use of DWC in an enclosed cabinet such as this unless you have a good handle on the temps in the cabinet.
I decided to use a recirclulating system this time around for the simple reason that I haven't used it before and I was curious to see if there would be any difference.
I also decided to use a single res and a single planting tray so i could vary the numbers of plants into the future.
I drilled a bunch of small holes in the lid for good root penetration, I also drilled a larger hole in one corner for an exit for the pump out hose. The black tube that penetrates the lid is for an auto topping system. The hose extends 4 inches below the lid to the top of the nutes. The top of the tube attaches to a 1 gallon res, when the nute level drops the res is topped up with fresh water from the topping res.
This top lid section is 4 inches deep.


Now the res its self.
The pump at the rear is for recirculating, it runs 24/7. The hoses exit through holes on the back of the res. On the front of the res you can see my nute level indicator.
In this pic you can see the second pump, this one is attached to a hose and is used to pump out the res at nute change time. I also run two airstones, one under each plant. You can also see the small hole in the front of the res which I use to ph test and for minor adjustments to the nutes.
So here it is all together front and back.
TheGhost
Member
This res has an 8 gallon capacity and gives me a 4 inch gap between the top of the nutes and the bottom of the lid.
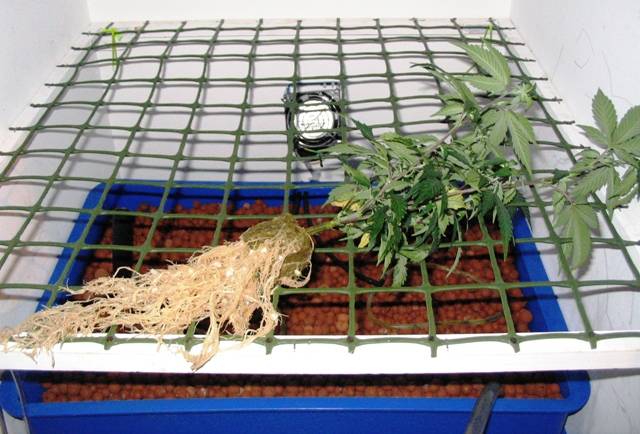
Here is the bottom half of the system in the cabinet.
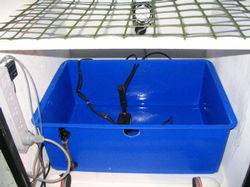
Now with the lid on.

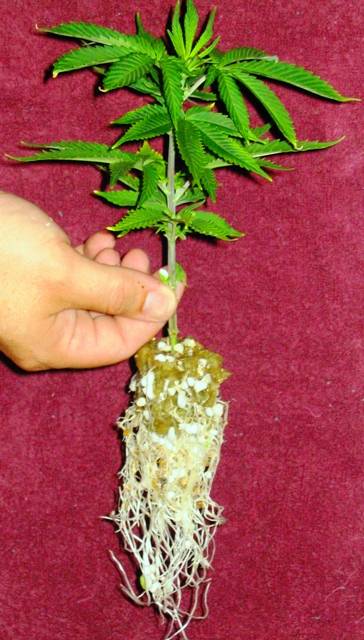
Now the top section filled with hydroton and a skunk#1 clone ready for planting.
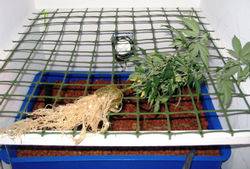
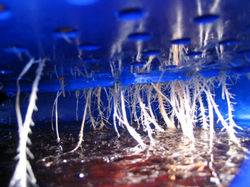
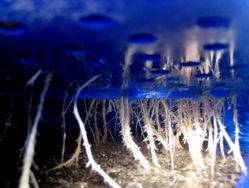
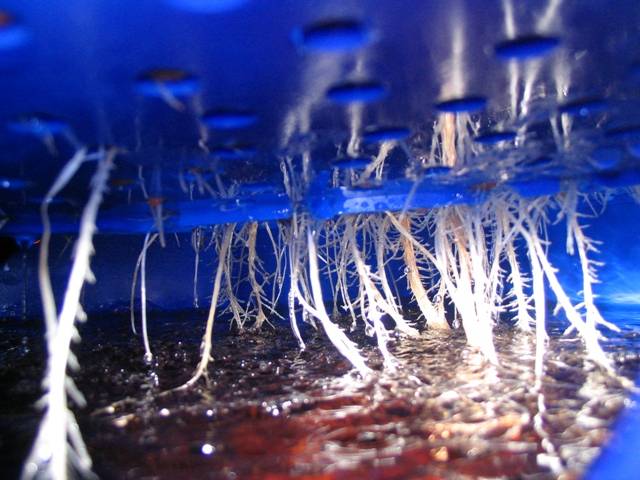
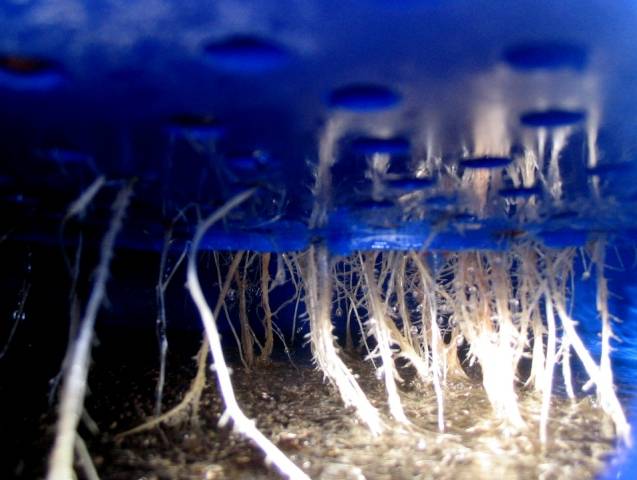
Here are a couple of shots of the root zone.
Later,
Ghost
Here is the bottom half of the system in the cabinet.
Now with the lid on.

Now the top section filled with hydroton and a skunk#1 clone ready for planting.
Here are a couple of shots of the root zone.
Later,
Ghost
TheGhost
Member
Wow! lots of views on this thread :smile: plenty of lurkers hanging out here.
Anyway, I run two plants at a time in this system. As you can see my clones are large and healthy when they are planted, when the clones are planted into the flower chamber they are already on full strength nutes (Lucas/PH formula 0-8-16). About two weeks before the clones are due to go into the flower chamber I start to increase the nute strength, I aim to get the clones feeding on full strength for about four days before I plant them into the flower chamber. The clones are then vegged for a further 7 days when I take new clones and switch to 12/12. I train for the first 7 days of 12/12 and this usually achieves a finished canopy height of 8-10 inches which is about perfect for a 250 watt light. I am an under canopy trimmer, I remove most of the leaves underneath the screen. I have debated about this for a few years and I have also grown and not trimmed but I have never noticed a change in yield either way and trimming gets me better airflow and easier access so I continue to do it at this time.
Once my clones are rooted (two weeks) I keep them just ticking over with very mild nutes for the next month or more until I need to start increasing the nute levels to get them ready for the next round. Running the cabinet in this way means that I don't need mothers so I can keep plant numbers down and the flower chamber is not in 12/12 for two weeks between grows,
1 week of drying time and 1 week of veg time. This quick turnover allows me to keep my wattage low and still keep a steady supply of buds.
I run two different strains in this cab, one more indica dominant for pain relief at night and one more sativa dominant for relief during the day.
I guess the secret to this is to understand your strains, if you keep changing strains in a system like this you will never achieve high yields.
I have been growing these two strains for about 10 grows back to back so I understand them both very well, that said I have just ordered some new strains and i will be slowly introducing them to the cab in the next couple of grows.
Here's a pic of a Skunk#1 clone that is on full strength nutes and ready to be planted into the flower chamber.

Later Ghost
Anyway, I run two plants at a time in this system. As you can see my clones are large and healthy when they are planted, when the clones are planted into the flower chamber they are already on full strength nutes (Lucas/PH formula 0-8-16). About two weeks before the clones are due to go into the flower chamber I start to increase the nute strength, I aim to get the clones feeding on full strength for about four days before I plant them into the flower chamber. The clones are then vegged for a further 7 days when I take new clones and switch to 12/12. I train for the first 7 days of 12/12 and this usually achieves a finished canopy height of 8-10 inches which is about perfect for a 250 watt light. I am an under canopy trimmer, I remove most of the leaves underneath the screen. I have debated about this for a few years and I have also grown and not trimmed but I have never noticed a change in yield either way and trimming gets me better airflow and easier access so I continue to do it at this time.
Once my clones are rooted (two weeks) I keep them just ticking over with very mild nutes for the next month or more until I need to start increasing the nute levels to get them ready for the next round. Running the cabinet in this way means that I don't need mothers so I can keep plant numbers down and the flower chamber is not in 12/12 for two weeks between grows,
1 week of drying time and 1 week of veg time. This quick turnover allows me to keep my wattage low and still keep a steady supply of buds.
I run two different strains in this cab, one more indica dominant for pain relief at night and one more sativa dominant for relief during the day.
I guess the secret to this is to understand your strains, if you keep changing strains in a system like this you will never achieve high yields.
I have been growing these two strains for about 10 grows back to back so I understand them both very well, that said I have just ordered some new strains and i will be slowly introducing them to the cab in the next couple of grows.
Here's a pic of a Skunk#1 clone that is on full strength nutes and ready to be planted into the flower chamber.
Later Ghost
darrinjefferson
Active member
wow ghost, i am really excited to see this baby in action. i myself am making some progress on my own cab. i now have the money to buy most of my materials which is the first step. i will be buying wood for my cab on monday and hope to have the whole cab built within a couple weeks. i also need to get my filter/fan combo since thats a large portion of how my cab will be fully designed. other than that things with me are going awesome. i have been trying to figure out which strains i wanted to try and i found an awesome hookup. my gf's cousin has a medicinal card and said he could get me seeds or cuttings, so i think i am going to be very lucky.
i had a couple questions for you though.
first one is about building materials. so i am going to get a big sheet of cheaper plywood for the back and inside of my cab, but i wanted something a little nicer for the top/sides so that it is more stealthy and doesnt look like a homemade box. is there any wood you know of thats not to spendy but will make the outside look decent? also for the front i was looking into getting some cabinet door, but thats still a work in progress. i want to have a nice front also but be able to have a lock on it.
also i was wondering if you could go a little more indepth with your veg chamber and how you can keep this steady flow of bud w/out the use of a mother plant for cuttings. this is the same kind of thing that i would like to do in my cab. as soon as your done with one harvest do you start another right away?
thanks for your help bro.
i hope to have some pics up soon of my cab construction.
late
When I made my cabinet, I used all plywood. They have plywood where one side is a higher quality wood, without any knots, so I grabbed a sheet of 8'x4' of that stuff, and I found these higher quality hardwood plywood 2'x2' sheets, which were perfect for the top and bottom, those were like $4.00 each. The larger plywood was about $20, and the 2x3s to build the framing were under $3.00 each, and I used two or three I think. I did one coat of primer on all the outside layers, and I've done one layer of paint. I'm not sure if I'll do one more layer of paint, but it looks pretty good now. I did do a quick sanding of it though. Looks decent, not like storebought quality, but a quick glance doesn't make it look out of place.
darrinjefferson
Active member
bounty29- thanks for the help bro. thank god wood is cheap. so from what it sounds like i will be able to build my whole cab w/ locks, etc for prob under 60 bones! thats awesome, i cant wait to get to home depot.
i def wanted to go a little higher grade for the outside where it will be seen so when i paint it it doesnt stand out. but im sure you know exactly what i am talking about.
thanks for your help.
peace
i def wanted to go a little higher grade for the outside where it will be seen so when i paint it it doesnt stand out. but im sure you know exactly what i am talking about.
thanks for your help.
peace
mushupork5
Member
looking good. i look forward to seeing what the 250 watter will put out with that system.
TheGhost
Member
Hey guys,
thanks for the replies.
darrinjefferson: I have a bunch of pics that i have taken over the last couple of years of using this cabinet, i might just do a grow thread.
Like I said earlier, I used MDF because it is cheap but mainly because it is very dense and i figured that it would contain the fan noise a little better than anything else but the jury is still out on that one. You are right to want to put proper doors on your cab, it really adds to the security. I would suggest painting the cab, then you can use whatever wood you like. In the pictures of my cab you will see that I only have two small bolt type locks, since that picture was taken I have added a door lock as well.
Okay so how do I get away with no mothers?
When I plant my clones into my flower chamber they have been on full strength nutes for about 4 days, I then veg them for about 7 days while they get used to the hps and fill out the screen a little. On the day I switch the lights to 12/12 I take clones and put them in rockwool cubes and into my veg chamber.
Two weeks later I have roots, I then pick my best two clones and dispose of the rest (I don't like having more than 4 plants at any one time for legal reasons). At this point I feed the clones with 1/4 strength nutes every day for about a week, this feeding greens them up and makes the roots explode with growth but the clones don't get too large. From now on until two weeks before the harvest of my flower chamber I feed the clones 1/4 strength for 4 days a week and plain ph adjusted water for the rest of the time, this keeps the clones healthy but doesn't really let them grow too much. About two weeks before harvest I put the clones into small pots filled with 50/50 perlite vermiculite. I then start increasing the nutes every second day for the next two weeks until I hit full strength on or about harvest day. I harvest the flower chamber and hang the cut buds in the same chamber. For the next four to five days I am feeding the clones full strength nutes while the harvested buds are drying. After five days of this I remove the buds to a different drying area and plant the now wildly growing clones into the flower chamber veg them for a week, cut new clones and switch the lights. So my flower chamber is not in 12/12 for less than two weeks between grows. Who Needs Mothers
mushupork5: Thanks for the props man. I may do a grow thread in the future.
Later
Ghost
darrinjefferson
Active member
well thank you very much for that post ghost. its so simple it might just work. i like the idea of not having to have a constant mother.
i also looked into doing a DIY cooltube. for about $20 you can get some hurricane glass to use for it. seems like a good idea, then i can use the reflector that i should get from my light.
thanks for all you help. i cant wait to see those pictures you have.
late
i also looked into doing a DIY cooltube. for about $20 you can get some hurricane glass to use for it. seems like a good idea, then i can use the reflector that i should get from my light.
thanks for all you help. i cant wait to see those pictures you have.
late
darrinjefferson
Active member
hey ghost hows it goin? im doin pretty well. just waitin till i have some free time to finish gathering supplies and to start building. although i should have my grow started prob by the first week in august.
i also talked to a guy and i am getting some free beans from him. they are
ak trainwreck x lovepotion. i am real excited to try these babies out. well i had a question for you.
we had talked about me having both the cooltube and the carbon filter connected to the electrical chamber so that it would do both. well look at this pic, would this work as well as the way that we talked about?
http://www.icmag.com/gallery/data/500/10737k1_room.JPG
he sucks the air through the filter then through the light and out the cab. i would run it through the filter, then light, then connect it to the electrical chamber. and the fan will extract it. i reckon it will work since its pretty similar to the previous idea.
i was also looking at getting a cheapo AC so that i can not only keep my ladies happy, but myself also.
well hope all is well.
later bro
TheGhost
Member
Hey DJ hows it going.
I got some new beans myself
Been runnnig the same two strains for a while now and figured it was time for a change. Anyway, I have got a run at day 35 in the cab now and some White Rhino beans soaking.
That's a cool pic, I like the setup and I think it would work great. I went for the two separate fans because my ambient temps are high and I wanted more control of the air.
I have been looking into AC myself, summer heat can be a bitch in a cab.
Maybe a portable unit.
The research continues.......
Later Ghost

