Drop That Sound
Well-known member
The dream... started just a few years back. I was getting more into hydroponics, started designing my own homemade grow systems, and needed a safe & secure place to experiment around in. Something private, outside of the house, and a man cave like spot I could hide out in and play. Not in a greenhouse either, because I lose the sun even in the best locations here. Or a shed type structure that would be semi permanent, or tents because.. well tents are cool, but not what I was looking to put outside.
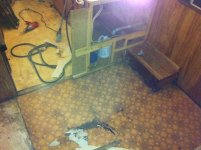
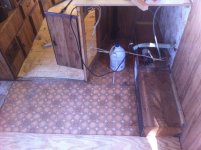
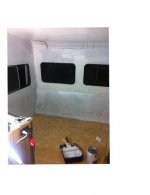
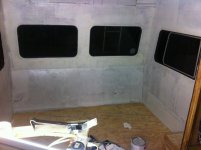
It just kinda hit me one day. There I had my older 80's 5th wheel, not really an eyesore at all, but she had a few leaks here and there that had developed since I got it. A real gem. It had been awhile since I stayed in it, due to a roof vent leak that wiped out my loft area, and it just made sense to salvage and use it for growing in. I still don't even have a hitch to pull it with.. so I moved it over next to the main power box with the bulldozer and some chains, and levelled her up on blocks.
I was only ever planning to spend a few days (lol..) and gut it all out, a few odds and ends, hookup some lights, and paint the walls. A flower room and a veg room in the front loft. The usual stuff, just neatly tucked into a travel trailer somehow, with some RDWC systems to start out with. Figured I could do it all quickly and on a tight budget. Suppose I could have.
Boy was I wrong, and little did I know what kind of project I would be getting myself into (practically rebuilding everything from the inside out, countless hours planning and hunting/salvaging for materials, piles of home depot and lowes receipts). Still, I think it's the best choice I ever made, and love the idea that I can hook up to a truck and relocate, and having a fully contained unit. I also needed something to keep me busy and get my mind off of things for awhile. The grow trailer idea fit the bill, as the more I worked on it, the more I got sucked in, and figured I might as well go all in at one point.
Till this day no one ever bats an eye either. Countless people (even sherrifs on occasion!) driving\walking by, only a few close friends or family, and maybe a few members here even know. Everyone has RV's and travel trailers parked around here in the country, and mine's just another one of many on the property anyway. You would never know whats behind the tinted looking blacked out windows. That's all I can reveal about the outside. Other than I sealed the roof with elastomeric coating and even built a 2 x 4 roof like deck with plywood and tarps over it to cover and protect my investment.
My main goal, as it has ever so evolved, is to continue to upgrade to and design an exclusively all hydro based multi-hybrid perpetual growing system, all contained within the trailer, with a easy to run schedule. Using some of the most state of the art advanced techs to date that I can muster up, and utilising every square inch as efficiently as possible. To create a turn key unit that is eventually fully automated with all the best digital and analog homebrewed environmental controls. All while collecting cheap or free materials when possible, and DIY'ing as much as I can to construct the whole system. It's turned into a never ending project though, which is fine with me. I'm hoping that by sharing this build you guys can help motivate me to continue working on it, and help me figure out some of the more complex issues I have run into. Or vice versa.
She's been sitting awhile and used as my tool storage room for the last almost 2 years now, but it's time to dust off the walls and continue implementing systems I've came up with to install. Plenty of finish work left too. It's as much of a show room as it is a grow room on wheels, and the more sophisticated it is the better to me. I've only ever started, and also harvested a few different runs in there, between different build phases as I went (which really slowed down construction at the times. Couldn't have dust in the flowers, but needed flowers).
I'm finally ready to change gears, and been clearing her out to get setup and start building/growing in there again. Trying to remember where all I left off. It's a pretty big project overall, with many complex systems I plan to make use of.
First, to start off the thread I will give a brief run down on everything that has been done so far, at least the things I can remember. Will post any pictures that I still have (lost a bunch in a hard drive crash) over the course of the build, and explain what I was doing. Then I will update as I go, starting from where I left off, and show the steps I take to getting a functional system up and running again. I'll take a bunch of new pictures too, and be sure to upload what I have real soon.
In the mean time here is a:
General overview of the trailer layout-
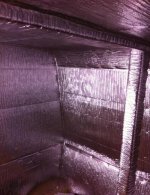
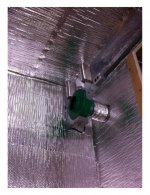
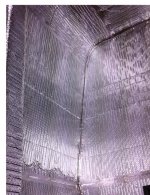
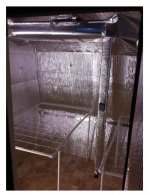
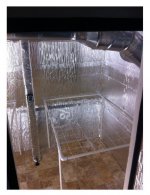
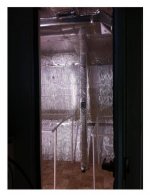
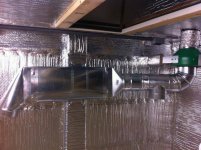
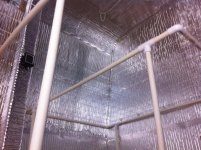
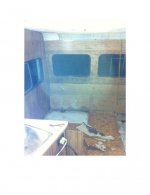
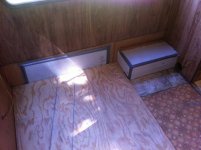
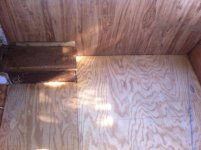
-7.5' x 5.5' x 6' Flower Room on the back end, added a wall to make the partition. Option to run passive, active, or sealed.
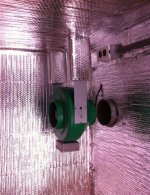
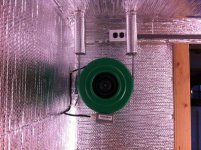
-3' x 5' x 3.5' Vegetation Chamber, framed out up in the front loft, extra work space up there too. Has lift up hinged access hatch with large viewing window. All wired and extra conduit ready for control panel box. Laminar flow style ventilation.
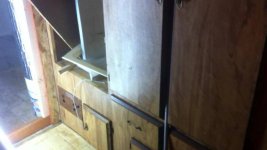
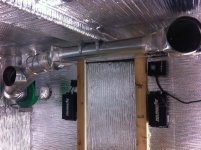
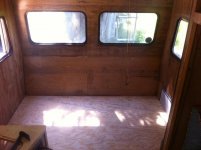
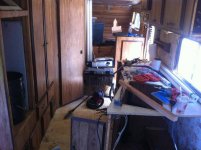
- Main Work area and entry way. The middle section of the trailer, the heart and epicenters of most of the systems, the main bridge of the ship (hopefully more like i'm in a submarine when it's done). Can't be complete without a rockin' stereo, and room to sit and trim. With upper/lower cabinets, and small countertops. Space for large water holding tank, places to store and hang tools and supplies. Res control tanks for both the veg/flower room's hydro systems, in their own cabinet spaces for undisturbed remote access.
-Propagation\seedling\clones\air layering station (originally the wardrobe closet).
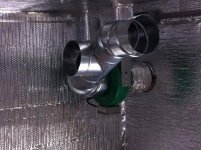
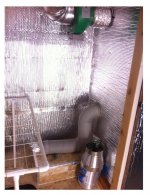
-Multipurpose room (originally the bathroom, all gutted out and plumbing pipes sealed off) for drying&curing/quarantines/breeding/experiments/motherplants, storage/various other uses, etc. Also shared ventilation up top for the veg room on the other side of the wall, and the whole outside facing wall of the room to be dedicated for a heat recovery ventilator for veg/work areas in the wintertime).
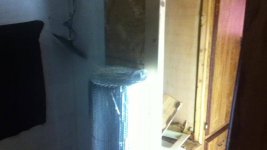
-AC\Chiller air handling space, next to flower room, (cubby hole where the old propane/12v fridge was. Already has existing exhaust vent on the roof, and large intake vent on the side that matches up exactly to the back of a 1/2 ton window ac!)
-Also a few other 'accessible from outside' hatch areas hidden away onboard to store batteries, c02 tanks, more equipment, etc. Also possibly usable are the built in tanks strapped down below (wont use the black water one nor have I ever ,maybe swap it for another RV grey water tank, lol) that could be insulated and used for a chiller or geothermal res.. For example I could cut an access slot or hole right through the floor, and down through it into the tank, and then I can dunk an AC window unit's cold coil right down into the tank full of coolant.
-Electrical: Outside I have a 220v 50 amp breaker installed on the main distribution panel, wired to a 50 amp 4 prong plug-in adapter that is mounted on a post next to the trailer. Onboard I have a 70 amp sub panel installed in the main work room (with a dual tandem 15 and also a dual 20 amp breaker, each using one of the 120 legs coming from the 4 wire extension cord . I never use all 70 of course,or even close to 30 amps really.. let alone the 50 that I could, just wired it all that way so I have an extra circuit to use outside or whatever, and know my limits and when to flip breakers). I also used a 30ft 50 amp outdoor grade extension cord that I cut the end off, and wired right directly into the sub panel box, so I can just plug it in right outside the trailer within so many feet and be good to go. A real nice fat, and weatherproof cord, coming right out of the bottom of the trailers floor through conduit. I can wind it up and store it underneath if I ever needed to move it. Everything is meticulously wired, covered in conduit along the walls\ceilings, with multiple circuits running to boxes in all the rooms\spaces, and all is brand new. I'm not using any of the original on board electrical systems what so ever.
I'll be back
-drop
It just kinda hit me one day. There I had my older 80's 5th wheel, not really an eyesore at all, but she had a few leaks here and there that had developed since I got it. A real gem. It had been awhile since I stayed in it, due to a roof vent leak that wiped out my loft area, and it just made sense to salvage and use it for growing in. I still don't even have a hitch to pull it with.. so I moved it over next to the main power box with the bulldozer and some chains, and levelled her up on blocks.
I was only ever planning to spend a few days (lol..) and gut it all out, a few odds and ends, hookup some lights, and paint the walls. A flower room and a veg room in the front loft. The usual stuff, just neatly tucked into a travel trailer somehow, with some RDWC systems to start out with. Figured I could do it all quickly and on a tight budget. Suppose I could have.
Boy was I wrong, and little did I know what kind of project I would be getting myself into (practically rebuilding everything from the inside out, countless hours planning and hunting/salvaging for materials, piles of home depot and lowes receipts). Still, I think it's the best choice I ever made, and love the idea that I can hook up to a truck and relocate, and having a fully contained unit. I also needed something to keep me busy and get my mind off of things for awhile. The grow trailer idea fit the bill, as the more I worked on it, the more I got sucked in, and figured I might as well go all in at one point.
Till this day no one ever bats an eye either. Countless people (even sherrifs on occasion!) driving\walking by, only a few close friends or family, and maybe a few members here even know. Everyone has RV's and travel trailers parked around here in the country, and mine's just another one of many on the property anyway. You would never know whats behind the tinted looking blacked out windows. That's all I can reveal about the outside. Other than I sealed the roof with elastomeric coating and even built a 2 x 4 roof like deck with plywood and tarps over it to cover and protect my investment.
My main goal, as it has ever so evolved, is to continue to upgrade to and design an exclusively all hydro based multi-hybrid perpetual growing system, all contained within the trailer, with a easy to run schedule. Using some of the most state of the art advanced techs to date that I can muster up, and utilising every square inch as efficiently as possible. To create a turn key unit that is eventually fully automated with all the best digital and analog homebrewed environmental controls. All while collecting cheap or free materials when possible, and DIY'ing as much as I can to construct the whole system. It's turned into a never ending project though, which is fine with me. I'm hoping that by sharing this build you guys can help motivate me to continue working on it, and help me figure out some of the more complex issues I have run into. Or vice versa.
She's been sitting awhile and used as my tool storage room for the last almost 2 years now, but it's time to dust off the walls and continue implementing systems I've came up with to install. Plenty of finish work left too. It's as much of a show room as it is a grow room on wheels, and the more sophisticated it is the better to me. I've only ever started, and also harvested a few different runs in there, between different build phases as I went (which really slowed down construction at the times. Couldn't have dust in the flowers, but needed flowers).
I'm finally ready to change gears, and been clearing her out to get setup and start building/growing in there again. Trying to remember where all I left off. It's a pretty big project overall, with many complex systems I plan to make use of.
First, to start off the thread I will give a brief run down on everything that has been done so far, at least the things I can remember. Will post any pictures that I still have (lost a bunch in a hard drive crash) over the course of the build, and explain what I was doing. Then I will update as I go, starting from where I left off, and show the steps I take to getting a functional system up and running again. I'll take a bunch of new pictures too, and be sure to upload what I have real soon.
In the mean time here is a:
General overview of the trailer layout-
-7.5' x 5.5' x 6' Flower Room on the back end, added a wall to make the partition. Option to run passive, active, or sealed.
-3' x 5' x 3.5' Vegetation Chamber, framed out up in the front loft, extra work space up there too. Has lift up hinged access hatch with large viewing window. All wired and extra conduit ready for control panel box. Laminar flow style ventilation.
- Main Work area and entry way. The middle section of the trailer, the heart and epicenters of most of the systems, the main bridge of the ship (hopefully more like i'm in a submarine when it's done). Can't be complete without a rockin' stereo, and room to sit and trim. With upper/lower cabinets, and small countertops. Space for large water holding tank, places to store and hang tools and supplies. Res control tanks for both the veg/flower room's hydro systems, in their own cabinet spaces for undisturbed remote access.
-Propagation\seedling\clones\air layering station (originally the wardrobe closet).
-Multipurpose room (originally the bathroom, all gutted out and plumbing pipes sealed off) for drying&curing/quarantines/breeding/experiments/motherplants, storage/various other uses, etc. Also shared ventilation up top for the veg room on the other side of the wall, and the whole outside facing wall of the room to be dedicated for a heat recovery ventilator for veg/work areas in the wintertime).
-AC\Chiller air handling space, next to flower room, (cubby hole where the old propane/12v fridge was. Already has existing exhaust vent on the roof, and large intake vent on the side that matches up exactly to the back of a 1/2 ton window ac!)
-Also a few other 'accessible from outside' hatch areas hidden away onboard to store batteries, c02 tanks, more equipment, etc. Also possibly usable are the built in tanks strapped down below (wont use the black water one nor have I ever ,maybe swap it for another RV grey water tank, lol) that could be insulated and used for a chiller or geothermal res.. For example I could cut an access slot or hole right through the floor, and down through it into the tank, and then I can dunk an AC window unit's cold coil right down into the tank full of coolant.
-Electrical: Outside I have a 220v 50 amp breaker installed on the main distribution panel, wired to a 50 amp 4 prong plug-in adapter that is mounted on a post next to the trailer. Onboard I have a 70 amp sub panel installed in the main work room (with a dual tandem 15 and also a dual 20 amp breaker, each using one of the 120 legs coming from the 4 wire extension cord . I never use all 70 of course,or even close to 30 amps really.. let alone the 50 that I could, just wired it all that way so I have an extra circuit to use outside or whatever, and know my limits and when to flip breakers). I also used a 30ft 50 amp outdoor grade extension cord that I cut the end off, and wired right directly into the sub panel box, so I can just plug it in right outside the trailer within so many feet and be good to go. A real nice fat, and weatherproof cord, coming right out of the bottom of the trailers floor through conduit. I can wind it up and store it underneath if I ever needed to move it. Everything is meticulously wired, covered in conduit along the walls\ceilings, with multiple circuits running to boxes in all the rooms\spaces, and all is brand new. I'm not using any of the original on board electrical systems what so ever.
I'll be back
-drop


")