What's new
  • Please note members who been with us for more than 10 years have been upgraded to "Veteran" status and will receive exclusive benefits. If you wish to find out more about this or support IcMag and get same benefits, check this thread here.
  • Important notice: ICMag's T.O.U. has been updated. Please review it here. For your convenience, it is also available in the main forum menu, under 'Quick Links"!

Free Energy Growing

Big Sky

Member
Here is something a little different then what your used to-

I designed and built a free energy grow closet that runs off the power of the SUN!
This took a lot of money, time and careful planning!!!
But it can be done!
With economic down times and increasing earth changes, finding a self sustainable means to grow indoor medication can be a real blessing
.

This entire project started as a simple idea and grew from there.
Now this little idea... does the growing for me!

This was all experimental and now that its proven, I use it for personal medication production and trying new strains.

Here is an overview of whats taking place.


The Grow Space:
I started With the grow closet-
A 3'x3'x7'H closet and developed the system around it first.
The closet is built and then painted flat white for moisture barrier and to give the grow area a naturally reflective surface.
Then I took 1/16th " thick insulated mylar with a hammer-tone pattern and
covered the walls where the actual grow would be taking place.
I used thin foam weather stripping to seal around the entry door and sealed any edges.
The closet grow space is now light proof and seals air tight.


The Lighting:
When the lighting came into play, the question came down to.....
what could I use that would be very little heat and power consumption but deliver the punch I was looking for in an indoor grow?
So I decided on using a low cost, dimmable I-Power Digital 400 watt MH/HPS ballast.
Next I purchased a 27 inch long, 6 inch round cooltube and socket set.
Then added two Lighthouse Blackstar 90 watt UFO style LEDS for supplemental lighting and versatility with power consumption.
They allow me to not only drop my HID wattage and still gain great lighting, but they come in really handy when extending a vegetative photo-period 18 hours a day if I need to.
They burn so little electricity without the HID running, that my battery bank can handle the load easily for a few hours with no sunlight visible outside.

Ventilation:

The ventilation is made up of an Active Air/ Hydrofarm 4 inch inline fan at 165+ CFM
This pulls open cooler air through the grow space, then through the cooltube, essentially air cooling the HID and also exhausting the grow area as a whole.
The intake Fans are simple 80 CFM electric Axial fans that bring cool air in the grow space at the base level of the flood table.This way, the air exchanges at a much faster rate over and through the canopy of the plants.

The Hydroponic System:

This system is a tried and true one.
The EBB & Flow.
The E&F system in this particular setup is made up of a simple 2x2' flood table with C.A.P drain /fill fittings and hoses.
The fittings attach to 3/4" hoses and drop into a 25gal reservoir.
There sits a Eco 185 submersible water pump that floods the table.
No air stones are really need in an ebb & flow but I opted for the most oxygen rich nutrient water as I can get.
So I use two, 2" cylinder air stones and a
Sunleaves 602 GPH commercial grade air pump.
The monitoring system I used is the Hanna Grow-Chek which gives me a steady monitor of PH, EC, PPM and temperature all in one unit.


Nutrients:

Hydroponics:

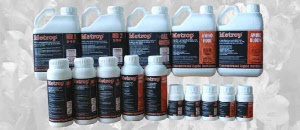
For hydroponics I really love the Metrop lineup.
I use:
MR1
MR2
Amino Root
Amino Bloom
Cal Green
Hygrozyme(not a Metrop product)
Runs pretty great in hydroponics DWC or Recirculation systems, Coco Coir, and Soiless.
My medium of choice for this recirculation system is Hydroton filled, mesh bottomed, Hydrofarm brand square pots.
I start my PH at around 5.5 to 5.7 and as the plants feed on the nutrients I let the PH slowly raise to around 6.0-6.3.
I call this the "feeding swing" and this weekly or bi-weekly swing will allow for maximum nutrient uptake of all macro and trace elements each period before topping off .
At top off, the reservoir is replenished with a higher PPM (nutrients) and the PH is then lowered down to around 5.5-5.7 without use of PH Down Buffers.
I use a ratio of MR1 to MR2 in my base formula depending on stage of growth.
(see soil feeding for more)


Big Sky

Member
Soil Recipe:
I grow a lot of my plants and breed using a light fluffy soil mix-
Currently I use Bonnie's potting soil and work in a PH range of 6.5-6.8.
Its a Canadian product widely distributed across the US states that is amended very lightly with dolomite lime, composted forest material, peat, perlite and a wetting agent to balance the moisture uptake.


I add nothing to this mix, it is very clean, with a great air to water ratio and seems to be perfect for potting indoor containers .It has proven to be very reliable for starting seeds, clones and young vegetative plants in.
I use a control in soil much like you gain from hydroponics by bottle feeding and micro dosing the plants with water soluble nutrients from mostly General Hydroponics.

GH Flora Nova Grow & Bloom:
This is my base formula I use and mix both parts in different ratios depending on what stage of growth .

Vegetative stage :

I use a 2:1 ratio grow to bloom.
GH Floralicious Plus @ 2ml per gal
Fox Farm Bush Doctor Microbe Brew @ 3ml per gal
Hygrozyme once every other week until flower @ 3ml per gal-
This is all based on a water, feed, water ,feed schedule

Transition Stage:
This is the stage where i start to switch up the nutrient base ratio.
I start at the first transition feeding schedule 5-7 days before I switch to the flowering cycle.
I still use the 2:1 ratio but this time its reversed bloom to grow.
The additives are used in the same manor and at the same values.
This feeding continues until 14 days after the flowering cycle has begun.

Flowering Stage:
Now we are in 14 days of the flowering cycle.I stop using the ratio of grow to bloom and start a full bloom feeding @ about 5ml per gal.

I use the following additives:
GH Floralicious plus @ 3ml per gal
GH liquid KoolBloom @ 3ml per gal
FF Bush Doctor Microbe Brew @ 3ml Per gal
Hygrozyme @ 2ml per gal
Molasses @ 2ml per gal

This is all based on of course the water - feed 1:1 ratio -
I use this strength until about 3 weeks before harvest, then I cut the last week or two feeding in half doses of everything except molasses. I start a progressive ramp down in nutrient strength.
But remain using the molasses @ 2ml per gal until harvest flush.
The last 7-10 days I flush with pure Water to clean any nutrients and unwanted chemical leftovers.
 

Big Sky

Member
The solar panels:
The solar panels I choose for this project are the UNI-Solar flexible PV panels.
They will slam onto just about any flat surface but are best made for use on corrugated metal roofing.
I have a 4 panel array of 24v DC current solar panels, 3 are 124 watt , the last one is a 144 watt for an array total of 516 watts @ 24 Volts DC.
I went with a 24v system rather then a 12V because a 24V system charges twice as fast as a 12v would.
This principal carries forward as a 48V system charges faster then a 24v.
But the drawback is that you need to supply a battery bank large enough to accommodate the voltage you want.
So a 24v system can be banked with either four 6v batteries or two 12v volt batteries in series to create the 24v. You can use the very large 24v batteries and get by with one battery but there not very efficient at all and have short life spans.

unisolar.jpg


The Charge Controller:
This is the soul and electronic heartbeat to any solar or wind system. Its a must have.
This is the device that connects everything together and brings the power from your solar and or wind power into the battery bank for energy storage.

1000661h.jpg


I went with a 60 AMP controller complete with LED voltage regulator and versatile from 12V, 24V, or 48V systems. It excepts both wind turbines and solar panels with a DC current source for a hybrid system.
This allows you to produce electricity day and night.

1000660m.jpg


Changing the incoming voltage is as easy as sliding a fuse out and repositioning it on the board.

0000013o.jpg
 

Big Sky

Member
Battery Bank:
I opted for four 6Volt golf cart batteries at 215 amp hours each.
Wired in series this creates a mega battery of 215 amp hours and 24 volts.
My battery bank is housed in a pantry closet above the AC distribution panel for this system.
I started with a separate 2x2x7'H pantry and gutted it.
Then split the difference of 3.5 feet with a fully supported shelf made of pressure treated 3/4" plywood.
After the shelf was solid i boxed the whole thing in and cut a large opening in the side, put a wood slide door in and viola! A secret battery bank storage hatch.
I used a few 4" inline booster duct fans and veted that portion out beacuse battiers do heat up and off gas.
So if you contain them without ventilation, well, add spark and the rest is Koolbloom! (pun intended)
So make sure your battery bank area is well ventilated kiddo's

outside
1000662m.jpg


inside
med_gallery_7644_3268_380499.jpg
 

Big Sky

Member
Ac distribution panel:

While hunting for regular Ac distribution panels online.
I came across something that struck me as unique.
RV's come with very affordable ac distribution panels that carry 110-120v all day at up to 60 amps sometimes.Thats almost 6000 watts!
So the more I dug the more versatility I found in them.
Come to find out, they also come with built in 12v converters!
The converters even run off the AC power coming in to have optional 12v power for anything that will run off 12v.
So I bought the Progressive Dynamics RV distribution box for about 200$ with built in converter, fuses, the works.
I installed it in the bottom portion of the new pantry wall (below the battery bank) and now have a new stereo and speakers built into my kitchen running off the 12v portion to boot.
I set this panel up with multiple breakers ( three 15 amp, a 20 amp and a 30 amp) and wired new sockets into the Grow closet I built from scratch using 12 gauge rated wire-
med_gallery_7644_3268_36105.jpg


solark.jpg
 

Big Sky

Member
The Inverter:

The inverter hooks directly into the battery bank just as the charge controller would.
This device is the Powerbright 1000 watt ac current pure sine wave inverter.
It supplies cleaner burning electricity then the power company can offer for use in home.
This is what is taking the DC current from the battery bank and converting it to AC current, which is the same as the power you use at your home.
This is the device pumping power to the AC distribution panel. From there the panel takes the 1000 watt power load to its 30 amp main breaker and distributes it to the rest of the breakers in the AC panel. Thus sending power from those breakers into the grow closets wall sockets.
1000663pp.jpg
 

Big Sky

Member
The Very first test grow:

For the first test grow I just ran a few strains as the initial experimental grow.
Corleone, Dina Fem Auto-Matic Cheese and some of my own SSCO, gear with Chemical D#1, my own fresh spin and rework of the fame Chem D line.
med_gallery_7644_3268_629001.jpg


about 36 hours later...

med_gallery_7644_3268_231002.jpg
 

Big Sky

Member
I knew the space would be limited so I only decided to pop 6 Chemical D#1 and already had the corleone kush cut and Dinafem Auto-matic cheese running about 2 weeks ahead of the Chemical D#1's in the solar oven.

I opted to use my soil mix and recipe for the first grow instead of using the hydroponics system but still utilized the flood table in a drain to waste fashion with a res underneath to catch the drainage.

I would then simply put a lid on it and take it outside to any gardening that was going on and used that drained water on them for nutrients Nothing goes to waste!
The main reason I choose to go ahead with a soil grow and just clean the table later was because I honestly didn't know how well this solar setup would run and wanted to be as forgiving as possible to not loose any plants etc.
If I could run all the lighting and ventilation for a grow then I knew I would be able to push the hydroponic system in full.
The pumps, monitor etc all cost precious power.
So now that I know my lighting will hold up solid in the next few runs everything will swap right over easily to the EBB and Flow system and have enough power to run it.
Until then , enjoy this last runs photo's.

med_gallery_7644_3268_1226947.jpg


med_gallery_7644_3268_1124754.jpg


med_gallery_7644_3268_2846692.jpg


med_gallery_7644_3268_1309563.jpg
 

Big Sky

Member
A free Energy Harvest of about 4.25 OZ's dry. not to shabby

1000579cx.jpg


1000585y.jpg


Thats Solar energy grow #1, in the books. #2 starting up. I have a few pre-vegged spacedragons under a 2x2 screen..hitting the switch today! 10/17/12!
keep a look out for the next one!
 

Big Sky

Member
Very impressive. Can you do us a tutorial to up the yield by a factor of 15? jk

lol yea that would take a while but yeah its the same concept- this system will run this op in a small scale but you can upgrade this unit to around 60amps of power- 6000w..just add panels, wind turbines, batteries-
but its fully upgradeable- eventually i will have it up to a scale like that lol
cheers thanks for the kind words-


We have companies around here who finance or lease solar systems. I wonder how much it would cost to set up a 6kw system excluding the panels?
 

Big Sky

Member
well if you look on ebay there are a ton of overstocks from the UK for the solar panels i bought- they have a 92% +output warranty..best in the business-
they sell them by the crate on the bay- 4000w worth for around 3800-4000$ shipped to you-
hell of a deal-
I'll prob use this deal in the future for a massive upgrade-
But then you have to buy multiple 5000w puresine wave inverters, you would need 2 at about 900$ ea and then batteries- a 24v system, and that kind of power would need an extensive bank , about 16-20 batteries at 200$ ea- 3200+$$$
then the charge controller to handle it-about 200-300$
so your looking at about 10-12g's..i could source everything out for that-
all parts ac panel breakers you name it-
a solar company or installation company would fork you over for about 35-40 grand maybe more depending on who's doing the forking ;)
But you learn these systems inside out building them a piece at a time- my system is a basic 1000w solar system-
3g's-
but theers a lot of initial parts in that 3g's wich allow massive upgrading ..hybrid your system wind and solar- produce electricity day and night-
the ideal way to rid your grid power would be this idea ive been working on-

A solar generation machine-
solar comes in and the system then powers an electric generator of twice to 3 times the systems power output-
this would be ideal-
 

gaiusmarius

me
Veteran
very impressive, so you are able to produce enough power to run that whole grow? pretty slick i must say. kudos on the workmanship too.
 

Big Sky

Member
very impressive, so you are able to produce enough power to run that whole grow? pretty slick i must say. kudos on the workmanship too.

yesssss sir!
a little balancing of lighting can really go a long way- on a cloudy day, or rainy day, i can use only 180watts for veg or flower by just using the LEDS saving the banks power- Then on the next full sun day i use just the LEDS one last time really allowing my battery bank to overcharge to around 27 volts instead of 24 normal or nominal volts-
Then its full blast lighting with dual LED UFO's and the cooltube DIgital 400 Watt HPS-

Im a stoned scientist that went a little mad-
and obviously a control freak lol-haha-
 

Latest posts

Latest posts

Top