What's new
  • Happy Birthday ICMag! Been 20 years since Gypsy Nirvana created the forum! We are celebrating with a 4/20 Giveaway and by launching a new Patreon tier called "420club". You can read more here.
  • Important notice: ICMag's T.O.U. has been updated. Please review it here. For your convenience, it is also available in the main forum menu, under 'Quick Links"!

Turntable grow

methias

Active member
I'm Back,,,

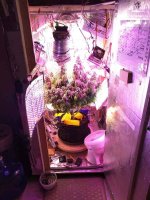
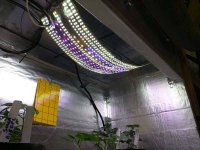
I've built a new grow hutch out of sheets of rigid foam insulation.
The design is pretty basic. A 35 x 35 inch piece of 3/4" plywood with wheels on the bottom, 4 pieces 35" x 72" rigid insulation with 2x2's for the corners (to screw into). I taped all the seams with metal foil tape, cut a door (tape hinge) and I made a light assembly that adjusts up or down as needed. I cut in a carbon filter up top and hooked my exhaust fan to it to pull the heat off the top without making the place skunky.
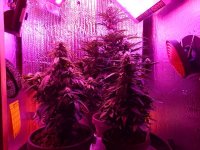
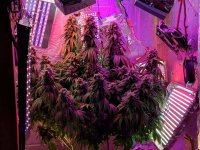
I have 500 watts of COBB Led's and a 300 watt self contained lamp.

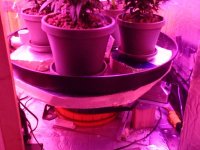
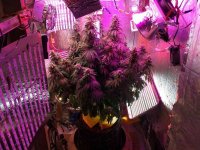
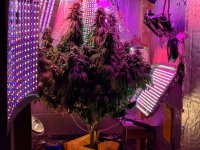
Since I have limited room I decided to create a carousel to slowly turn the plants while the lights are on. This allows me to have multiple plants in this tiny hutch and insures everyone gets light everywhere.

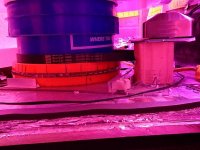
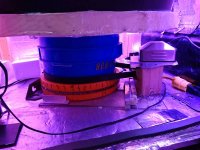
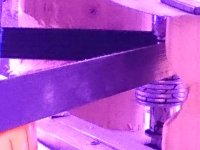
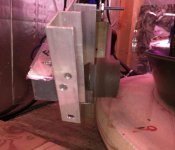
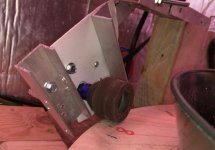
The turntable is made from 2, 5 gallon bucket lids, bolted together in the center. I used glass marbles in the outer groove as bearings before bolting the lids together. I took a BBQ rotisserie, a automobile fan belt and some fittings to power the device. I used a 5 galloon bucket that I cut off about 6 inches from the middle.
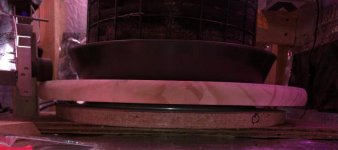
The bottom of the bucket fits perfectly onto the turntable and the top piece (with a lid on it) slides over the lower part. I cut a 30 inch round piece of 2 inch insulation and set a water heater drain pan on that to catch any spillage while watering.

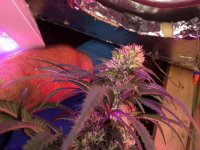
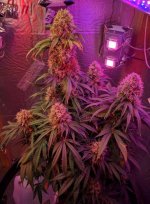
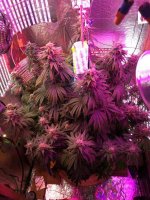
The turntable turns about 6 times per hour during lights on and stops at "night". I currently have 5 clones in flower on their 4th week of 12/12. I may be pushing the limit on how many will fit to harvest but it's all an experiment. Next tome I will do just 3 clones.


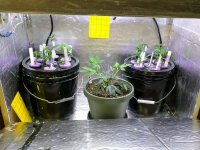
All the clones got one week veg (after rooting and potting) and went straight to flower.
So far everything is working well. As they turn they all pass by my two fans and the motion seems to help make the stems stronger. I am having some minor PH issues on the one I put in miracle grow, but the rest are great. Looking forward to seeing the results in about 4-5 more weeks.
 

methias

Active member
Pics?

Pics?

Not sure how but I think I screwed up inserting the pics above.
Trying again.

attachment.php
attachment.php
attachment.php
attachment.php
attachment.php
 

Attachments

  • DSC_7829.JPG
    DSC_7829.JPG
    62.5 KB · Views: 37
  • DSC_7827.JPG
    DSC_7827.JPG
    67.7 KB · Views: 35
  • DSC_7831.JPG
    DSC_7831.JPG
    56.2 KB · Views: 32
  • DSC_7826.JPG
    DSC_7826.JPG
    46.8 KB · Views: 32
  • DSC_7833.JPG
    DSC_7833.JPG
    85.6 KB · Views: 34

methias

Active member
Well thats the problem with stoners. we can forget to update when we get good harvest.....

OK all 3 in the first pics went mostly well. A little heat issues but...

Next I was given a Strawberry Diesel clone that I repotted and at 12 inches tall I went to 12/12. The stretch more than doubled its size.
Everything was great as you can see.


Then on day a friend came by and noticed a little discoloration and commented about mold.
I laughed the idea off till a few hours later (after coming down) and went in with light and magnifier.

He was right (almost) I had fungus in my top biggest flower cluster.
:eek:
Emergency harvest.

The entire top cluster (nearly a whole ounce wet) was toast.

Fortunately we caught it when we did and I was able to save 5.3 ounces (dry) of some of the best I have ever grown.

I did it to myself.
The heat freaked me out so I made a bucket swamp cooler to cool air going into my grow box. It did keep it 7-10 degrees cooler but the humidity was around 80+ %. And that is how to grow fungus.
 

Attachments

  • IMG_20180705_223914.jpg
    IMG_20180705_223914.jpg
    68.2 KB · Views: 32
  • Screen Shot 2018-08-18 at 2.44.08 PM.jpg
    Screen Shot 2018-08-18 at 2.44.08 PM.jpg
    80.7 KB · Views: 33

methias

Active member
Thanks,
I currently have a Blue Dream in the third week of flower in a diy smart pot.
To make it is easy. You need felt, sewing machine, a little chicken wire for a semi ridged exterior because I am using thinner felt. So 20 minutes to sew it all together and make a tube the same diameter as the pot. Put the felt pot inside the chicken wire tube and fill with dirt.

I'll try to remember to get a picture or two when the lights come on this evening.
Lights at night = less heat to deal with. For me..
 

methias

Active member
Week 4

Week 4

As promised picks of my current crop.
She is a Blue Dream clone in her fourth week of flowering.

I have added more internal fans to the mix. After the fungus fiasco with my Strawberry Diesel last grow, I'll allow no stagnant air in my grow cabinet.
Yeah, I get it now.:bashhead:

I've added lights and altered the exhaust system too.
Now I have a total of 450 watts (lights, fans, exhaust, and the turntable) electric use.
Half of my cob led lights are 12 volt and the other half are constant current. I am converting over to the 12 volt cobs as one switching transformer can power fans and the leds.
With constant current leds you need a separate power supply for the cooling fans. If the fan power supply fails, you can kiss off your leds.
Lighting is as follows ;
1) HLG quantum 65 (4000k) actually draws 65 watts.
1) Mars Hydro 300 actually draws about 115 watts.
3) Small 115 volt circulating fans
Chinese leds below with claimed wattage.
5) 50 watt cob leds (each with its own driver);
3 full spectrum, 1 Deep Red (650nm), and 1 warm white.
actually draws 111 watts
4) 12 volt, 50 watt, full spectrum cob leds actually draws 78 watts
1) Meanwell NES-350-12 power supply (for all 12 volt leds & fans)
2) Computer case fans 120mm (for circulation)
10+) ( lost count) small computer fans (80x80 - 50x50) for heat sinks and additional heat control.
The lights are on an adjustable ceiling (between the exhaust fan and grow compartment) and I have about a foot more I can move them up.

The turntable rotates my girl once every five to six minutes so we get light everywhere.

I'm on my third grow in this and no smell so far.

Gotta go. My outside two ladies need watering.

:tiphat:
 

AgentPothead

Just this guy, ya know?
I have no rep atm, but I'm really digging that turntable setup! You are driving the bucket itself, and it's resting on top of the 2 lids which are separated by marbles, creating a bearing? That's really awesome hack.
 

MJPassion

Observer
ICMag Donor
Veteran
pretty cool setup with the turn table & all.
I dig it.
Looks like it works pretty well for you too.
That's the best part.
Watch that humidity. It's a killer.
 

methias

Active member
Hack

Hack

I have no rep atm, but I'm really digging that turntable setup! You are driving the bucket itself, and it's resting on top of the 2 lids which are separated by marbles, creating a bearing? That's really awesome hack.

This hack finally died. The side of the bottom lid cracked and the bearings (marbles) rolled out.
that made it impossible for the motor to turn the pot, and killed the motor.
I realized that the side pull was too much strain so I redesigned the turntable completely.

Went online and got;
A 1000 Lb 12" lazy Susan (<$20.)
A 12 volt, low speed 0.6 RPM motor with metal gear reducer (<$20)
A 24" round piece of 3/4" plywood ($12.)
A pair of 6mm to 6mm aluminum shaft couplers (<$5.)
One rubber A/C compressor isolation foot

Once I had all the new parts I ripped it all out and started over.

First I got the holes properly drilled on the round piece to center it on the lazy Susan.
Next I attached the lazy Susan to a 20" x 30" scrap of plywood (careful to center it in my box) and set the round on top and screwed it in place.
I took the motor and attached the shaft coupler to it and pushed the rubber "foot" over the coupler for a really snug fit. The round rubber isolator (turned sideways) is my drive wheel.
The motor is attached with a hinge that allows it to be raised and lowered like a phonograph stylus with the drive wheel off to the side.
Now raising the stylus (drive motor and wheel) disengages the wheel from the turntable and rotation stops.
Lowering the stylus makes rotation start.
I put this all together in November 18 and no problems at all. 8.5 minutes per rotation so my girl won't get dizzy.:woohoo:
I'll have to get back later with some good pics of the assembly.
 
Last edited:

AgentPothead

Just this guy, ya know?
This hack finally died. The side of the bottom lid cracked and the bearings (marbles) rolled out.
that made it impossible for the motor to turn the pot, and killed the motor.
I realized that the side pull was too much strain so I redesigned the turntable completely.

Went online and got;
A 1000 Lb 12" lazy Susan (<$20.)
A 12 volt, low speed 0.6 RPM motor with metal gear reducer (<$20)
A 24" round piece of 3/4" plywood ($12.)
A pair of 6mm to 6mm aluminum shaft couplers (<$5.)
One rubber A/C compressor isolation foot

Once I had all the new parts I ripped it all out and started over.

First I got the holes properly drilled on the round piece to center it on the lazy Susan.
Next I attached the lazy Susan to a 20" x 30" scrap of plywood (careful to center it in my box) and set the round on top and screwed it in place.
I took the motor and attached the shaft coupler to it and pushed the rubber "foot" over the coupler for a really snug fit. The round rubber isolator (turned sideways) is my drive wheel.
The motor is attached with a hinge that allows it to be raised and lowered like a phonograph stylus with the drive wheel off to the side.
Now raising the stylus (drive motor and wheel) disengages the wheel from the turntable and rotation stops.
Lowering the stylus makes rotation start.
I put this all together in November 18 and no problems at all. 8.5 minutes per rotation so my girl won't get dizzy.:woohoo:
I'll have to get back later with some good pics of the assembly.
That sucks it broke, but that's awesome you replaced it with something better! Can't wait to see the pics.
 

methias

Active member
Pics

Pics

OK,
Back with pics.
12 volt motor

attachment.php


next the turntable,

attachment.php


the motor is turning clockwise

attachment.php

that makes the table ccw.
Lift the stylus and I can turn as I please.
attachment.php


I added a center led tube (I can do better) to give the middle light.

attachment.php


Pretty baked right now so I hope I got it out.
that calls for a vape.
 

Attachments

  • IMG_20190311_183559.jpg
    IMG_20190311_183559.jpg
    101.3 KB · Views: 30
  • IMG_20190311_184019.jpg
    IMG_20190311_184019.jpg
    50.4 KB · Views: 35
  • IMG_20190311_183641.jpg
    IMG_20190311_183641.jpg
    26.9 KB · Views: 32
  • IMG_20190311_183922.jpg
    IMG_20190311_183922.jpg
    42.6 KB · Views: 32
  • IMG_20190311_183523.jpg
    IMG_20190311_183523.jpg
    42.8 KB · Views: 31
  • IMG_20190311_184123.jpg
    IMG_20190311_184123.jpg
    97.9 KB · Views: 35

AgentPothead

Just this guy, ya know?
That looks great! The plants look great too. How did you make that led light tube? it looks like maybe a strip of LEDs wraps around tube shape like a toilet paper tube?
 

methias

Active member
attachment.php
Currently in the box, I have a Sour Diesel 5 weeks into flower cycle. I have 5 to 7 weeks to go (according to the interweb) till harvest.
I trained her into four main branches and I inserted a eight inch tube of LED's down the center. The tube hangs and the plant orbits the light.
With all lights and fans I have about 520 watts total draw on the box.

I also have a mini box with a Venom OG starting veg and two sticks in the mud (clones) hoping they take.:dance013:
 

methias

Active member
That looks great! The plants look great too. How did you make that led light tube? it looks like maybe a strip of LEDs wraps around tube shape like a toilet paper tube?

1.5" PVC with water resistant LED's wrapped around and secured with zip ties.
Thinking of getting some red and blue for the next version.

Vape on.
 

starke

Well-known member
It never ceases to amaze me how creative we stoners can get when it comes to growing our beloved plant. Excellent job sir! :tiphat:
 

AgentPothead

Just this guy, ya know?
1.5" PVC with water resistant LED's wrapped around and secured with zip ties.
Thinking of getting some red and blue for the next version.

Vape on.
Looks good and that's a great idea! Do you know your power pull at the wall? For the whole setup and the central tube light? Nevermind I saw where you said it takes about 520 at the wall.
 
Last edited:

methias

Active member
Power draw

Power draw

Looks good and that's a great idea! Do you know your power pull at the wall? For the whole setup and the central tube light?

All in;

532 Watts 120 VAC

120 Volt consumption;
Exhaust fan
Mars Hydro
HLG 56 Quantum board
12 Volt power supply*
5 constant current drivers for 50W COB's

12 Volt consumption;
All 12 volt COB's
all strip LED's
all internal fans
my turntable
minibox leds and fan​

It all passes through my Kill a Watt and through a good GFI (get one that you do not need to reset after a power outage, Really, Trust me on that) to a #10 thhn 3 prong grounded pigtail.


* Meanwell 12 Volt 350 Watt switching power supply.
I use those WiFi Sonoff switches, sensors, and 4 gang smart switch

And No, I was not baked as I planned and wired it all up. Even so one could get the wrong impression if they saw the back power board / wiring area.

I am now tho.
:smoke:
 

methias

Active member
Week 10

Week 10

Hello again boys and girls,,
Time for an update.

My Sour Diesel is doing pretty good. She is in her 10th week of flower and I started flushing 4 days ago.

This strain (according to the interweb) is 10 to 12 weeks to flower and I think they got it right. She also has fox tailing everywhere.

Here she is in her box

I brought in a large 115V fan (lower right) to make sure I get no fungus this grow.
Next two shots as the turntable slowly turns.

She is getting close,,, Still almost all clear, just a few going milky.

Next I decided to address the fact that I currently have a 5% success rate when cloning. Yes I suck at cloning.
A little research (ICMAG) and I have created two cloning buckets to see if I can improve on my success rate.
Fairly simple, buckets, pumps, cups, and a new homemade light.

I am using this new box as my clone / vegging box. Here is how the light turned out..

Well gotta go out and make some money (real life) so happy trails to you all.
 

Attachments

  • IMG_20190401_213417.jpg
    IMG_20190401_213417.jpg
    96.9 KB · Views: 31
  • IMG_20190401_213300.jpg
    IMG_20190401_213300.jpg
    94.9 KB · Views: 36
  • IMG_20190401_213107.jpg
    IMG_20190401_213107.jpg
    81.4 KB · Views: 35
  • IMG_20190401_160238.jpg
    IMG_20190401_160238.jpg
    76.7 KB · Views: 32
  • IMG_20190401_160248.jpg
    IMG_20190401_160248.jpg
    60.8 KB · Views: 31

Latest posts

Latest posts

Top