What's new
  • Happy Birthday ICMag! Been 20 years since Gypsy Nirvana created the forum! We are celebrating with a 4/20 Giveaway and by launching a new Patreon tier called "420club". You can read more here.
  • Important notice: ICMag's T.O.U. has been updated. Please review it here. For your convenience, it is also available in the main forum menu, under 'Quick Links"!

Pushing Limits- #1 The medical SOG(ish) Room

pushlimits

Member
Hello ladies and gentlemen. I've been a member here for a short time and I feel ready to share my latest journal with this fine community. I am a card holder, patient and a caregiver to a very ill person, so quality is absolutely paramount. Roughly 1/32nd of each harvest is for me but we are both very happy. One more patient is on there way, so it's time to push the limits of what we can achieve.

I am constantly changing my setup I feel experience and experimentation are vital to the continuing development of a grower. No two grows of mine are ever the same. (risky but necessary to learning) So stay tuned, and look out for future Pushing Limits- numbered Journals. Welcome to volume # 1.

Skip to dots if not interested in introduction.

Notice- I don't exactly have what some might call a green thumb. I am a much better engineer then a gardener. Although some of you may be intrigued with my construction, few of you will be impressed with my gardening skills. If anyone has straight up gardening tips (pertinent to my grow) I would be very grateful.

I'm probably just being hard on myself because I've created fantastic meds for a suffering family member and I- for almost a decade. But when I see some of you growers on here, I just can't compete! I guess I just don't have that magic. :bow:

Efficient, organized, clean. I try my hardest to make my garden live by these rules. I would love some input. I may be chasing my tail but I never stop looking for newer and better ways! Not to mention I have still my day job.

In the interest of emulating good print media (the ones that are still worth a shit, and don't lie), I will make a feeble attempt to dramatize, draw out, and (hopefully) keep people interested through the means of "updates". (too bad there's no babes in bikinis- then I'd get viewers) and like all good publications I will not give away all my information, -yet- I will record this in a strictly accurate and scientific manner, with as much detail to assist in future growers, feel free to ask questions. please don't mind my nerdy humor- your just gonna have to bear with me. dun dun da dun da daaaa-- :whistling:


Enough Gab, Let's check it out

......................................................................................

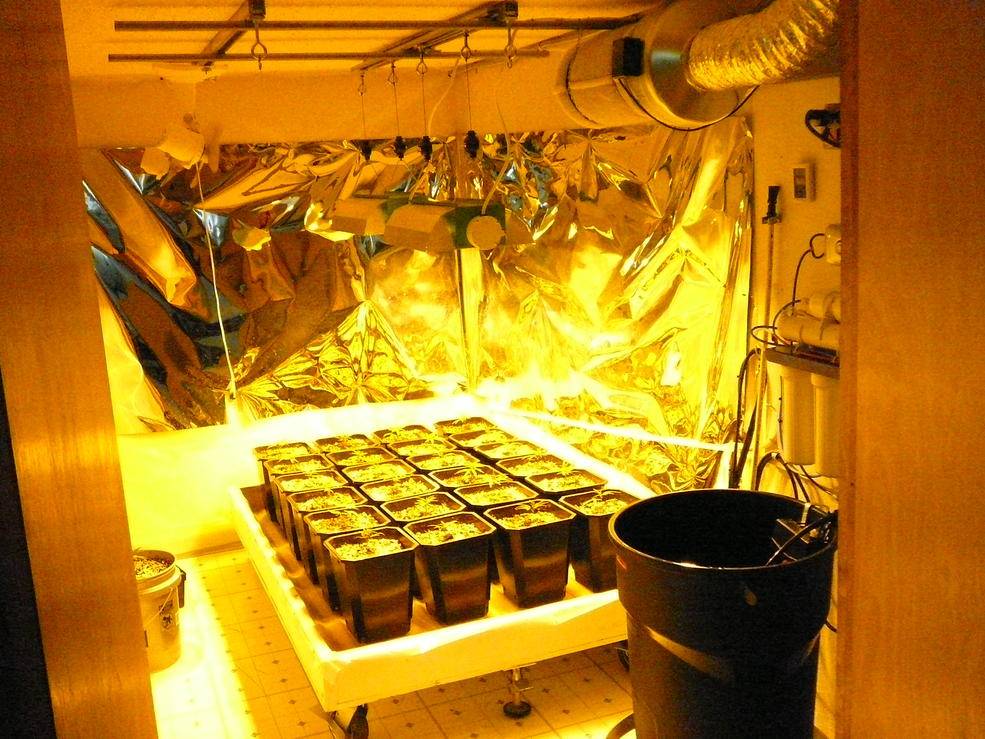
These plants are Lemon Skunk, a delicious strain, but a poor yeilder, sacrifice right? I cut them from there mother about 20 days ago (give or take.) I like to force this strain relatively early, because it likes to Stretch! This cycle I'm using 600's and not my usual 1000's. So less penetration. keep 'em short. Try to anyway.

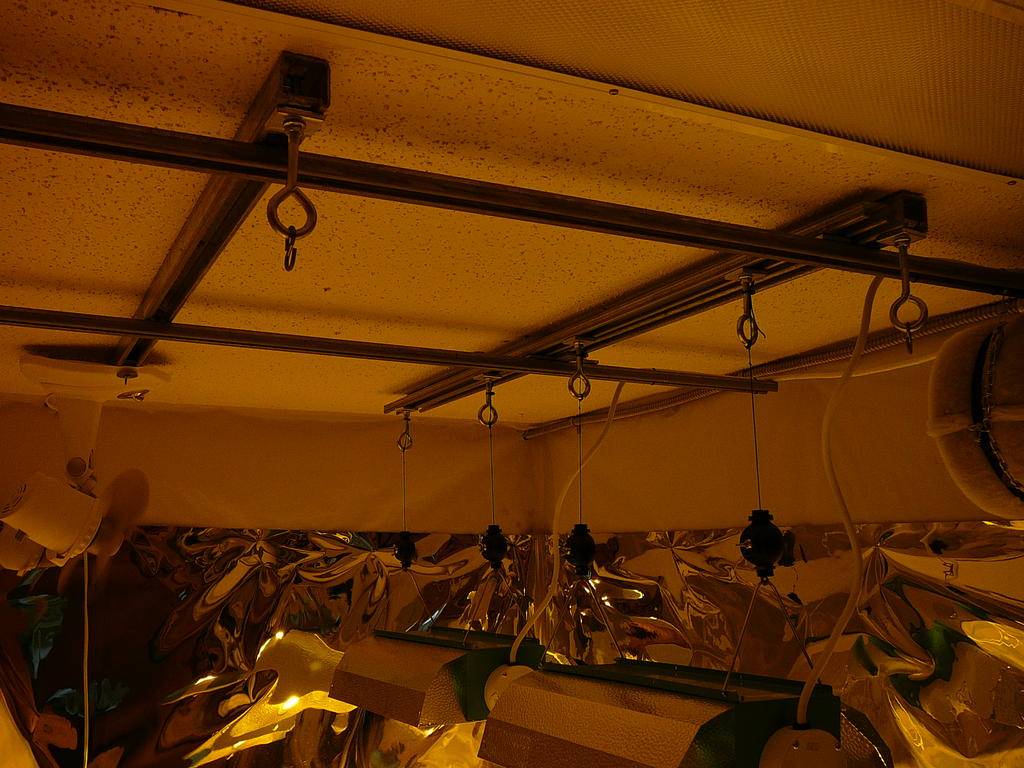
Flowering Room overview- 2x600 watt hps, 24-3.1gal pots- bla bla bla Here's a picture already-
picture.php
picture.php

picture.php
 

pushlimits

Member
Table of Contents

Table of Contents

Table of contents


Chapter # 1- Let's take a quick look.
Chapter # 2- Water system
Chapter # 3- Electrical system
Chapter # 4- Ventilation system
Chapter # 5- Substrate/ nutrition
Chapter # 6- Progression/watch them grow
Chapter # 7- Harvest
Chapter # 8- Record data, make changes

Excited? Me too! Enjoy your first chapter below (with the addition of $9.95 + s/h)
 

pushlimits

Member
CHAPTER #-1 Let's take a quick look.

Flowering Room-
2 x 600 watters
24- 3.1 gal containers a custom pro-mix
6" inline fan with carbon filter
4' x 6' homemade table with adjustable incline, and corrugated plastic
R.O. water source, with a lot of bells and whistles (you'll see in later chapters)
Dedicated 2 pole 40 amp circuit, and upgradable automated control panel (again, you'll see)
Check it out friends-
picture.php


picture.php


picture.php


picture.php


This last Picture is of almost everything.
From Left to right;
flowering room,
electrical panel (behind door),
work bench/shelves/nutrients,
mother cabinet below/ clone cabinet above (both currently empty -long story)
 

Hydrosun

I love my life
Veteran
Super clean and sexy. I'm sure the journey will be fun thanks for documenting it for us stoners ;)

:joint:
 

killerweed31

Smile Vs Cry
Veteran
gonna be a great grow for sure man, very nice example a s.o.g. style man, now i have special thread to watching , i like it!!
 

pushlimits

Member
Chapter #2 - Watering system

Chapter #2 - Watering system

Hello friends. In this chapter, I will attempt to quickly explain my watering system. Some of it's features include;
In order of appearance

  • Air pump with 12" air stone
  • 100w water heater.
  • Shut off float valve connected to 5 stage Reverse Osmosis
  • 365 GPH Pump- activated by foot pedal
  • 1/2" Watering stick with swiveling nozzle, connected to pump
  • Corrugated Plastic on an adjustable incline to channel run off.
  • Run off drains into a sud pump well in the room next door.

To water plants I step on the foot pedal, aim water stick and away I go.

picture.php
picture.php
picture.php
picture.php

picture.php
The picture above gives you a good view of the table. As you can see it's on wheels, but whats not so obvious is the thing in the middle- this is a foot pedal that raises the table to an incline to assist the run off water. All the water runs down hill into a pan that drains into my sud pump in the other room. This makes watering and flushing very easy for me (two things that used to be a pain in the ass).
 

Hydrosun

I love my life
Veteran
Looks great. Why the water heater? It looks like the res is in your room so probably a nice temp after it leaves the RO.

The table casters and leveling piece look really cool. It looks like a custom built table too :woohoo:

:joint:
 

pushlimits

Member
Custom built table? sure is, my friend.

As for the water heater, were should I begin, hmmm..

it would seem to most that it is very toasty in there, but I am afraid it's not the reality. I have went through several measures to stabilize the ambient temperature in there. ( which I will elaborate in the ventilation chapter!) I live in a state with notoriously unpredictable weather and extremely cold temps, and the incoming water is VERY cold.

The explanation for the cold ass water is pretty simple. I have a well that is very deep, and my incoming water travels underground. demographically the ground temperature below 36" almost never thaws, and even when it does, it stays uber cold- year round.

My incoming water travels through the cold ground, and spits out into the rez (even through the R.O.) at around 45-55 degrees. with the heater, it stays at 65-67 degrees.

This temp makes PH adjustment simpler and the plants don't freak out when they are delicate. Young plants would droop for an hour of so after watering. not anymore.

Here's were I tap into my water:


picture.php

picture.php
 

pushlimits

Member
Thank you guys for all the great comments. It's very much appreciated. :)

Stay tuned for Chapter #3- Electrical System.
 

pushlimits

Member
Chapter #3-Electrical system (not complete)

Chapter #3-Electrical system (not complete)

Electrical system-
I have always thought about engineering a fully automated grow system, but until I can afford to build one- this semi automated system will have to do. This panel is not yet finished. I will update all new changes as they are completed. I need more components, and they are very expensive.

First I will explain what it carries. Power comes in by 3/4" greenfield filled with 3- #6's and 1- # 8 gauge thhn wire. It carries a 2 pole 40 amp dedicated circuit to my control panel.

From there the power is distributed (evenly between the two legs) to the recepticals attached to the side. All cables are managed with plastic cable Troff. The mess you see now will not last. nothing (cables, timers, power strips, ect.) will be outside the enclosure. cables that go between rooms are light proof, with the help of a trick I picked up a few years back.

Here's a quick rundown;
  • Power comes into the main block.
  • The main block then branches off- in this case to the terminals
  • The terminal strip, then goes to it's respective outlet.
  • The two horizontal pieces of din rail will house the controller relays and possibly a PLC.
  • Right now the only control component you see is the dial to the left, this is the Timer relay. (it's not hooked-up yet) No more cheap plug in timers for me.
  • In the near future I would like temp control relays, timers, solenoid pump controllers, alarms, indicator lights, e-stops- you get the idea. I may need a bigger enclosure
With my background in automation controls and manufacturing, Ive seen it done before and I know whats available. Hell, I've done enough of this shit for other people- It's my turn to enjoy the fruits of my labor!

Here it is. Incomplete, but getting there!

picture.php

picture.php


picture.php


picture.php
picture.php
 
K

Krautrocker

Thank you for your work to discribe your grow in such a detailed manner and sharing your good work with us. I am happy to be here with you :wave:
 

pushlimits

Member
Chapter #4 Ventilation system

Chapter #4 Ventilation system

Chapter # 4 ventilation system-

I have went through many measures to keep a good ambient temperature and humidity in there. I grow in a basement, which is located in a state were Climatic and environmental anarchy is a common fact of life. For example; Humidity is either super high or super low. It is at a stable 50% maybe 1-2 months out of the year, and only if your lucky. So Mold, Fungus, viruses, moss and bugs Thrive for roughly 6 months out of the year. Thankful they are gone remaining 6, but their just waiting, Trust me.

So you hear people talk about air cooled hoods? They work great for some conditions, but definitely not mine friends! first, temps stay on the cool side anyway. It goes from cool to cooler. so that precious heat from the lamps actually helps me (in more ways then one.) Second, the heat created lowers my humidity in the summer, and keeps it directly around 45-55%. Lesson here is, environment dictates gardening method- not necessarily what "so and so" swears by. In realizing this little fact, I swear by no method. There's always a better way you just gotta find it, and when you do, find another one.

The only thing in a garden you cannot have too much of is AIR. let me repeat this NEVER TOO MUCH AIR. I just want to make this clear as to not confuse any future gardeners with this next part. I only did this for better quality air, not less of it.

I sealed up every nook and cranny (includes insulation) as best I could, I leave the inline fan and carbon filter on full blast 24/7. on the opposite side of the room I have a passive intake that consists of a register conected to duct that is covered with a carbon screen, and floss filter that sits under my water heater in the room next door. whew, that was a mouth full. This makes negative pressure, so I can better control the clean, co2 rich, intake air. The water heater flame makes it so I have a poor mans cO2 system. Just take long showers when the lights are on!

I can't really think of much more right now. So let me know if you have any questions.


picture.php


picture.php
picture.php
picture.php
 

pushlimits

Member
Chapter # 5 substrate and nutrition.

Chapter # 5 substrate and nutrition.

This chapter I will breeze over. I'm not particularly fond of writing this out, for the simple fact that- I'm not very good at it. roughly one out of every three grows I have completed had nutrient issues. It's not as much of a problem as it is a f%cking annoyance at this point. I always figure out what it was and fix it every time. I can definitely read my plants very well. I feel when somethings up.

Profit motive has skewed nutrient companies to less then honorable practices. I never know who to trust, what to get, were to turn. I have used many lines with good- but not great- results. and some products would've worked better with piss in them. Bottom line is- I should be better at this nutrient management thing by now, but I'm not. I could build on previous nutrient regimens and just continue copying it, but I want the experience. "Keep looking for better ways."

Any plant nutrition experts out there that feel like sending me a tip or two (hell, a schedule will work) Feel free. maybe I'll ask in a thread.


  • Pro-mix with big perlite for lot's of drainage 30-40% and a dash of dolomite lime (no differences without it really)
  • Fox farm (Entire line up) Works MUCH better in soil then peat moss products.
  • Cal-mag +
  • Dark energy- works good actually
  • Bunch of other stuff that just collects dust
  • Water quality is very good
  • PH is strictly managed
  • Watering in stages and with a lot of run off has helped tremendously in my yields.
  • I scrape the top after watering, don't know why I started this, but it seems to help quite a bit.
  • I purge the soil of excess salts with clearing solution on a regular basis. frequency depends on nutrient line and strength of application
Fox Farm, you have done me very well. It's sad to let you go but you're more work then you're worth and it's time for me to move on. Don't worry, this hurts me more then you. sniffle sniffle.

Hey H&G, let me buy you a drink

Ohh- Maxi-bloom, you look great tonight.

I'm still flirting as you can see.


picture.php


picture.php

picture.php
picture.php
 
Top