
Jellypowered
Member
Hello! Long time lurker, recently decided to be active and share my thoughts and trials with everyone. Let me start by saying I'm not very good at forums and posting. I tend to run on, and jump around a lot haha.
I have lurked here for a couple years, reading, soaking up all the information I can, I felt that I was at a point to try and utilize some of the knowledge I soaked up.
I built a "high pod" using 8 55w PLLs. DWC 10gal, jacks nutes, one white widow autoflower seed. Long story short, I made a classic noob mistake and chopped her too early. Lots of immature, non-active buds. Very grassy smell despite trying to dry and cure (i'll need lots of work on that)
The wifey needs about 2oz per month as she uses it for nausea/appetite/anxiety, I stopped partaking so we wouldn't have to buy as much, so I hope the following will be able to supply it, without me having to buy it from the local rip off shady dealer. Boy I could tell some stories there. Just sayin, I miss it.
Got a shed I ran 60A service to using some direct burial cable, wired up a proper breaker box and outlets. Now I am currently in the process of installing insulation/sheet rock on the inside.
I know nothing I do is anything short of Ghetto, but I figure every little bit is better than nothing at all. While constructive criticism is welcome, keep the hate away.
Lets begin shall we?
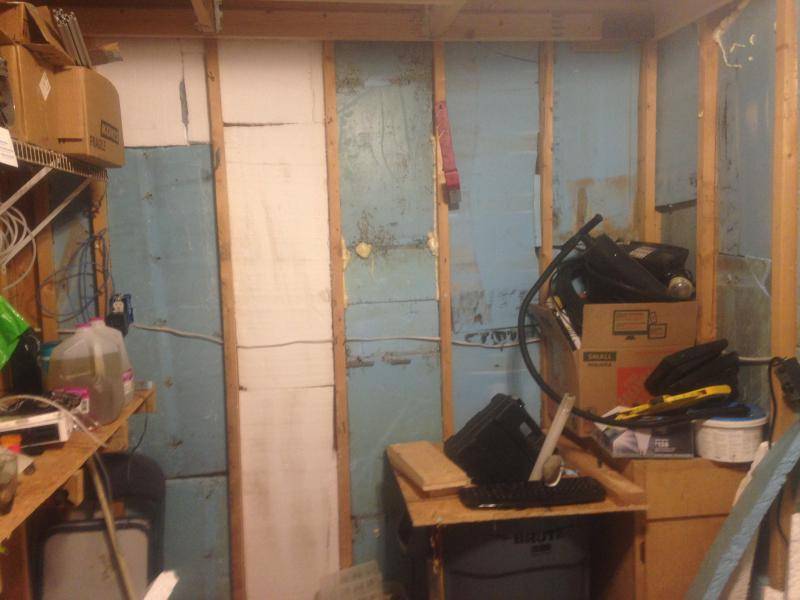
Here, you see my cheap as possible insulation job. I got the blue foam from a local chicken house farmer, his houses have sat unused for years and he's started to tear them down, I paid 5$ per 4x25 sheet of 1.5" foam.
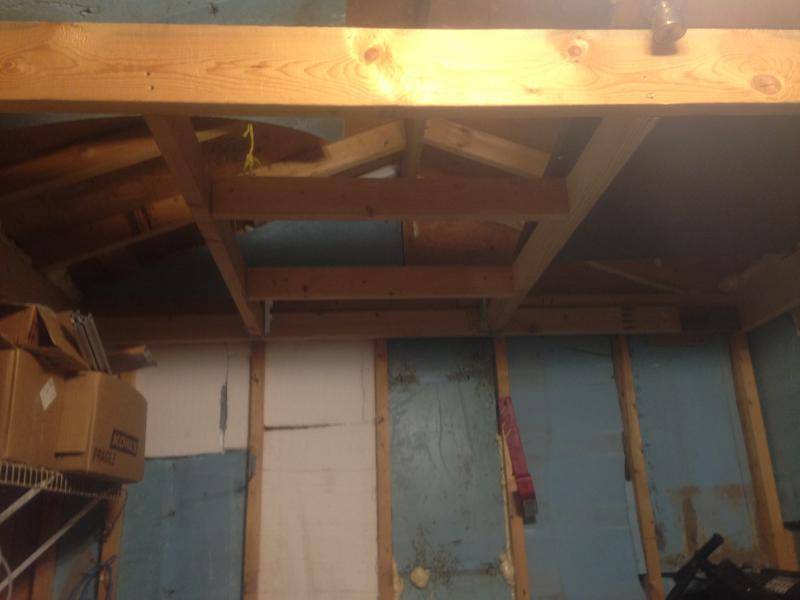
Here you can see where I added a ceiling to put sheet rock on. I know it's not the proper way to make a ceiling, but i'm working with whatever i can scrounge and/or have on hand. Future plans may include finishing a ceiling out and blowing in a layer of insulation on top to isolate roof temps from shed space.

The worst part, is the shed is only 8x12 or so, and I have nowhere else to move all the crap I have stored in here. So, I have to move everything a ton of times to get anything done.
Right side shot, a random door sitting on my makeshift ceiling for now. May use this, or might just buy a 24" door w/ frame. Can't decide what i'm gonna do yet.
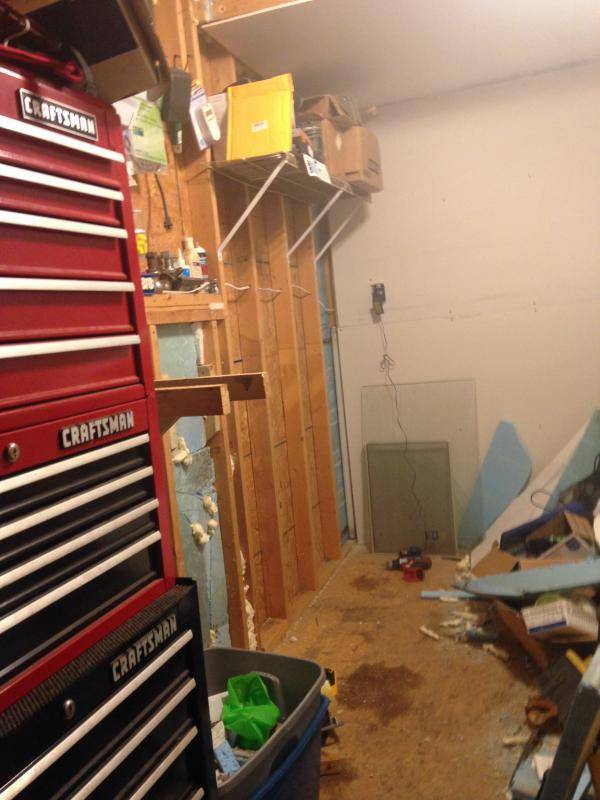
And the last of the pictures for now, This was taken tonight. I have been cleaning the left side out and removing all the nails, hooks, and installing the rest of the foam I have. I'm at the point I have to buy more sheet rock, so there won't be much progress besides cleaning and moving crap around. I'm planning on getting more rock and other materials tomorrow after work.
So, my grow area will be a little room under the ceiling area. I got the following gear at my disposal.
Ipower 190cfm 4" fan
Large 4" can style carbon filter
Xtrasun 64 6" air cooled reflector (need to get a reducer 6" to 4")
Quantum 400w dimable ballast
400w HPS bulb (forget the brand off hand)
2 bags Happy Frog soil
Emeral Harvest nutes
LOTS of 9w screw in LED Bulbs, 10x 2700, 10x 5000k
20x cleat low profile bulb sockets (in the mail)
(I plan on eventually using these for separate mother and clone veg area)
And I just found out today a friend is getting me two rooted clones (Northern Lights) soon so i need to finish this before I get them.
The sheet rock should take care of the light leaks from whoever built this shed. I'll say nothing is square, and the previous owner like using nails and hooks to hang everything.
Should I worry about mudding/sanding/painting given my accelerated time frame (clones given to me soon) ? Panda film/mylar is out of my price range right now, I guess flat white paint would be better than nothing, but is a couple days enough to offgas? I could just wait until I flower these clones out, I'm anxious to get started, hopefully shooting for at least .5 gpw (not that i'm obsessed about getting that much, I just know 200g would last us long enough for me to finish the improvements after the first run)
I'm not in this for nefarious purposes, I won't be selling, I just want to be free from having to buy it. Our "hookup" is all over the place with prices but its a supply and demand market. 350/oz one time, 240/oz the next, i never know what to budget for because it's different every time.
Hopefully ya'll still with me.
My planned grow area is 34"L 53"W x87"H which gives me the following stats supposedly
12.51 sq ft (is that right?)
91 Cubic feet
So my fan should be enough for complete air exchange and keep everything cool. Sound and smell aren't really an issue, but i'd still like to stay stealthy if possible.
I can't think of anything else right now, I know i can't edit posts till 50 or something, so I tried to remember it all.
Stay tuned for more, and please for the love of god, say something lol!
I have lurked here for a couple years, reading, soaking up all the information I can, I felt that I was at a point to try and utilize some of the knowledge I soaked up.
I built a "high pod" using 8 55w PLLs. DWC 10gal, jacks nutes, one white widow autoflower seed. Long story short, I made a classic noob mistake and chopped her too early. Lots of immature, non-active buds. Very grassy smell despite trying to dry and cure (i'll need lots of work on that)
The wifey needs about 2oz per month as she uses it for nausea/appetite/anxiety, I stopped partaking so we wouldn't have to buy as much, so I hope the following will be able to supply it, without me having to buy it from the local rip off shady dealer. Boy I could tell some stories there. Just sayin, I miss it.
Got a shed I ran 60A service to using some direct burial cable, wired up a proper breaker box and outlets. Now I am currently in the process of installing insulation/sheet rock on the inside.
I know nothing I do is anything short of Ghetto, but I figure every little bit is better than nothing at all. While constructive criticism is welcome, keep the hate away.
Lets begin shall we?
Here, you see my cheap as possible insulation job. I got the blue foam from a local chicken house farmer, his houses have sat unused for years and he's started to tear them down, I paid 5$ per 4x25 sheet of 1.5" foam.
Here you can see where I added a ceiling to put sheet rock on. I know it's not the proper way to make a ceiling, but i'm working with whatever i can scrounge and/or have on hand. Future plans may include finishing a ceiling out and blowing in a layer of insulation on top to isolate roof temps from shed space.
The worst part, is the shed is only 8x12 or so, and I have nowhere else to move all the crap I have stored in here. So, I have to move everything a ton of times to get anything done.
Right side shot, a random door sitting on my makeshift ceiling for now. May use this, or might just buy a 24" door w/ frame. Can't decide what i'm gonna do yet.
And the last of the pictures for now, This was taken tonight. I have been cleaning the left side out and removing all the nails, hooks, and installing the rest of the foam I have. I'm at the point I have to buy more sheet rock, so there won't be much progress besides cleaning and moving crap around. I'm planning on getting more rock and other materials tomorrow after work.
So, my grow area will be a little room under the ceiling area. I got the following gear at my disposal.
Ipower 190cfm 4" fan
Large 4" can style carbon filter
Xtrasun 64 6" air cooled reflector (need to get a reducer 6" to 4")
Quantum 400w dimable ballast
400w HPS bulb (forget the brand off hand)
2 bags Happy Frog soil
Emeral Harvest nutes
LOTS of 9w screw in LED Bulbs, 10x 2700, 10x 5000k
20x cleat low profile bulb sockets (in the mail)
(I plan on eventually using these for separate mother and clone veg area)
And I just found out today a friend is getting me two rooted clones (Northern Lights) soon so i need to finish this before I get them.
The sheet rock should take care of the light leaks from whoever built this shed. I'll say nothing is square, and the previous owner like using nails and hooks to hang everything.
Should I worry about mudding/sanding/painting given my accelerated time frame (clones given to me soon) ? Panda film/mylar is out of my price range right now, I guess flat white paint would be better than nothing, but is a couple days enough to offgas? I could just wait until I flower these clones out, I'm anxious to get started, hopefully shooting for at least .5 gpw (not that i'm obsessed about getting that much, I just know 200g would last us long enough for me to finish the improvements after the first run)
I'm not in this for nefarious purposes, I won't be selling, I just want to be free from having to buy it. Our "hookup" is all over the place with prices but its a supply and demand market. 350/oz one time, 240/oz the next, i never know what to budget for because it's different every time.
Hopefully ya'll still with me.
My planned grow area is 34"L 53"W x87"H which gives me the following stats supposedly
12.51 sq ft (is that right?)
91 Cubic feet
So my fan should be enough for complete air exchange and keep everything cool. Sound and smell aren't really an issue, but i'd still like to stay stealthy if possible.
I can't think of anything else right now, I know i can't edit posts till 50 or something, so I tried to remember it all.
Stay tuned for more, and please for the love of god, say something lol!
")

