
-
Happy Birthday ICMag! Been 20 years since Gypsy Nirvana created the forum! We are celebrating with a 4/20 Giveaway and by launching a new Patreon tier called "420club". You can read more here.
-
Important notice: ICMag's T.O.U. has been updated. Please review it here. For your convenience, it is also available in the main forum menu, under 'Quick Links"!
You are using an out of date browser. It may not display this or other websites correctly.
You should upgrade or use an alternative browser.
You should upgrade or use an alternative browser.
ReikoX's Workshop 2017
- Thread starter ReikoX
- Start date
Tbonegrower
Member
Digging the setup! I think I will pull up a chair as well.
ReikoX
Knight of the BlackSvn
It sure would be interesting, but not sure how useful. I do hate dry trimming thoughI'd certainly be interested to watch any build you did from the tech side of things. I dont think I'd have a need in my climate though ...

I picture a shoe box sized grow chamber with a gigantic water cooled radiator, huge power supplies, and a bottle of CO2 slapped on the outside.i want to see you build a micro sealed grow chamber
if anyone can do it its u

In all seriousness, these things barely keep up with the heat generated from fermenting beer. Though an experiment with a TEC cooled COB would be fun... hmm Google time!
Welcome to my corner of IC. I may show some plants soon, mostly it's been concentrates and cabs.Digging the setup! I think I will pull up a chair as well.
I've been getting lots of requests for more hard candies. This is the perfect opportunity to try decarbing some rosin. I had 2 grams of rosin.
I put it in a small petri dish with a lid. This was then put in the toaster oven set to 240°F for 40 minutes. The first 20 minutes or so it bubbled and fizzled like soda pop. After that the activity slowed.
Next to calculate how much ethanol to add.
WARNING, math ahead!
I used the "decarb values" of 71% THC. I was shooting for 20 mg/ml potency. So, (2000 mg • 0.71) / 20 mg = 71. I'll call it 70 ml. But wait, my recipe calls for 2 oz. of GD reduced to 1 oz. So I added 35 ml to get a potency of 40 mg/ml. Finally, I removed the extra 5 ml and set the rest aside for later. I then added back another 5 ml of fresh ethanol to give me an extra 10 ml at the normal 20 mg/ml potency. It came out to a nice amber color with a hint of pink to it. Very pretty looking.
Now for my favorite part, the bioassay of the potency. I put 10 drops in my morning coffee, and sipped it slowly. It is definitely decarbed and active. I just put six more drops in my second cup and looking forward my day.
I'll be making the cinnamon hard candies in the next day or two. The recipe makes about 120 pieces for a dose of about 10 mg each. One piece is a good medical dose, two is recreational, and three is a party.

I am an engineer at heart, not just by trade. I'm sure any of you who have seen my builds will notice that. As a result I am always thinking about something. I like to design and build stuff, and often over engineer the simplest of projects.
So I've been reading about custom built drying rooms. Basically it is a sealed room with an air conditioner and dehumidifier. They then set the temperature and humidity for the ideal conditions (usually 60°F and 60%RH). But what about us micro guys? I live in an arid climate and often struggle to keep humidity up and slow the drying process. Small plants also dry a lot faster. So I started thinking about a drying cabinet.
First thing I looked at what was available off the shelf. Mostly everything was a cabinet with an inadequate filter. I did see one box that used a humidity controller and exhaust fans, but no odor control. Another was lined with Spanish cedar, but was almost $1000.
So I started to look at small dehumidifiers. They exist and are pretty reasonably priced. As they are designed though, they have no humidity control and heat up the air quite a bit. But the technology that drives them got my interest.
These small dehumidifiers use a Peltier, also known as a thermoelectric, plate. If you don't know, they basically move heat from one side (cold side) to the other side (hot side) when electricity is applied. They can even switch hot and cold sides by reversing polarity. They are also used in electric camping coolers, now we are getting somewhere!
While doing research I found a humidor that used one to control temperature. I found several fermentation chambers using these. I even saw a grow box using them for cooling. They were using almost 1000W to cool around 300W of lighting. Terribly inefficient, but under the right conditions may be useful. For example, they may work wonderfully to cool COB lighting similar to how they are used to cool PC chips.
So my idea is starting to form, but I'm debating if this project is worth the time and money. I can dry my weed in a shoe box with a bit of time and effort.
Basically I would need to build a well insulated cab with both temperature and humidity control. I would need to engineer it to use the peltier plates to dehumidifier and cool. Most likely an Arduino board and code to control it, which is something I've wanted to play with. Pricing out parts it would cost a bit more than I would like.
Basically I want a cab big enough to hang about 200 grams dry weight. It would have to be completely sealed for odor prevention, and of course the temperature and humidity control. The goal would be to wet trim the bud, hang it in the cab, set the temp and humidity and leave it. If it maintains well I may even cure in there.
What do you guys think? Should i even bother? It's definitely over engineered, but there is nothing like it on the market. I can see something like this being popular for small personal grows.
Maybe MacGyver a small fridge?
Tbonegrower
Member
Your concentrate processing is very interesting. I have toyed with the idea of making rosin for a bit, as I only produce for myself and my girlfriend...
ReikoX
Knight of the BlackSvn
That is a really good idea. Hook up the fridge to a temp controller and throw one of those small dehumidifiers in there. If I got a used fridge, it could be done for around $100 or so. It does fit all the design goals: stealthy, well insulated, air tight, environmental control... The only question is where would I put my concentrates, edibles, seeds, and beer?Maybe MacGyver a small fridge?
ReikoX
Knight of the BlackSvn
I only produce for myself. Thats the beauty of rosin, I feel it works best on small runs. With my press I can take a gram of bud, press it, and dab it on the nail in just a few minutes.Your concentrate processing is very interesting. I have toyed with the idea of making rosin for a bit, as I only produce for myself and my girlfriend...
Tbonegrower
Member
How much does a gram of bud usually yield? I am unclear on the conversion rate...
That is a really good idea. Hook up the fridge to a temp controller and throw one of those small dehumidifiers in there. If I got a used fridge, it could be done for around $100 or so. It does fit all the design goals: stealthy, well insulated, air tight, environmental control... The only question is where would I put my concentrates, edibles, seeds, and beer?
I was thinking dorm sized since you mentioned smaller size, but if you went with full-size, you could probably figure a way to do the drying in the fridge side and storage in the freezer side (not necessarily freezing but different temp/humidity than the fridge side).
ReikoX
Knight of the BlackSvn
I'm getting between 10-15% return with a single press. That turns out to be about 1-1.5 grams of rosin from each 10 grams of bud squished. Some strains yield more and I'm still experimenting to get closers to 20% yield.How much does a gram of bud usually yield? I am unclear on the conversion rate...
Yeah, I was thinking the dorm sized one too. They also make wine coolers, and apparently thermoelectric cigar coolers. Though they seem to have bad reviews.I was thinking dorm sized since you mentioned smaller size, but if you went with full-size, you could probably figure a way to do the drying in the fridge side and storage in the freezer side (not necessarily freezing but different temp/humidity than the fridge side).
OK, so now I picture that shoebox sized growing chamber with a male in it happily doing its thing. Since it is sealed, as long as it isn't opened, there should be no unplanned pregnancies.I picture a shoe box sized grow chamber with a gigantic water cooled radiator, huge power supplies, and a bottle of CO2 slapped on the outside.
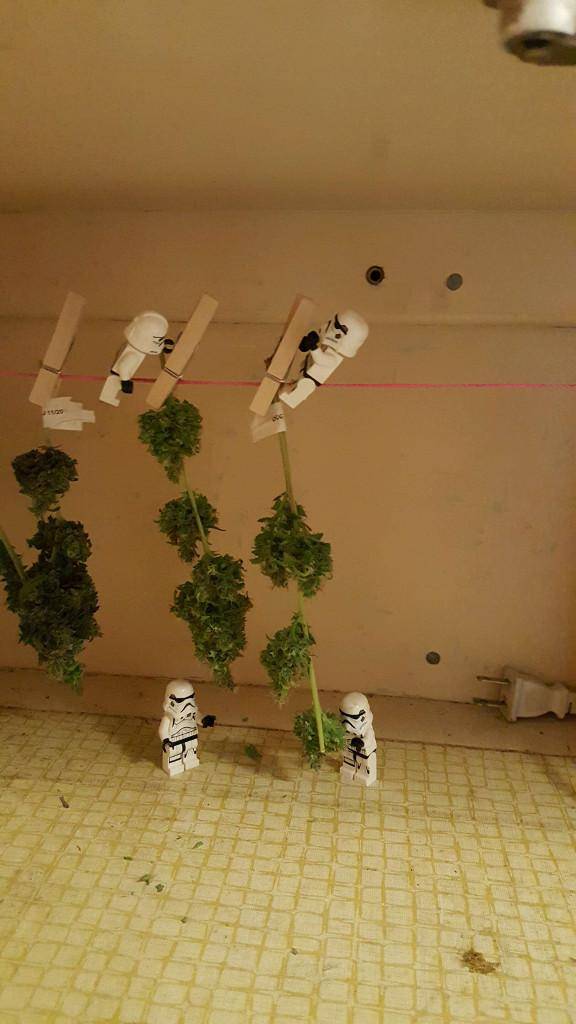
Last night I watered the coliseum and transplanted three new clones, but one was dead. Nothing was harvested this week. One of the plants, Holy Grail 69, was harvested last week at eight weeks. The other two, CBD and THC Juanita, I am going to let go ten weeks. I usually go eleven, but they look like they will be done on time.
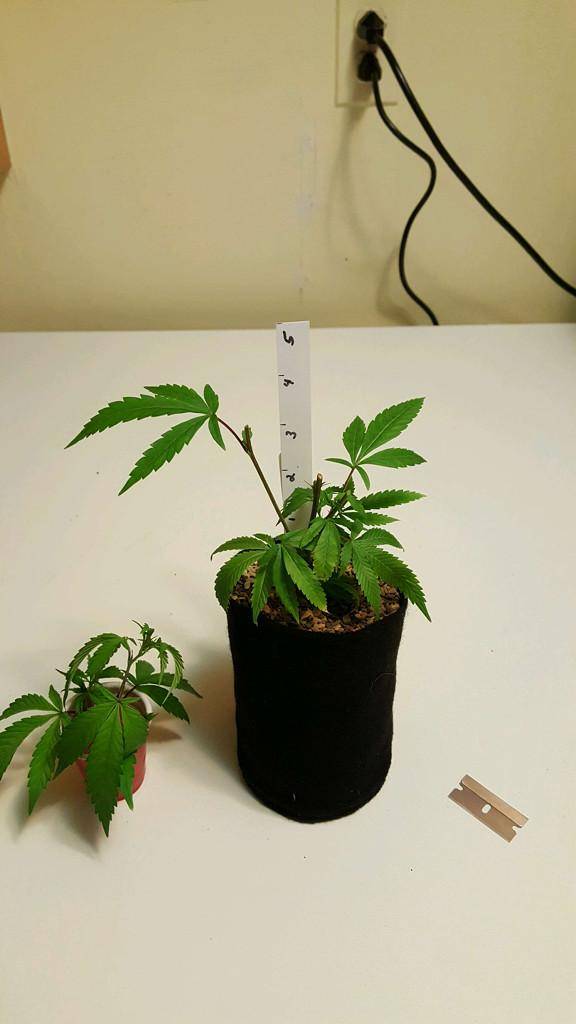
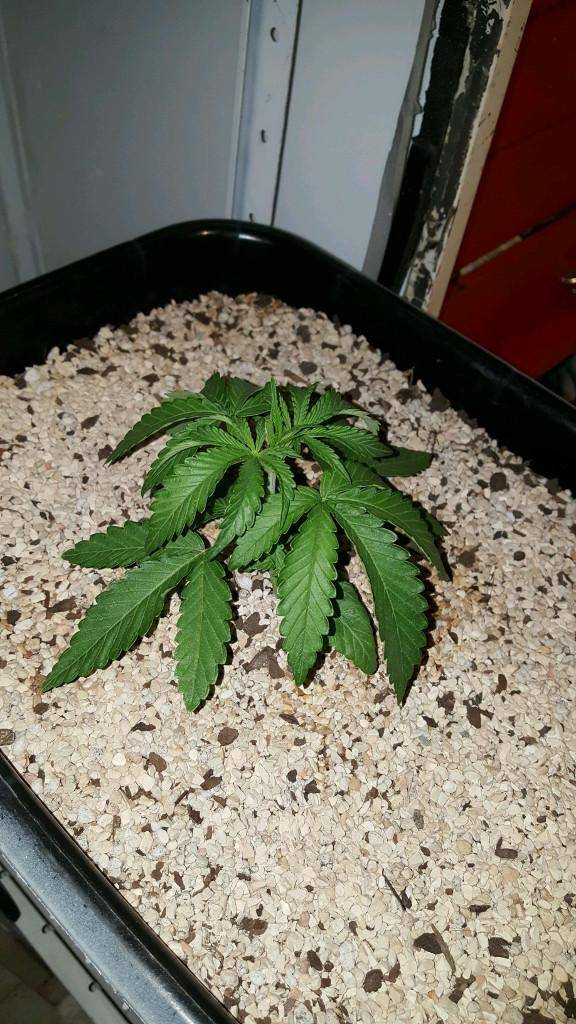
Remember that Bubba Kush S1 I had germinating? Well, she (yes I am assuming it's female) is coming along nicely. She's working on her first set of five bladed leaves. The cabinet is running a little hot (85°F) with such a little plant in it. You can tell by the crinkly lower leaves. Next time I start seeds in here, I will keep them a little further from the lights until five nodes. She's almost big enough to start fully watering though, so temps and humidity should fall in line.
Finally a little preview of my next little project. I have tried two of these seeds and one cracked, but drowned because I left it in the water for too long. The next one cracked and never sprouted between the paper towels. I tried cracking a Bubba Kush S1 (see above) and had no issues. I assume the seeds are viable and the issue is something I am doing. The only two things I can think of are the seeds are not viable, or I tried to crack them too soon (24 hours) after taking them out of the refrigerator . These have been in a cool dry place for about two weeks.
I dropped five Lowryder mixed seeds in water. Hopefully a few will germinate this time. If they do, they will go in my PC. I can fit eight of my fabric pots in there. I will fill the rest with some Delicious auto flowering seeds: La Diva, The Devil, and The Muse. I also have a Samsara Ultraviolet if there is still room. I hope to get some males to collect pollen and make a bunch of auto seeds.
ReikoX
Knight of the BlackSvn
I'm trying to dial in the perpetual SOG. Yields aren't as good as when I did all the clones at once. I believe that in the end yield is a sum of all the little things going right. For example, when I was watering, I noticed some clones looked the perfect height after stretch. But I never documented how tall it was when it went in to flower, so I can't replicate that. That is one thing I can do to improve right there.
Tuesday is clone day. Taking clones is a huge part of dialing in my perpetual SOG. To keep it humming along, I need three healthy clones a week. I usually take six clones a week, let them root for two weeks, then transplant them into 12 oz. cups for a week or two to veg. Finally I transplant the three best into my MT38 tree pots to flower. This usually gives me a few extra for other patients or to throw into other cabs.
I've decided the second transplant from the 12 oz. cups is not only unnecessary, but also stunting the plant right when I want it to take off. By skipping the transplant I should have a bigger root system going into flower. When I mono cropped last time, I transplanted directly into the MT38 tree pots. I also used White Lightning mycorrhizae. This week I transplanted the rooted cuts into the MT38 tree pots directly and dipped the roots in mycorrhizae.
I'll walk through the process and see whats working, and what to improve. Let's start with my Tahoe OG mom. Here you can see, according to my calibrated measuring device, that my moms are trimmed to about 4" tall. This usually happens every two weeks if clones are needed or not. In this case I got two nice clones from her.
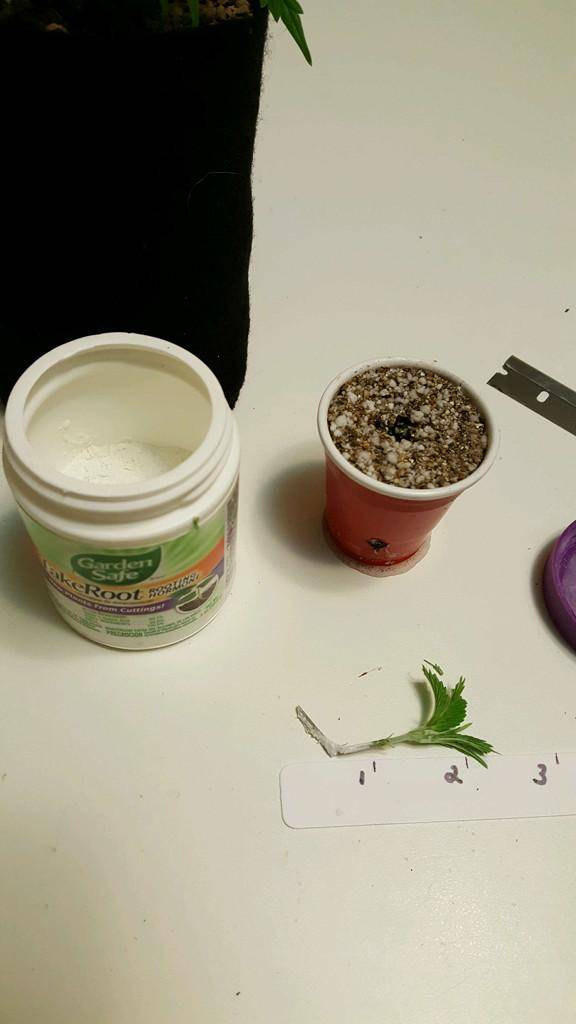
Next I strip off all but the top node. I cut the fan leaves in half to lessen the need for respiration. I then re-cut the clone to two inches long. I scrape the outside, dip it in rooting powder, then add it to the micro hempy bucket. I noticed they were getting pretty dry between waterings so I decided to mix in 50% vermiculite with 50% perlite.
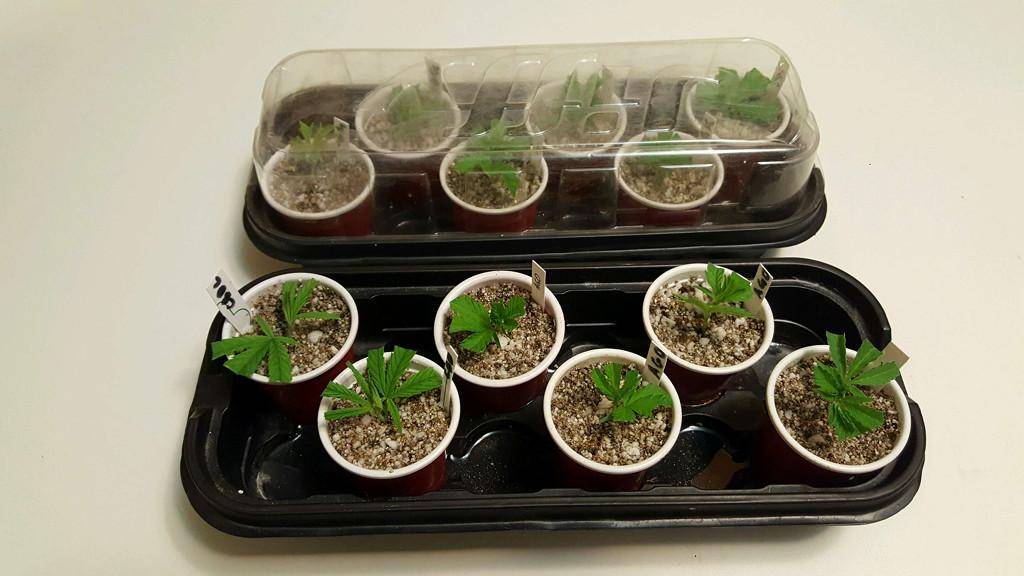
Here we have two trays worth of clones. For the first week the dome is kept on tight. After the first week, they are hardened off by lifting the lid and letting air circulate. They get watered with RO water and 10 drops of superthrive per gallon. The RO water is different, I used to use my tap water and have to correct the pH. I never bothered checking the pH since I switched. That could be an issue.
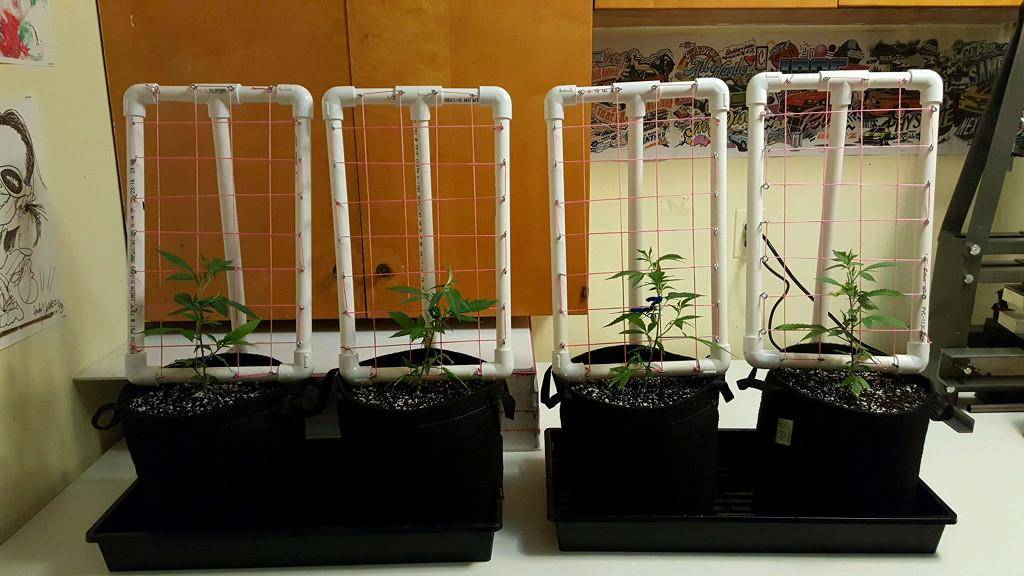
Alright, enough about the clones. Next to take care of are the Holy Grail 69 girls. They were trained back to the screen. This should encourage the side branching to stretch some. I'll then tie that back, and fill the screen this way.
They were fed RO water and my home-made fertilizers. They got the following:
15 ml / gal Fermented Fish Fertilizer
15 ml / gal Fermented Cannabis Leaf Extract
1 ml / gal Lactobacilius Culture
I haven't been messing with pH lately, but decided to test it and it was 4.1. I had no idea it was that low. I corrected it to 5.9 or so using potassium bicarbonate. This is a similar mix to what I feed my moms, so poor plant nutrition could also be part of my cloning issue.
Finally I fed my Bubba Kush S1 seedling. She took about 1/2 gallon of the same mix as above. I filled the eight fabric pots for the PC with soil, watered them and am letting it "cook" for a bit. I checked on the seeds and it looks like one may crack. I put them between paper towels.
So I have a list of six improvements to work on:
- Document the height of clones going into flower, as well as after harvested.
- Transplant rooted clones directly into the MT38 tree pots.
- Use mycorrhizae when transplanting rooted clones.
- Clone in 50/50 mix of vermiculite and perlite.
- Adjust pH with clone waterings, possibly switch back to tap water for micro nutrients.
- Adjust pH for mothers to keep them healthier.
Tuesday is clone day. Taking clones is a huge part of dialing in my perpetual SOG. To keep it humming along, I need three healthy clones a week. I usually take six clones a week, let them root for two weeks, then transplant them into 12 oz. cups for a week or two to veg. Finally I transplant the three best into my MT38 tree pots to flower. This usually gives me a few extra for other patients or to throw into other cabs.
I've decided the second transplant from the 12 oz. cups is not only unnecessary, but also stunting the plant right when I want it to take off. By skipping the transplant I should have a bigger root system going into flower. When I mono cropped last time, I transplanted directly into the MT38 tree pots. I also used White Lightning mycorrhizae. This week I transplanted the rooted cuts into the MT38 tree pots directly and dipped the roots in mycorrhizae.
I'll walk through the process and see whats working, and what to improve. Let's start with my Tahoe OG mom. Here you can see, according to my calibrated measuring device, that my moms are trimmed to about 4" tall. This usually happens every two weeks if clones are needed or not. In this case I got two nice clones from her.
Next I strip off all but the top node. I cut the fan leaves in half to lessen the need for respiration. I then re-cut the clone to two inches long. I scrape the outside, dip it in rooting powder, then add it to the micro hempy bucket. I noticed they were getting pretty dry between waterings so I decided to mix in 50% vermiculite with 50% perlite.
Here we have two trays worth of clones. For the first week the dome is kept on tight. After the first week, they are hardened off by lifting the lid and letting air circulate. They get watered with RO water and 10 drops of superthrive per gallon. The RO water is different, I used to use my tap water and have to correct the pH. I never bothered checking the pH since I switched. That could be an issue.
Alright, enough about the clones. Next to take care of are the Holy Grail 69 girls. They were trained back to the screen. This should encourage the side branching to stretch some. I'll then tie that back, and fill the screen this way.
They were fed RO water and my home-made fertilizers. They got the following:
15 ml / gal Fermented Fish Fertilizer
15 ml / gal Fermented Cannabis Leaf Extract
1 ml / gal Lactobacilius Culture
I haven't been messing with pH lately, but decided to test it and it was 4.1. I had no idea it was that low. I corrected it to 5.9 or so using potassium bicarbonate. This is a similar mix to what I feed my moms, so poor plant nutrition could also be part of my cloning issue.
Finally I fed my Bubba Kush S1 seedling. She took about 1/2 gallon of the same mix as above. I filled the eight fabric pots for the PC with soil, watered them and am letting it "cook" for a bit. I checked on the seeds and it looks like one may crack. I put them between paper towels.
So I have a list of six improvements to work on:
- Document the height of clones going into flower, as well as after harvested.
- Transplant rooted clones directly into the MT38 tree pots.
- Use mycorrhizae when transplanting rooted clones.
- Clone in 50/50 mix of vermiculite and perlite.
- Adjust pH with clone waterings, possibly switch back to tap water for micro nutrients.
- Adjust pH for mothers to keep them healthier.
Tbonegrower
Member
The perpetual SOG is very interesting, and I think you will be happy with the direct planting. I have seen much happier root systems, although I have been trying to plant them a bit deeper as of late. I flip one plant every 1.5-2 weeks. It's is much nicer to have a steady stream...
This is an amazing setup you have here. I like how this setup can keep clones and flowering ladies too.
I just set up a lil veg/clone area so I can try to keep the herb coming all year long.
I just set up a lil veg/clone area so I can try to keep the herb coming all year long.
ReikoX
Knight of the BlackSvn
Yeah, the perpetual harvesting is pretty nice. Yields need work, but the quality is there.The perpetual SOG is very interesting, and I think you will be happy with the direct planting. I have seen much happier root systems, although I have been trying to plant them a bit deeper as of late. I flip one plant every 1.5-2 weeks. It's is much nicer to have a steady stream...
When I built it, it was the only cabinet I planned to have. So having a mom/veg area was required.This is an amazing setup you have here. I like how this setup can keep clones and flowering ladies too.
I just set up a lil veg/clone area so I can try to keep the herb coming all year long.
ReikoX
Knight of the BlackSvn
Cinnamon Candies
Cinnamon Candies
I made these last week, but forgot to post it here.
To make them you will need:
- 1 cups granulated sugar
- 1/3 cup light corn syrup
- 3/8 cup water (6 tablespoons)
- 1/2 dram (1/2 teaspoon)* LorAnn cinnamon
- 1 Oz Green Dragon (8g/Oz reduction)
- Red food coloring
- Hard candy molds
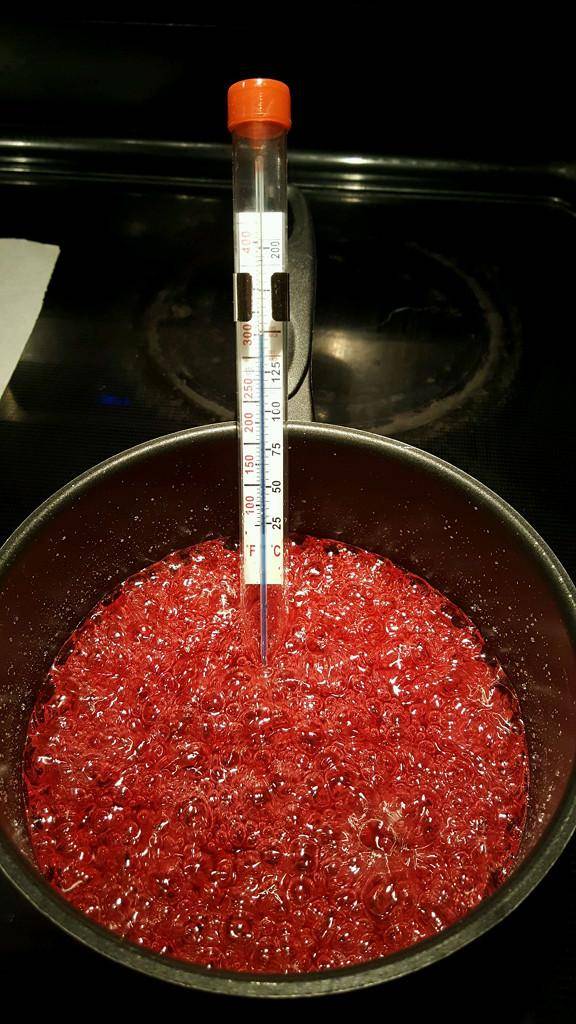
In a sauce pan, combine the sugar, corn syrup, and water. Using a medium heat, stir until well combined. Insert your candy thermometer, making sure not to touch the bottom of the pan. Turn up the heat and stop stirring. Once the temperature reaches 220*F, you can add the food coloring.
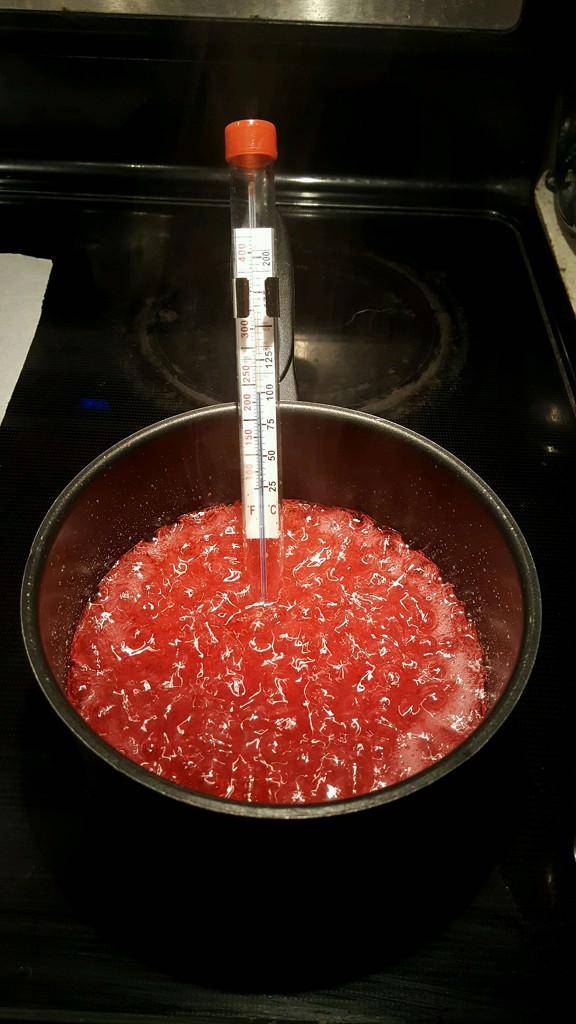
As soon as the temperature reaches 300*F, remove from the heat. Wait for the bubbling to settle down, and then add the cinnamon flavoring while stirring rapidly. Be careful not to inhale the fumes. Next add the Green Dragon while still stirring. You may need to add a little bit of heat to re-melt the candy.
Quickly pour the candy into the molds, You can add more heat to try and get the last of it out. I usually just get as much as I can and give the rest "to the gods". Next time I may boil some water and make a tea with it.
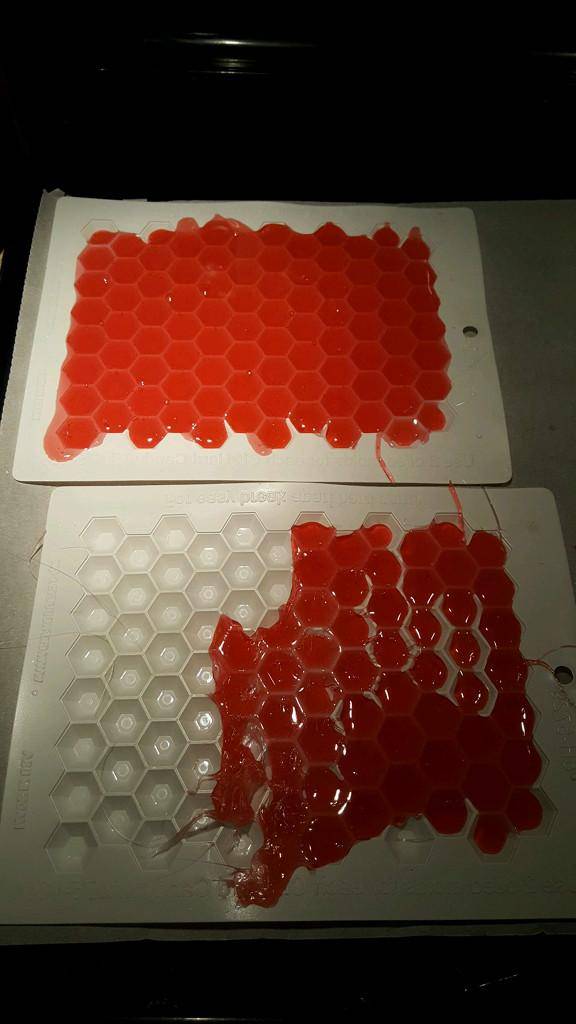
Allow the candy to cool, then break the candy up. Store in a cool dry place in an airtight container. Now for my favorite part, licking the spoon!
Cinnamon Candies
I made these last week, but forgot to post it here.
To make them you will need:
- 1 cups granulated sugar
- 1/3 cup light corn syrup
- 3/8 cup water (6 tablespoons)
- 1/2 dram (1/2 teaspoon)* LorAnn cinnamon
- 1 Oz Green Dragon (8g/Oz reduction)
- Red food coloring
- Hard candy molds
In a sauce pan, combine the sugar, corn syrup, and water. Using a medium heat, stir until well combined. Insert your candy thermometer, making sure not to touch the bottom of the pan. Turn up the heat and stop stirring. Once the temperature reaches 220*F, you can add the food coloring.
As soon as the temperature reaches 300*F, remove from the heat. Wait for the bubbling to settle down, and then add the cinnamon flavoring while stirring rapidly. Be careful not to inhale the fumes. Next add the Green Dragon while still stirring. You may need to add a little bit of heat to re-melt the candy.
Quickly pour the candy into the molds, You can add more heat to try and get the last of it out. I usually just get as much as I can and give the rest "to the gods". Next time I may boil some water and make a tea with it.
Allow the candy to cool, then break the candy up. Store in a cool dry place in an airtight container. Now for my favorite part, licking the spoon!
ReikoX
Knight of the BlackSvn
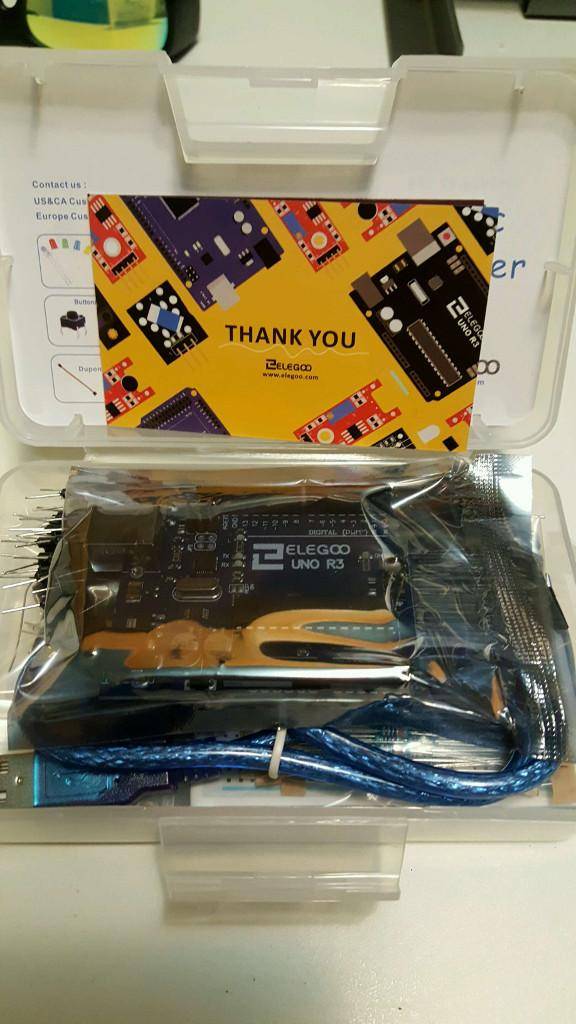
My Arduino board got here today. I will have to mess around with this soon. It's Friday night and I'm going to relax at my desk for a while.
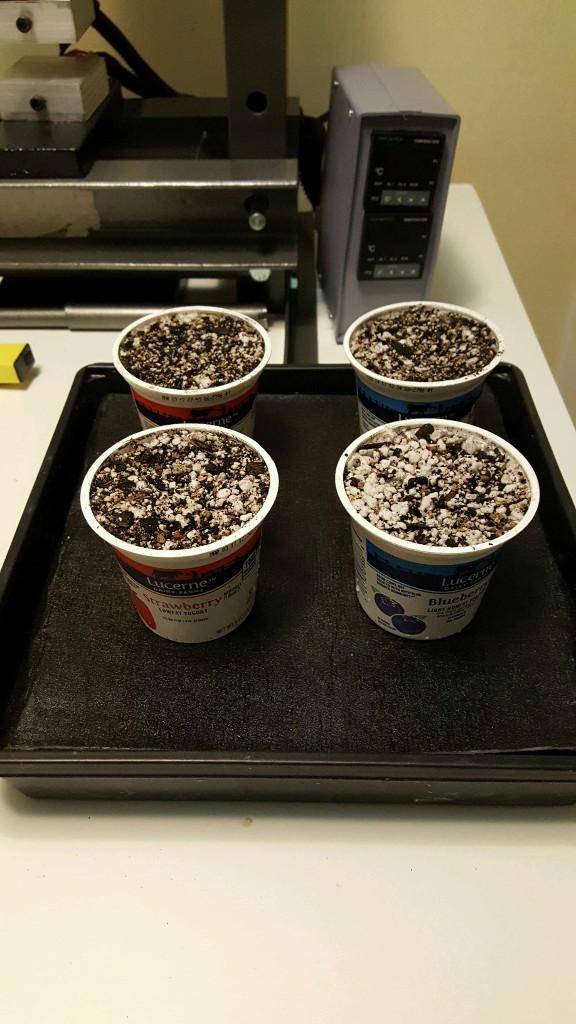
*COUGH COUGH* Alright, now I've got the munchies, just a minute. Now if there was only something I could do with this empty yogurt container...
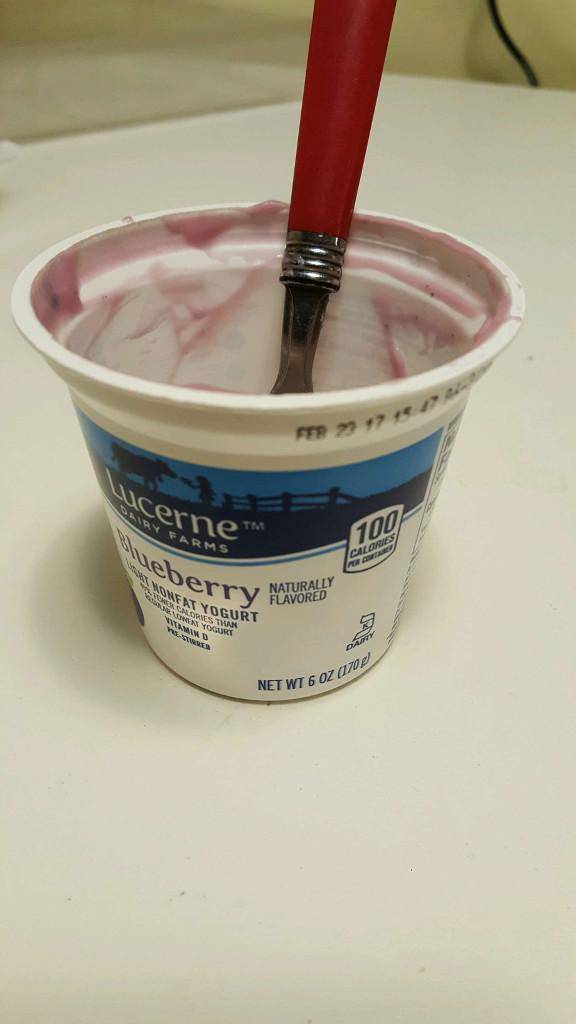
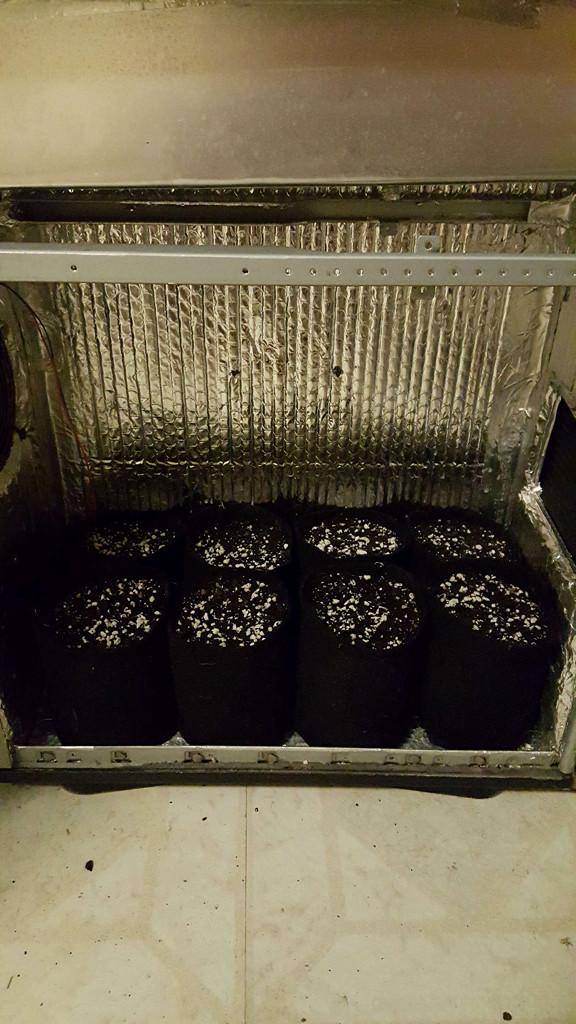
It's time for the yogurt cup challenge! I remember one of the first threads I read here was the shotglass challange. I remember thinking, that looks like fun. I want to assure good drainage, so I cut that inner circle out. I cut out some weed blocking fabric and put it in the bottom. I mixed up an airy medium with three parts recycled soil, one part perlite, one part vermiculite.
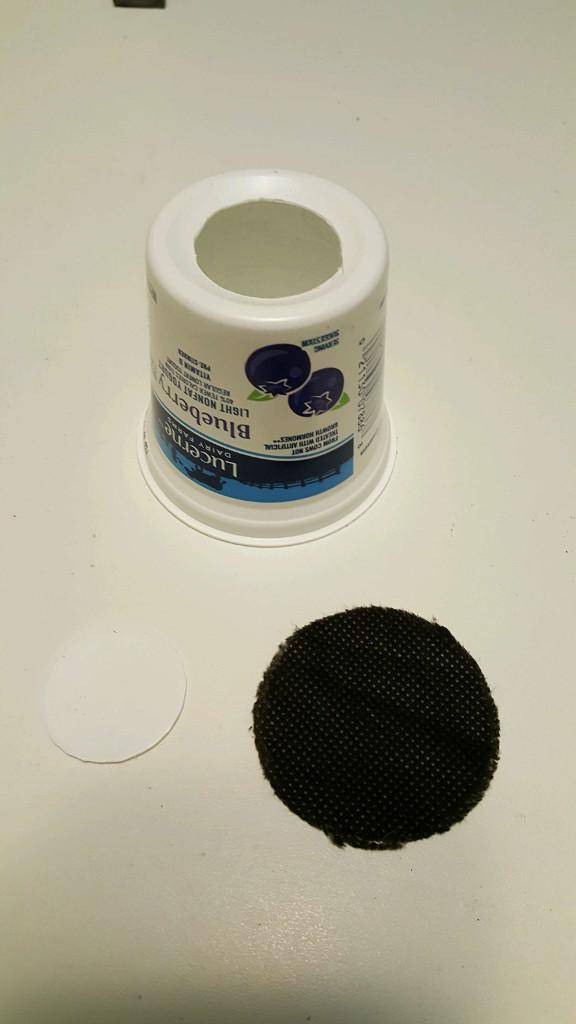
This is a crazy coincidence, the other night I was thinking about how I would be able to keep up with watering these tiny pots. I suddenly remembered my burpee seed starting kit. Dave Coulier was using them in his thread for starting seedlings. The next morning I woke up and he posted:
Granted, the idea came from him using them. So here we are with medium testing this capillary mat for the yogurt cup challenge. I should have some clones in a week or two ready to go in. I think they will get a spot with my screens since I'm only running four this round.
The Bubba Kush S1 is a vigorous little girl. She is developing with 1-3-5-7 leaf nodes so far. I think I am going to try mainlining again. I tried it a couple times before, once was just a bad cultivar who has been culled (THC Bomb accidental F2). I think I was rushing the process before, so I plan to take it slowly and be patient. The first step is to let her get to five or six nodes, then top her. I'll try to clone the toppings, she should produce quite a few clones for me in the process.
*COUGH COUGH* Alright, now I've got the munchies, just a minute. Now if there was only something I could do with this empty yogurt container...
It's time for the yogurt cup challenge! I remember one of the first threads I read here was the shotglass challange. I remember thinking, that looks like fun. I want to assure good drainage, so I cut that inner circle out. I cut out some weed blocking fabric and put it in the bottom. I mixed up an airy medium with three parts recycled soil, one part perlite, one part vermiculite.
This is a crazy coincidence, the other night I was thinking about how I would be able to keep up with watering these tiny pots. I suddenly remembered my burpee seed starting kit. Dave Coulier was using them in his thread for starting seedlings. The next morning I woke up and he posted:
...
Would be very useful for anyone competing in the yogurt cup challenges *wink wink*
Granted, the idea came from him using them. So here we are with medium testing this capillary mat for the yogurt cup challenge. I should have some clones in a week or two ready to go in. I think they will get a spot with my screens since I'm only running four this round.
The Bubba Kush S1 is a vigorous little girl. She is developing with 1-3-5-7 leaf nodes so far. I think I am going to try mainlining again. I tried it a couple times before, once was just a bad cultivar who has been culled (THC Bomb accidental F2). I think I was rushing the process before, so I plan to take it slowly and be patient. The first step is to let her get to five or six nodes, then top her. I'll try to clone the toppings, she should produce quite a few clones for me in the process.
ReikoX
Knight of the BlackSvn
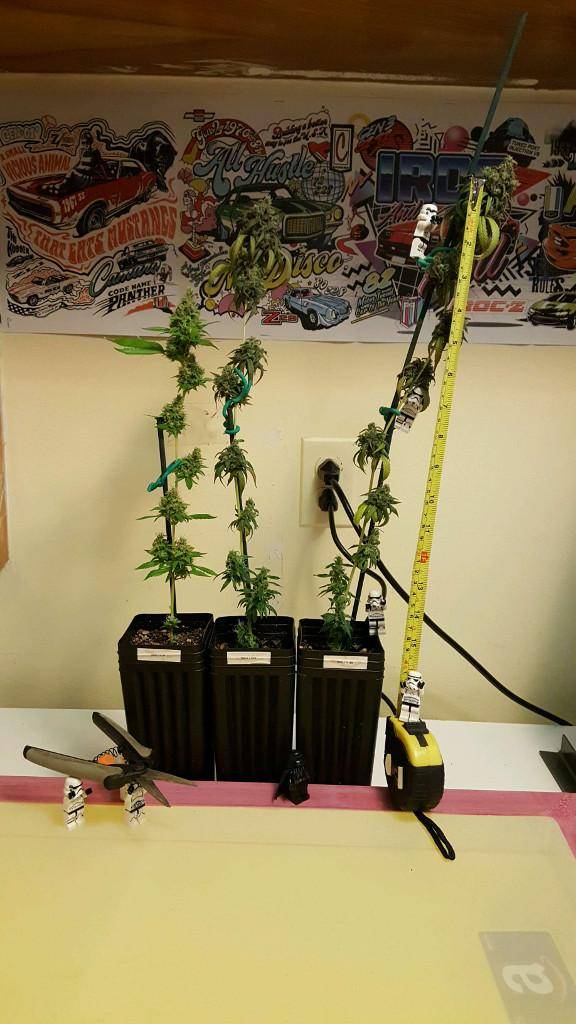
Today was harvested time for these three girls. They are, from left to right, Delicious Candy at 9 weeks, THC Juanita at 10 weeks, and CBD Juanita also at 10 weeks. Since this is such a huge harvest, I recruited a few buddies to help me trim.


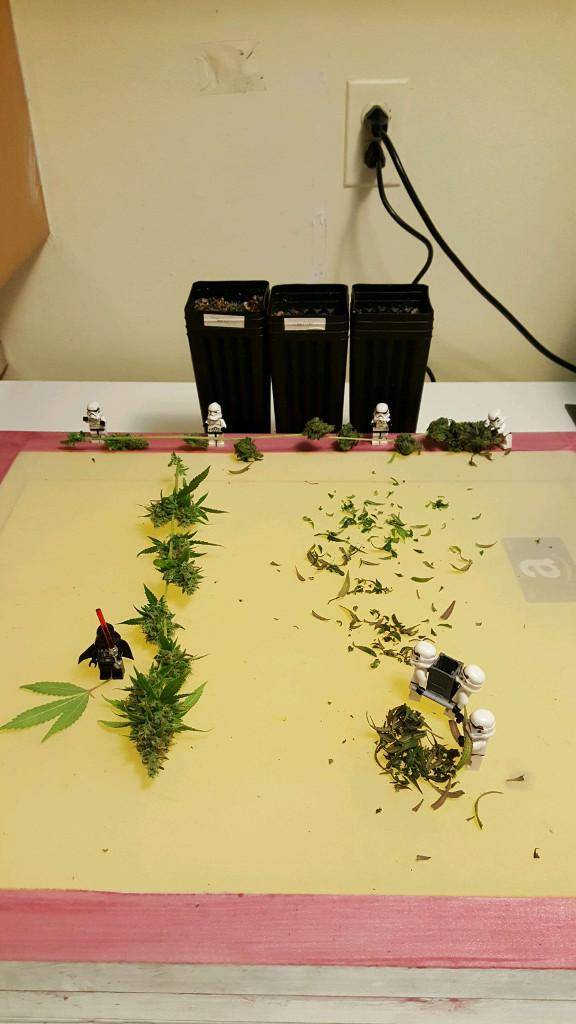

I gave them some bud for their troubles...


I gave them some bud for their troubles...

ReikoX
Knight of the BlackSvn
I'm still having trouble with these Lowryder seeds. The seeds cracked after about 48 hours, but didn't do a whole lot more in the paper towels. I'm not sure if these seeds were old stock, or if something happened to them during shipping. I have three more seeds left to try, perhaps someone has some advice to help the issue?
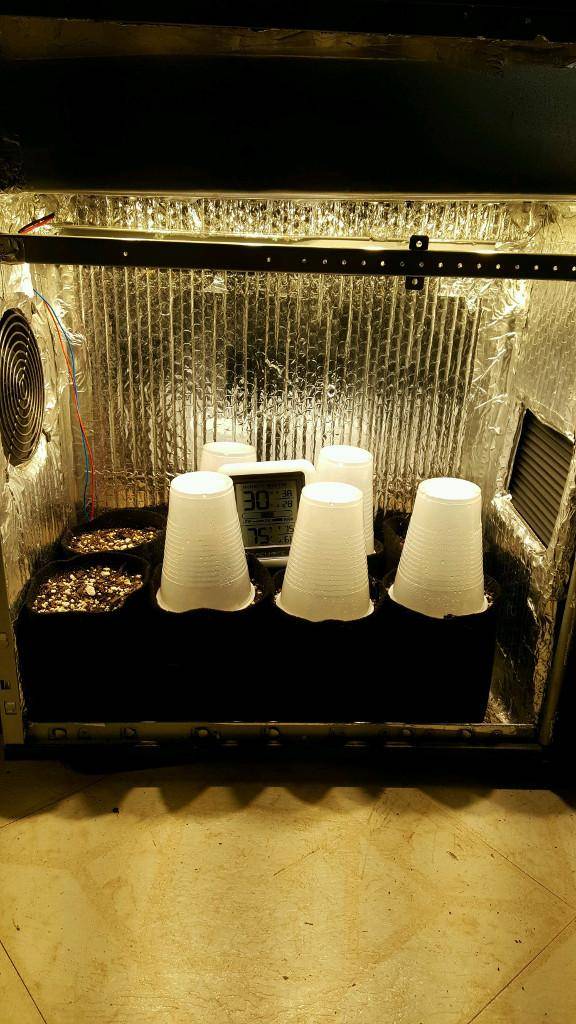
I went ahead and germinated some more seeds from that same order to determine if something may have happened. Eight total, two each of Delicious The Devil, Delicious La Diva, Delicious La Musa, and Samsara Ultraviolet. I haven't decided what I'm going to do with them. That all depends on how those Lowryder seeds turn our. I will probably just germinate them in peat pucks until roots are showing on the bottom, then decide where to put them. The big cabinet will be done soon, I was debating running a round of autos in there.
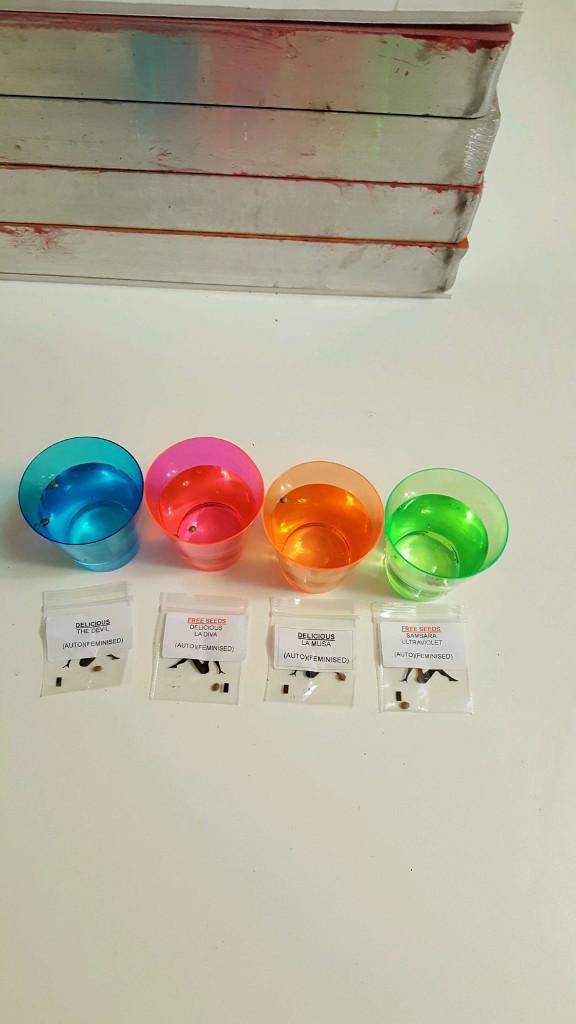
I went ahead and germinated some more seeds from that same order to determine if something may have happened. Eight total, two each of Delicious The Devil, Delicious La Diva, Delicious La Musa, and Samsara Ultraviolet. I haven't decided what I'm going to do with them. That all depends on how those Lowryder seeds turn our. I will probably just germinate them in peat pucks until roots are showing on the bottom, then decide where to put them. The big cabinet will be done soon, I was debating running a round of autos in there.
doams
Member
lol luke looks too much devastated at the end.


Latest posts
-

-

-

-
-
 Diary Seeds mafia-critical jack & gorilla cake- too late ⏰ for comp, diary instead.
- Latest: tobedetermined
Latest posts
-
-
-
-
-
Diary Seeds mafia-critical jack & gorilla cake- too late ⏰ for comp, diary instead.
- Latest: tobedetermined
