What's new
  • Happy Birthday ICMag! Been 20 years since Gypsy Nirvana created the forum! We are celebrating with a 4/20 Giveaway and by launching a new Patreon tier called "420club". You can read more here.
  • Important notice: ICMag's T.O.U. has been updated. Please review it here. For your convenience, it is also available in the main forum menu, under 'Quick Links"!

Kit Kat's OG Kush Round 2, the Perpetual vScrog

Kit Kat

Member
Hi y'all! After my last grow I tore everything down and moved thinking I had a good handle on the mistakes from last time and was going to replicate everything I did previously, only without the fuckups.

Unfortunately I had to get this place sight unseen (rental market here is bloody crazy) and didn't realize the basements were only 6' 4". Not able to get the tents set up so things'll hafta be a bit different this time. Pretty disappointing because I love the security of knowing I can tear down and leave no trace but an empty room when using tents.

The space this time around is going to be 9.5' x 9.5' and I plan on doing a perpetual style vscrog using Ichabod Crane's screen design. Screens are 24" x 36". The rest of the room is roughly 5x8 with a closet as well, this will be a working and storage area.

The ladies are the same old school OG Kush cut and the first round is going to be the few cuts I left with that stayed in a paper bag for almost a week, thrown under whatever light I could find while I was moving in, bushed out then chopped to bits for cuts and finally stripped and splayed open on a screen. Poor gals. They've been through some shit, I tell ya hwhat.

Same nutrient line as last time, full House & Garden fed via blumats - until I run out, at which point I'll swap over to Jack's. EC will be maintained in the feed res between 1.2 - 1.5 EC and no higher. Ladies'll be flowered in 2 gallon Air Pots with Canna Coco.

There will be 4 plants per 600w, with possibly 4 of these set ups filling the room eventually (perhaps 3, depending on how easy it is to move around in there). Each 4 plant set up will have its own blumat feed line ring with a T hooking up to a quick disconnect (once they arrive) - since this is going to be perpetual, I want to be able to easily unhook a 4 set loop and connect a straight water res for the flush period.

The worry I have so far with this is 24" x 36" screens with 4 of them gives me 24sqft of canopy, with one 600w bulb, clocking in at 25w/sqft. Should I stack another bulb in there to bring it up to 50w/sqft? Does it matter? Regardless for the first set it'll just be the one bulb, want to keep things easy while I get used to the new place.

Hope that covers everything, on with some pics!

Transplanted on 5/1, and this is what the rootball in a 1g Air Pot looked like three weeks later.


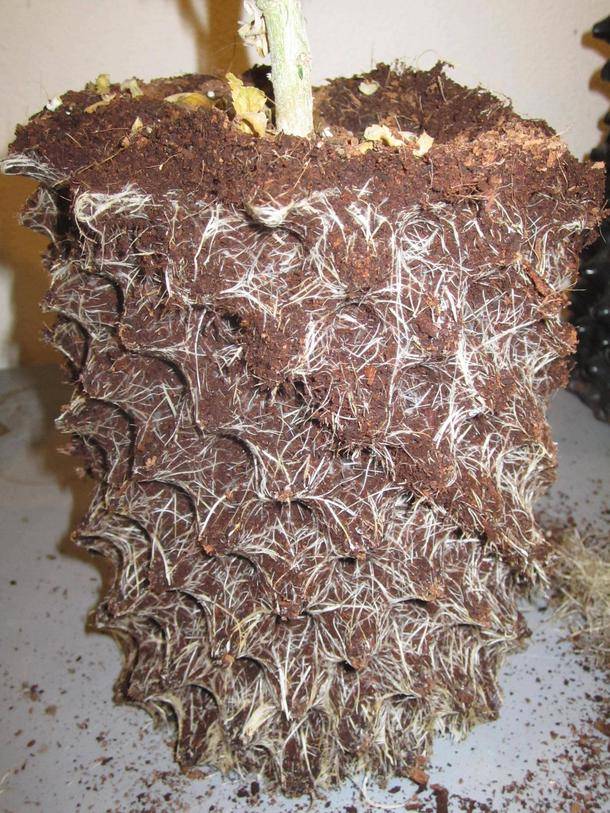
Since they were a bit tall for a 2 gallon Air Pot I had to saw off the bottom 1.5" of the rootball to get them to fit. They were dusted all around with Mykos. Pretty pissed off at this point, hah.


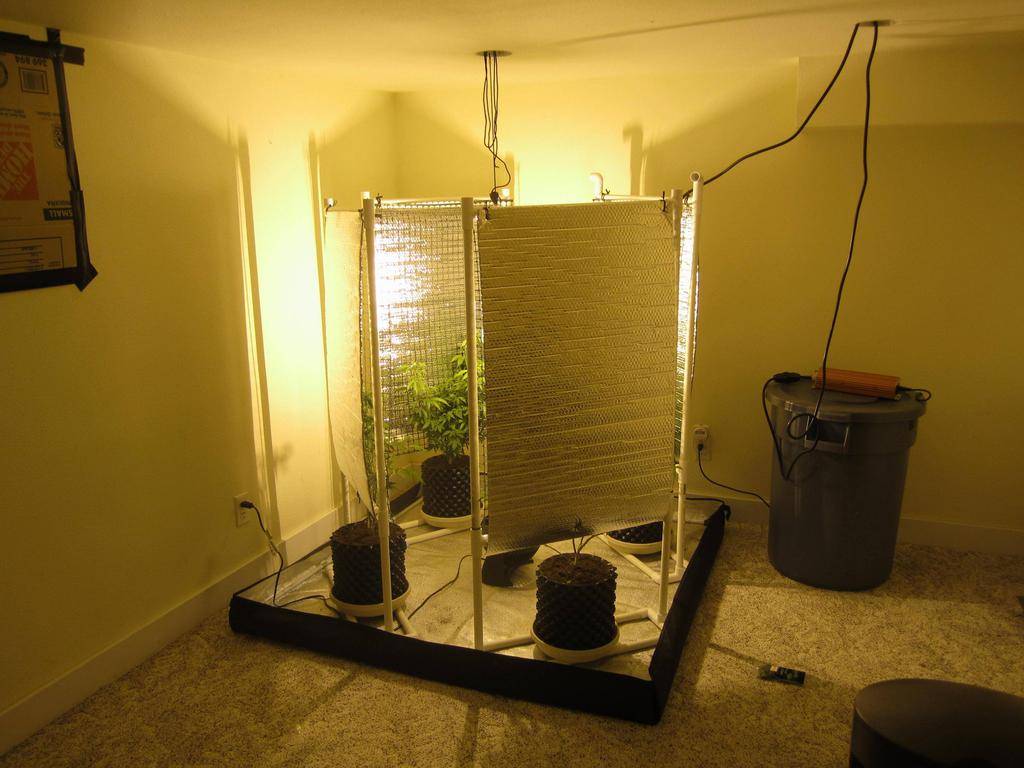
4 days later, the screens were set up. Ichabod's instructions were fantastic, and the cost with everything came out to about $18 per screen after picking everything up from Home Depot. I went with plastic garden screen since all that was available for the suggested metal fencing was 100' rolls and I just didn't want to deal with that. Once I add the PVC supports on the corners I'll hang reflectix here as well to bounce the light back in from the gaps.


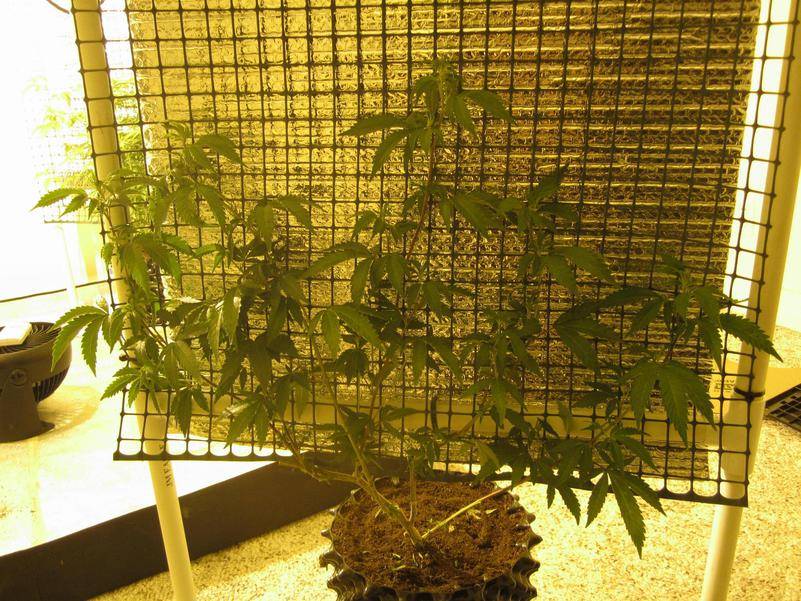
This lady was chopped back pretty heavily and tied down - never really done a screen before, but I hope this looks alright.


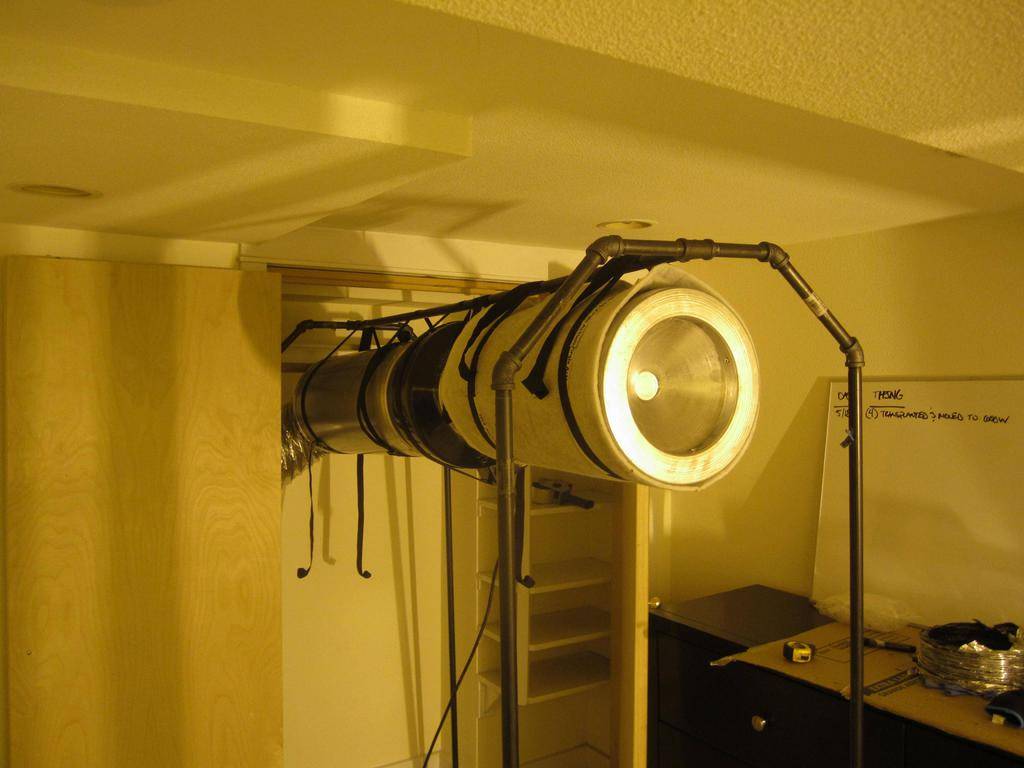
Mounting the fan against the ceiling would leave holes I don't much want to patch/explain in case of a tear down and would make the house hum anyways, so I took a page from sunnydog's book and built a frame from 1/2" pipe. Sucker is strong, I did a half dozen pullups from it no problem and it's big enough to upgrade to a larger fan/scrubber/muffler combo down the road.


Next up is moving the plants out and laying down a 10x10 piece of pond liner to act as an overflow catch. Lights are being hung with hooks from the recessed light mounts that were already in place, I just removed the bulbs and housings.

Not sure what I should do about the ballasts yet, those I might just have to mount on a plywood board but at least the impact to the wall will be minimal.

Thanks for dropping in!
 
D

DHF

Fortune favors the prepared mind....Nice to see folks doin their homework and research beforehand........

Respect.....and.....welcome....

Peace....DHF.....:ying:......
 

FlowerFarmer

Well-known member
Veteran
Nice and clean. I like it.
Really like your support for your fan/filter combo.


Your muffler however will be more effective at quieting the fan if placed between the filter and fan. I imagine you're still getting a bit of noise at the filter...

Filter > Muffler > Fan > Out.

Using the muffler in front of the fan kills the noise at the filter.. and using insulated ducting after the fan usually eliminates that wooshing noise.

Or.. really both would be the best way to ensure the most quiet operation.

Filter > Muffler > Fan > Muffler > Out
At least that has been my experience.


I actually put my 6in muffler directly onto the top of the Can Filter 66 (no flanges on either) and tape the seam with HVAC tape. The other side of my muffler has 1 6" flange to attach my fan. Using a vortex 6" with muffler on a Can 66 like this I get nearly zero noise out of it. Quieter then a normal oscillating fan.
 

Kit Kat

Member
DHF, thanks! My first couple were no where near as prepared, third time is the charm though, right?

FlowerFarmer, I'm definitely getting noise out of the filter. Never thought about reversing the order, I just looked at the sticker and saw <--- duct fan ---> and rolled with it. Anything that cuts my sound down more I'll go with.

In your experience would insulated ducting do a good job on the wooshing sound? Right now I'm hearing the fan/filter (faintly) through the floor at night when it's quiet, and when I'm anywhere near the basement I hear the wooshing noise from the exhaust and I'd like to eliminate that. If a second muffler will do the job best I'll go that route, but would like to keep costs down until this gets going.
 

Arminius

"I'm not a pezzamist, I am an optometrist"
Veteran
Looking good so far. I am not so sure you should get hung up on the 50w per sf. Vert has to be looked at differently in my opinion.
I do similar screens, 4 per light. Depending on the strain, I will stack lights, but I do have a room that I only do singles for fast flowering, minimal stretching strains like the OG Kush x UK Cheese, and a couple others. For my stretchy Sativas I go with stacks.
If you are filling your screens, you should end up with four 3x4 canopies that are not losing light in a reflector. No point in stacking lights if your finished plant size is 36".
Perfectly dialed you should have 48 sf of canopy in a 16 sf footprint per light. In my rooms, 16 sf per light is the norm. As an example I just loaded a room with 16 plants and 4 lights.
ImageUploadedByTapatalk1369333616.225716.jpg
ImageUploadedByTapatalk1369333661.755815.jpg
And for my taller plants.
ImageUploadedByTapatalk1369333723.671784.jpg
Best of luck!
 

Kit Kat

Member
Thank you for the wattage per square foot answer, I suspected with vert it didn't matter as much.

Your room is phenomenal looking - I love the efficient use of space. Definitely going to be reading your massive thread through to the end, I've never seen such a compact set up. With the space I have I could do something very similar if I grew out enough suitable cuts at once.

How difficult is it to move around in there once things get going?
 

Arminius

"I'm not a pezzamist, I am an optometrist"
Veteran
That is my tightest room by far, but it is totally manageable. The room dimensions are only 7.5' x 7.5', and the room next to it is 11 x 7.5 which gives me a little more work space. When I need to get in to top dress, or train, all I need to do is remove the two closest to the door, and I can get all the way to the back plants.
 

Kit Kat

Member
Alien Dawg, thanks man! Glad to have you kickin' it around the thread.

g0g0g0, honored your 4th post and first outside your thread is in here. =)

FlowerFarmer, I can't thank you enough. Swapping my muffler location seriously cut down on the obvious heavy fan/air noises. The fan itself and the air wooshing through the duct are still loud, but when I'm at the top of the steps it sounds like the furnace is on and not something obviously moving a metric fuck ton of air. Next up is swapping the crap duct run out with insulated and seeing what that does.

Edit: Whoa, it's actually so quiet now that the noises I'm hearing are the whine from the 4" fan exhausting my veg tent. Holy shit. I unplugged the 4" and with the door shut it's pretty damn quiet.


Spent a bit of time after work and stuck the pond liner in place, it's a little uneven, but unfortunately is the floor and the squaring of the walls itself. The more I poke around this house the more I realize whoever did most've the work was very much of the "Fuck it, looks good enough" school of thought.


Ladies are bushing out nicely now, they've been on the screens for about two days or so and I've already had to start bending tops down. The VPD symptoms are subsiding, and since I didn't do a 2.0EC precharge of my coco it took awhile for that to settle down as well. Hand watered them all with the remainder of the calmag boosted water, after this no more calmag.


And here's the next round - also suffering a little (so bloody light green here) because of the lack of precharge, but I can take it easy on these and give them a bit of time.


Next up (probably tomorrow) is building a 30" stand for the 32g trashcan that'll be my blumat res and running the line to the first light. Once the blumats are installed I'm going to flip, last time I did so at about 12-14" and got plants 36-40" tall when stretch finished without screens.

Does anyone know of a replacement for that shitty black blumat feed line tubing that's flexible? I seriously hate working with it and would love anything else that isn't such a pain in the ass.

Edit: Found this post by Señor Chang about a flexible silicone hose in the blumat thread, gonna start the order process and stick with the crap black line for the first go through.

Here's the post prior:

I wanted to check in and report my findings to the blumat group.
I'd been curious about silicone rubber tubing for the feed lines and not just the drip lines.
I located a vendor and have purchased their .224 ID silicone flexible tubing.
It fits all of the blumat parts and works like a champ.
It is infinately better than working with the black 8mm feed lines.
If you have been contemplating a change, I can heartily recommend flexible silicone tubing.
 

Kit Kat

Member
Weekend got away from me unfortunately, so today is the first day of flower - they're in the dark cycle now, between 7am and 7pm. The screens were almost halfway full by the time I got around to this so I'm hoping they don't get too out of hand.

I'm pretty pleased with the temperatures down in the basement, it sits at 76 with lights on and 70 lights off with rH swinging between 50-60%. I know this needs to be brought up higher, so the next project will be building a humidifer, probably using bobbleheads design from his now closed thread.

Unfortunately I'm still hand watering, when I went through the blumat box all of my 8mm black line had been chopped up into pieces for the various tent set ups I had previously, with none long enough for the room as it is now. Put an order in for the .224 ID silicone hose above to replace it, and I'll set the blumats up once that arrives.

Post a few pics once the lights come back on and y'all can tell me if I'm screwed or not. :)
 

Kit Kat

Member
Day 1 Flower

Day 1 Flower

Alrighty, here's day one of flower! Think I'm going to start dumping some water on the liner to get the rH up until I can build a humidifier, they're looking a little pissed that way. Believe this is a bit overvegged too, they got an extra five days I wasn't planning on.

Some single lady shots


Opened it all up


Closed back up
 

Arminius

"I'm not a pezzamist, I am an optometrist"
Veteran
What are the height on those screens?
I have my tallest plants yet in my closet. The tallest is 4" above the screen. Stretch is just about over though. Looks like I found the optimal veg height after running the USD four times now.
ImageUploadedByTapatalk1369813162.705689.jpg
What I plan on doing is adjusting the bulbs to focus on the top portion, and strip the lowers gradually. I am getting a pretty good feel for what stays and goes by now.
Sorry for clogging your thread, but the grow style is very similar :)
 

Kit Kat

Member
What are the height on those screens?
I have my tallest plants yet in my closet. The tallest is 4" above the screen. Stretch is just about over though. Looks like I found the optimal veg height after running the USD four times now.

These screens are 36" tall and 24" wide. I suspect they'll be poking up above the top as well.

What I plan on doing is adjusting the bulbs to focus on the top portion, and strip the lowers gradually. I am getting a pretty good feel for what stays and goes by now.
Sorry for clogging your thread, but the grow style is very similar :)

Good idea! If they shoot up too high past the screen I'll do the same. And no worries, I appreciate you dropping in - definitely helps, especially since I've never done this before.
 

Kit Kat

Member
Start of week 2

Start of week 2

First up! Some plant pics. This last week was largely hand watering about a gallon a day and trying to fight a calcium def/lock out.

At first my humidity was around 45% on the low end with temps at 75-78 and because of leaf curl I assumed it was an issue with VPD and set about trying to raise the humidity. Splashed some water on the liner and stuck a fan blowing over it, that helped a little and pushed it up to around 52% on the low end.

Tried to go to home depot to find a whole room or whole house dehumidifier and didn't have any luck - since I couldn't impulse purchase something I ended up going with a 3g bucket filled with wet vermiculite and my fan stuck down in it. That brought things up to 60-63% with temps around 74-76. Not perfect, but a lot better.


Unfortunately the calcium issue persisted so last hand water before I installed the blumats they got about 2.5ml/gal of calmag and I went to pick up some epsom salt. Thinking about using 1/2 tsp/gal before A&B from here on out since H&G is supposed to have plenty of Ca in it already. Thoughts?
 

Kit Kat

Member
Blumat set up

Blumat set up

So this post by Señor Chang talked about some .224 ID silicone hose that made a good alternative to the stiff black 8mm tubing the patio kit comes with. I seriously hate working with that shit and didn't have enough anyways, so I ordered a 100' roll for $75 with shipping from Mocap.

Took about a week to arrive, and I already love it. Way easier to work with. It's like a larger version of the 3mm line. Haven't had a quicker blumat set up yet.

32g trashcan with an on/off valve right at the base


Runs along the bottom of the door with RG6 cable holders, fits perfect and doesn't pinch the line - it can still be pulled through if needed.


Each 4 set will have its own on/off valve so it can be easily hooked up to a straight water res for the last two weeks.


Extra 3mm along with the flexibility of the red hose will make moving plants around if needed very easy and no pinching.


Once all the runs were run I left the blumats completely open and filled the res up with about 4g of water - and waited until all of the 3mm hoses were steadily pouring water out. Let the res drain itself mostly down before dialing back so there was just a cling hanging off the end. Going to fill it up with about 30g and aiming for 1.2 EC with Epsom, A & B, Pro-Tekt - then add in Roots, Multi Zen, and Drip Clean at a pH of 5.8.
 

DamnUglyDogE

Learning the rules well,so as to break them effect
ICMag Donor
Veteran
Nice spread into the screen.. Walls of funky green well on their way. .
Looking awesome.. Upgrades to the system ~~ Always a good thang..

Keep doing ya magic . ..

Good show, bro..
 

Latest posts

Latest posts

Top