Bullfrog; That is exactly what I've done.

-
Happy Birthday ICMag! Been 20 years since Gypsy Nirvana created the forum! We are celebrating with a 4/20 Giveaway and by launching a new Patreon tier called "420club". You can read more here.
-
Important notice: ICMag's T.O.U. has been updated. Please review it here. For your convenience, it is also available in the main forum menu, under 'Quick Links"!
You are using an out of date browser. It may not display this or other websites correctly.
You should upgrade or use an alternative browser.
You should upgrade or use an alternative browser.
10 min $10 DIY aerated compost tea ACT brewer
- Thread starter heady blunts
- Start date
Sweet, you should take some pics once you are all done with your design. I would love to check it out.
130$ for 15 gal cone with no stand and shipping included.
80$ for Commercial Ecco 5 at my grow store, they have fantastic prices. (you might be able to get away with the Commercial Ecco 1 or 3 according to MM)
tubing cost maybe 10$ (not 100% sure)
PVC cost maybe 20$ (not sure here either)
Hose clamps $1
PVC glue for trouble fittings, 5$ but I already had a bunch.
The stand I built out of spare lumber from a job I was working on. However it took about 2-3 2x4's to build, so less than 10$ for the stand.
Handful of 2 1/2 inch screws. 3-10$
So about 246$ for the brewer, maybe 20 for the stand max. I am pretty sure this would be on the high side if off at all.
Well, I also have one that is a 5 gal that I use the same air pump for and a similar amount of PVC on. The biggest difference is the bottle is an Alhambra bottle that costs 9 bucks. Easy to make, let me know if you want more details. BTW, it works just as good as the 15 gal for way less money. I just needed something bigger, and still do.
130$ for 15 gal cone with no stand and shipping included.
80$ for Commercial Ecco 5 at my grow store, they have fantastic prices. (you might be able to get away with the Commercial Ecco 1 or 3 according to MM)
tubing cost maybe 10$ (not 100% sure)
PVC cost maybe 20$ (not sure here either)
Hose clamps $1
PVC glue for trouble fittings, 5$ but I already had a bunch.
The stand I built out of spare lumber from a job I was working on. However it took about 2-3 2x4's to build, so less than 10$ for the stand.
Handful of 2 1/2 inch screws. 3-10$
So about 246$ for the brewer, maybe 20 for the stand max. I am pretty sure this would be on the high side if off at all.
It sure adds up doesn't it? It is very tough putting together a decent brewer cheap and then trying to make some income. Everybody always says it is just a bunch of pipe, tubing, fittings and a pump. Why is it so expensive? I say you run around and find all those fittings then and put it together yourself.
$130 for the cone. Why not look at thermoforming a cone of your design? Have a small shop do this, I mean. Very low tech and perfect for lower production runs. I bet you could get production costs to $20.
Tell me where. I'll do it. Most molds etc cost thousands.
That's high tech injection molding. I'm talking about much older tech. Vacuum thermoforming. The process generally involves a negative of the part with holes strategically placed. Picture an orange construction cone as your negative. This may be a foam part, wood, fiberglass, etc. A simple vacuum is attached to this negative part so that air is sucked into the part.
A thin semi rigid plastic sheet of polyethylene or propylene is suspended overhead and heated with hot blowers. When the material is soft enough to form ( a few seconds) it is lowered over the negative plugs. The vacuum pulls the hot plastic tight to the mold.
In a few seconds the part is cool, the vacuum is turned off and the part removed and trim cut.
This assumes the part shape is of at least a slightly tapered nature and can simply be pulled off the mold.
rrog can you do that with food grade plastics?
I have listed a bunch of local thermoforming shops and will be calling them this week. It is hard to compete with a $10 bucket.
Okay, I ran a 36 hour brew with my prototype [ 8 gallon; 1 inch PVC airlift with return through sidewall with bulkhead using ECO com 1 pump @ 1.5 CFM and diffuser chamber] and was not overly happy with results. The DO2 is at 6.1 ppm and there are around 1000 bacteria per 200X field of view (FOV) but very few flagellates. There are fungal hyphae about every ten fields of view and there are a few ciliates whizzing around. There are lots of testate amoebae but they are just directly extracted from the vermicompost and do not typically multiply in tea. This compared to my usual design in a 5 gallon and 1.25" pipe with the Hailea 2 CFM and in a 50 gallon and 1.25" pipe using the ECO 5 @ 3.8 CFM producing major dense ACT just around 12 to 14 hours (eg. fungal hyphae about every FOV, 10,000+ bac and around 4 avg. flagellates/FOV) NOTE: this is with my high density vermicompost.
My regular design involves no exit holes from the vessel. The airlift device is simply submerged into the container. For the 50 gallon model I use a supplementary 1.25" X 16" diffuser across the bottom of the container.
I'm going to run a little brew off here with the (1) design I just described against my
(2)typical design in 8 gallons using 1" pipe and my (3) typical design in 8 gallons using 1.25" pipe and (4) my typical design in 5 gallons using 1.25" pipe. After that I'll run a comparison of 1" exiting out the bottom of the 8 gallons and the typical design in 5 gallons using 1" pipe.
Unfortunately I only have one ECO 1 so I'll have to use the Haileas.
It sure adds up doesn't it? It is very tough putting together a decent brewer cheap and then trying to make some income. Everybody always says it is just a bunch of pipe, tubing, fittings and a pump. Why is it so expensive? I say you run around and find all those fittings then and put it together yourself.
It certainly does add up. However I had the benefit of leaching off your knowledge also. If I had to add up all the hours you put into matching pumps to bottle size it would be more understandable why people charge so much. Then like you said putting together the pvc and running from store to store trying to find the connectors you need. All a big PITA. However, I love my brewer and the 250 or so I spent was honestly one of the best purchases I have ever made. I will soon get my scope, (big set backs there) and make sure I am doing everything correctly.
I do think it is somewhat a joke what vortex is putting out. How long does it take to clean the 15 gal unit they have with all those hoses running everywhere? Plus how many air pumps? Also, almost $1,700? Seems like it isn't worth it to me. http://www.progressivegardens.com/urban-farming/vortex-brewer-15-gallon.html
J
jerry111165
Hey Scrap,
Pictures would be better fo sho.
Anyway, if I'm following your description right it sound like the problem may be that your lift is not vertical. If your teeing off from the bottom of the tank you must be running part of the lift at an angle less than straight up, won't work, bubbles rise to the upper side of angled pipe and passes all the water.
The lift needs to rise straight up so the water will get trapped on top of bubbles and be pushed straight up.
I fabbed mine like this.
Air diffuser runs on it's own pump. Cut slots in the bottom of the octogon with the thinnest Dremel cutting wheel. Delivers air to the perimeter at the bottom.
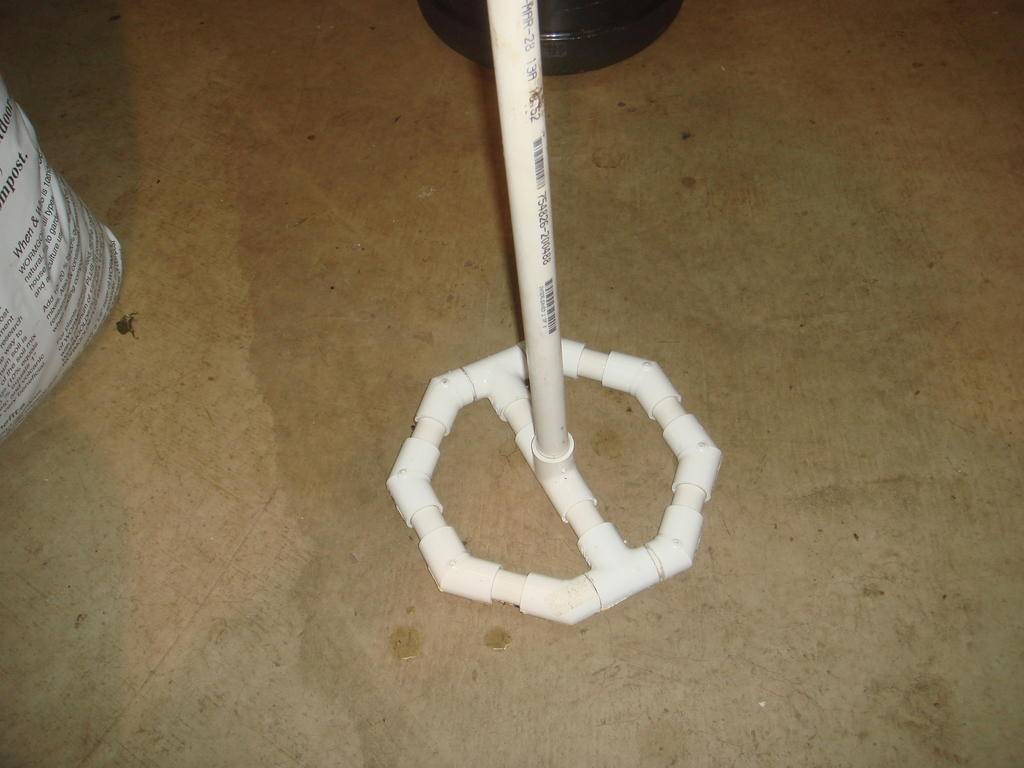
Then I fashioned this manifold for the bottom of the lift. Four 1/8" elbows delivering air and cutouts to allow water above the air outlets
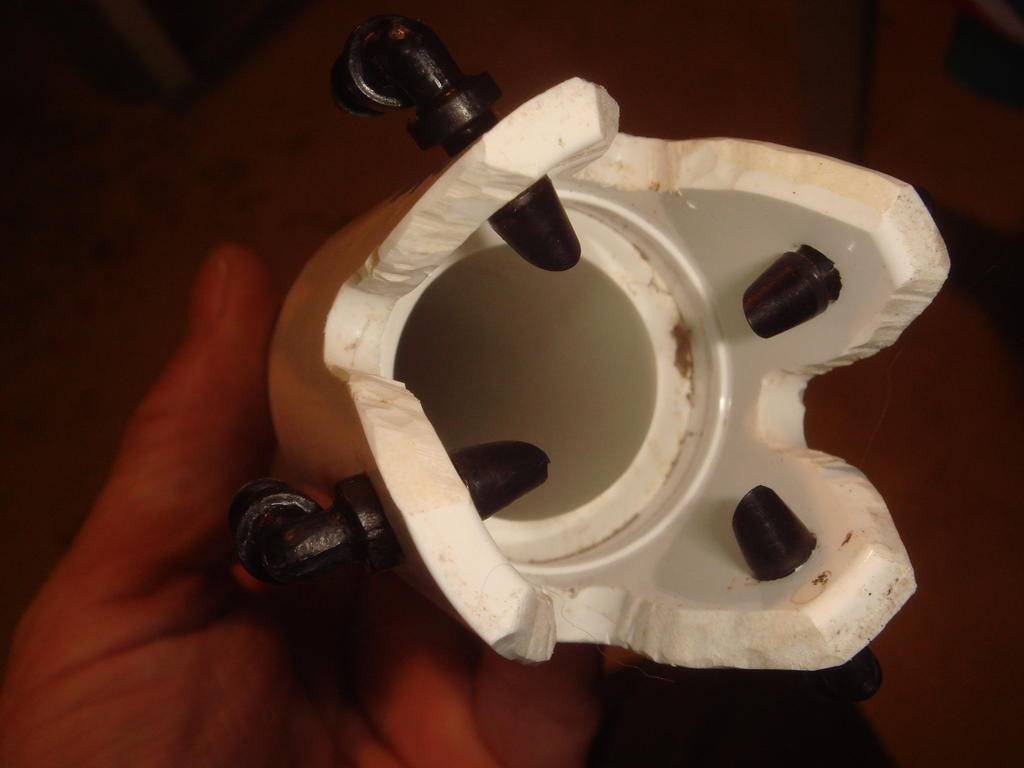
It lifts more than 1.5 gpm of water from the bottom of the bucket!
Respect,
I am in the process of building a 15 gallon cone bottom brewer myself. Thank you for the pictures! I think that I am going to try this design. I am going to use the Alita AL-60 air pump - approximately (maybe just under) 70 lpm. This pump should be more than sufficient for the 15 gallon setup? Was $200.00 just for the air pump. Seems like a very well made pump.
Anyhow, your pictures show just how easy it is to build an air-lift design and I thank you for that! I'm new to the whole air lift design - have been using the 'ol 5 gallon bucket and simple fishtank pump w/ an airstone forever. In everybodys opinion, the air lift is the way to go, correct? Much better than the simple pump and diffuser sitting on the bottom of the cone shape tank?
jerry.
J
jerry111165
Still a work in progress, but I'm getting closer.
I'm using an eco air 3 commercial pump. It is rated at 65 liters per minute, I would not go any smaller for an air lift design as it is barely enough to force the tea up and over.
But just the pump and diffuser in the tank without the air lift return up riser agitates better than the air lift, but i have no way to measure dissolved O2 difference each way.
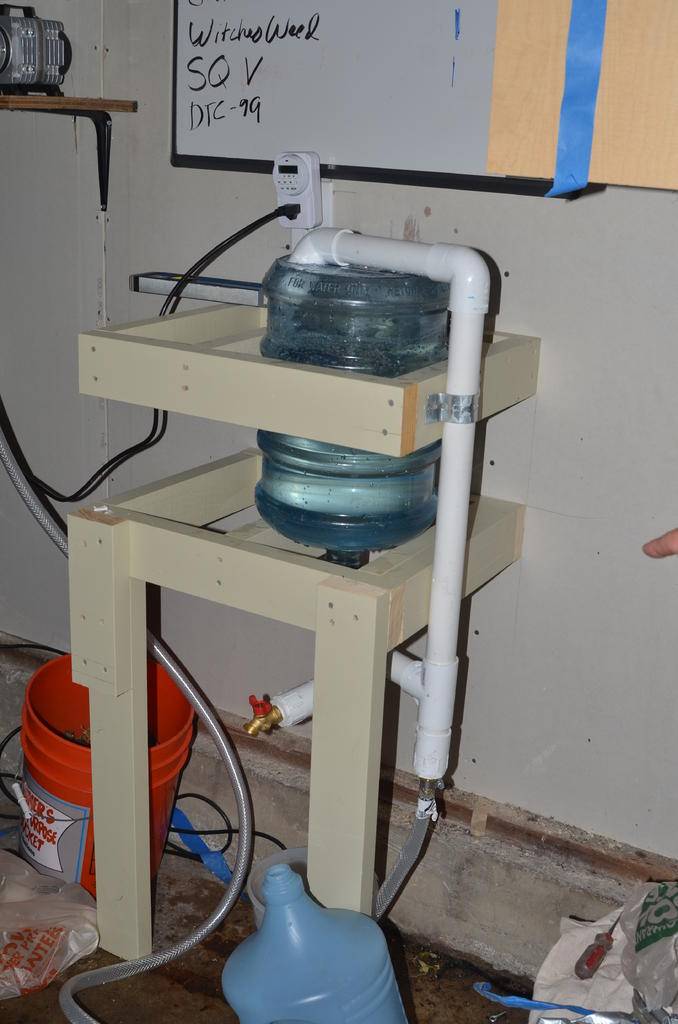
The tank came with threaded nuts embedded on one side of the tank, so I screwed the tank to the plywood, then U bolted the plywood to the cart.
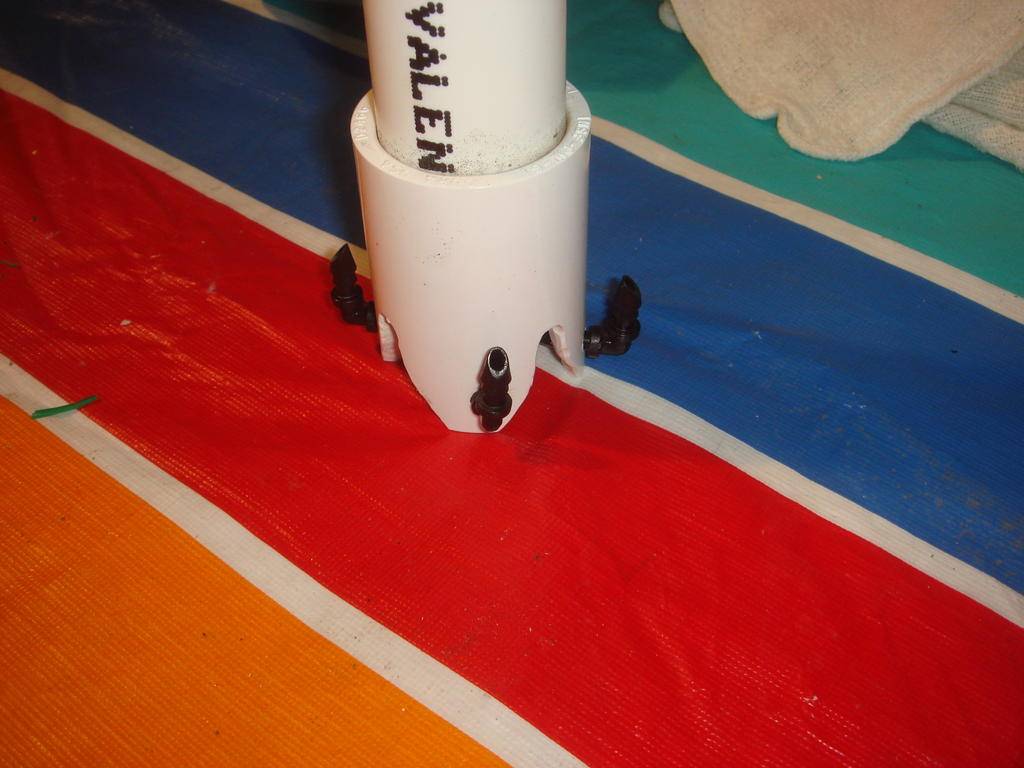
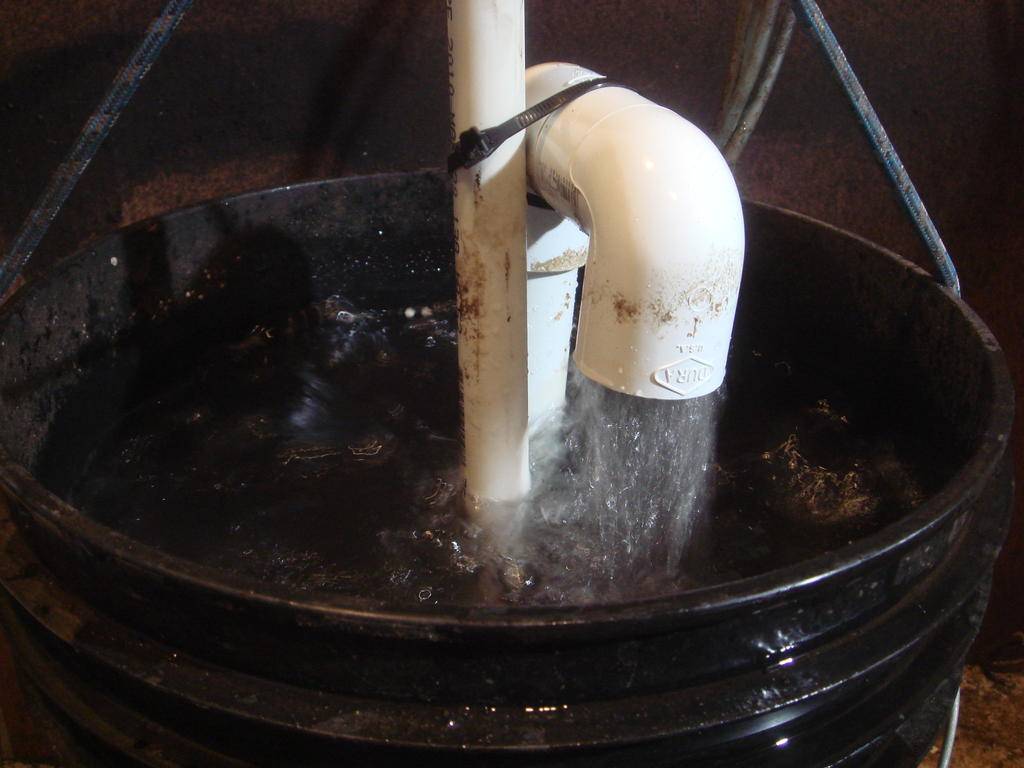
The bottom pic shows the homemade diffuser. It is simply a piece of pvc that has been plugged and jammed into the female end of the barbed fitting, and is inside of the return up-riser. It has tiny holes drilled on an angle to force the air up......scrappy


Diffuser:

Scrappy, now that you have been using this setup for awhile, are you happy with your design, or would you change anything? This is also a super brewer setup - love it!
I think that you had mentioned, but what air pump are you using and how many lpm does it push out? (sorry - just noticed the 65 lpm) is that sufficient for you?
jerry.
Last edited:
J
jerry111165
Thanks Heady blunts, as you can see, I borrowed from other posters previous designs and MM's web page. Thanks to all.
Actually it does run with only two gallons of tea in it, although that would close to the minimum, at one gallon the return line drips and spits a little, two gallons maintains a flow, and the flow increases as the volume goes up. I only tested up to 5 gallons because my outside water is still not hooked up yet because we still are getting below freezing temps in my neck of the woods. So 5 gallons is all I hauled for this test. I ran it 24 hours with two gallons of tea, it did foam up nice, but I doubt the tea was very biologically active due to our low temps. I poured it on my compost pile. I did have some build up of mud on the bottom of the tank. The "cone" is more like a pyramid and has a flat spot on the bottom, so that gets a little build up, but I doubt it is enough to worry about. When set up as an air dump, there is not much agitation, when it is run as a bubbler style, it agitates real well. I wish I had a meter to check the dissolved O2 each way......scrappy
Edit although it's tuff to see in my pics the upriser is reduced from 11/4 to 1 inch. This helped get better flow.
Size of the vertical riser tube is making a difference then?
So - 1" then vs. a 4" vertical pvc pipe? (just making a point) - at that point, would a 3/4" be even better?
Just trying to get all this straight in my head!
thanks!
jerry.

Latest posts
-
-

-
Osmocote, my favorite plant food - easy peasy, complete
- Latest: Hiddenjems
-

Latest posts
-
-
-
Osmocote, my favorite plant food - easy peasy, complete
- Latest: Hiddenjems
-
