What's new
  • Happy Birthday ICMag! Been 20 years since Gypsy Nirvana created the forum! We are celebrating with a 4/20 Giveaway and by launching a new Patreon tier called "420club". You can read more here.
  • Important notice: ICMag's T.O.U. has been updated. Please review it here. For your convenience, it is also available in the main forum menu, under 'Quick Links"!

Killer A5 Haze goes micro

OZZ_

Well-known member
Veteran
Hello beautiful people!

Hope your all staying safe in these crazy times of quarantines.

Title says it all, for better or worse Im gonna try to roll with the Killer A5 Haze in my micro cab after having decent success with ACEs panama in a micro environment I thought I’d bite the bullet and up the anti. My panama thread can be seen here:

https://www.icmag.com/ic/showthread.php?t=365961


As for my micro cab, here’s the deets:

Flower cabinet:

23” L x 16” D x 35” H with 30” of usable vertical height (not much when considering the strain!)

AC infinity 205 cfm DC fan with temp controller and AC infinity scrubber.

Simple Organic soil mix promix hp, homemade worm castings, a generic granular fert (Dr Earths) a bit of kelp and a bit of lime, and during heavy flowering Neptune’s fish/seaweed as needed. 2 gallon self watering pot.

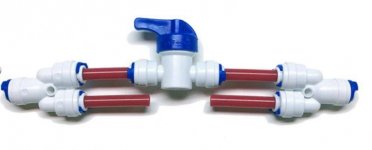
Water is my weak point. Chicago water sucks, and my RO filter took a dump, so I’m left with filtering tap water through a britta pitcher. PH isn’t perfect using this method so I’m going to try to either get another RO unit soon or buy water. It’s not so bad since I’m running just a single plant.

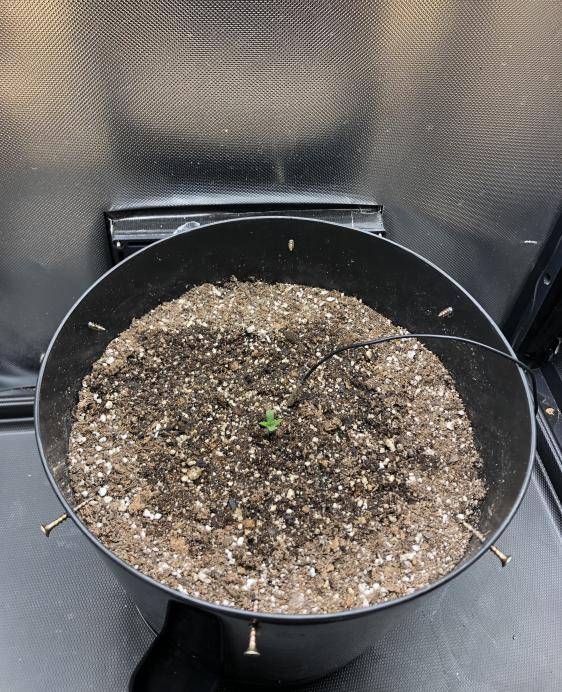
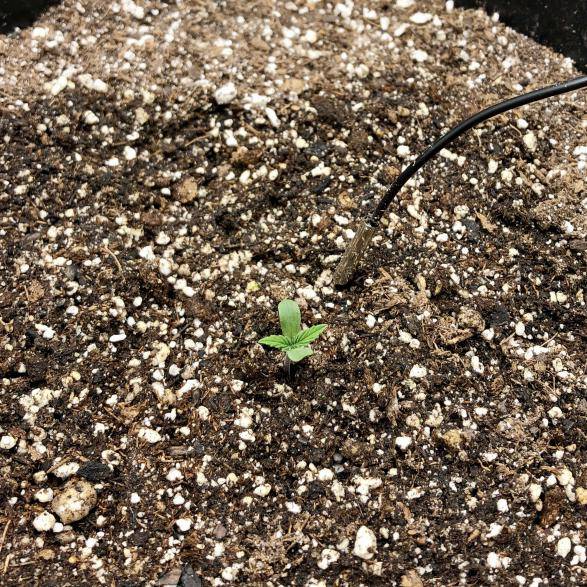
Well, not much to look at for now, but let’s get this thing going and see if I can train this beast into this little space. As of now the little gal looks happy she’s already reaching her little hands up to the sky for the light. She broke ground two days ago on March 27th.

picture.php


picture.php


picture.php
 
Last edited:

dubi

ACE Seeds Breeder
Vendor
Veteran
Hi OZZ :)

Glad to see a new thread about your new grow after your success with Panama in your setup.
I think you will be able to tame the Killer A5 Haze in your little indoor space by following a similar procedure than in previous Panama grow.

Try to get a good source of water as soon as possible. As you know, to have a source of good quality water, and to measure and feed your plants within the correct EC and PH range are crucial points to keep healthy these long flowering sativas and to get the best from them.
 

OZZ_

Well-known member
Veteran
Hi OZZ :)

Glad to see a new thread about your new grow after your success with Panama in your setup.
I think you will be able to tame the Killer A5 Haze in your little indoor space by following a similar procedure than in previous Panama grow.

Try to get a good source of water as soon as possible. As you know, to have a source of good quality water, and to measure and feed your plants within the correct EC and PH range are crucial points to keep healthy these long flowering sativas and to get the best from them.

Hi Dubi-

Thanks for stopping in and dropping some pointers. Getting a new water supply will be my number one priority. What kind of stretch should I expect, would you say more or less than the panama? In my little setup timing the flip to compensate for stretch is crucial. Flip to soon and yield suffers due to lack of veg time, flip to late and I run the risk of her growing into the lights. I nailed it with the panama grow but with the different phenotypes in the Killer A5 timing this one might prove more difficult.

Thank you. :biggrin:
 

repuk

Altruistic Hazeist
Veteran
subbed! :lurk: :tiphat:

Neat setup OZZ_!!

Regarding RO, you can assemble your own for cheap, no need for a 5-6 stage "drinking water" unit (you don't need those extra 2 stages nor a pressurized tank or faucets); I assume your water needs are low; in that case I'd source a simple "passive" (no booster pump) kit, like e.g.

- RO Buddie Check its install video, really easy. Another install video

I see Chicago tap water chemicals is an issue; so to remove them first, I would add an specific two stage chemical filtration before the RO Buddie; this Video can help, but no need to use his complete setup (he needs much more water than you); just check the two stage filtration stage.

-Filter housing Filter Kit and Stainless steel cartridge housings fitter. (These will go before RO Buddie tap water intake)

For less than $100 you will have a cheap RO system delivering good quality water.

This method (no pumps boosting tap water pressure) will waste a lot of water, so only ok if your water needs are low.

For better efficiency and if you want to keep everything passive I'd add a Permeate pump instead (Install video).

Finally, you can add an ASO valve (Auto Shut Off valve) to stop RO when your reservoir is full for automatic operation.

- ASO Valve Float Valve Install Video with float valve to make your DIY reservoir.

To finish the system, you could add afterwards this fitting on the brine out from the membrane:

attachment.php


This will allow you to open this valve to manually backflush (clean) your membrane when desired. Fittings cheaply available in amazon too. (operating position should be closed!)

Lemme know if I can help! I could create a diagram on all the connections. Water is our prime matter and the single most important factor when growing. And... we smoke it aftwerwards, so the cleaner the water... the healthier the outcome.
 

Attachments

  • Captura de pantalla 2020-03-30 a las 10.31.46.jpg
    Captura de pantalla 2020-03-30 a las 10.31.46.jpg
    15.5 KB · Views: 41

OZZ_

Well-known member
Veteran
subbed! :lurk: :tiphat:

Neat setup OZZ_!!

Regarding RO, you can assemble your own for cheap, no need for a 5-6 stage "drinking water" unit (you don't need those extra 2 stages nor a pressurized tank or faucets); I assume your water needs are low; in that case I'd source a simple "passive" (no booster pump) kit, like e.g.

- RO Buddie Check its install video, really easy. Another install video

I see Chicago tap water chemicals is an issue; so to remove them first, I would add an specific two stage chemical filtration before the RO Buddie; this Video can help, but no need to use his complete setup (he needs much more water than you); just check the two stage filtration stage.

-Filter housing Filter Kit and Stainless steel cartridge housings fitter. (These will go before RO Buddie tap water intake)

For less than $100 you will have a cheap RO system delivering good quality water.

This method (no pumps boosting tap water pressure) will waste a lot of water, so only ok if your water needs are low.

For better efficiency and if you want to keep everything passive I'd add a Permeate pump instead (Install video).

Finally, you can add an ASO valve (Auto Shut Off valve) to stop RO when your reservoir is full for automatic operation.

- ASO Valve Install Video with float valve to make your DIY reservoir.

To finish the system, you could add afterwards this fitting on the brine out from the membrane:

View Image

This will allow you to open this valve to manually backflush (clean) your membrane when desired. Fittings cheaply available in amazon too. (operating position should be closed!)

Lemme know if I can help! I could create a diagram on all the connections. Water is our prime matter and the single most important factor when growing. And... we smoke it aftwerwards, so the cleaner the water... the healthier the outcome.

Great info repuk and thanks for stopping in! Sure I’d love a diagram if you have time, we wouldn’t mind using it for our drinking water too as we are only using a britta pitcher for that also BUT we are in a condo so we can not install a canister type to the sink, instead I have / had the old one connected to the cold water output of our washing machine. I used a garden hose “Y” adapter with shutoff valves to connect the RO filter to the cold water output. Then when I need water I just turn on the valve and let it rip. Doing it this way I drain the waste water into our washing machine and use it for doing laundry so it still gets used.

Yes, I’d be very interested in seeing exactly what units you recommend! I have cal/mag and was supplementing 5 ml / gal of RO water to add some minerals. Seemed to be working well before it took a dump on me and started tasting horrible within only three or four months! It was a cheap o unit so I tossed it. Not sure why it only lasted such a short time but replacement filters were just as much as the unit almost so I decided just to toss it and get another unit when I had time, and the time is now lol.

I won’t be needing automatic operation so I’ll just keep it as a manual unit for now. Those links provided are great, as mentioned if you don’t mind throwing me up a diagram I’d love to take a look. :tiphat:
 

repuk

Altruistic Hazeist
Veteran
Diagram

Diagram

This is how I would retrofit RO Buddy with permeate pump, etc:

picture.php


this is conceived to be low maintenance and 100% passive.
 

OZZ_

Well-known member
Veteran
this is how I would retrofit RO Buddy with permeate pump, etc:

View Image

this is conceived to be low maintenance and 100% passive.

Yup That’s pretty much what I had in mind but I won’t be automating it so I won’t be using a pump (or a res) but this gives me an idea of what I need. Thanks!
 

repuk

Altruistic Hazeist
Veteran
you're welcome! The issue w/o pump is the ratio of purified water vs wasted will be horrible... 1:4 if your tap has good pressure, possibly worse.

I'm marveled at the tiny seedling in that "huge" pot... and soil! skills!. I always have issues with seedlings soil watering even on tiny pots (my fault)...
 

OZZ_

Well-known member
Veteran
you're welcome! The issue w/o pump is the ratio of purified water vs wasted will be horrible... 1:4 if your tap has good pressure, possibly worse.

I'm marveled at the tiny seedling in that "huge" pot... and soil! skills!. I always have issues with seedlings soil watering even on tiny pots (my fault)...

Lol thank you. It’s a self watering pot so I simply fill the bottom tray and it whicks water from the bottom up through the soil. While they are this small I also water a bit around the outside from above. Not to much don’t want to run into damping off problems. Which, btw It’s a 2 gallon pot so not huge by any means but I understand what you mean lol.

Usually I follow a regular up potting method when I have more space and can use my large lights and tents. We are moving in October and then I’ll be able to pull out all my equipment from storage and do some “real” grows. For now though, I’m stuck in this small metropolitan condo and my tiny armoir grow so I’m making the best of it!

As for the RO water- waste water is a non-issue. I run the waste water into my washing machine and use it to do laundry, so it doesn’t get wasted at all. :tiphat::dance013:
 

repuk

Altruistic Hazeist
Veteran
You're welcome Old Toker! :tiphat: I have it fresh now, as my first RO System just failed recently and I had to do some research, this way I won't forget either :biggrin:
 

OZZ_

Well-known member
Veteran
You're welcome Old Toker! :tiphat: I have it fresh now, as my first RO System just failed recently and I had to do some research, this way I won't forget either :biggrin:

Just ordered the parts! On its way amazon prime. Ill need some sort of 3/4" to 3/8" water line fittings to go into and out of those dupont housings but Ill look around and see what I can dig up. Really excited to see how this grow goes now with clean water, as I ran into a few issues on my panama grow and Im convinced it was from lockout due to my bad water.
 

repuk

Altruistic Hazeist
Veteran
For me, its has been a before and after. Growing with RO makes a world of difference. Before, nailing PH's was a nightmare, and swings were erratical, as it was my tap water quality. Now I can guess the current EC just by adding my salts to it... when it reaches 5.7-5.8 is on the right spot for me (0.8-0.9). What I mean is: chemistry and predictability is easy with RO water, it takes out all the guesswork from the equation.

Additionally, cannabis absorbs heavy metals... one of the reasons I grow my own is to make sure no pesticides nor heavy metals, so RO for me is a must.

I suspect your municipal water carries a lot of stuff, inspect the 2 first filters each two months and you'll extend membrane life.

On the same amazon page for the housings there are several install pictures by users, and even cool mods fitting pressure gauges to have a glance on each filter "status".
 

OZZ_

Well-known member
Veteran
For me, its has been a before and after. Growing with RO makes a world of difference. Before, nailing PH's was a nightmare, and swings were erratical, as it was my tap water quality. Now I can guess the current EC just by adding my salts to it... when it reaches 5.7-5.8 is on the right spot for me (0.8-0.9). What I mean, is chemistry, and predictability is easy with RO water.

I suspect your municipal water carries a lot of stuff, inspect the 2 first filters each two months and you'll extend membrane life.

On the same amazon page for the housings there are several install pictures by users, and even cool mods fitting pressure gauges to have a glance on each filter "status".

I saw that, I looked through the reviews and all the install pictures. Pretty straightforward and I believe I might even have the adapters I need already. As for the water- it can’t get here soon enough, I’m already seeing slight yellowing on this little seedling that I saw on my adult plants previously, once my RO water took a dump and I started using the britta water. When my RO filter was working all was well and it was smooth sailing. Problem is a tiny seedling can’t handle PH problems as well as a more mature plant can so I need that filter ASAP. It’s definitely the water, pretty obvious at this point. Hopefully it will get here shortly and I can get it up and running before the seedling takes to much damage.
 

OZZ_

Well-known member
Veteran
Until you have the RO System, you could use bottled water...

Yup, that’s what Ive been doing. ;) the Dupont whole house filter housings showed up. I hooked up the first with the paper sediment filter that came with the units, and put a 5 micron carbon filter in the second. The RO system should show up in a day or to. Really excited to not have to deal with water issues on this next grow. :dance013:

She started to really yellow and stall out on me from the water. Now that Ive switched to bottled water she’s greening back up and starting to take off again. Still slightly yellow but she will recover soon. Ive never had so much trouble with water in my life. Makes you wonder what its doing to our bodies! We will be getting our drinking water from the same setup from here on out because if our tap water was killing this little seedling even after being filtered through a britta filter, who knows what it was doing to us!

Week 1 Veg

picture.php
 
Top