
Hello and welcome to the show. This cabinet of mine has been in the works for quite a while. Slowly but surely, it is almost complete. Just little things I'd like to do to clean it up a little more.
The cabinet is a “Closet Maid” bought from a local chain hardware store. Its dimensions are 48”L x 20”W x 72”H
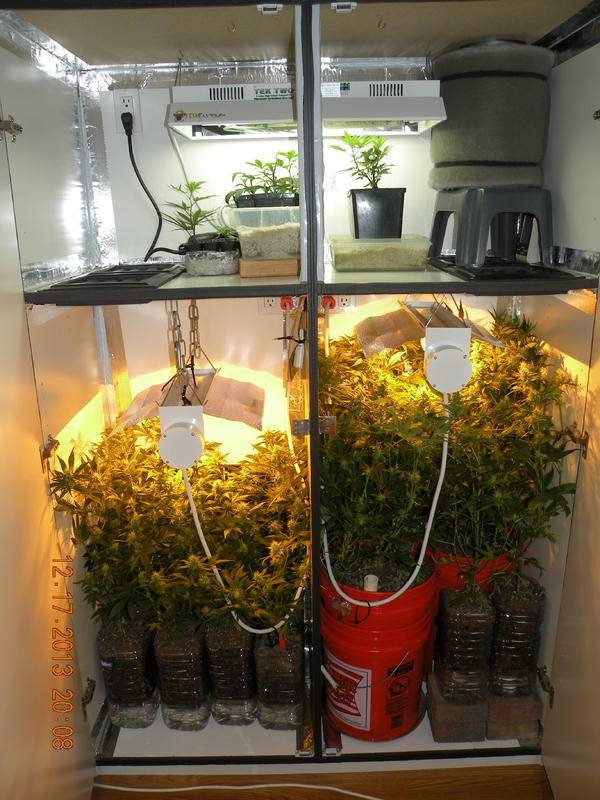
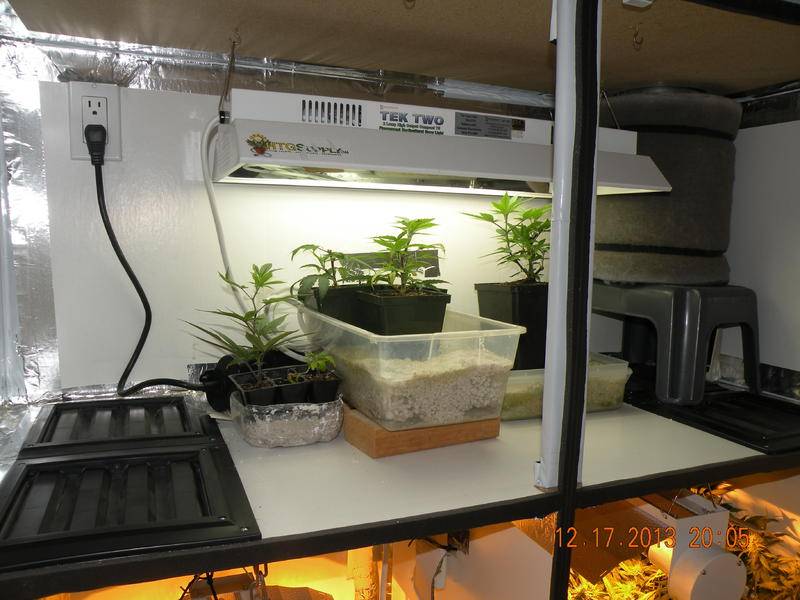
The top part of the cabinet is used as a Mother/Clone Chamber. Its dimensions are 48”L x 20”W x 20”H. It has a 2’ 2 bulb PLL and it had a 2’ 2 bulb T5 (The T5 has been removed to be used on a different project of mine)
The bottom two sections are being used as Flowering Chambers. Their dimensions are 23”L x 20”W x 48”H each
There is a 150w HPS in each side
For ventilation, the cabinet has a 6” Vortex sitting on the top right of the cab with a carbon filter directly under it. The box of the Vortex has been rotated so no decals from the box show and it is sitting over the fan to hide it from view. The Vortex is being slowed down to about 70% with an Autotransformer. There are 2 - 8”x8” Darkroom Louvers as intakes in the back of each chamber about 15” above the floor. There are also 2 – 8”x8” Darkroom Louvers in the top left of the left chamber and top right of the right chamber to vent into the mother chamber and then out the cab by the scrubber/fan.
So far, this setup has been working GREAT! Temps range from 73-78 depending on ambient temps of the room. The setup isn’t silent by any means, but it was easily covered up by moving our small box fan from one part of our room to the top of the cabinet running constantly. The wifey and I like the white noise for when we sleep.
The back has been reinforced with ¾” plywood and all wiring I attached to it. I decided to keep it clean by installing outlets into each chamber and wiring everything up. At first, they glowed like crazy, so since I have a ton of panda film, I took pieces of it and stapled them over each outlet on the back. I caulked everything up and then for extra measures, put a strip of panda film over all the caulked areas. I used fairly large weather stripping for the doors. If I ever have to change it, I’ll go with the next size down.
To keep the doors closed tight, I have a magnet latch at the top and bottom of both doors. I also installed cabinet locks right under the door handles for security purposes. Overall, it works very well.
I have had the wifey lock me in each side of the cabinet with lights on in the top and other side as well as lights on in our bedroom and each flower cab is 100% light proof.
The 2 ballast, timer and autotransformer are sitting next to the box with the fan in it on top of the cab. I placed a box around it all as well to hide them from view. It definitely does its job nicely.
As for plants, since I’m just getting back into growing again, I’ve decided to go with some bag seed. I’ve been using this time to practice cloning, test my mix and seeing what methods work for me.
My cloning method, since very few clones are needed, has been using a shot glass of water. Simple, low maintenance and super effective. I've been taking tons of cuts and experimenting with them in every way possible.
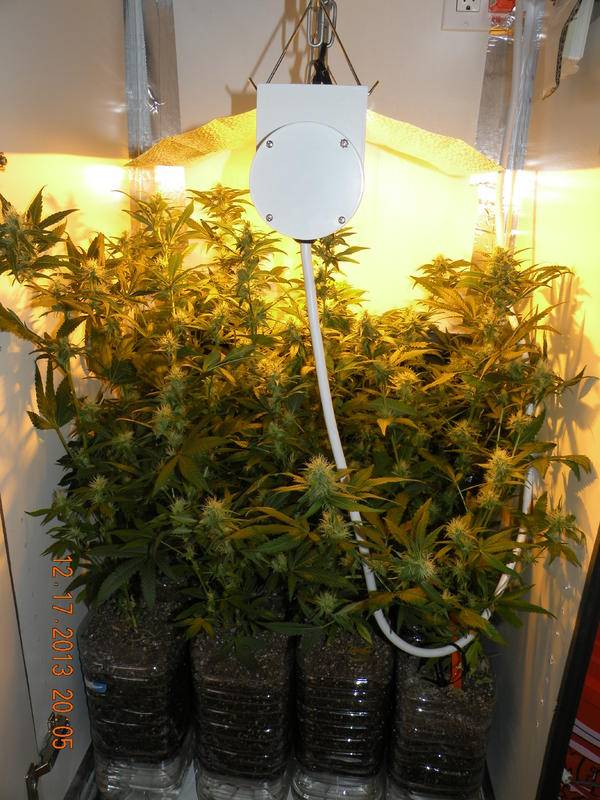
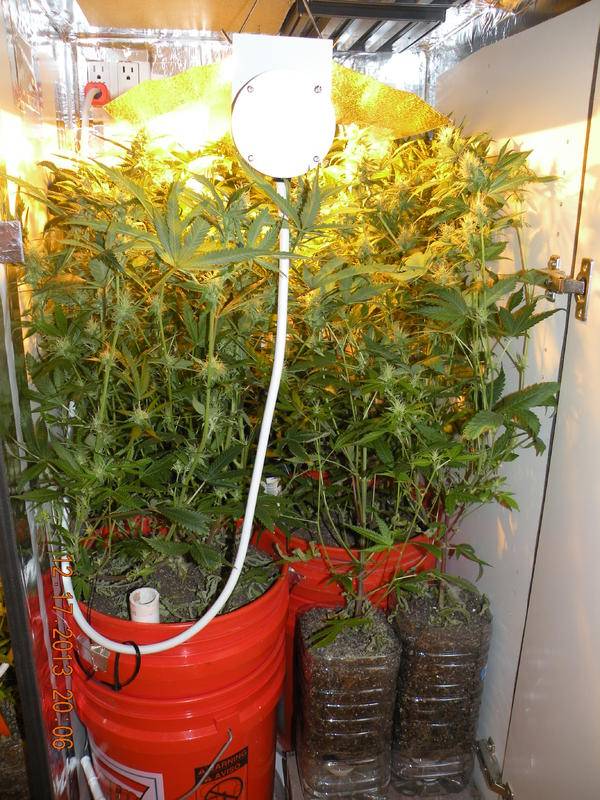
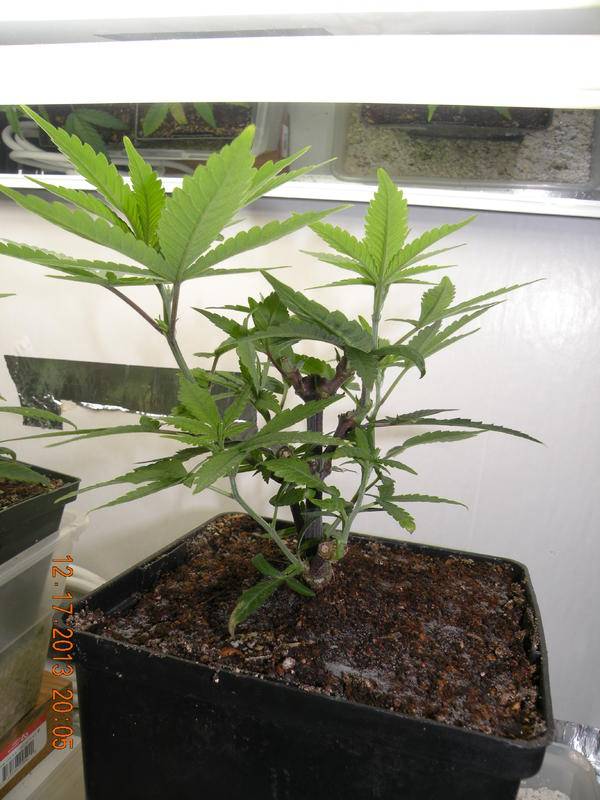
At the moment, I have 2 plants, 67 days into flowering in my tent. All of the plants in this cabinet are cuts from those two plants. I started off with 8 – 3 gallon grow bags, 4 on each side. Having to hand water all of these from day one was a hassle. So after a couple days of that, I had a brilliant idea to make self-irrigated planters out of the stock of 1 gallon water jugs I have. So I made a bunch and planted all the clones that I had gotten to root. I also made 2 – 5 gallon self-irrigated containers as well to see how they do. So far, I love them. I have so much more free time now. All I do is top off the reservoirs of each container and that’s it. Perfectly watered at all times.
I have 12 clones in 1 gallon self-irrigated containers on the left side. The other side I have 4 clones in 1 gallon self-irrigated containers and 2 clones in 5 gallon self-irrigated containers. All of them are at 30 days 12/12. A few of the 1 gals and both of the 5 gals had some veg time while all the rest are 12/12 from rooting.
This is a practice run so I wasn’t too strict about canopy management as you can tell by the jungle I have going on. I mainly wanted to make sure I could keep a mother plant, take clones and get them from start to harvest before getting too serious with everything.
On the next go around, I plan on running a 5 gal in each side and scrogging them. So far, I feel they have been the least maintenance. Some of the 1 gals need to be refilled every day where the 5 gals give me time for other things.
For media, I decided to go the organic route and I have to say, I love it! Got it from a member from the Organic Soil section.
This mix consists of:
1 part Home Made Leaf Mold
1 part Peat
1 part Perlite
1 part Vermiculite
1 part Home Made Worm Castings
1 part Home Made Compost
For each 7.5 Gallons (1 cuft) of mix
I mixed all ingredients for each mix together in equal volume and used
2 Cups of Food Mix:
Blood Meal (wanted to finish the bag but discontinuing its use)
Bone Meal (wanted to finish the bag but discontinuing its use)
Alfalfa Meal
Cotton Seed Meal
1.5 Cups of Fix It Mix:
Crab Meal
Kelp Meal
1 Cup of Mineral Mix:
Green Sand
Azomite
Oyster Shell
Gypsum
Dolomite (wanted to finish the bag but discontinuing its use)
That's all I have for now. I've been watching the 2 plants in my tent closely since they are getting close to harvest time. So far mostly milky with 0 amber. When I get a chance, I'll snap a few pics of them as well.
Let me know what you think. If you have any questions, ask away. Thank you for checking it out.
The cabinet is a “Closet Maid” bought from a local chain hardware store. Its dimensions are 48”L x 20”W x 72”H
The top part of the cabinet is used as a Mother/Clone Chamber. Its dimensions are 48”L x 20”W x 20”H. It has a 2’ 2 bulb PLL and it had a 2’ 2 bulb T5 (The T5 has been removed to be used on a different project of mine)
The bottom two sections are being used as Flowering Chambers. Their dimensions are 23”L x 20”W x 48”H each
There is a 150w HPS in each side
For ventilation, the cabinet has a 6” Vortex sitting on the top right of the cab with a carbon filter directly under it. The box of the Vortex has been rotated so no decals from the box show and it is sitting over the fan to hide it from view. The Vortex is being slowed down to about 70% with an Autotransformer. There are 2 - 8”x8” Darkroom Louvers as intakes in the back of each chamber about 15” above the floor. There are also 2 – 8”x8” Darkroom Louvers in the top left of the left chamber and top right of the right chamber to vent into the mother chamber and then out the cab by the scrubber/fan.
So far, this setup has been working GREAT! Temps range from 73-78 depending on ambient temps of the room. The setup isn’t silent by any means, but it was easily covered up by moving our small box fan from one part of our room to the top of the cabinet running constantly. The wifey and I like the white noise for when we sleep.
The back has been reinforced with ¾” plywood and all wiring I attached to it. I decided to keep it clean by installing outlets into each chamber and wiring everything up. At first, they glowed like crazy, so since I have a ton of panda film, I took pieces of it and stapled them over each outlet on the back. I caulked everything up and then for extra measures, put a strip of panda film over all the caulked areas. I used fairly large weather stripping for the doors. If I ever have to change it, I’ll go with the next size down.
To keep the doors closed tight, I have a magnet latch at the top and bottom of both doors. I also installed cabinet locks right under the door handles for security purposes. Overall, it works very well.
I have had the wifey lock me in each side of the cabinet with lights on in the top and other side as well as lights on in our bedroom and each flower cab is 100% light proof.
The 2 ballast, timer and autotransformer are sitting next to the box with the fan in it on top of the cab. I placed a box around it all as well to hide them from view. It definitely does its job nicely.
As for plants, since I’m just getting back into growing again, I’ve decided to go with some bag seed. I’ve been using this time to practice cloning, test my mix and seeing what methods work for me.
My cloning method, since very few clones are needed, has been using a shot glass of water. Simple, low maintenance and super effective. I've been taking tons of cuts and experimenting with them in every way possible.
At the moment, I have 2 plants, 67 days into flowering in my tent. All of the plants in this cabinet are cuts from those two plants. I started off with 8 – 3 gallon grow bags, 4 on each side. Having to hand water all of these from day one was a hassle. So after a couple days of that, I had a brilliant idea to make self-irrigated planters out of the stock of 1 gallon water jugs I have. So I made a bunch and planted all the clones that I had gotten to root. I also made 2 – 5 gallon self-irrigated containers as well to see how they do. So far, I love them. I have so much more free time now. All I do is top off the reservoirs of each container and that’s it. Perfectly watered at all times.
I have 12 clones in 1 gallon self-irrigated containers on the left side. The other side I have 4 clones in 1 gallon self-irrigated containers and 2 clones in 5 gallon self-irrigated containers. All of them are at 30 days 12/12. A few of the 1 gals and both of the 5 gals had some veg time while all the rest are 12/12 from rooting.
This is a practice run so I wasn’t too strict about canopy management as you can tell by the jungle I have going on. I mainly wanted to make sure I could keep a mother plant, take clones and get them from start to harvest before getting too serious with everything.
On the next go around, I plan on running a 5 gal in each side and scrogging them. So far, I feel they have been the least maintenance. Some of the 1 gals need to be refilled every day where the 5 gals give me time for other things.
For media, I decided to go the organic route and I have to say, I love it! Got it from a member from the Organic Soil section.
This mix consists of:
1 part Home Made Leaf Mold
1 part Peat
1 part Perlite
1 part Vermiculite
1 part Home Made Worm Castings
1 part Home Made Compost
For each 7.5 Gallons (1 cuft) of mix
I mixed all ingredients for each mix together in equal volume and used
2 Cups of Food Mix:
Blood Meal (wanted to finish the bag but discontinuing its use)
Bone Meal (wanted to finish the bag but discontinuing its use)
Alfalfa Meal
Cotton Seed Meal
1.5 Cups of Fix It Mix:
Crab Meal
Kelp Meal
1 Cup of Mineral Mix:
Green Sand
Azomite
Oyster Shell
Gypsum
Dolomite (wanted to finish the bag but discontinuing its use)
That's all I have for now. I've been watching the 2 plants in my tent closely since they are getting close to harvest time. So far mostly milky with 0 amber. When I get a chance, I'll snap a few pics of them as well.
Let me know what you think. If you have any questions, ask away. Thank you for checking it out.
 These are the two plants that all of the clones in my cabinet came from. They are getting close to done. Just watching the trichs.


