What's new
  • Happy Birthday ICMag! Been 20 years since Gypsy Nirvana created the forum! We are celebrating with a 4/20 Giveaway and by launching a new Patreon tier called "420club". You can read more here.
  • Important notice: ICMag's T.O.U. has been updated. Please review it here. For your convenience, it is also available in the main forum menu, under 'Quick Links"!

My many designs and experiments.

Killkingkong

Active member
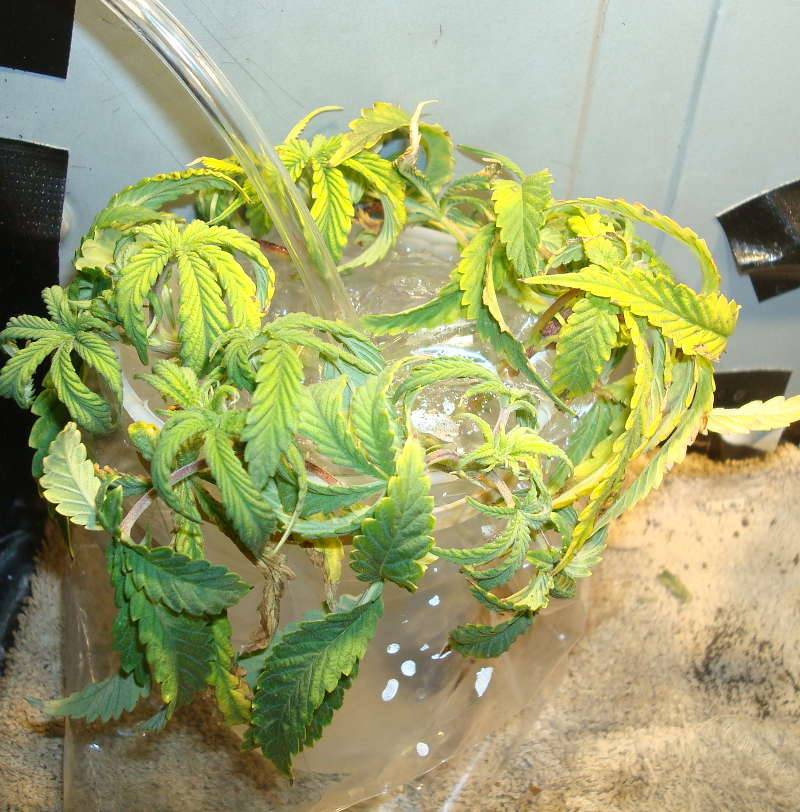
Where to begin? Let start with the clones. Well the clones that are in coco look fine, I expect to see results by the end of next week. The bubble cloner on the other hand looks horrible. I changed the design twice since last week. My most recent design for that might work in the future, but I think it's too late to save those clones, but I'll keep it running and see. While training the plant in the big PC there was 1 branch I didn't know where to tuck so I cut it off and threw it in coco today for a 4th coco clone.

So I had a total stoner moment last week and though I switched to 10/14 lighting, but apparently I set my timer to 'always on'. So what I thought was first reach of stretch for the big PC was just veg growth. I trained the plant today and there's a lot more room but I think I'm going to run out of space quickly in this one. I'll cut off whatever branches I think are just getting in the way but hopefully I won't have to and it will be packed from top to bottom with thick buds.

I started up a colloidal silver generator with 2 pieces of silver I bought months ago. The plan is to take 1 of the clones as soon as they root and throw them in the bucket on 12/12 to flower immediately and begin spraying with the CS. after 2 weeks I plan on putting one of the other clones in there to flower and be the mother plant for the hermi pollen. The bucket is now a breeding box, my PCs with multiple cobs are much more efficient.

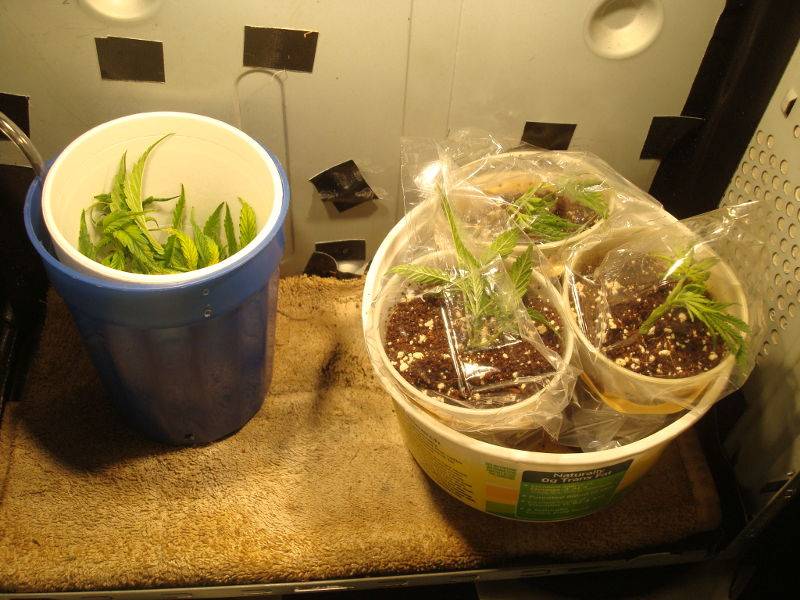
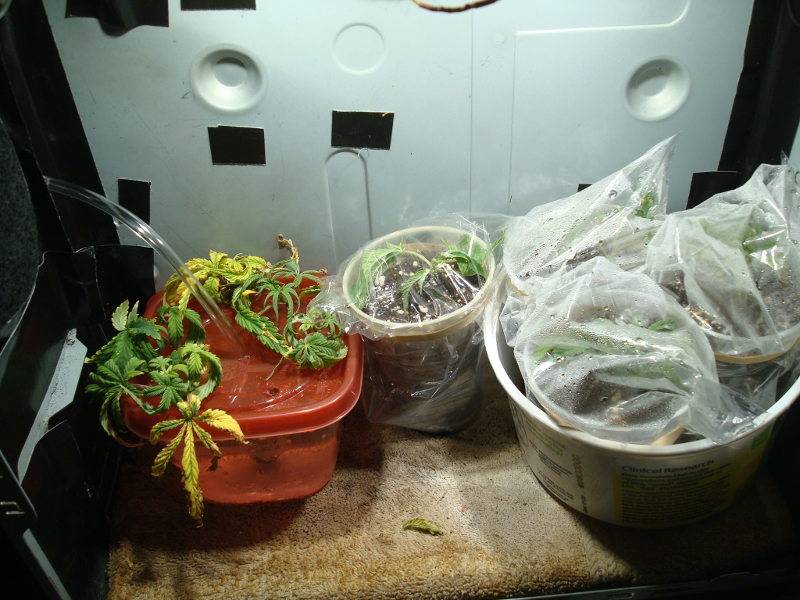
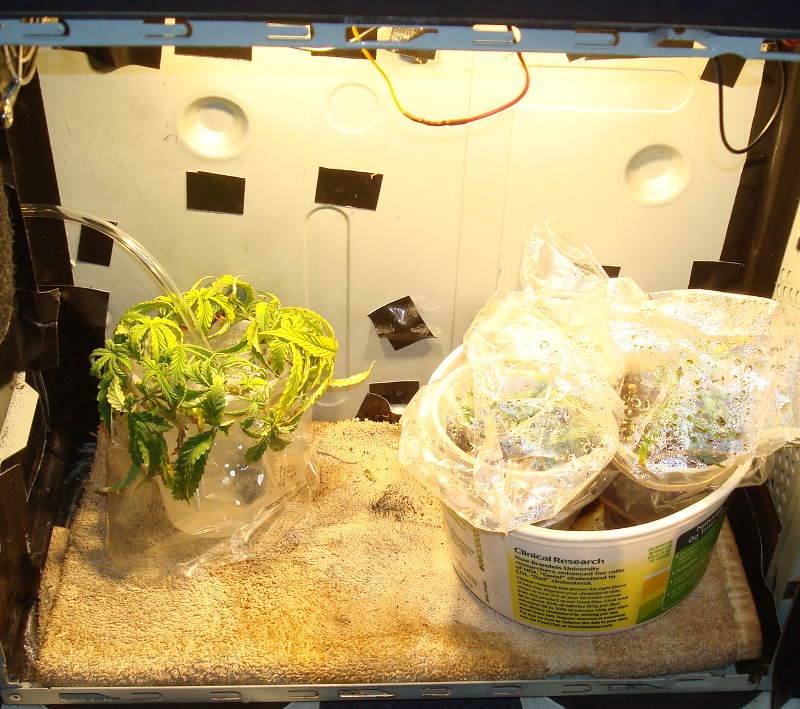
different version of my bubble cloner and coco clones:
 

Killkingkong

Active member
Things are moving along. The bubble cloner clones died, but that was expected. The clones in the coco are looking kind rough, but roots are starting to form around the cup, so it's only a matter of time.

As for the reveg plant in the big PC that's doing well. I still kinda think it's gonna outgrow the box, but we'll see. I actually made a major improvement to this box this week and made it an automatic feeder. If you recall the last 2-3 weeks of my last plant last round I fucked up and got drunk and forgot to water the plant and it dried up. This should solve that problem. The system I made is actually pretty simple, it's a siphon that uses only gravity, some tubing, a flow control valve and a dripper spike. Now I can leave my plants for a few days and not have to worry about watering my small container coco pots daily.

Last week I said I was done making cases, but I got a bday check I wasn't expecting so I splurged, so expect a very indepth tutorial next week. And to be honest I just started seeing a new girl and she's a smoker too, so now I have more reason to grow as much weed as possible so I don't have to buy from dealers. I can't spoil a girl and spoil a dealer at the same time lol.

Clones


Automated watering system


Reveg plant Day 6 of flower
 

Killkingkong

Active member
Simple Guide to Building a LED PC

Simple Guide to Building a LED PC

Step 1, Drill out the rivets for all the metal you don't need in your case:


Step 2, Gather supplies to put in the case:


Killkingkong

Active member
Step 3, hook up your super high power fan to your power supply that you chopped up so that it doesn't take up space in the case. Then build a little cardboard holder for your activated carbon. Put an activated carbon sheet down to hold carbon pellets in place.


Step 4, fill with activated carbon pellets and then tape a sheet of activated carbon on top to hold everything in place for your filter.


Pics of the completed filter, with wires:
 

Killkingkong

Active member
Step 5, Glue magnets to hinges


Step 6, Drill hole in heatsink and zip tie hinge (with magnet glued on it) to the heatsink to hold the heatsink to the steel case (no drilling holes necessary!)


Step 7, Use thermal adhesive to to glue COB to heatsink


Step 8, Use heavy duty duct tape to fill ALL holes and gaps in the PC. Then use Aluminum tape to tape over the duct tape to have a reflective finish. Wire COBs together in parallel to be used with a 50w driver and for each COB to receive 1/3rd of that power.


Step 9, Wire the end of the COBs to the power supply plug so you can use that as your power source
 

Killkingkong

Active member
Step 10 take the power cord from your power supply and cut it in half. Hook up the appropriate halves to the LED Driver


Step 11, Marvel at your work, that was relatively easy.
 

Killkingkong

Active member
So like I thought the plant in the big PC is definitely going to run out of space. I don't even have anywhere else to train the plant. So to fight this I topped all the main stems and defoliated. Hopefully this not only stunts the plants vertical growth but also gets light to the lower branches to fill out all the colas. It's only 13 days into flowering, so I'm not too concerns about the topping.

I made 1 change to my newest PC, which will now big called medium PC. That was to glue a magnet onto a 60mm fan and put that on the otherside of the case blowing towards the exhaust. There haven't been any signs that I needed this fan, but I think 1 fan is just too little. I did the math and the medium PC uses 52w in LEDs and 8w in fan, so 60w total. 60g will be my 'goal as 1gpw is for all my cases.

3/4 of the coco clones survived. The 4th one feel right out of the soil when I touched it, I didn't put it in deep enough. The fan leaves on the clones look bad but they're growing. By next week they should look fine. I topped them all to force them to grow outwards. I put them in the medium PC after I finished building that. I'll put one of the clones into the bucket next week and another in the small PC and round 4 should be fully on the way. I've decided not to use the collidial silver i made this round since it's just bag seed. my plant is to get as much of a supply as possible this round and then buy a variety pack of fem seeds next round and take clones & make more fem seeds from each strain.

Amendment to the medium PC


Big PC


Clones in Medium PC:
 

blynx

WALSTIB
Moderator
ICMag Donor
Veteran
Can't wait to see how the big pc turns out. That thing is gonna be packed with buds.

Are the LEDs running at one-third power controlled by the way you wired them? or are you using a dimmer?
 

Killkingkong

Active member
Can't wait to see how the big pc turns out. That thing is gonna be packed with buds.

Are the LEDs running at one-third power controlled by the way you wired them? or are you using a dimmer?

Yup, by wiring the LEDs in parallel the total amount of amps for my driver (1500ma) gets divided by the number of cobs I wired in parallel. If they were wired in series for every COB I have you would multiply the voltage of the cobs by the total # of COBs, so this is done for low power rated (~10w) LEDs, not high power rated (~100w) ones like these. I was pretty confused about this when I first saw this concept in Bueno's thread, but then I started playing around with 18650 Li-ion batteries for my e-cig stuff and it started making sense. Here's a pic explaining it with batteries, just imagine those are LEDs.


And with LEDs you control how bright they are by how many AMPs. You always want to be in the same volt range. You can either buy really expensive dimmable LED drivers or if you're cheap like me and like to experiment buy a variety of cheap LED drivers for about $8-$18 each depending on the amps.
 
Last edited:

Killkingkong

Active member
I just realized that last pic didn't make much sense for parallel as far as LEDs so I photoshopped it and hopefully my edit makes more sense for our needs.


Killkingkong

Active member
So, different boxes are at different stages of life right now. The clone in the bucket looks great, that should really show what the bucket can do this run (crossing my fingers for 1gpw). The clone in the small PC looks mediocre, but new fresh branches have started growing so that should look good soon. The clone in the medium PC looks awful. It's not dying, but the leaves are fucked up. Hopefully that bounces back. The medium PC is still in veg, the others are all in flower.

I don't know what to say about the big PC, it's overgrown like I predicted. I've have to chop/top of tons and tons of branches, but stretch should be over now. I'm gonna try to just let it be with just some defoliating and see what happens, all the light penetrates pretty deep.

I finally got the chance to turn all my boxes into automatic watering ones. for my 3 PCs I took a bucket and a water pump that I already had and set up a drip line for them all. For the bucket I'm using gravity to power the same drip system that the PCs use. I'm still dialing in the system (I've flooded all the boxes out numerous times) but I'm sure I'll get this working and saving me a ton of time. Then I'll only have to really worry about the plants during stretch because training is most important then I believe.

So a funny story from this week. I was in a car accident 2 weeks ago and wanted to avoid going through insurance but the lady who owned the other car started to extort me. Since I needed a lot of cash fast I unplugged my medium PC and took it to a local hydro shop where i buy supplies from if the price is the same on the net. I showed the guys there my medium PC and they were definitely impressed with the engineering behind it but that they're more interested in bigger boxes. They didn't buy the box, but it looks like I'll be making their website for them at least.

Big PC (Day 26)


Bucket (Day 14)


Small PC (Day 5)


Medium PC (Veg)
 

Killkingkong

Active member
Hey guys, sorry for being flakey. Things were iffy last run. 2 of my plants died due to under watering (my automatic watering system was constantly overflooding so I would lower the water flow and it would get clogged blah blah blah) that ugly plant in my medium PC turned out great, but i didn't document anything after the last post.

Well, I'm back and hopefully will document this run from beginning to end. I made quite a few changes to my PCs. I got rid of the bucket, too have to train a plant in there. instead i took that LED and put it in my small PC. I took the 2 high quality LEDs from the small PC and put them in the Medium PC along with the LEDs already in there. The big PC has the same LEDs, i just wired things differently.

All the PCs now use the same power connections, so the power sources are interchangeable. Aside from that I bought 2 600w boost converts from china and hooked them up to some old laptop/hdtv power bricks. At first I thought these things would boost any wattage to 600w, but it seems it maxes out at the max power from your power source. So I used 95w rated bricks, that's plenty of power for these LEDs I'm running. The main purpose of using things is because they have both variable voltage and amp controls. So combined with all the other LED drivers I have all these cases are variable power.

3 Cases in my closet along with the redesigned automated watering system:


Variable 600w Boost Adapters hooked up to the big PC & small PC:


Upskirt of the big PC (Variable voltage, currently being run ~60w I think.) and pot for future use:
 

Killkingkong

Active member
Upskit of the medium PC (50w currently. 30w in the center, 20w on the sides.) and 3 ugly seedlings and 2 seedlings i hope to sprout:


Small PC upskirt and the 3 seedlings that are doing great and have already been topped. 12/12 this weekend to sex everything.
 

Killkingkong

Active member
A week has passed and there's been decent progress. enough so where today will be the day I flip the switch on the medium and small PC (the 2 that have high quality LEDs). The other runts (ph problems the first week) will veg for another week or less in the big PC. Hopefully I get 3 females out of the 6.

New wiring harness to stop wire tangling:


Webcam that's zip tied to a piece of card board (further secured with plenty of clear tape, since it's lighter than duct tape) and with magnets taped to that paper to stick onto the steel cases. I use high power magnets to the heatsinks and fans in the small and medium pc. my big pc uses zip ties to hold the heatsinks in place. I bought a raspberry pi during xmas and the plan is to hook up the webcam in the medium PC and track the progress with a timelapse video. I'm a lazy stone, so I may or may not get to that, but I have all the parts so at least I don't have a legit excuse.
 

Latest posts

Latest posts

Top