
-
Happy Birthday ICMag! Been 20 years since Gypsy Nirvana created the forum! We are celebrating with a 4/20 Giveaway and by launching a new Patreon tier called "420club". You can read more here.
-
Important notice: ICMag's T.O.U. has been updated. Please review it here. For your convenience, it is also available in the main forum menu, under 'Quick Links"!
You are using an out of date browser. It may not display this or other websites correctly.
You should upgrade or use an alternative browser.
You should upgrade or use an alternative browser.
picture request
picture request
i've been asked to put up a few photos of my plants. these are really bad and were taken with a cheap camera that's been dropped 3 ft onto concrete. also, i'm a "do it yourself" kind of guy. you make money from both ends. i tired of my ass feeling sore every time i walked out of the grow store. soooo,
welcome to "ghetto-ponics"
Last edited:
bostrom155
Active member
Hi Delta, very impressive, and thank you for the info, i'm thinking of trying to wick the nute/water from a tub with the plants in the tub to make it a bit easier
hempy bucquet - with compost
hempy bucquet - with compost
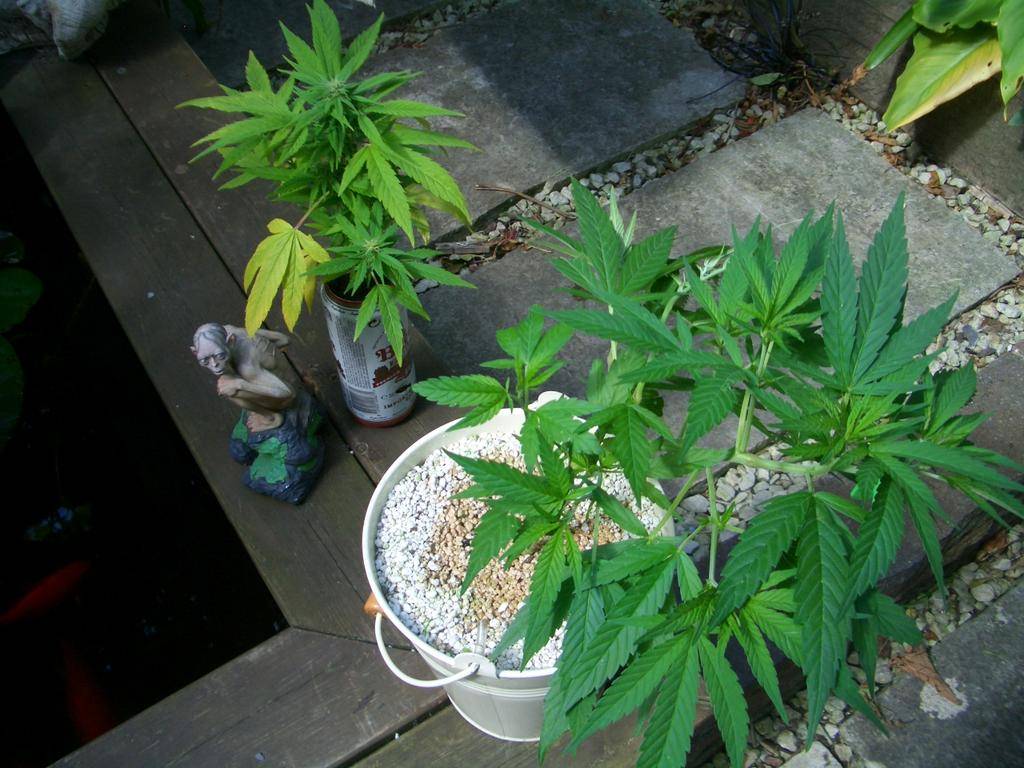
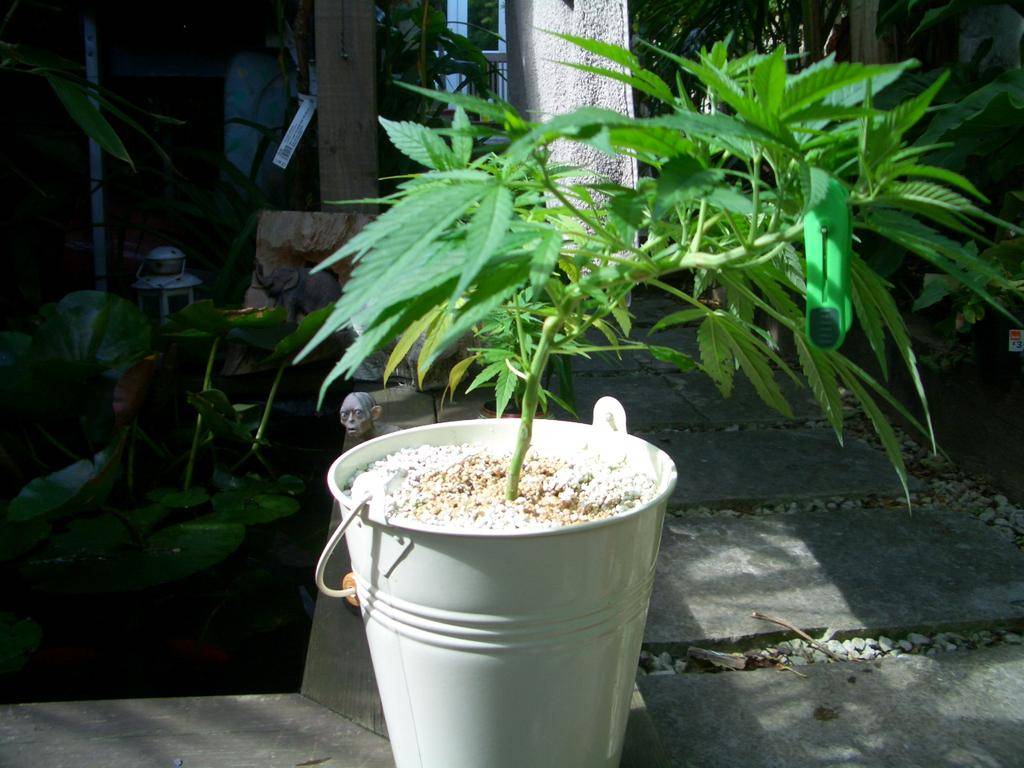
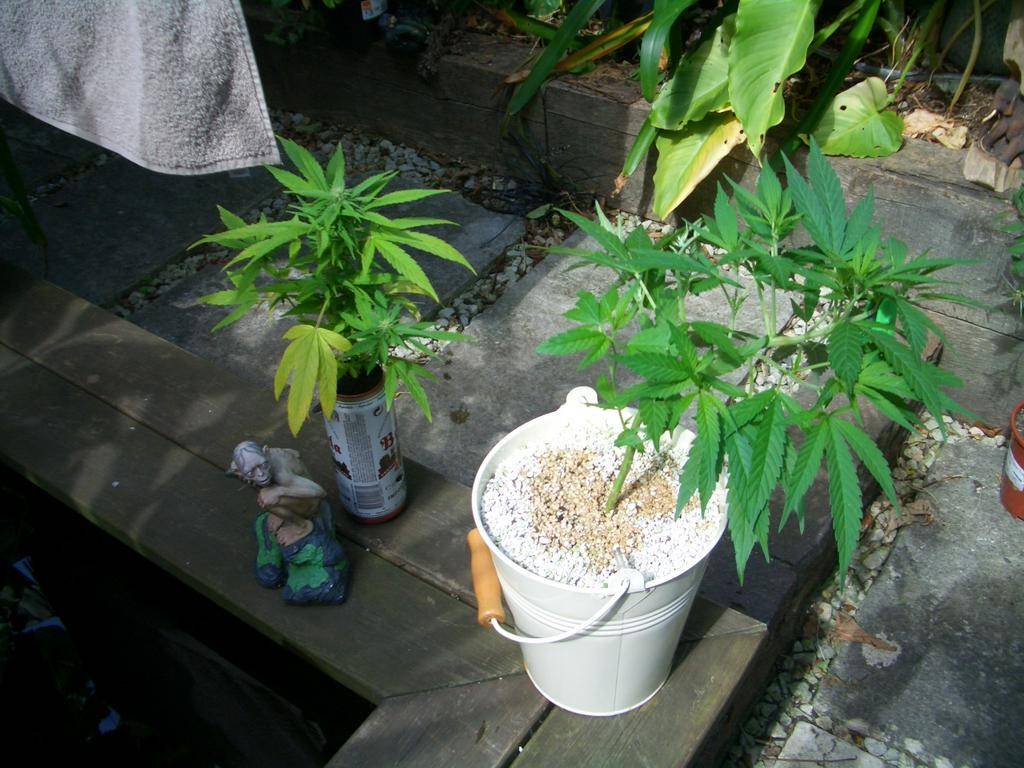
Here's my take on the hempy bucket with a top layer of compost, no vermiculite, just perlite.
The beer can one was flowered at day one of clone showing roots ( I was very stoned and did it for a laugh ). I do not have access to any hydro nutes, I've been feeding with regular soil organic feeds.
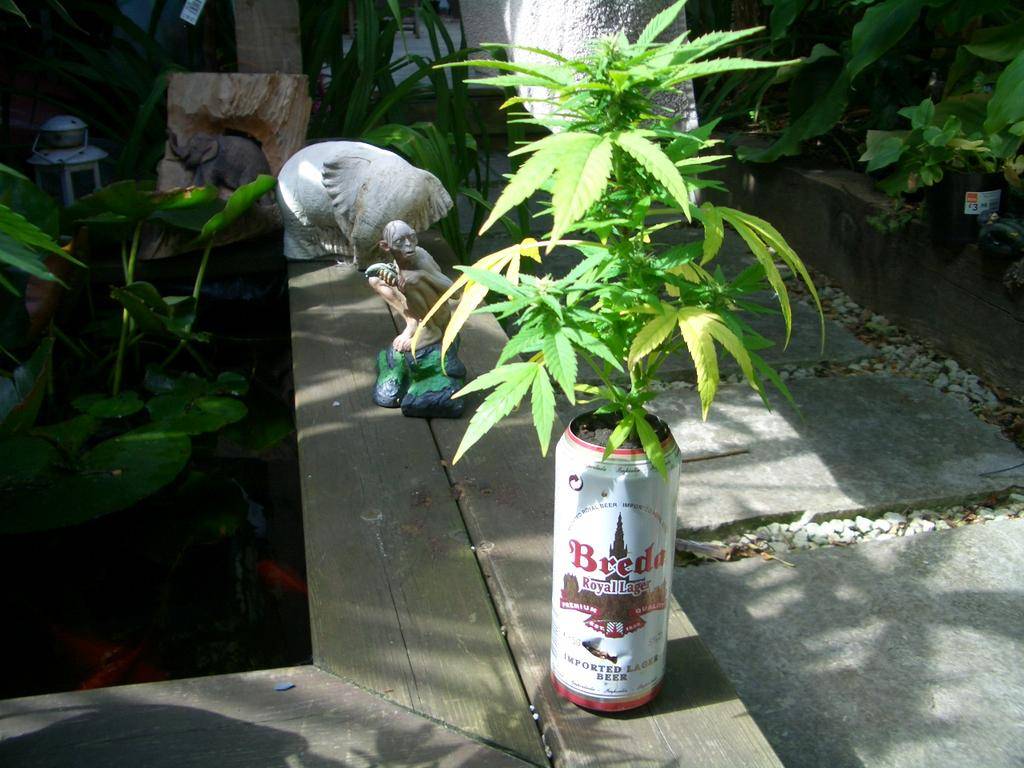
I bought a ready-made hempy bucket - maybe the Dalai should have patented the design!
The two clones are the same age, just different sizes of container. It has a 4/5 inch layer of compost on top of the perlite resevoir and an inch of perlite to top it off. This one had a much slower start in life but has taken over the joke beer can grow. I used a layer of slate chippings to seperate the perlite from the compost which could have slowed the roots reaching the resevoir. I'm happy with the bucquet and I will be using this method scaled up in future.
hempy bucquet - with compost
Here's my take on the hempy bucket with a top layer of compost, no vermiculite, just perlite.
The beer can one was flowered at day one of clone showing roots ( I was very stoned and did it for a laugh ). I do not have access to any hydro nutes, I've been feeding with regular soil organic feeds.
I bought a ready-made hempy bucket - maybe the Dalai should have patented the design!
The two clones are the same age, just different sizes of container. It has a 4/5 inch layer of compost on top of the perlite resevoir and an inch of perlite to top it off. This one had a much slower start in life but has taken over the joke beer can grow. I used a layer of slate chippings to seperate the perlite from the compost which could have slowed the roots reaching the resevoir. I'm happy with the bucquet and I will be using this method scaled up in future.
hey bostrom, i'm growing this way now, but have been going over the engineering and materials for a large scale wick experiment. i just can't leave shit alone.
oneQ, no way. those are full of 100% perlite. for now
here's a photo legend
1 this one is getting whacked today. it's not as large as most, for some reason. yes, that's a yardstick hanging in the branches. i expect 9-10 oz dry bud
2 a shot of the flower room from the door. tight in there. i can only work there in contact with the lights. 1k hps hortilux in cooltubes with 500 cfm fans on each
3 a low shot of the veg area, see the little isis seedling? my daughter brought back a pack from the dam. another 1k hps hortilux for veg
4 higher angle veg room. the small square container is a clone that's about to be transplanted into a 10 gal. btw, bostrom, that's a wick cloner. 100% success rate for 18 mos.
5 16" clone before first pruning
6 same after
7 very crude drawing i did for someone a while back showing floor plan, black dots are lights, circles are plants, numbers are week of growth.
that's all folks!
thank's people!
i originally had the lights set up horizontally with the internal reflector that comes with them and the accessory wing reflectors. after a few months i decided i didn't like the pattern they threw. after i went vertical my yield went up noticeably, at least an oz per. the arrangement also hits plants 4-5-6-7, which are at peak bud development, with 2 lights approx 120* apart hitting simultaneously. i run them around 10" from the plants. the room is only 6.5' wide so 1 side is always pushed into the wall. they get rotated 1/3 turn every day. all bulbs are now hortilux, which also definitely increased yield. i got 120 sq ft of floor with 4k. wish i could throw in 2 more lights to bring it up to 50 w per sq ft, but got to keep the electric bill reasonable.
right now i'm in the middle of a changeover to 10 gal containers from 5 gal buckets. the lead plant still has 5 weeks to go but is really bushy, huge stem.
it will be interesting to see what it yields.
as you may have deduced, it's perpetual harvest, 1 in and 1 out every week.
i also began a new nutrient program today. it's based on dry commercial horticulture salt premixes and the addition of other salts as needed for growth stage. the nice thing about it is that none of the ingredients came from cannabis "grow shops". most of the stuff i was able to buy locally or online from bulk horticulture suppliers. i have enough to mix nutes for at least a year for around $200 us.
hey dabbler, the beer can is great. shows how simple things can be. i believe you're going to have to give it a little bit of coffee grounds.
later
Last edited:
L
lysol
Hey delta good pics + advice, thanks for posting those pics ") Good to have a garden to put to your screename ( instead of a face to your name )
Good to have a garden to put to your screename ( instead of a face to your name )
Good to have a garden to put to your screename ( instead of a face to your name )bostrom155
Active member
Hey Delta, just wondering how long ur vegging those plants and if ur also potting up a few times. thanks
hey, bostrom, i veg 7 weeks and, as you can see, use a severe pruning technique (lucas style). every pot is in a different week of growth. for clones, as soon as they get 13 nodes, usually 15-16 inches, from the medium up, i take off the first 6, leave 6, and top. in weeks 5-6 of veg i further prune in a slow, easy progression, the first 3 branches of any branch that gets over about a foot long. week 7 of veg i don't touch them so they can be growing vigorously by the flip. i don't take the fan leaves near each cut.
there are several ideas involved in this that i think heavily influence yield.
since i'm growing with vertical lights, radiating 360*, i want the canopy, when measured from top to bottom, to be no more than about 30" thick at onset of 12/12. this keeps almost all the foliage in the sweet spot of the lamps with better penetration to budsites further away that day. i never move the lights.
i get a much larger, more dense bud structure. this looks better in the bag and is much easier to trim. plus more weight.
i clone in a 3 quart wick cloner in straight perlite. one cut each. i need one every week and with the wick cloner i cut one every week. no failures. finally! for a while clones trembled with terror at the mention of my name.
the 3 quart container also serves as a pot for the first few days of vegging with the 1k before the single transplant to 10 gal containers. i usually give them about 2 days of 24/7 behind a larger plant to get acclimated, pop the bottom container off, pull the wick out and water with normal ferts for a day or two in full light, then transplant.
the wick cloner makes beautiful, healthy clones. they don't discolor at all. it's got me thinking about wick growing. over in the coco heads section there are some groundbreaking techniques evolving. But I think they're doing drugs.
later
L
lysol
can you transplant from soil into the hempy bucket?

I was wondering
1: can I start out in small dixie cups of soil and then transplant to a hempy bucket
2: for every "gallon of bucket" how much gallons of nutrient solution are you pouring into the top every day when running 100% perlite.
howdy, you can start in soil or almost anything you feel comfortable with. a little organic material never hurt anything.
in the 10 gal tubs i water about a gallon per day. about once week i skip a day. next day ph'ed water, then feed 5 days. they probably need a little more dry time but grow really fast anyway.
in the 10 gal tubs i water about a gallon per day. about once week i skip a day. next day ph'ed water, then feed 5 days. they probably need a little more dry time but grow really fast anyway.
i've been asked to show the fittings i use that allow me to check ph and ppm after watering, which is what the roots will be sitting in. i've been tracking plants for about 2 months now and it has really helped me see trends and correct them if necessary. it also functions as the drain/ overflow. these are 1/2" but i think you can do this up to 1 1/2". i've used them in bio-buckets and rdwc. one is installed in a 32 gal trash can with a faucet for ro water. here is a post i did on another thread that explains it fairly well.
"about the bulkhead fittings. if you take regular pvc plumbing male and female adapters you can thread them together but they won't go all the way down because they have tapered pipe threads. so you can't compress an "o" ring or gasket with them. they won't hold water through a bulkhead. if you go over to electrical you will see what looks at first to be the same thing, except gray pvc conduit fittings. male and female threaded adapters that will accept regular white pvc tubing. if you thread a pair of those together you will find they go all the way down because they use regular machine thread. you put your "o" ring or gasket on the male fitting and then just teflon tape the connection to the female. no leaks. i've been using these in fish holding systems for years. works great. if your application is horizontal you leave it like it is. if you want a vertically oriented nearly flush drain you saw off the part of the male fitting above the pipe stop. you will be able to drain down to approx. 5/64 th's in the case of 1 1/4" fittings. or drill it several times at that level. i'm looking at a pair of 1 1/4" ones right now and the lowes part number's are E942G and E943G. around a buck for the pair. Smaller “o” rings at lowes in plumbing, large ones at all auto parts stores. Use the male fitting with the “o” ring on the inside and be sure to give the threads a few wraps of teflon. Later, delta9nxs"
"about the bulkhead fittings. if you take regular pvc plumbing male and female adapters you can thread them together but they won't go all the way down because they have tapered pipe threads. so you can't compress an "o" ring or gasket with them. they won't hold water through a bulkhead. if you go over to electrical you will see what looks at first to be the same thing, except gray pvc conduit fittings. male and female threaded adapters that will accept regular white pvc tubing. if you thread a pair of those together you will find they go all the way down because they use regular machine thread. you put your "o" ring or gasket on the male fitting and then just teflon tape the connection to the female. no leaks. i've been using these in fish holding systems for years. works great. if your application is horizontal you leave it like it is. if you want a vertically oriented nearly flush drain you saw off the part of the male fitting above the pipe stop. you will be able to drain down to approx. 5/64 th's in the case of 1 1/4" fittings. or drill it several times at that level. i'm looking at a pair of 1 1/4" ones right now and the lowes part number's are E942G and E943G. around a buck for the pair. Smaller “o” rings at lowes in plumbing, large ones at all auto parts stores. Use the male fitting with the “o” ring on the inside and be sure to give the threads a few wraps of teflon. Later, delta9nxs"
Last edited:

