What's new
  • Happy Birthday ICMag! Been 20 years since Gypsy Nirvana created the forum! We are celebrating with a 4/20 Giveaway and by launching a new Patreon tier called "420club". You can read more here.
  • Important notice: ICMag's T.O.U. has been updated. Please review it here. For your convenience, it is also available in the main forum menu, under 'Quick Links"!

Arduino based plant watering system using Soil Moisture Sensors

M

Mr. Sparkle

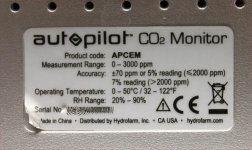
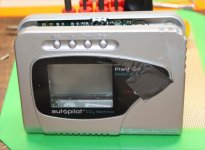
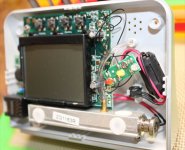
Oh nice that's from 2016 even, I wonder if he is still using that home made sensor. If that lasts a year, score.

My later ones using stainless steel rc axle rods "$1 for 20" lasted years and still would probably have a decade+ worth of use on them as they looked pretty much untouched when i stop using them.

The trick with them was throwing the power on an output pin and only turning them on a second or so before your reading then turning them off afterwards, that way any of the electro-corrosion was avoided and the stainless steel avoided normal corrosion. Eventually got down to making my own circuits using attiny85 micro development boards and n channel mosfets with the resistor comparative circuits for watering control and all built onto a small board with screw terminals for the power and pump leads that way they were independant little circuits.


Saying that though i moved onto timed watering cycles instead as my systems allow me to collect and reuse my runoff, and i found i was always tweaking the sensor event points, as your resistance could vary depending on soil/coco contact to particulate size to placement in your pot, to what plant you were reading off of and what stage of life it was in, in the end i went a simpler more effective route with time based system, just have to learn how to read your plants.

I don't use anything arduino based anymore, my main light timing is done with a sonoff and my watering pumps are done with prebuilt cycle timers which are $3 but i do have those running off a sonoff output as how its setup allows me to turn the pumps off at night and power cycling the pump circuit which acts like remote watering, cause as soon as those circuits are powered a watering event is triggered, and then it goes into a countdown mode on the cycle timer till my specified time is over and repeats forever.

Honestly its a way better and simpler method, changes take a couple secs, and all i really change is the time between watering events, and sometimes watering duration, but again takes seconds to change and i don't need to reflash a chip to do so.
 

AgentPothead

Just this guy, ya know?
Yeah the time based system definitely sounds easier in the long run. Thank you for all the awesome information Sparkle!
 

Ringodoggie

Well-known member
Premium user
Cool thanks! If it isn't an easy to open case, don't force it though. I've found they tend to not wanna honor warranty after ya crack stuff open. :D 
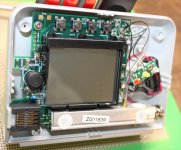
I tried to find a breakdown or schematic on google but my googlefu is weak and getting weaker by the day. Either that or google is getting worse by the day. Maybe both.

I snapped a couple pics. Not much to see but a quick search of the number on the CO2 sensor (the long silver square tube at the bottom) shows who Hydrofarm/Autopilot sourced these from...

https://www.zyaura.com/products/ZG1163R.asp


.
 

Attachments

  • autopilotco2-1.jpg
    autopilotco2-1.jpg
    72.8 KB · Views: 23
  • autopilotco2-2.jpg
    autopilotco2-2.jpg
    58 KB · Views: 25
  • Harvested Malawi 2
    Harvested Malawi 2
    79.3 KB · Views: 43
  • autopilotco2-4.jpg
    autopilotco2-4.jpg
    86 KB · Views: 31
  • autopilotco2-5.jpg
    autopilotco2-5.jpg
    75.9 KB · Views: 25

AgentPothead

Just this guy, ya know?
Eh, the actual co2 sensor is inside that long metal casing. Would probably have to destroy it to find out what they are actually using. Looks like Autopilot just bought a bunch of that premade sensor/lcd and got them put into different cases. Thanks for looking Ringo!!! Googling for the specific specs on the product, it looks like literally hundreds of companies are re-badging the same product. So googling for more information about the specs of the sensor makes me believe we might be looking at something like this https://www.digikey.com/product-detail/en/amphenol-advanced-sensors/T6613-C/235-1281-ND/3681409
Looks like this one is even cheaper, has a larger range, and works over i2c instead of just outputting a set voltage you have to quantify. https://www.digikey.com/product-detail/en/amphenol-advanced-sensors/T6713-5K/235-1374-ND/5027892
 

f-e

Well-known member
Mentor
Veteran
I think you test for co2 through diffraction. There is likely an ir source led one end, with a shade or perhaps it's even laser. At the other a receiver. One with a dome over it to amplify any shift. That is how I would do it. But it's precision engineering, followed by electronic calibration as you wouldn't get it right through mechanical means alone.

Walk away lol


I have used many metals for simply testing the presence of run-off for pumps. Many lasted just hours. 304 stainless lasted days. 314, which is often known as marine grade, has lasted years.

My sensors are made using 314 threaded rod. These are held using terminal block. The type known here as choc-block. The threaded rod is connected to electrically using ringlet's and nuts. Taking advantage of the threads.

The 314 has been monitoring constantly using an ac signal for years. Nothing else lasted a week. If 304 is working by using momentary testing to limit electrolysis, then 314 might actually be consistent enough to be called good for moisture control.


Right at the start of this thread, it was said coco growers are making multiple waterings per day. I'm one of them using small pots and as much as 6 waterings. The idea isn't to keep a constant moisture level though. It's entirely the opposite reason for me. I want wet dry as often as possible, because it's air displacement and fresh feed taken to the root. Maximizing oxygen and nutrient availability. Exploiting coco's advantages fully.
 

exploziv

pure dynamite
Administrator
Veteran
Anyone worked enaugh with the capacitive soil moisture sensors to be able to tell me about their expected service life and maybe what percentage between 0% (air reading) and 100% (water reading) they used as a good point to apply watering? Maybe what are the sweetspots to keep the soil between?
Thank you!
 

OakyJoe

OGJoe / Wiener und kein Allemann
Veteran
Anyone worked enaugh with the capacitive soil moisture sensors to be able to tell me about their expected service life and maybe what percentage between 0% (air reading) and 100% (water reading) they used as a good point to apply watering? Maybe what are the sweetspots to keep the soil between?
Thank you!

soil or cocos? :)
 

unnamedmike

Well-known member
Im been looking at this "sensor" for years, i never used one, im a coco grower, but the sensor look ok, and easy to clone.
 
Last edited:

acespicoli

Well-known member
Either. I use soil but any data will help.


Just a guess but if I wanted to set a ec measured moisture auto water setting I would gain that from a ec preferred moisture reading your specific hardware and environmental conditions will vary,


too dry water / wet stop pump = low / high ec voltages


I would also be concerned running 24/7 voltages and prefer interval samples which would take care of wet dry cycle

also anode cathode stainless was a great idea, light sanding or corrosion removal by steel wool should make the rods read brand new
IMO


very nice article thanx for the thread
 

unnamedmike

Well-known member
Carbon bars (recycled from batteries for example) are a great material for cathodes, better than mostly of metals. Anyway capacitance sensors dont need fisically touch the soil, can be wrapped in plastic for a longer life span.
 

Phagoos

Member
After reading Mr. Sparkle's thread I bought some 2mm stainless axles. I did not buy a moisture sensor module like he did but I used a capacitor to build an RC circuit. Arduino pin D3 is used for a hardware interrupt and the 16bit timer counts the number of clock ticks it takes to load the capacitor through the soil resistance. The capacitor value used is 68nF but can be anything between 10nF and 100nF.
After loading, the capacitor is unloaded by turning the load pin back to zero.

The critical part seems to be to fully load the capacitor before unloading it. Initially I immediately started unloading as soon as pin D3 triggered but that was still causing corrosion. Now the 16 bit timer counts to 8192 before turning off the load pin and starting the unload. This makes sure that the damage done by the load is reversed by the unload curve. When using larger capacitors you might need to increase the load time too.

Corrosion can easily be measured by reversing the connections of the 2 soil pins and comparing the time used to load the capacitor in both cases. Currently I still have a 25 clock ticks difference if I reverse the polarity of the soil pins.

Turning off the soil sensor like Mr. Sparkle did will only delay the corrosion because there is no reverse current applied. I've not used a capacitive soil sensor yet but from what I've read so far they might suffer from water ingress if they stop working after some time.
 

exploziv

pure dynamite
Administrator
Veteran
The capacitive ones seem to work well 1 month in. Also I have 2 of them in a test set-up and they are just 4% apart on the full scale.
 

Phagoos

Member
Soldering to stainless

Soldering to stainless

Here is how to 'solder' an electrical connection to a stainless steel rod.
A bit of flux and solder on the connector causes a pretty solid connection to the stainless steel too ;)
The connector comes from a re-purposed power connector from an old computer PSU.


Latest posts

Latest posts

Top