
clown baby
Active member
This was inspired by the threads on perlite cloning in popsicle molds.
I liked it because 1) the perlite passively wicks up water as needed and 2) no clone dome necessary. It's a little slower than an aerocloner but the ease of maintenance is worth it for me, and I can just cut clones a week earlier to compensate.
Materials:
-10x20 propagation tray
-50mL centrifuge tubes (2x 1/8" holes drilled into the bottom of each tube so water can get it)
-Something to hold the tubes up (I made a lid of some plastic cardboard to keep light out of the water, but you can probably use a centrifuge tube rack)
-Perlite. Not miracle grow brand, you don't want the added fertilizer.
1. The propagation tray is filled with a gallon of water, with just a little bit of bleach. (1mL of 1/5th diluted bleacH solution/gallon). Bleach prevents the funk but doesn't hurt the plants at this concentration.
2. Scoop some perlite into the 50mL centrifuge tubes, and set them up in the propagation tray so they can start wicking water.
3. Dip your clones into root powder/gel, and pop them in.
4. go live your life. Just replace the water in the tray once every 7-10 days until you have roots.
Every week or two, I dump the water, give the tray a quick cleaning, refill with water/bleach, and put the clone rack back in.
Usually see decent roots within 2 weeks. So I take clones 3 weeks before I need them and let them get extra rooted.
Benefit of the clear centrifuge tubes is being able to check for roots without disturbing the clone / media. Been a game-changer for me. Wasn't able to find too many threads on low maintenance cloning, so i hope this helps people in a similar situation.
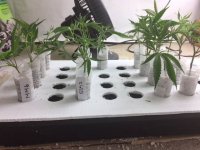
Cloner in action

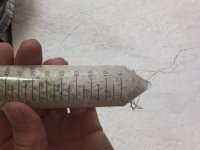
Checking for roots

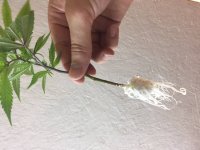
Rooted clone after 2-3 weeks

I liked it because 1) the perlite passively wicks up water as needed and 2) no clone dome necessary. It's a little slower than an aerocloner but the ease of maintenance is worth it for me, and I can just cut clones a week earlier to compensate.
Materials:
-10x20 propagation tray
-50mL centrifuge tubes (2x 1/8" holes drilled into the bottom of each tube so water can get it)
-Something to hold the tubes up (I made a lid of some plastic cardboard to keep light out of the water, but you can probably use a centrifuge tube rack)
-Perlite. Not miracle grow brand, you don't want the added fertilizer.
1. The propagation tray is filled with a gallon of water, with just a little bit of bleach. (1mL of 1/5th diluted bleacH solution/gallon). Bleach prevents the funk but doesn't hurt the plants at this concentration.
2. Scoop some perlite into the 50mL centrifuge tubes, and set them up in the propagation tray so they can start wicking water.
3. Dip your clones into root powder/gel, and pop them in.
4. go live your life. Just replace the water in the tray once every 7-10 days until you have roots.
Every week or two, I dump the water, give the tray a quick cleaning, refill with water/bleach, and put the clone rack back in.
Usually see decent roots within 2 weeks. So I take clones 3 weeks before I need them and let them get extra rooted.
Benefit of the clear centrifuge tubes is being able to check for roots without disturbing the clone / media. Been a game-changer for me. Wasn't able to find too many threads on low maintenance cloning, so i hope this helps people in a similar situation.
Cloner in action
Checking for roots
Rooted clone after 2-3 weeks
Attachments
Last edited:


