What's new
  • Happy Birthday ICMag! Been 20 years since Gypsy Nirvana created the forum! We are celebrating with a 4/20 Giveaway and by launching a new Patreon tier called "420club". You can read more here.
  • Important notice: ICMag's T.O.U. has been updated. Please review it here. For your convenience, it is also available in the main forum menu, under 'Quick Links"!

CLONES!!! 7-14 Days! 99% Success Rate!

SGS

In The Garden
Veteran
Hi everyone! Been a long time since I posted up a tutorial.. I hope you enjoy it.. I tried to make this as clear as possible so for you experienced people sorry if it seems a bit redundant... i wanted even the newest grower to be able to use this method.

I told some people that were having some trouble in the GG#4 forum that I would post my cloning method up that I have found to get even the hardest to clone strains a very high success rate.

This method is very simple and can even be adjusted for larger production scale.

I call it HEMPY CLONING ... i took the method used for HEMPY Buckets and applied it to cloning.. it works better then I ever expected. Most strains have a 100% success rate. This has proven by hundreds of clones from different strains. Been doing this for years now.

This produces bare root clones... can be used for soil, coco, DWC, aeroponics, etc...

Water Quality:
Preferred lighting:
Temperature Range:

PLEASE POST UP YOUR PICS AND SUCCESS! And any failures or problems you may experience.. Open to suggestions as well!

Thanks SGS!

Step 1.
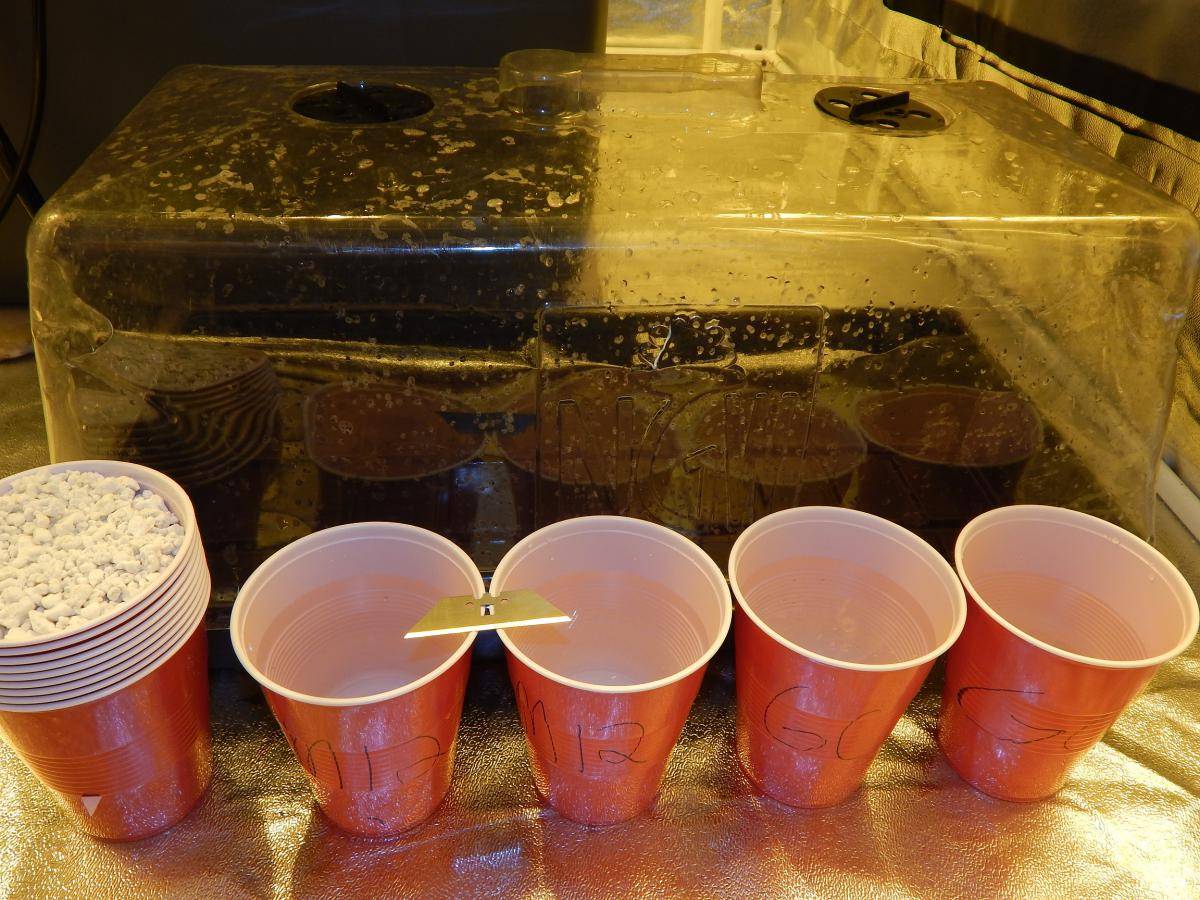
Clean and disinfect a tray and dome. Use new clean cups or other containers that have been washed and disinfected (remember to rinse well!)

picture.php


Step 2.
Take all cuttings,, make them as big and long as possible for you to work with... put them in cool (not to cold!) water.

picture.php


Step 3.
Prepare the cup or container by cutting a hole about 1/3 of the way up from the bottom. Usually no higher than 2 in. (5 cm).
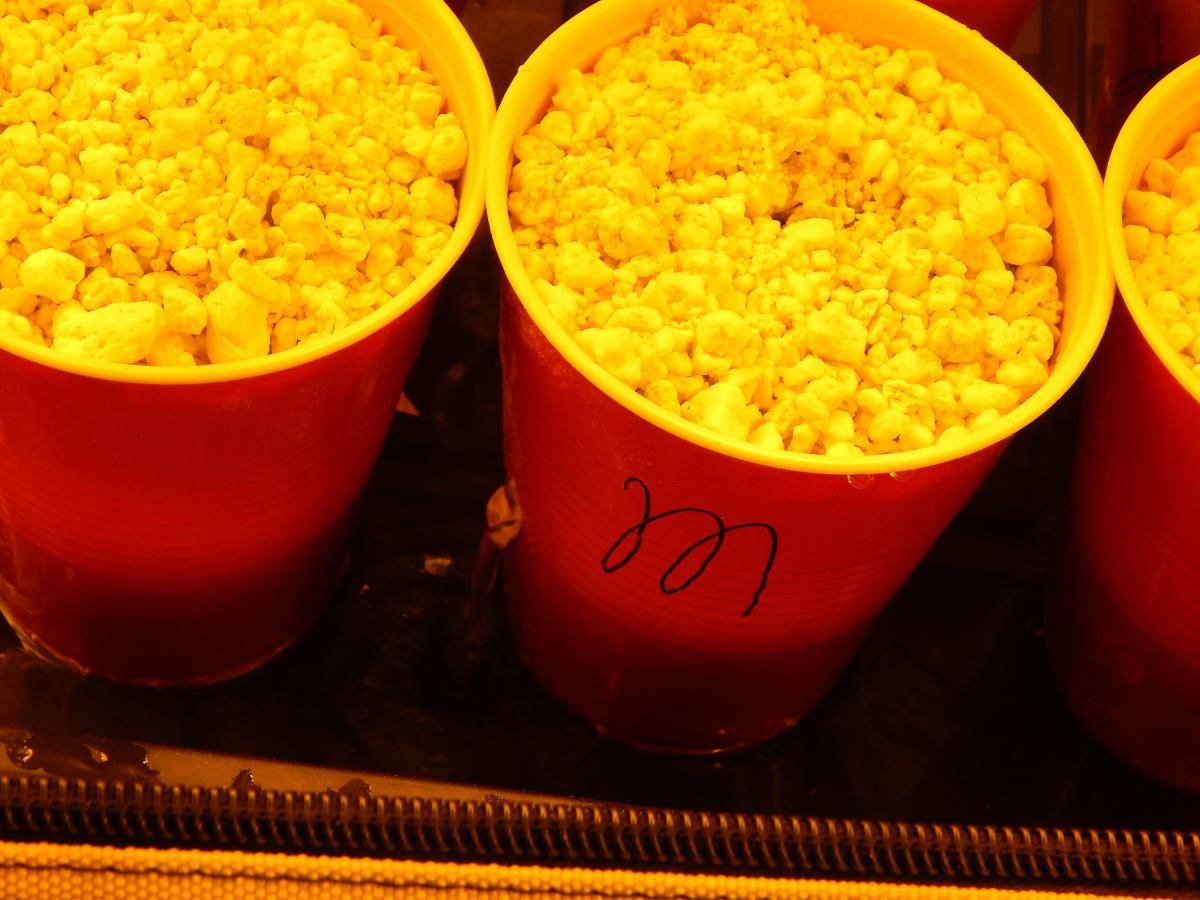
Label if needed.

picture.php


Step 4.
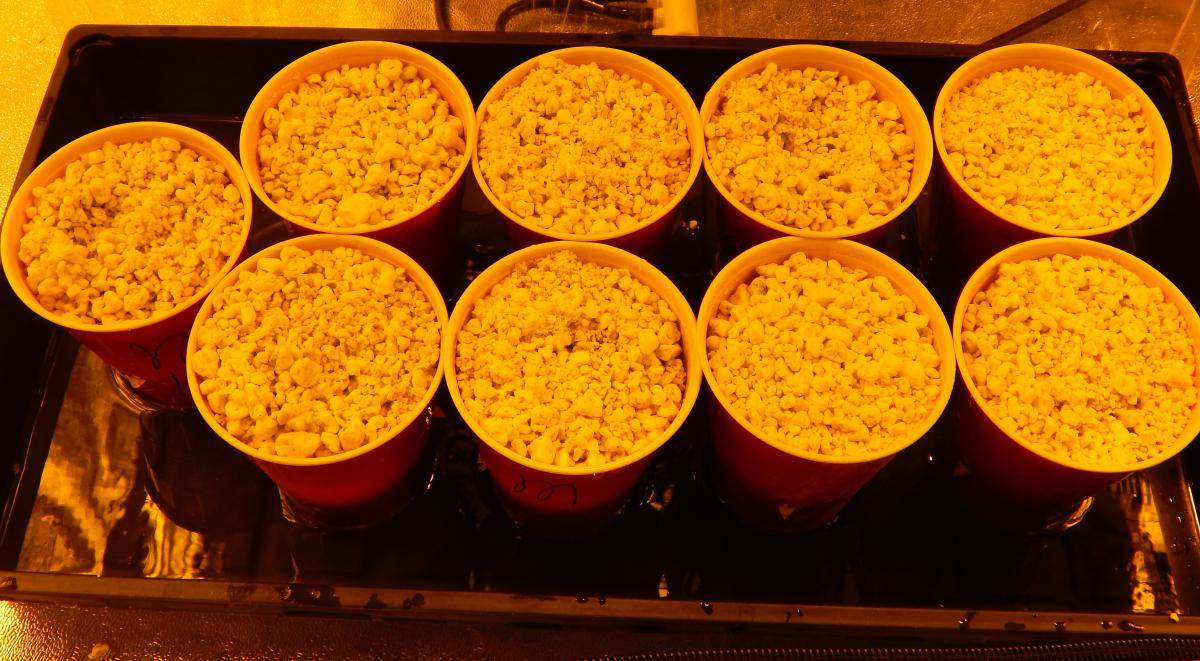
Fill Cups with Perlite loosely do not compact. Place in tray and water evenly to ensure all perlite gets saturated. Add until water starts to pour from hole.

picture.php


picture.php
 
Last edited:

SGS

In The Garden
Veteran
Step 5.
Make pre-holes for the clones to easily go into the perlite otherwise they may get damaged trying to push them in. In this tutorial Im using a hard leftover stem lol! Measure the depth of the hole a little bit past the hole on the cup ,, this will allow for some of the perlite to fall back in when you pull it out but still set the correct depth for the clone easily.

picture.php


picture.php


Step 6.
:preparing The Clone: Use clean and sharp razor blades for precision cuts.
The end size of your clone should be 5 - 7 in (12.5-18 cm) long so start with something longer if possible. If you clones are smaller in the end I have successfully done as small as 3in cuts with very thin stems.. tho your success rate can start to drop... usually strain dependent.

picture.php


Step 7.
Cut the end of the clone at roughly 45 angle on the opposite side and a bit lower than a node.

picture.php


Step 8.
Completely remove node.. be careful to not cut into main stem.

picture.php
 
Last edited:

SGS

In The Garden
Veteran
Step 8. Cont.
These stipule must be removed. They can die off, mold and rot.. running the risk of infecting your cutting, slowing its grow or killing it.

picture.php


picture.php


Step 9.
Continue removing nodes until there are only 1 or 2 well developed nodes and the growing tip are left. ( For Very Large cuttings up to 4 nodes can be left on the clone)

picture.php


*Optional* This method even works with sections of stems with a sinlge node... if the stem is thick enough and has a well developed node it can be used as a clone. The space above the node must be at least 1 in (2.5 cm).

picture.php


Step 10.
Measure prepared clone so the end of the stem is just above the hole in the cup,, this is the correct depth.. any deeper they will be sitting directly in the reservoir water which can lead to problems. If not placed deep enough the clone may not get enough moisture resulting in slow rooting.

picture.php
 
Last edited:

SGS

In The Garden
Veteran
Step 10. Cont.
Finished cut... you can see this clone looks a little crooked... this is not a problem,, as long as the main part of the stem that goes into the cup is fairly straight.. the clone with straighten itself out as it begins to grow.

picture.php


Step 11.
Replace clones in tray... add a little water to set the perlite hole around the stem creating a snug fit. Don't compact the perlite down with your hands.. this may push the clone into the reservoir or damage it.

picture.php


Step 12.
Cover with dome... leave the vents on dome closed for the first 5 Days Drain off most of the water left in the tray .. leaving some will increase humidity and keep clones healthy. (If water in tray becomes smelly at any time immediately drain and disinfect tray) ... Leaving water in the bottom of the tray is really optional but it seems to raise humidity faster keeping your clones healthier for the first 5 days when they need it the most.. this is also strain dependent... some strains require less.

Cover with dome... leave the vents on dome closed for the first 5 Days, open them 1/4 to 1/2 way after that.

picture.php


picture.php


Thats it!!! 7 -10 Days fully rooted clones will be ready for transplant. Some strains are faster than others. Chemsis would root in 5 days :woohoo: Please post up your results!
 
Last edited:

DocTim420

The Doctor is OUT and has moved on...
Have you tried using "orchid rooting bark" instead of perlite? Try it, in my experiments, the rooting bark excelled all other aggregates I tested.

My problem was transferring the rooted cutting into a peat based grow medium. For me--in my garden, both bark and perlite failed to provide adequate "structure support" to keep the cutting upright. Hence I went with pre-moistened Promix BX in those tiny 2" net baskets (no beer cups).

Also before doing the "cloning routine", I soak the cutting in plain tap water for a few days. Have not lost a single cutting for years now...not one. I attribute 100% success to healthy donor plants and the water soak trick (trim leafs and make your final 45 degree cut before the water soak).
 

SGS

In The Garden
Veteran
Have you tried using "orchid rooting bark" instead of perlite? Try it, in my experiments, the rooting bark excelled all other aggregates I tested.

My problem was transferring the rooted cutting into a peat based grow medium. For me--in my garden, both bark and perlite failed to provide adequate "structure support" to keep the cutting upright. Hence I went with pre-moistened Promix BX in those tiny 2" net baskets (no beer cups).


Also before doing the "cloning routine", I soak the cutting in plain tap water for a few days. Have not lost a single cutting for years now...not one. I attribute 100% success to healthy donor plants and the water soak trick (trim leafs and make your final 45 degree cut before the water soak).

Hi DocTim420,

BEER CUPS! :D lol this was for ease of use in the tutorial... these cups are larger than you need unless taking cuttings that have a 1/2 inch stock.. like cloning a large main top of a plant which is easy to do with this method. You can use smaller containers.. test and see what works.. I will finish posting up the larger scale production section soon and its variations. A mix of perlite and vermiculite can be utilized... will explain in section.

No structural support is needed for this method when coming to transplant.. you simply wash the perlite off the roots which is very easy to do and I will post pics in the saved areas soon on how this can be done. I will transplant a clone into a DWC and into FFOF soil. These are bare root clones for you to do with as you please. DWC.. Soil ,, Coco.. ect..

Agreed healthy mothers are the key to successful clones
tiphat.gif
Im using plain tap water in this method but my water here is very nice has a low ppm of around 80 and pH of 6.4 on average. I will post info on water quality and such soon in the first post. As you can see in the first post and 2nd pic the clones are taken and allowed to soak there while the rest is being done.. I have left them in the water for no more then 48 hours.. any longer the water can become stagnant and cause damage and risk infection..

As for doing the final cuts before soaking I dont do cause of the reason above.. I want to ensure not to damage or risk infecting the rooting area.

SGS
 

DocTim420

The Doctor is OUT and has moved on...
SGS,

View the water soaking as "hydrating the cutting" (think placing cut flowers in a vase of water).

I use a propagation tray with water to about 1/2" from the top (gallon or so). To hold the cuttings I use an upside down rooting cube tray (10 x 5 = 50 spots) placed in the water--modified as follows: remove one row (length-wise) and one row (width-wise), now you have 36 spots (9 x 4). With the cube tray upside down submerged in the water, the small holes hold the cuttings upright, keeping the leaf tissue dry. I shine a CFL lamp on it 24/7 and I do trim the leaf and make the final 45 degree cut before the water soak.

Time between snip from and transplant to soil in 16 oz cup (48 hour water soak + days in root cube under humidity dome) is about 14 days...sometimes 12, and sometimes 16-18. If I get backed up/busy/no room, I have been known to extend the water soak to week plus (no reason to change the water) and full 3 weeks in root cubes. I would not advise doing both again...I had cuttings with giant roots and cried when I broke a few root shoots...lol, they "outgrew" the tiny 2" netting cups.

Do an experiment...about 2 days before you do clone--snip some for the water soak thing, then run a side-by-side clones.

Since I nip/cut each leaf before water soaking...every leaf that is missing a nip/cut I know grew during the water soak. I have seen as many as 3 new leaf sets (8 day water soak)--and even had new root shoots while soaking under water.

Zero mushy stems, zero rot or bacteria issues (probably from the chlorine in my tap water), and no limpy/leaning cuttings--seems the water makes them stand up at attention.
 

dr-dank

Member
question. Do you ever top off the cups once you have inserted the cuts? Or is this initial hydration and lower 1/3 of the cup a sufficient reservoir to get them to root?

Seems after 10-14 days things might get a bit funky in the bottoms and one would want to flush them out/exchange the water.

Thanks for any clarifications.

Regards
 

1G12

Active member
Question for SGS

Question for SGS

After having yur cuttings in the cups for the required amount of time, how do you recommend checking for root development without damaging whatever has (or hasn't) developed? And so what do you do if you find you need to leave them in the cups for a little longer before transplanting?
Thanks.
 

1G12

Active member
Well, I've never attempted right and proper cloning before. So, I followed the SGS method here as close as I could. The only additional thing I did was dip in some Clonex. After 11 days things turned have turned out perfect, perfect, perfect!!!!:woohoo:

Thank you SGS for a great teaching thread!!:tiphat:
 

mtntrogger

Member
Veteran
Well, I've never attempted right and proper cloning before. So, I followed the SGS method here as close as I could. The only additional thing I did was dip in some Clonex. After 11 days things turned have turned out perfect, perfect, perfect!!!!:woohoo:

Thank you SGS for a great teaching thread!!:tiphat:

Nice man !
 

mtntrogger

Member
Veteran
SGS,

View the water soaking as "hydrating the cutting" (think placing cut flowers in a vase of water).

I use a propagation tray with water to about 1/2" from the top (gallon or so). To hold the cuttings I use an upside down rooting cube tray (10 x 5 = 50 spots) placed in the water--modified as follows: remove one row (length-wise) and one row (width-wise), now you have 36 spots (9 x 4). With the cube tray upside down submerged in the water, the small holes hold the cuttings upright, keeping the leaf tissue dry. I shine a CFL lamp on it 24/7 and I do trim the leaf and make the final 45 degree cut before the water soak.

Time between snip from and transplant to soil in 16 oz cup (48 hour water soak + days in root cube under humidity dome) is about 14 days...sometimes 12, and sometimes 16-18. If I get backed up/busy/no room, I have been known to extend the water soak to week plus (no reason to change the water) and full 3 weeks in root cubes. I would not advise doing both again...I had cuttings with giant roots and cried when I broke a few root shoots...lol, they "outgrew" the tiny 2" netting cups.

Do an experiment...about 2 days before you do clone--snip some for the water soak thing, then run a side-by-side clones.

Since I nip/cut each leaf before water soaking...every leaf that is missing a nip/cut I know grew during the water soak. I have seen as many as 3 new leaf sets (8 day water soak)--and even had new root shoots while soaking under water.

Zero mushy stems, zero rot or bacteria issues (probably from the chlorine in my tap water), and no limpy/leaning cuttings--seems the water makes them stand up at attention.
In my efforts to improve my success rates I researched many threads on here. This water soaking technique seems super helpful. I left my snips in shot glasses with distilled h2o, changed the water a few times , left the cuts in the glasses for about 4 days before planting in rockwool , no clone gel or such. They dont need the dome at all , no wilting and look very healthy at 10 days, expecting them to be ready to plant in about a week. I do need to moisten the cubes every day or so, I just use "Snypes" mix in a spray bottle .
 
Top