I've heard it's better to go 11/13 not 12/12 for sativas to ripen. Dave would know better peace sddwish you much perseverance in your thai stiks
My day is 140 12/12
Still no end

-
Happy Birthday ICMag! Been 20 years since Gypsy Nirvana created the forum! We are celebrating with a 4/20 Giveaway and by launching a new Patreon tier called "420club". You can read more here.
-
Important notice: ICMag's T.O.U. has been updated. Please review it here. For your convenience, it is also available in the main forum menu, under 'Quick Links"!
You are using an out of date browser. It may not display this or other websites correctly.
You should upgrade or use an alternative browser.
You should upgrade or use an alternative browser.
Click here for Afropip Durban Poison, and GN Thai Stick or don't. I dont care.
- Thread starter Dave Coulier
- Start date
CannaBossFarms
Member
wish you much perseverance in your thai stiks
My day is 140 12/12
Still no end
Longest I have took them is 120 days it's crazy how long they need
I've heard it's better to go 11/13 not 12/12 for sativas to ripen. Dave would know better peace sdd
I agree 11/13 works better in my opinion for some strains
Those roots look amazing brother, looking forward to hearing what the syringe and measuring cup are all about. And the Thais look amazing as well, can't wait to see em grow up. Looking beastly so far
Thanks a bunch SourDank. The roots really are beyond anything Ive seen in my garden before. I think Ive perfected the technique of hand-watering, or pretty damn close. Spurr got me on the right track long ago, and from there Ive refined my methods to be shared in detail soon. I promise.
I've heard it's better to go 11/13 not 12/12 for sativas to ripen. Dave would know better peace sdd
12/12 will work fine for many sativa hybrids, ime, but for pure sativas I definitely like some more dark time. Thaibliss suggested 11/13, and he's been growing Thai a pretty long time, so I went with his advice finally.

Longest I have took them is 120 days it's crazy how long they need
I agree 11/13 works better in my opinion for some strains
At 120 days in, they're just getting warmed up hehe. My TSA clone is at 70 days flower under 11/13 and she just now finally started budding up. I expect a flowering time of 200+ days on her. 1/3rd of the way there, and she's still very healthy and smells just like lemon cleaner. Ill have to snap a few pics of her soon to share.
Afropips Durban Poison Update
Afropips Durban Poison Update
Thanks for stopping by Get Mo. Speaking of Durbans I have an update for them as well. Ive got pics from a couple of days ago, and some pics I took tonight. Lets check em out.
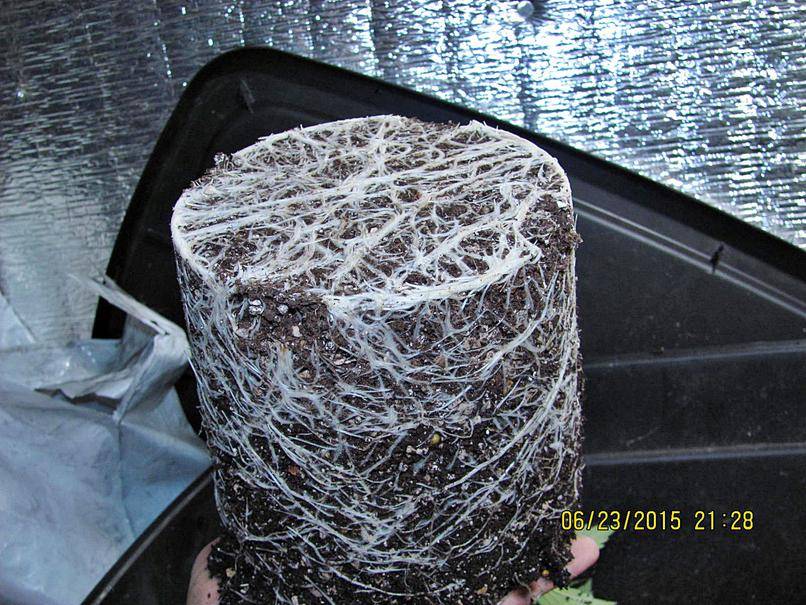
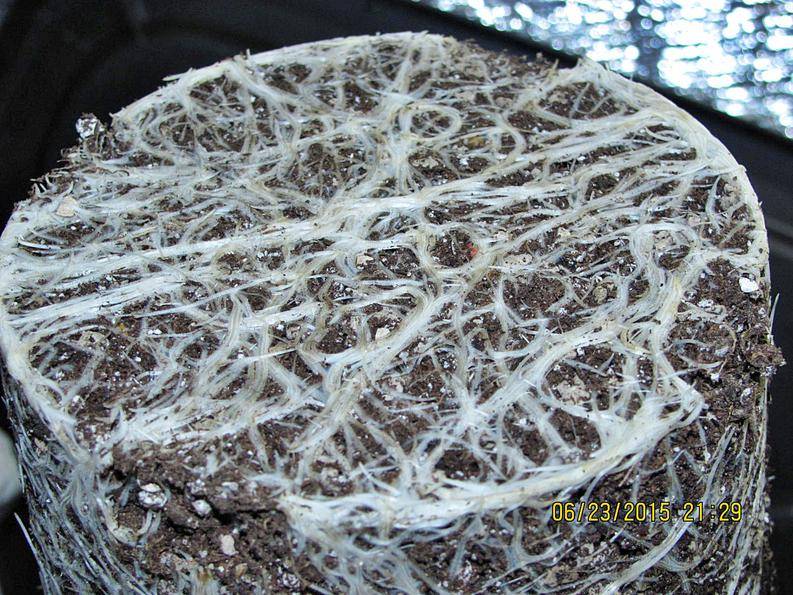
Day 29 Rootball of my most developed plant.
Afropips Durban Poison Update
SuB'd!
Lookin forward to seeing what them Durbans do!

Thanks for stopping by Get Mo. Speaking of Durbans I have an update for them as well. Ive got pics from a couple of days ago, and some pics I took tonight. Lets check em out.
Day 29 Rootball of my most developed plant.
Afropips Day 31 Update
Afropips Day 31 Update
Lets take a peek at how the first group of Durban Poison are developing now.
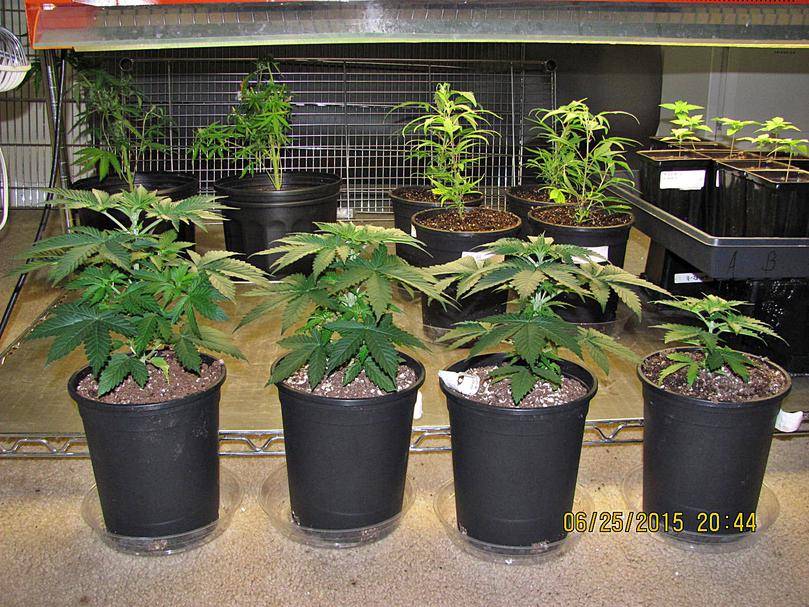

What a beauty this plant below is. I could care less if its a boy or girl. This plant is by far my fave when it comes to physical looks.
Next up are the twins. Itd be easy to confuse the two if one didn't have better lateral branching.
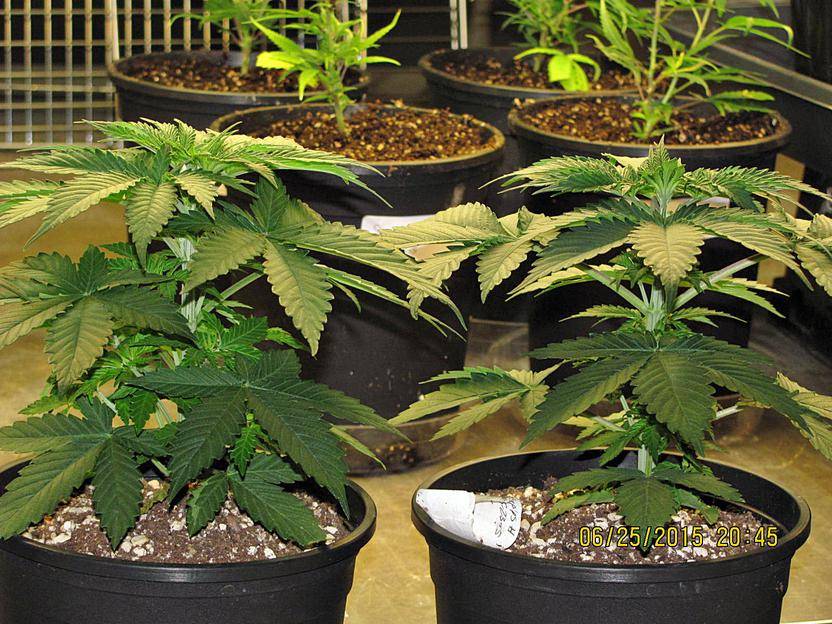
And finally the runt of the litter. It was the last one to come up out of the bunch. I hope with some extra room for her roots she can pick up the pace.
Afropips Day 31 Update
Lets take a peek at how the first group of Durban Poison are developing now.
What a beauty this plant below is. I could care less if its a boy or girl. This plant is by far my fave when it comes to physical looks.
Next up are the twins. Itd be easy to confuse the two if one didn't have better lateral branching.
And finally the runt of the litter. It was the last one to come up out of the bunch. I hope with some extra room for her roots she can pick up the pace.
wow such broad leaves! beautiful plants dave!
B
Baron Greenback
They really are lovely, not a leaf out of place. Really good work.
wow such broad leaves! beautiful plants dave!
Thanks HD. Much appreciated. I hope I can continue to keep them beautiful long term. So far so good!
They really are lovely, not a leaf out of place. Really good work.
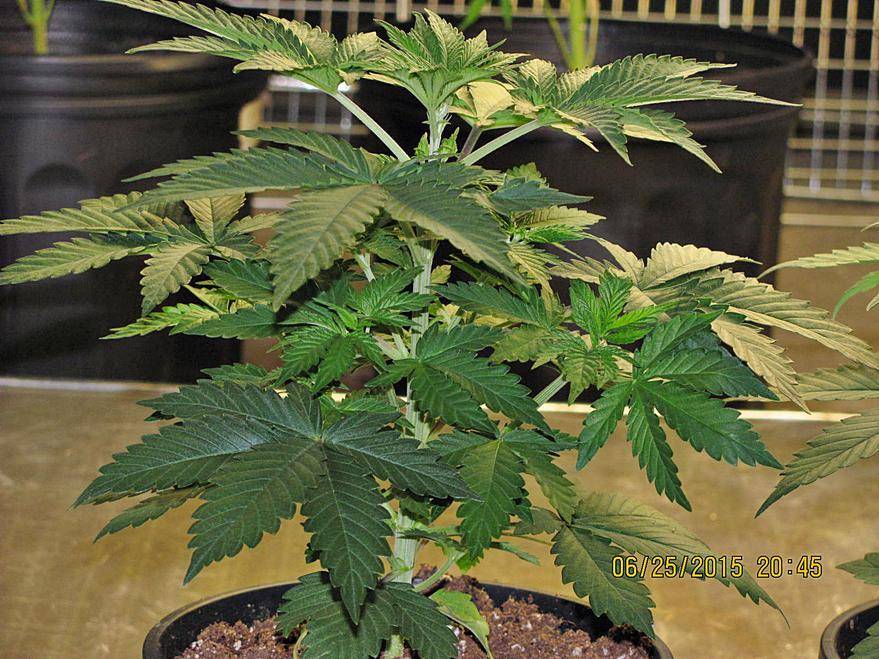
Actually Baron Greenback, I do believe there was one leaf out of place on the bottom of my largest DP. Its kinda yellow. Ill do better next time.
I agree though, they look pretty damned nice. Osmocote @ 5gr/gallon of media and twice weekly feedings @ 450-475 PPM using GH Flora 3 part has worked out pretty good so far.
Subbed! Looking great! I'm excited to see how these progress!
Welcome to the thread djimb. I do hope you enjoy these fine pure sativas on display here. Maybe even be encouraged to try some yourself.
New Promix
New Promix
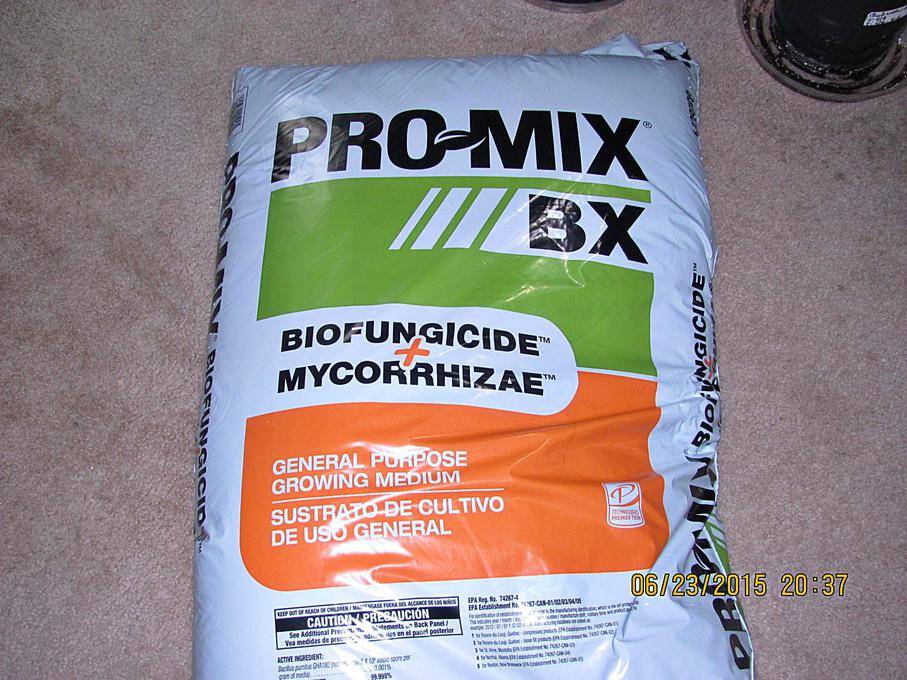
Well I exhausted my supply of Promix Bx with Biofungicide(bacillus subtilis), so I went to my local garden shop and picked up some new Bx, and low and behold they've now added Myco and Bacillus Pumilus together!
Add in some bioworks rootshield plus and were working with 4 different beneficials(Trichoderma harzianum strain T-22, and Trichoderma virens strain G-41). Root pathogens be damned! They wont be getting a stronghold in my plants roots.
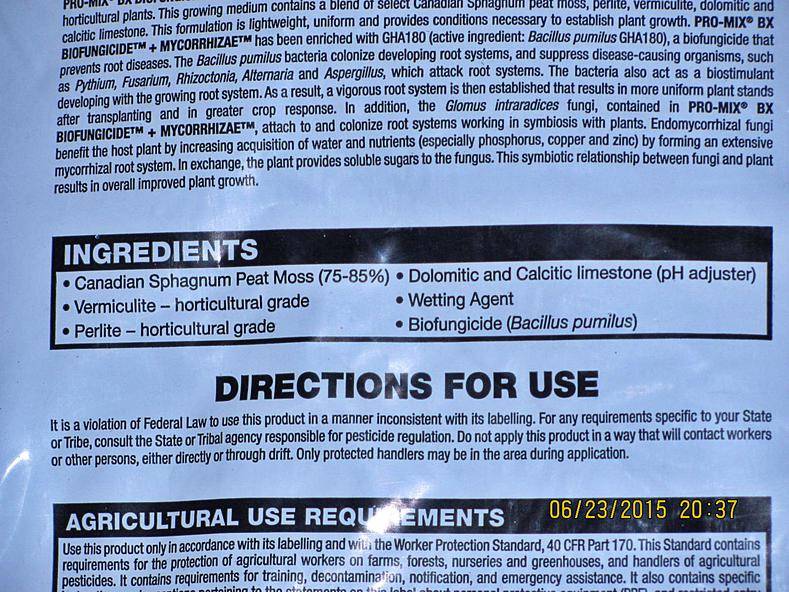
Read the small text on the backside of the bag for more useful info.
New Promix
Well I exhausted my supply of Promix Bx with Biofungicide(bacillus subtilis), so I went to my local garden shop and picked up some new Bx, and low and behold they've now added Myco and Bacillus Pumilus together!
Add in some bioworks rootshield plus and were working with 4 different beneficials(Trichoderma harzianum strain T-22, and Trichoderma virens strain G-41). Root pathogens be damned! They wont be getting a stronghold in my plants roots.
Read the small text on the backside of the bag for more useful info.
Garden Update
Garden Update
Now that Ill be using myco in my garden(first time ever), Ill need to adjust my WSF feed to reduce the amount of P supplied. I was running 5/5/7 GH Flora 3 part series. Now Ill run 5/5/5. That'll drop the P to about 35ppm total. Ill be losing some Mg, and Sulfur, so Ill be using Epsom Salts to supplement. Ill post rates later for the E.S. that I end up using.
Ive already got 3 of the Thai transplanted last night, but I ran out of 2.5 gallon containers, so ill have to delay that till tomorrow afternoon. Tonight the Durban P will be transplanted into some 3 gallon containers I have except for the runt. I hope that one will be ready in a weeks time for transplant.
I think Im gonna get a headstart on the transplanting now. Ive got my hands full over here and cant afford to dawdle.
gorilla ganja
Well-known member
Are you going to tell us the secret to those roots. Whats the syringe for? Most people only care whats above ground, but the roots are where it's at. Great job. I hope my Durbans finish half as healthy as yours. I believe my DP's have a some Indica in them, They are from Dutch passion.
Are you going to tell us the secret to those roots. Whats the syringe for? Most people only care whats above ground, but the roots are where it's at. Great job. I hope my Durbans finish half as healthy as yours. I believe my DP's have a some Indica in them, They are from Dutch passion.
Well obviously it would no longer be a secret if I told everyone.
Its coming I promise..I had to get more pictures snapped to help demonstrate how I water. Im also bogged down with quite a full garden. All this transplanting every couple of weeks wears me out. Anyone want to volunteer to be my mixer? Two more Thai to transplant, and then Ill begin working on that watering update.

Nice show dave....surprised of the visual indica influence of your durbans....im watching because I have some south african seeds durban I used a whyle back....much different skeletal structure than mine...none the less interesting selections....and good luck with those GN thai....
Nice show dave....surprised of the visual indica influence of your durbans....im watching because I have some south african seeds durban I used a whyle back....much different skeletal structure than mine...none the less interesting selections....and good luck with those GN thai....
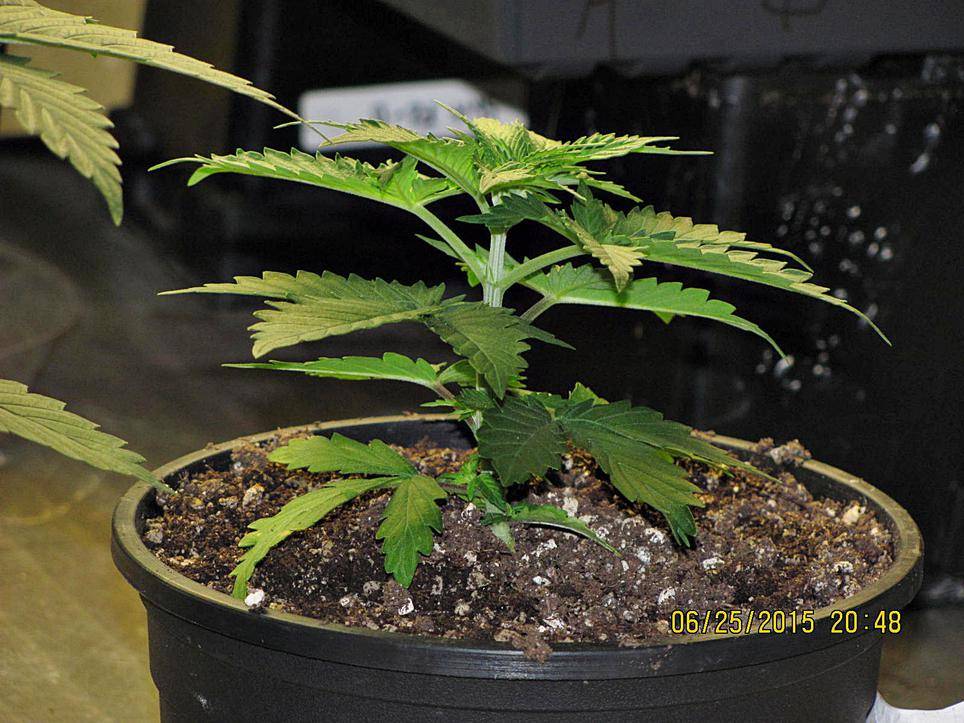
Much obliged moneymike. I do see how they look Indica like from the leaves. I expect changes in leaf morphology over time though. Check out this leaf on my Thai Stick A Clone. The leaves never looked like this in the seedling/young veg stage.
Got any pics or threads for your Durban you ran?
Im working on the watering/rootball update post, but its a time consuming one and unfortunately Ive got work. Ill try to get it finished and posted tonight after tending to my garden.
Toodaloo everyone!
Fyi Dave, I was just reading about T. harzianum being inhibited by glomus fungi. I'll try to find the study.
Thanks for the info. With some quick googling I found some interesting studies, so I think Ill read up on it now.
After reading a few abstracts, Im sure I need to research more. One abstract I read says Glomus Intradices adversely affected T. harzianum, but that was a root-free study. Another one involving melon seedlings stated they worked quite..
Abstract
BACKGROUND: Biological control through the use of Trichoderma spp. and arbuscularmycorrhizal fungi (AMF) could contribute
to a reduction of the inputs of environmentally damaging agrochemical products. The objective of this study was to evaluate
the interactions between four AMF (Glomus intraradices, Glomus mosseae, Glomus claroideum and Glomus constrictum) and
Trichoderma harzianum for their effects on melon plant growth and biocontrol of Fusarium wilt in seedling nurseries.
RESULTS: AMF colonisation decreased fresh plant weight, which was unaffected by the presence of T. harzianum. Dual
inoculation resulted in a decrease in fresh weight compared with AMF-inoculated plants, except for G. intraradices. AMF
colonisation level varied with the AM endophyte and was increased by T. harzianum, except in G. mosseae-inoculated plants.
Negative effects of AMF on T. harzianum colony-forming units were found, except with G. intraradices. AMF alone were less
effective than T. harzianum in suppressing disease development. Combined inoculation resulted in a general synergistic effect
on disease control.
CONCLUSION: Selection of the appropriate AMF species and its combination with T. harzianum were significant both in the
formation and effectiveness of AMsymbiosis and the reduction of Fusarium wilt incidence inmelon plants. The combination of
G. intraradices and T. harzianum provided better results than any other tested.
c 2009 Society of Chemical Industry
References:
"Interactions between arbuscularmycorrhizal fungi and Trichoderma harzianum and their effects on Fusarium wilt in melon plants grown in seedling nurseries"
AinhoaMart´ınez-Medina, Jose A Pascual,∗ Eva Lloret and Antonio Rold´an
Published online in Wiley Interscience: 25 June 2009
(full text) http://microgaia.eu/almost/wp-conte...-melon-plants-grown-in-seedling-nurseries.pdf
So you want to produce great roots huh?
So you want to produce great roots huh?
I think Ive had you all waiting long enough, so I present to you my method of producing amazing rootballs.
It isn't enough to provide a great medium, nutrients, and beneficials to get great roots. All that can easily be undone by improperly watering, which is often a common concern for many of us. Steady, methodical watering is the key step in growing amazing roots. I used to just take cups of water/feed and pour it on top of the media and let it soak in, rinse repeat until I thought I was done or until I saw pooling below. How many of us have done that one before? Dumping water onto the top of our rootballs usually leads to funneling/channeling of water as well as water flowing down the sides of the rootballs. Piss poor watering as I learned. I could do better.
Then Spurr told me about pulse watering, and that was a game changer for my roots then. You simply apply your solution to your plants in pulses allowing time for the water to wick throughout the media in between each pulse. Time between pulses are typically 5-10 minutes for me. I like to apply about about 20-25% of the water to plant A, move onto Plant B and water, move to Plant C and water, etc and eventually you work your way back around to Plant A where we start the process over again. Rinse repeat until we give them the required solution. The time in between plants give the water the time it needs to wick throughout the media. I can apply more water without wasted run-off.
Step 1: Start with a rootball needing water. I water sooner than others may. A consistently moist rootball is a happy vigorous rootball. Blumats taught me that, and I carried that over to hand-watering. Dry-downs in wet/dry cycles only cause damage to your fine root hairs and roots, leading to greater chances of root pathogens infecting them as well as stunting.

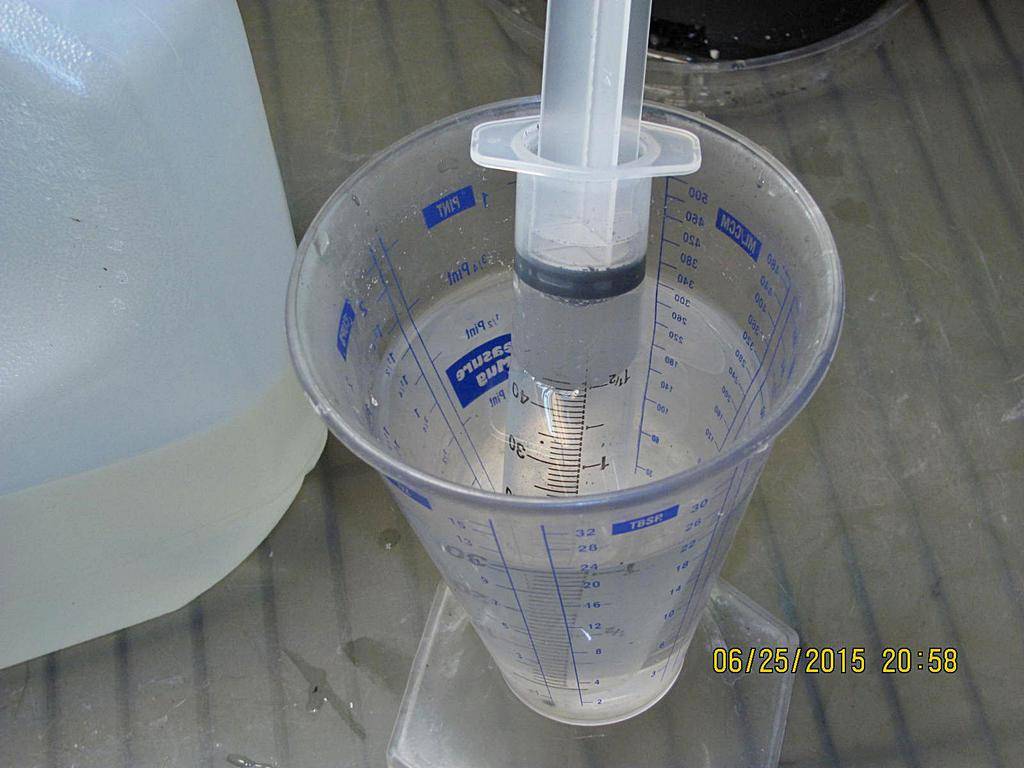
Step 2: The mysterious syringe and measuring cup. The syringe provides me the fine precision control I need to cover every square inch leaving no dry spots left behind. I can water with a slow steady drip as I do for my seedlings in small containers, or a steady flowing stream or anywhere in between. I always water either in 30ml or 60ml increments each pulse. Nothing in between.
The measuring cup allows me to accurately measure out a consistent amount of water/feed every time. There is no guessing or half assing involved. I measure out exactly how much solution I need for all the plants and each gets their appropriate amount. Its important to know how much water it takes to reach container capacity and to exceed it. When you know that, you can better tailor how much water your plants really need each watering. I do not water to run-off by the way. No leaching in my garden at all. That only kills root-hairs if you are constantly flushing/leaching with each watering, IME.
Although, I also do water from the bottom once the plants reach the .75 gallon or larger containers. Its too time intensive to use the syringe on each plant at that stage. After about a 30 minute period to wick up the bottom watering, I lift the plant, tilt it at 90 degree angle to drain the perched water table(often times lifting the plant up and quickly descending repeatedly to further drain the PWT) and set it in a saucer with no more water.
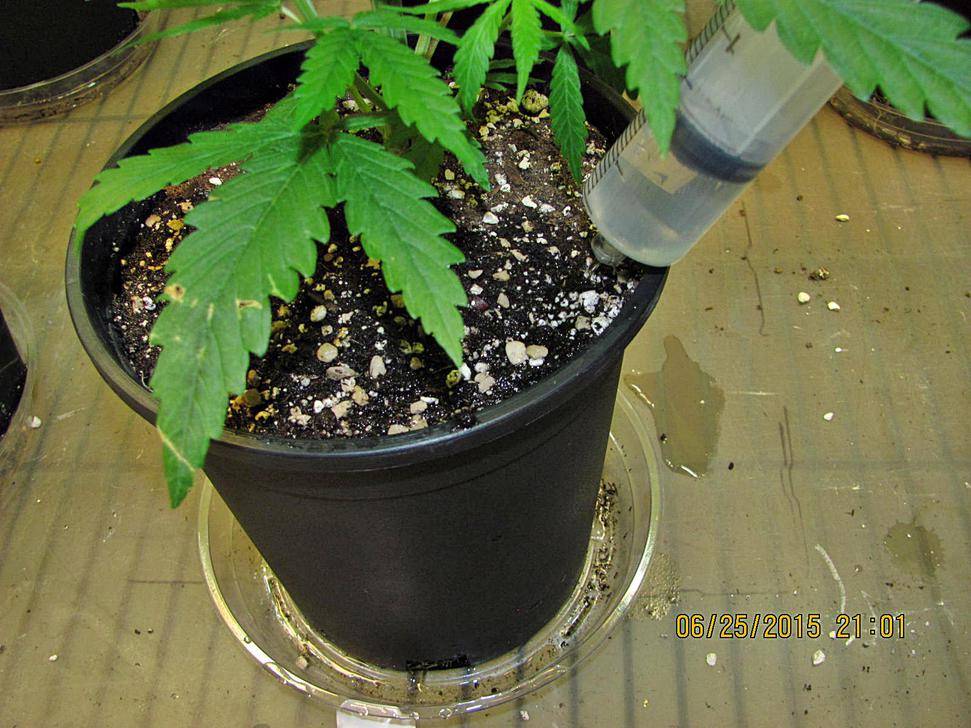
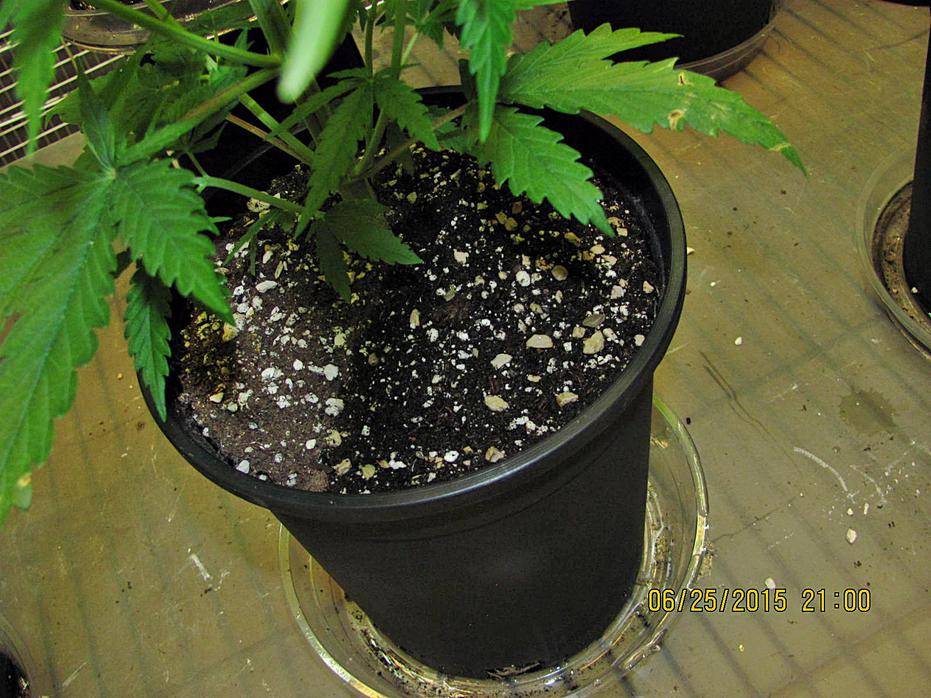
Step 3: I start with 60ml in my syringe at this stage. I apply the solution to one half of my media. The first picture shows me about done watering that side of the plants rootball. The 2nd picture shows the media with the full 2oz/60ml of water applied. She's also already soaked up 180ml I bottom watered by the time I was done applying 2 oz of water to the top. This is just the first pulse btw.
Step 4: Now this step is crucial if you want to keep those beautiful fuzzy white roots on the outside of your rootball. Its real easy for them to become desiccated if too much time passes between waterings, or care isn't taken to fully ensure the entire rootball is moistened.
I make sure the roots on the outside edge dont have any dry pockets by applying around 50-60% of my water along the edge of the rootball. If I apply most of my water to the inner areas of the rootball, I end up with dry spots on the outside, which is why I pay great care to circling the entire rootball with a slow steady stream from the syringe.
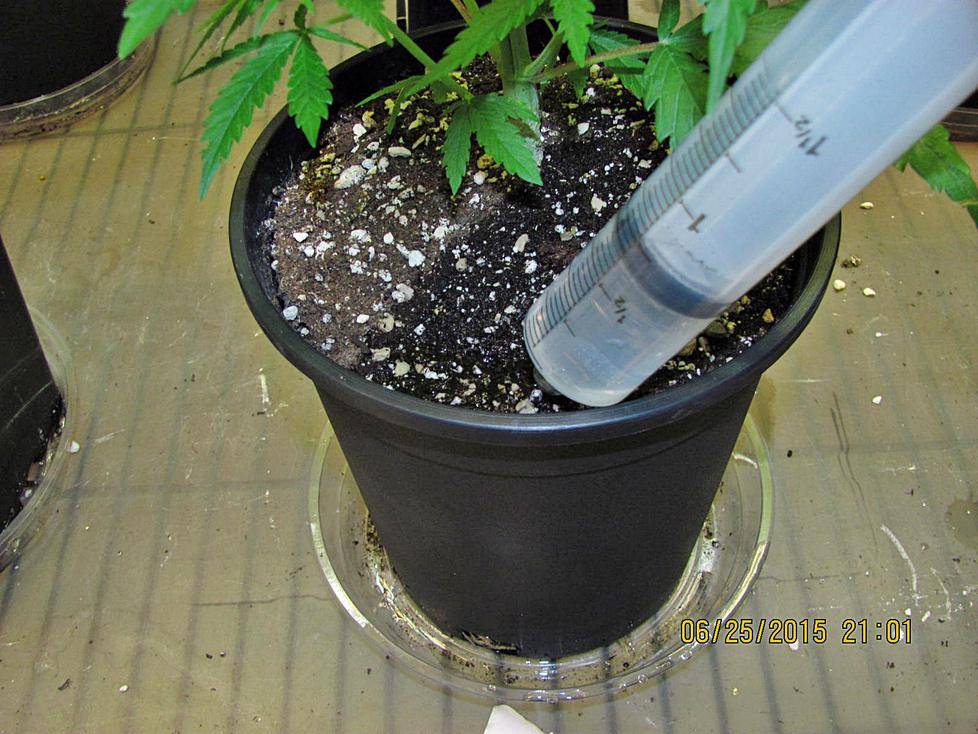
Step 5: Repeat Steps 3 and 4 on the other side of the rootball. Follow that up with a watering all the way around the outside edge only, and Im typically done at that point. It usually takes 2 or 3 pulses + bottom watering to satisfy a plant. Once the plants have rooted enough, I lift them from the containers to gauge the results of the pulses as well. It helps me know how many more pulses Im likely to require.
Unfortunately, I have hit my limit for photos to upload. Please visit my albums to see pics of the rootballs, or if you've been following the thread you've already seen some of them.
So you want to produce great roots huh?
I think Ive had you all waiting long enough, so I present to you my method of producing amazing rootballs.
It isn't enough to provide a great medium, nutrients, and beneficials to get great roots. All that can easily be undone by improperly watering, which is often a common concern for many of us. Steady, methodical watering is the key step in growing amazing roots. I used to just take cups of water/feed and pour it on top of the media and let it soak in, rinse repeat until I thought I was done or until I saw pooling below. How many of us have done that one before? Dumping water onto the top of our rootballs usually leads to funneling/channeling of water as well as water flowing down the sides of the rootballs. Piss poor watering as I learned. I could do better.
Then Spurr told me about pulse watering, and that was a game changer for my roots then. You simply apply your solution to your plants in pulses allowing time for the water to wick throughout the media in between each pulse. Time between pulses are typically 5-10 minutes for me. I like to apply about about 20-25% of the water to plant A, move onto Plant B and water, move to Plant C and water, etc and eventually you work your way back around to Plant A where we start the process over again. Rinse repeat until we give them the required solution. The time in between plants give the water the time it needs to wick throughout the media. I can apply more water without wasted run-off.
Step 1: Start with a rootball needing water. I water sooner than others may. A consistently moist rootball is a happy vigorous rootball. Blumats taught me that, and I carried that over to hand-watering. Dry-downs in wet/dry cycles only cause damage to your fine root hairs and roots, leading to greater chances of root pathogens infecting them as well as stunting.
Step 2: The mysterious syringe and measuring cup. The syringe provides me the fine precision control I need to cover every square inch leaving no dry spots left behind. I can water with a slow steady drip as I do for my seedlings in small containers, or a steady flowing stream or anywhere in between. I always water either in 30ml or 60ml increments each pulse. Nothing in between.
The measuring cup allows me to accurately measure out a consistent amount of water/feed every time. There is no guessing or half assing involved. I measure out exactly how much solution I need for all the plants and each gets their appropriate amount. Its important to know how much water it takes to reach container capacity and to exceed it. When you know that, you can better tailor how much water your plants really need each watering. I do not water to run-off by the way. No leaching in my garden at all. That only kills root-hairs if you are constantly flushing/leaching with each watering, IME.
Although, I also do water from the bottom once the plants reach the .75 gallon or larger containers. Its too time intensive to use the syringe on each plant at that stage. After about a 30 minute period to wick up the bottom watering, I lift the plant, tilt it at 90 degree angle to drain the perched water table(often times lifting the plant up and quickly descending repeatedly to further drain the PWT) and set it in a saucer with no more water.
Step 3: I start with 60ml in my syringe at this stage. I apply the solution to one half of my media. The first picture shows me about done watering that side of the plants rootball. The 2nd picture shows the media with the full 2oz/60ml of water applied. She's also already soaked up 180ml I bottom watered by the time I was done applying 2 oz of water to the top. This is just the first pulse btw.
Step 4: Now this step is crucial if you want to keep those beautiful fuzzy white roots on the outside of your rootball. Its real easy for them to become desiccated if too much time passes between waterings, or care isn't taken to fully ensure the entire rootball is moistened.
I make sure the roots on the outside edge dont have any dry pockets by applying around 50-60% of my water along the edge of the rootball. If I apply most of my water to the inner areas of the rootball, I end up with dry spots on the outside, which is why I pay great care to circling the entire rootball with a slow steady stream from the syringe.
Step 5: Repeat Steps 3 and 4 on the other side of the rootball. Follow that up with a watering all the way around the outside edge only, and Im typically done at that point. It usually takes 2 or 3 pulses + bottom watering to satisfy a plant. Once the plants have rooted enough, I lift them from the containers to gauge the results of the pulses as well. It helps me know how many more pulses Im likely to require.
Unfortunately, I have hit my limit for photos to upload. Please visit my albums to see pics of the rootballs, or if you've been following the thread you've already seen some of them.

