What's new
  • Happy Birthday ICMag! Been 20 years since Gypsy Nirvana created the forum! We are celebrating with a 4/20 Giveaway and by launching a new Patreon tier called "420club". You can read more here.
  • Important notice: ICMag's T.O.U. has been updated. Please review it here. For your convenience, it is also available in the main forum menu, under 'Quick Links"!

Drip Drop Droop

stihgnobevoli

Active member
Veteran
I dunno if this should be here or in coco, but you guys prolly know more about this.

I'm having an issue with keeping on top of my watering and i wanna set up a drip system. I only need like 4-6 lines. it's DTW so i'm not gonna be needing anything complex. in fact it's prolly not even a hard question.

i have a fountain pump 60GPH, i have a 1 gallon bucket. i think it's one gallon. might only be half. i have lines and those little spike barb connectors (straight, 90 degree, T) i used to have a buncha those little things that spray the water i guess? i think i left em back in the "old country".

basically i need to water my plants like a little tiny bit every 2-3 hours. they drink like 1/2 a gallon a day together. but i need to water like 3-4 times a day. i can't have a big ass thing like when i googled drip feeding and they were like get 12 trays and a table, or build this contraption with a large bucket under to recirculate. and i'm all like wtf. how do i apply 1-2 cups of water slowly every 3 hours?

so how to i make this pump which shoots water 3 feet into the air drip drops of water on my droopy plants?

i have a pump like i said
a bunch of connectors
some hoses
and some sort of adapter for a garden hose with a screen in it. what do i need to do?

also i don't have anywhere to put a large tub and plastic sheets to catch a huge mess. i just need it to water to the point where like 1oz of runoff comes out.
 

stihgnobevoli

Active member
Veteran
picture.php

https://www.icmag.com/ic/showthread.php?threadid=287675

hmm this thread might be part of or my solution.

i've only read a little bit but i think he's saying i make an adapter like this on my pump and use these little valves to control how much water is actually making it down the line to the plants?
 
Check out my thread, I made my drip system including the drip rings.
When you drop down from the 1/2" to 1/4" "spaghetti" tubes, they make little individual shut off valves, or each 1/4" line can be regulated by drip controllers which come in varying GPH.
 

DONAJTHEIII

Member
GPH drippers found at your local hardware store. get like a gal. per hour then set them up like a halo around each plant. then get a programmable digital timer like an apollo titan. Watch your plants the first week to know when they need water to set up your system FLAWLESSLY.


This is how Im setting mine up this round. The GPH drippers allow you to dial things in since there slowed down know what I mean ? They need to be set up like a halo around each plant.


AJAE
 

stihgnobevoli

Active member
Veteran
@fishywater. i'm gonna check out your thread now

@donajtheiii. i've been reading some more there was a pdf in that thread i linked. i just need to get some emitters and then figure out where this screened connector goes. i have a digital timer, but it's an on off daily thing. i'm not sure if i can make it run independent of the time clock. but if not i have a couple analog timers i'll just set to run 3-4 times during lights on hours.

if i can get this setup right i can put a bigger res and be away for longer.
 
018171672001.jpg


I recommend raising your res/bucket and gravity feeding....

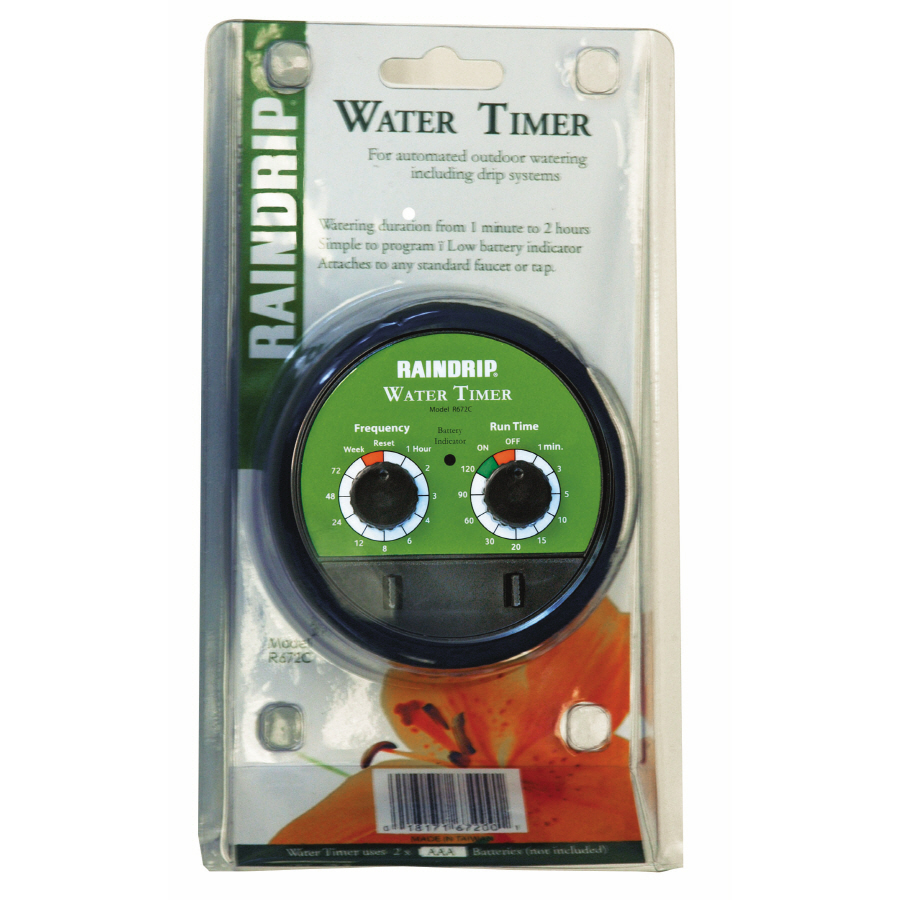
Get an analog electric timer like above, use an ebb and flow fitting to put a hold towards the bottom of your res/bucket, from there run 1/2" poly to a ring with 1/4 inch feed tube barbed into it with the 1 or 2 gph connectors mentioned above, figure out how much time it takes for you to get as much water/feed as you need per feeding, then set the timer appropriately.

These are real simple timers to use. ONe dial controls how often feeding occurs, the other dials in how long each feeding is for. It runs on a battery (and indicates when the battery is dying) so it doesn't fail even if electric goes out.

Or look into a blumat patio kit and learn how to dial them in.
 

stihgnobevoli

Active member
Veteran
what is gravity feeding?

my plan is 1 pump 1 bucket, 1 tray to catch runoff. some hoses, lines and the drip/emitters on the end.

pump goes in bucket and pumps when the timer comes on, liquid runs through tubes and drips on plants till timer shuts off.

i already have 99% of it, i just didn't know how to make the pressure change because i'm only gonna be using a small bucket. i just have a handful of plants in a micro cab. i just can't keep up with hand watering tiny amounts multiple times a day. with all of you guys input i have a good handle on how it should all run together. i just need to get some drippers that go really low. is .5gph the lowest?

i figure i can get my timer to go off like 15minutes every 3 hours then i can adjust the flow at the pump end so that it's doing like 30 drops of water in those 15 minutes or whatever.
 
Gravity feeding is not using a pump, raising the bucket of feed/water, and letting gravity do the work instead of a pump.
 

DONAJTHEIII

Member
Gravity feeding is not using a pump, raising the bucket of feed/water, and letting gravity do the work instead of a pump.


How can you do a gravity feed with a timer simple ? Maybe this jack herrer got me tonight but what would you be plugging into the timer ?


Wouldnt you need a solenoid too to open and control valves ?


AJAE


Here's a few of the versions of the timers I'm speaking about. You'll see that they have hose input and outputs, and the timer opens and closes a valve as you set it.

ONe of these pictured above is a single feed and the other one has two different output feed zones. IN the pic you can see the single zone timer as it is "hosed" inline with the rubbermaid tub I was using as a res.

It basically has two knobs. One controls how often the valve opens to feed. The other controls the duration of each feeding. Super, super simple.

It uses a battery, which lasts about a year and a batter indicator that lets you know when it's going bad. I highly recommend them if it suits your setup.
 
Last edited:

DONAJTHEIII

Member
[URL=https://www.icmag.com/ic/picture.php?albumid=7414&pictureid=132416&thumb=1]View Image[/url]

Here's a few of the versions of the timers I'm speaking about. You'll see that they have hose input and outputs, and the timer opens and closes a valve as you set it.

ONe of these pictured above is a single feed and the other one has two different output feed zones. IN the pic you can see the single zone timer as it is "hosed" inline with the rubbermaid tub I was using as a res.

It basically has two knobs. One controls how often the valve opens to feed. The other controls the duration of each feeding. Super, super simple.

It uses a battery, which lasts about a year and a batter indicator that lets you know when it's going bad. I highly recommend them if it suits your setup.


These are awesome simple ! love the simplicity.

Couple questions though.


1) are the valves built in to the timer im guessing ?

2) what size tubing is that that you connected to the timer ?

3) are there any extra pieces of equipment needed to connect the timer to the rez and the hoses to the timer ? I see a yellow valve on your timer that connects the hose to the rez is that part of the timer ?


Thanks simple these look nice might have to try this gravity feed this round !

.:tiphat:

AJAE
 
These are awesome simple ! love the simplicity.
Couple questions though.
1) are the valves built in to the timer im guessing ?
2) what size tubing is that that you connected to the timer ?
3) are there any extra pieces of equipment needed to connect the timer to the rez and the hoses to the timer ? I see a yellow valve on your timer that connects the hose to the rez is that part of the timer ?

Thanks simple these look nice might have to try this gravity feed this round !

.:tiphat:

AJAE

My pleasure. I love these things and have used them for years.

1. The valves are built inside the timer. It simply opens to let water/nutes through then closes....that simple!
2. That is 1/2" poly tubing that I was using. I've used 3/4" tubing in similar setups and that's been fine..
3. Other things you'd need:
1 ebb and flow fitting (1/2" or 3/4", whichever diameter tubing you're using). This goes through your res and connects your res to the tubing that will go to the timer.
2 hose/faucet adaptors/menders that adapt to the 1/2" or 3/4" tubing you're using. These connect the tubing into and out of the timer. I forget if you need the male or female twist ends (maybe one of each???), but they are so cheap I have 10 or each laying around.... Your typical hose mending/repair kit will have some of these pieces(usually a male and female connector) in there. Harbor Freight, Home Depot, and Lowes all have them and individual pieces in stock for under $5 a piece The yellow that you see is what came with one of the adaptor pieces to tighen the hose onto the adaptor. The hose clamp that you see that attaches the tubing to the ebb and flow fitting serves the same purpose as the yellow plastic piece.

Also...one last thing. Inside the hose input portion of the timer there is a screen that should be rinsed out every now and then when the res is empty. Takes 5 seconds to take it out, rinse, and put back in.

These timers also have an "on" option on the duration knob if you want to manually turn it on while you're with it....
 
Last edited:

Latest posts

Latest posts

Top