What's new
  • Happy Birthday ICMag! Been 20 years since Gypsy Nirvana created the forum! We are celebrating with a 4/20 Giveaway and by launching a new Patreon tier called "420club". You can read more here.
  • Important notice: ICMag's T.O.U. has been updated. Please review it here. For your convenience, it is also available in the main forum menu, under 'Quick Links"!

DIY: A new angle on light proof vents

Wonderful thread! I have have 2 questions though, would love any answers!

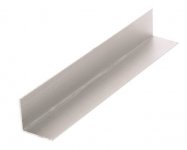
1)Is this okay to use to make the vent?

[FONT=Arial, Helvetica, sans-serif]262.jpg[/FONT]

2)I want to make a lightproof vent for a space which is 10x10 and which is ventilated by 3x6" exhaust fans and 1x10" fan. What dimensions should the vent have?

Thank you very much!:tiphat:
 

Attachments

  • 262.jpg
    262.jpg
    6.1 KB · Views: 24

messn'n'gommin'

ember
Veteran
Three 6" fans and one 10" fan equates to about 163 square inches. Double that, and it comes out to about an 18" x 18" hole, or whatever size hole/s you use that add up to 324 square inches.

As for the material you have pictured, it looks like aluminum angle and should work well. But, most any right angle stock will do.

Just a suggestion: when you put the vanes together, use flat black and paint them first, before making the vent.

hth!
 
Thank you very very much for the answer bro! Thought that this hole ought to be bigger, phew! If i use 2 fans for active intake,the hole should be smaller i guess? I have a 6" fan an a 5" fan used as active intakes. So it goes like this:

Active intake-5" fan at 200 CFM, 6" fan at 450 CFM+hole with the vanes(?)
Active exhaust-2x6" FANS, each rated at 450 CFM (900 CFM), 1x10" fan rated at 1100 CFM+adding one more 450 CFM fan

So, the hole should be smaller i guess? Thanks again!
 

messn'n'gommin'

ember
Veteran
My apologies, I misunderstood! I thought it was for a passive system! I don't use big lights, so I don't have near the problem with heat removal as those who do use them.

So, with that in mind, yes, you can get by with a smaller hole in an active system. But, I have no idea how to figure it.

As much as I know, just put the more powerful fan on the tail end and the least powerful fan at the intake.

Again, my apologies!
 

sub

Member
Got all the vents installed, things are lookin good so far! The images on the left is with the door panels up (for blocking light. The metal loops are for easy moving.) and the right is (obviously) the box open. Can see the two vents in the divide (on either side of the scrog screen) and the passive vent in the bottom back:

7ytA398.jpg


Still working on patching the last of the light leaks and a couple other little things (probably add more lights.. mount fans, finish the exhaust top with the carbon scrubber, which is a bin that sits on top of the cabinet. Looks pretty stealthy with the panels up and the doors closed!) and the perpetual scrog box is a go!

This thread definitely made it possible without taking up too much room.
 

meeko01

New member
hey opinions?

hey opinions?

Hello and 2whoop! So I'm an IC ghost have been for some time picking and prodding the wonderful info here on this site for years actually. This topic has driven me to conceptualize a broked-ass version out of black posterboard from my local dollar tree I have not started in production i wanted an opinion on something first. I have attached this graphic
 

Attachments

  • idea.jpg
    idea.jpg
    30.8 KB · Views: 32

meeko01

New member
Hello and 2whoop! So I'm an IC ghost have been for some time picking and prodding the wonderful info here on this site for years actually. This topic has driven me to conceptualize a broked-ass version out of black posterboard from my local dollar tree I have not started in production i wanted an opinion on something first. I have attached this graphic
ugh! that was only half the statement the question I have is instead of sharp "z" why not a more "s" shape fin?
 

BigJohnny

Member
block 100% of the light by simply making another one, turn it "upside down" and stack it in front of the first one.
 

HorseBadoritiz

Active member
After going through this thread, and looking at what I had on hand, I cobbled up this light trap. It is 100% light proof!

picture.php


I drew it with 1/4" spacing between the fins, but after I cut up the fins, I realized my math skills suck and I only had 1/2 the pieces I'd need, LOL! I did a test, and it looked like 1/2" spacing would work... good thing!

Original drawing.

picture.php


I had a few pieces of galvanized window/door head flashing, which is vaguely zee shaped. I was able to cut through 5 pieces at a time with an abrasive blade... and a stop block kept them all pretty much the same length.

picture.php


I hot glued the short edges together to make an upside down W... which I guess is an M!

I had cut up a bunch of 1/4" thick PVC lattice to make pieces 1/2" wide for spacers. I had to double them up to make the 1/2" fin spacing.

Upside down shot.

picture.php


I wrapped it with some t&g decking. I lined the inside of the frame with some closed cell laminate flooring underlayment scrap. I made the frame a little tight so that when it went together it squeezed everything together so there wouldn't any gaps for light to get out around the edges.

picture.php


I had painted one side of the fins flat black, but ran out of course, LOL! When I put everything together for a dry fit, and it worked, I figured I'd better leave it that way and paint it later. It was very easy with the 1/2" spacing. Next time I won't paint anything until it's all together.

When I pulled out my old vents which were screened and louvered foundation vents, the screens were mostly filled with crap the exhaust fan had been sucking through. So I put a fine nylon window screening on the out side where I could clean it. I splined it into the groove on the frame with a piece of plastic coated clothes line and some staples.

I sealed the wall penetration from the inside with some real HVAC duct tape, not the plastic duck tape. Lights dry the glue out on that crap in a short order.

I got close to 100sq" of venting, minus what the screening cuts off... and no light get's through... at all! I had everything on hand except for that last damn can of paint!

This a great thread, really opened my eyes to light trapping and ventilation...big THANKS!
 

earthwyrms

Active member
Where can the plastic ones be found?

Where can the plastic ones be found?

i am not sure, where i can find these in plastic and 1/8''

i saw some people had plastic ones in the forums but the one/ones i saw were in grows and mentioned as a slight detail or were in a picture.


in case it is LDPE HDPE, it turns out LDPE and HDPE can be welded together with a soldering iron (the smoke is horrible though).
 

earthwyrms

Active member
edit: i meant that LD to LD can be welded and HD to HD, to erally get a good stick between LDPE and HDPE it helps to get the two surfaces melted with the iron and blend them together.

i am unsure where plastic bends are available, preferably in 1/8''

melting off the tab parts seems much easier to do
and if people are making rubbermaid bins, they can be welded right into the design.
 

earthwyrms

Active member
playing around with graphing calculator, material calculations

playing around with graphing calculator, material calculations

i played with calculations and
if going for 120mm wide and tall then i guessed adding 6mm for each shim so if it would be 120mm wide, add 12mm.

so it would be 132mm long bits needed for each double height. so from the innermost part of the bottom to the top would be the height being used and

so i wanted to know how much length i would need to buy depending on the thinness of the metal or plastic

the length in inches L would get you
(cm of how long the length is + 2 times the length in cm of the shims [for both sides]) divided by 2.54 to get to inches.) times 2 because the shims give you an extra height of the same width of the angle thin/thickness)
then to account for the height from the bottom to the top of the area, divide that whole bit by that height in cm.
to finish it up, take all of that and put it under 1, that is divide 1 by all of that.

so if using a desired width 120mm i figure 6mm shims might do, so 120+6+6, 132mm, 13.2cm
and figure 120mm high

what to type in a online or actual graphing calculator looks like

y = 1/(((X/(13.6/2.54))*2)/12)

or y = 1/(((X/(length plus two shims/2.54))*2)/height)

y = the Length of stuff you need to buy
X = the thinness in inches of the metal like 1/16 wall thickness

http://www.wolframalpha.com/widgets/view.jsp?id=c5e70574a3c9db7c84505985651757ac

AWESOME siite

so if i use the graphing calculator, for everbilt home depot aluminum angles,
so if replicating the OP build
of
"Main fins - 12mm x 12mm x 1.4mm thick
Spacers - 12mm x 12mm x 3mm thick"
but only using the original 1.4mm spacer

than 1.4mm is .14cm so .14/2.54 which is close to 1/18 inch

so if using 1/16inch it would be 498.8976378inches of length needed to make
1/20 would need 623.6220472inches of length

so if doing it exactly like like his planned second attempt,
using

" Main fins - 25mm x 25mm x 1.4mm thick
Spacers - 25mm x 25mm x 2.8 thick (two of the 1.4mm thick "main fin" angles placed together)
"
then the angles are 1.4mm thick and the height is tripled by one calculated length (this time just using all millimeters).

so if going for 120mm wide, add maybe 6mm*4, two for each side which is double spaced to get 144mm. we get 3 heights of 1.4mm from the innermost part of the bottom part to the tip of the top part of the filter. this example is for 120mm high.

y=1/(((X/144)*3)/120)
X is 1.4mm
so y=1/(((1.4/144)*3)/120)
y=4114.285714mm
about 4.114meters

the height and length stay the same no matter how long the corners are

if doing the same calculation above but using only one 1.4mm shim on either side the equation would be
y=1/(((X/132)*2)/120)
y=1/(((1.4/132)*2)/120)
y=5657.142857mm
about 5.657meters


if anyone knows where to find these things in plastic, inexpensive, please post about it.
thanks
 

earthwyrms

Active member
i just looked at that post and figured it might be good to simplify it

using millimeters
use Length as y
use thickness as X

y=1/(((X/width of filter plus width of shim on left plus width of shim on right)*number of shims high plus one full bar)/height of filter)

so for 120mm wide plus a left 6mm shim and a right 6mm shim = 132mm
one spacer height unit plus one regular bar height unit = *2
height of filter = 120

y=1/(((X/132)*2)/120)

use X at 1.4mm
and y = 5657.142857mm
about 5.7meters of bar is needed

if doing it like Scrub Ninja's second part,
add two 6mm parts to length=144
add one more unit to height (double spacers)=3
for one 120mm x 120mm filter

y=1/(((X/144)*3)/120)
X at 1.4mm from original specs
y=4114.285714mm
about 4.2meter of bar needed
 

earthwyrms

Active member
After going through this thread, and looking at what I had on hand, I cobbled up this light trap. It is 100% light proof!

View Image

I drew it with 1/4" spacing between the fins, but after I cut up the fins, I realized my math skills suck and I only had 1/2 the pieces I'd need, LOL! I did a test, and it looked like 1/2" spacing would work... good thing!

Original drawing.

View Image

I had a few pieces of galvanized window/door head flashing, which is vaguely zee shaped. I was able to cut through 5 pieces at a time with an abrasive blade... and a stop block kept them all pretty much the same length.

View Image

I hot glued the short edges together to make an upside down W... which I guess is an M!

I had cut up a bunch of 1/4" thick PVC lattice to make pieces 1/2" wide for spacers. I had to double them up to make the 1/2" fin spacing.

Upside down shot.

View Image

I wrapped it with some t&g decking. I lined the inside of the frame with some closed cell laminate flooring underlayment scrap. I made the frame a little tight so that when it went together it squeezed everything together so there wouldn't any gaps for light to get out around the edges.

View Image

I had painted one side of the fins flat black, but ran out of course, LOL! When I put everything together for a dry fit, and it worked, I figured I'd better leave it that way and paint it later. It was very easy with the 1/2" spacing. Next time I won't paint anything until it's all together.

When I pulled out my old vents which were screened and louvered foundation vents, the screens were mostly filled with crap the exhaust fan had been sucking through. So I put a fine nylon window screening on the out side where I could clean it. I splined it into the groove on the frame with a piece of plastic coated clothes line and some staples.

I sealed the wall penetration from the inside with some real HVAC duct tape, not the plastic duck tape. Lights dry the glue out on that crap in a short order.

I got close to 100sq" of venting, minus what the screening cuts off... and no light get's through... at all! I had everything on hand except for that last damn can of paint!

This a great thread, really opened my eyes to light trapping and ventilation...big THANKS!

i looked for window/door flashing after reading this and found something else.

http://www.homedepot.com/p/SureSill...nector-10-Piece-per-Box-SS-1-18C-EC/203837837

it may be cheap and work too. the lips could be used as the spacing. blue tape could be used to protect the glue areas when spray painting.
 

Granger2

Active member
Veteran
Wouldn't it be way less labor, probably more cost, to just intake or change air thru a fan/carbon filter? You could buy a cheapo. -granger
 
Granger that's a good idea but heck this is a DIY thread so here's what I came up with:

Hay what a great thread! Loved shadowing the assembly journey of the posters and the pictures made it easy to conceptualize and duplicate. And the DIY thread worked it’s magic like it’s supposed to do and recorded the evolution of the idea.
It seems like it still costs somewhere around $25 bucks or more in materials you have to buy. Plus many posters needed some additional tools like hack saws, tin snips and elbow grease. I would like to try and bring that cost down to worst case scenario about $10 total cost for one vent about 2 foot by 3 foot.
You heard me right about 2 foot by 3 foot. In other words perhaps 4 tents or cabinets worth or a lifetime supply for you micro growers. Like all DIY projects half the fun is in the build out. My method adds the elements of stealth, danger and the chance to commit a felony which most of us do on a daily basis anyway.
First the tool list and stuff you probably have on hand.
Utility knife
Tape measure
A car or better yet a pickup truck (you read that right, we’ll get to why later)
Stuff you need to buy:
Two cans of flat black spray paint $1.00 each (yup that’s the correct price from Home Depot check out the link below)
http://www.homedepot.com/p/Quick-Co...eral-Purpose-Aerosol-Paint-J2853812/100115071
Hot glue gun from the Dollar store $3.00 http://www.dollargeneral.com/product/index.jsp?productId=12580339
Additional glue sticks $1.75
http://www.dollargeneral.com/product/index.jsp?productId=12580338
One bag of rubber bands from the Dollar store $1.00
http://www.dollargeneral.com/product/index.jsp?productId=11787182
One gallon of gas, either regular or high test whatever your vehicle takes about $2.25.

OK let the build begin….first thing we gotta wait until like February when the presidential auction I mean election is under way cause we’re gonna use those 4’ x 8’ election signs made out of the cheap corex!

Here’s where the stealth, danger, a chance to commit a felony and that vehicle and gas come in.
Scope out in the daytime the sign you wanna hit. If you are wanting to exhaust all the hot air out of the room or cabinet I suggest you use a Donald Trump sign. If it goes on the extreme right of the cabinet or grow box look for a hard to find Rick Santorum sign or Ben Carson will do in a pinch. If it’s goes on the left and is for passive intake I recommend using Bernie Sanders signs. If your new girlfriend is a feminist use the Hilary Clinton sign and you might get laid too.

The order in which you obtain the materials plays a part too. Don’t go out after burning a fat one! You may forget where you saw the sign you picked out in the daylight and wind up aimlessly cruising around and using more than one gallon of gas driving in circles. Go get the sign first because if you are busted getting the sign you’ll need the hot glue gun, rubber bands and spray paint money for bail.
The pick up truck allows you to get a 4’ x 8 sign. If you have to use your girlfriend’s Camry you’ll have to get the yard sign size. That’s gonna take more gas. Don’t get signs from a front yard also displaying an NRA flag or you may have to explain how the bullet holes got in the Camry. That could get messy. In the morning don’t forget to call your probation officer and ask if getting the signs can count as picking up litter and reduce your community service hours. Maybe that’s a bad idea if he/she is narrow minded. Forget I suggested that. It could get messy too.

Don’t get all jacked up from the covert action and forget to swing by the Dollar store and the Depot or you may run up more gasoline costs.

OK assuming all that went well and you are home safe and sound with all the materials purchased you are ready to start the assembly.
Now for the build out.
Spray paint the first side of the corex sheet with the flat black paint. Don’t worry about how thick or even the first side is, just slather it on where it’s sorta even. Now you may burn the first half of that fattie while it dries. On the second side pay more attention to a full and even coverage doing a better job on this side. Let it dry while finishing that fattie.
After both sides are dry any you held it up to the sun or a light to look for holidays in the paint you cut along the 4’ wide part strips about ¾” or an inch wide about 6 or 7 runs. We’re gonna stack this out like the aluminum vents and these are the spacers. Cut these pieces into 3” long each. You’ll end up with about 96 or 120 pieces depending on if you cut 6 or 7 strips. Using 2 each on each end you will be able to make a vent 48 or 60 layers tall. Assuming the corex is 3/16” thick you can build a vent about a 24” to 30” tall by 22” wide from one sheet.
Then cut length wise along the ribs in the corex so you have 16 strips 3” wide by 90 or 92 long. You can use a straight edge or just follow along the rib lines in the corex by eye. Neatness counts here as if you do a ragged job the vent will look all raggedy.
Now if you look at the corex on what was the 4’ edge you will see it’s got a top skin and bottom skin with little ribs every 3/16’s of an inch or so depending upon how much the candidate’s handler’s laid out for the corex sheets. We are going to take the little pieces and cut through only the top skin along the rib width of the ¾” to one inch width in the middle of the 3” piece. Then form it with your fingers into a “V” aiming for a 90 degree bend. We will be stacking 2 of these on each end of the vent.
Then cut the length of the 90” or 92” strips top skin only down the middle of the 4” edge strip. In this example we cut these strips into about 22” lengths for the width of the finished vent. Whatever number you choose make all the pieces the same length
Now plug in the hot glue gun and load it with a glue stick and open the rubber bands while it heats up.
OK now take a rib piece molded into the 90 degree shape and using the tiniest drop of hot glue place a spacer folded into 90 degrees on top of it at each end with the glue in between each spacer then a second spacer and place a rib on top. Now quickly select a rubber band and put one on each end. Form the pack into the 90 degree shape by adding or changing the rubber bands. You may need more spacers in the middle depending on the width of the vent or the flimsiness of the candidate, I mean the corex. You made need to work on your assembly process for timing the glue before it hardens and which size rubber band creates the proper tension to get a nice 90 degree product. After building 5 or 10 of these items hit the hay and know you are over with much of the hard part and let it dry overnight.
When you return home from your under paid suck ass job the next day you can assemble these little legos into the vent height with glue. But before you begin take 6 to 10 of the rubber bands and daisy chain them into a rubber band about 18 to 24 inches long. You’ll need two of these. Warm up the glue gun and start stacking the legos with a lil dab of glue on each end. When you are happy with the height wrap the rubber bands around each end till it makes the 90 degree shape we want and place it on a flat surface with an Encyclopia Britianca weight and sized book on top. Opps I forgot those are all gone now and it’s online, use a phone book…shit they went away too. Use your girlfriend’s laptop.
Then get back in the vehicle and go get another sign because I know you can make a neater or better sized vent the second time around cutting the pieces to different dimensions than I laid out here.
The final vent can then be framed in wood or the outside corner bead or just ghetto wrapped in silver tape and installed on the grow space wall.

Nomad…peace
 
Top