What's new
  • Happy Birthday ICMag! Been 20 years since Gypsy Nirvana created the forum! We are celebrating with a 4/20 Giveaway and by launching a new Patreon tier called "420club". You can read more here.
  • Important notice: ICMag's T.O.U. has been updated. Please review it here. For your convenience, it is also available in the main forum menu, under 'Quick Links"!

Building a stealth 3 drawer IKEA grow cabinet

SweetDee

Member
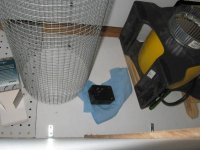
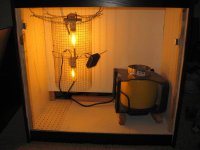
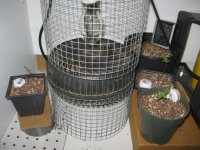
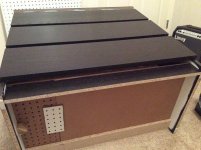
Unexpected challenge... The door is freakin' heavy and the cabinet latches are weak.
Now taking suggestions for ways to keep the front of the cabinet on from the inside. I'm thinking one option, though not ideal, would be to put hinges on the bottom.... would make it slightly more difficult to access the plants though.
Or some sort of screw hook on the sides of the front panel and eye-screws inside the cabinet, and put the door on from a downward angle?

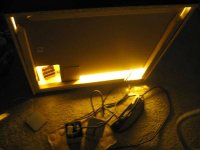
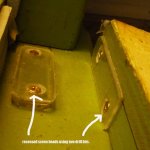
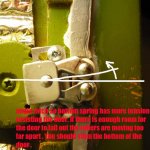
Man that's what my last post was about but I erased it cause I thought you had the door on already. I had the same problem with the door .i made shims with my lexan scraps.2x pieces counter sunk deep so the screw head was below flush on the cab left and right side of the door and also 2x stacks right above them on the bottom of the door that rubbed on the cab side lexan pieces also counter sunk . You must shim the door side so the spear latches go directly in .if they are left and right of the door that is.the problem is most likely you have a gap on bottom which is dragging the spear to disengage . Imagine using your finger as the spear in the latch and pull down and you will see the rollers pull apart .this is when your disengage is happening . Don't allow the door to sag .Try maybe stacking some penny's 2x to support the door Intill you get it shimmed right .maybe even tape them for now if it helps.if you need I will post photos of mine .
 

SweetDee

Member
door with latches either side .
 

Attachments

  • image-15.jpg
    image-15.jpg
    47.2 KB · Views: 12
  • image-18.jpg
    image-18.jpg
    102.5 KB · Views: 14
  • image-19 copy.jpg
    image-19 copy.jpg
    81.4 KB · Views: 15

zlock

Member
SweetDee, you rock! Thank you for sharing!
I'm on my way out for the day but when I get home I'll re-read your posts and study your pictures more closely to make sure I understand what it is you're describing. Glad to see you've been down this road before, I was getting frustrated with the whole situation an unsure how to make it work.
I think part of the problem I'm facing is that theres not much for the bottom of the door to rest on, it's got a very small amount of overlap that can support the weight of the door. But that was just my initial hypothesis, I need to spend more time working on it.
I'll keep you posted...
 

SweetDee

Member
SweetDee, you rock! Thank you for sharing!
I'm on my way out for the day but when I get home I'll re-read your posts and study your pictures more closely to make sure I understand what it is you're describing. Glad to see you've been down this road before, I was getting frustrated with the whole situation an unsure how to make it work.
I think part of the problem I'm facing is that theres not much for the bottom of the door to rest on, it's got a very small amount of overlap that can support the weight of the door. But that was just my initial hypothesis, I need to spend more time working on it.
I'll keep you posted...

awesome . I forgot to mention the countersunk portion was done very carefully . you might could even do it by hand to keep the bit from going all the way though . this is of course if you just don't wanna buy a actual counter sinking tool . good luck !
 

zlock

Member
Re-read what your earlier post and pictures described and you're spot on. I got some decent pics that show what I'm dealing with on the bottom of the cabinet, I think that like you said, unless the door is perfectly put in place, the alignment is messed up and the latch is virtually useless.

In the pic(s), there is just one 1/8" thick layer of MDF for the floor, and door/wall consists of 2 (and 3 overlapping where the two main pieces butt up against each other) pieces of MDF and a 5/8" "spacer" for the false drawers to mount...
Lexan (or wood/mdf) would make a fine shim if it was just a matter of bringing the door up to the correct level, but I'm not sure about the best way to provide support / something for the door to rest on and raise to the correct position from here...

I'll be brainstorming ideas and am curious how you and other ICMagers would or have handle(d) the situation...
 

Attachments

  • d 4.jpg
    d 4.jpg
    61.5 KB · Views: 15
  • d 3.jpg
    d 3.jpg
    28.7 KB · Views: 17
  • d 2.jpg
    d 2.jpg
    54.6 KB · Views: 10
  • d 1.jpg
    d 1.jpg
    64.9 KB · Views: 13

Dr.Nonagon

Member
Hey Zlock, I'm not sure I totally understand the problem but I think I solved a similar problem to this.

I used a bracket on the bottom of the door to set the position when it's closed. I have to lift up the door slightly but the bracket is adjustable so the door looks straight. Then I used a second bracket on the inside of the cabinet. This is a large steel bracket and is strong enough to support the 20lb magnet (eBay)that I screwed to the door.


2zxz2wx.jpg
33136lt.jpg
f3gsr4.jpg
 

zlock

Member
Dr Nonagon and Stereotypo, thank you both for replying and posting pics!

Dr., brackets like those are a good idea. Looks like a trip to Home DePot is in order!

Stereotypo, very cool to see the 6 drawer version of what I'm building! I like what you did with yours! :)
You did it right with the spacers on the front, I should have done thin strips at the end of each one instead of going solid all the way across. I wonder if it would make any sense to try and re-do mine like that. My only concern is that the IKEA particle board won't hold up if I rip the drawers off. I used Liquid Nails so I assume it's a strong bond. Damnit! haha

Thanks for showing the magnet door holder setups you guys are using, I feel better knowing that I'm going in a direction that does work.
 

Stereotypo

New member
zlock, you want to make sure you have adequate intake volume. I have two 4" ducts on the rear panel, they are barely enough for my situation. Those little holes may not be large enough to vent your cabinet. In the winter I need a temperature controller but in the summer my fan runs full speed 24-7 and I am averaging 35* during lights on.
 

zlock

Member
Stereotypo, by my calculations the intake volume should be sufficient based on the 2x exhaust rule. The pegboard on the bottom is a very small part of the intake, the rear wall has a ~2" gap running all the way along the bottom (3" in one section), when I calculated it (don't remember off hand the exact dimensions) it was almost twice the surface area of the exhaust vent. The pegboard and the gaps in the front of the cabinet will actually put the intake area over twice what the exhaust area is, so I think the cabinet should be able to breathe sufficiently.

Getting ready for a mini vacation for the 4th of July weekend so probably won't have any updates until next week, but am going to try to make it to the hardware store today to find some spacers for that front door issue.

Hopefully I'll have some beans germinating within the next week or two so we can get this show on the road!

Happy 4th everyone (if you celebrate, that is... hell, even if you don't, happy 4th!)
 

SweetDee

Member
Stereotypo, by my calculations the intake volume should be sufficient based on the 2x exhaust rule. The pegboard on the bottom is a very small part of the intake, the rear wall has a ~2" gap running all the way along the bottom (3" in one section), when I calculated it (don't remember off hand the exact dimensions) it was almost twice the surface area of the exhaust vent. The pegboard and the gaps in the front of the cabinet will actually put the intake area over twice what the exhaust area is, so I think the cabinet should be able to breathe sufficiently.

Getting ready for a mini vacation for the 4th of July weekend so probably won't have any updates until next week, but am going to try to make it to the hardware store today to find some spacers for that front door issue.

Hopefully I'll have some beans germinating within the next week or two so we can get this show on the road!

Happy 4th everyone (if you celebrate, that is... hell, even if you don't, happy 4th!)
My setup wouldn't cool till I had 5x but each design is different .Working with a 15 cfm ram In a 3.5 cu.ft.space @ 15 mmH2o it still sucked falling saw dust into the intake also so my neg pressure was still good .
 

zlock

Member
Back!

Sorry guys, had a busy month and am just now getting back to work on the cabinet.

Got some L brackets from Creepo Depot and attached two of them to the bottom of the door. Put two nails sticking out in the bottom front of the cabinet, lined up with the holes in the brackets on the door, so now I can lift the door and put the brackets over the nails to hold the bottom part in place, and the magnets hold the door up at the top well enough.

Also made the screen to go around the two vertical bulbs to keep the plants from getting too close, and am working on mounting the fan at the bottom.

Tomorrow gonna work on getting the fan and the speed controller wired up and maybe wire up the ballasts and light sockets, before getting the sockets mounted right and turning it on for a test run!

Right now my goal is to have seeds germinating by the weekend, assuming the cabinet works like I'm planning!

Now to decide on what genes to try...
 

Attachments

  • IMG_0124.jpg
    IMG_0124.jpg
    54.6 KB · Views: 12
  • IMG_0126.jpg
    IMG_0126.jpg
    57.2 KB · Views: 12

zlock

Member
Ugh, this has been taking so much more time than anticipated!
The cab hasn't been #1 priority for me the last several weeks so progress has been sloowww, but I'm finally at a point where theres updates worth posting!

Got the lights wired up and mounted, and the fan installed.
Right now I've got the cabinet running to get an idea of what the temps are at right now, and then it's just a matter of buttoning things up and light-proofing it all, the noise level is more than I'd hoped but if I can't get it to come down, I'll deal with it.
I got a fan speed controller (as in the earlier post), but when I use it, it actually creates MORE noise! Go figure...

Anyway, here are pics of where it's at now....
 

Attachments

  • IMG_0131.jpg
    IMG_0131.jpg
    43.3 KB · Views: 13
  • IMG_0129.jpg
    IMG_0129.jpg
    42.6 KB · Views: 13
  • IMG_0128.jpg
    IMG_0128.jpg
    31.1 KB · Views: 11

zlock

Member
Pics are from a few days ago, seeds are in soil and in the cabinet... temps over the past 24 hours have ranged from 73 with the lights off to 82 with the lights on (just the 70w HPS)

Two are Female Seeds C99, one is TGA Apollo 13 x Vortex, and one is Delicious Seeds Northern Lights Blue auto.

They are in Fox Farm Light Warrior and will be transplanted once they're big enough into Ocean Forrest.

As far as the cabinet goes, I still need to do some lightproofing and get a carbon filter which will hopefully muffle the exhaust fan noise a little bit more, and also figure out how to get the temps lower with both the 70w and 150w lights on.

I'll post another update once I've made some progress with the cabinet and the plants begin making their appearance. The NLB has started poking up through the soil and I expect the rest aren't too far behind :dance013:
 

Attachments

  • IMG_0005.jpg
    IMG_0005.jpg
    31.5 KB · Views: 10

zlock

Member
Okay, so the gals (fem'd seeds so I'm assuming here) are about a week old from seed, and seem to be doing alright even though they've sprouted under an HPS, which I know is not ideal, as the light is on the strong side... but it's a 70w so it's not THAT powerful :tongue:

I'm being careful not to overwater them, which has been my downfall in past grow attempts. The 3 small containers feel pretty light and dry, the larger pot still has some weight to it so I may let it go another day before watering, but I've got a gal of distilled water with a few drops of Superthrive waiting 'til tomorrow morning to give the 3 small containers a drink.

After reading through some threads about the Female Seeds C99 genetics, and consulting my calendar for the next few months, I think I'm going to let them veg until I can top them once or twice then switch to 12/12. I'd like to be done with this round before the end of the year, but at the same time don't want to cut the yield short because of insufficient veg time. I plan on using individual screens for each plant to train them and do a vertical SCROG type grow, and this is my first time with sativa dominant genetics. I'm anticipating some stretch, but depending how much the plants are growing by the time I plan on flipping to 12/12 I may veg a little longer.

Lightproofing updates to follow in a while...
 

Attachments

  • IMG_0024.jpg
    IMG_0024.jpg
    56.4 KB · Views: 7
  • IMG_0022.jpg
    IMG_0022.jpg
    47.3 KB · Views: 9
  • IMG_0016.jpg
    IMG_0016.jpg
    84.9 KB · Views: 14
  • IMG_0015.jpg
    IMG_0015.jpg
    62.5 KB · Views: 14
  • IMG_0014.jpg
    IMG_0014.jpg
    78.3 KB · Views: 11

zlock

Member
Temps today were creeping up to the high 80's so I turned the exhaust fan up to the 2nd setting, the temps are back down to low 80's...
Watering with just superthrive, pH'd to 6.8, letting the soil get pretty dry before watering.

Still not 100% lightproof, I used some of that expanding foam insulation spray to take care of a few spots along the side (could have used liquid nails just as easily for there I suppose...), made a foam barrier around the sides and bottom of the front door of the cabinet, which has done an OK job keeping light in. I taped aluminum foil around the inside edges of the door so that when I put the door on after spraying the foam I could get it to come off without much effort, while still getting the benefits of the "seal" molding itself to the door.
Now it's just the top of the front door and the back of the cab where the intake vents and exhaust is. Exhaust will probably be taken care of when I install the carbon filter, and the intake I've got a plan of attack that just needs to be implemented.

Anyway, here are pics of the plants as of today...
 

Attachments

  • IMG_0028.jpg
    IMG_0028.jpg
    65.6 KB · Views: 13
  • IMG_0033.jpg
    IMG_0033.jpg
    52.6 KB · Views: 11
  • IMG_0035.jpg
    IMG_0035.jpg
    32.5 KB · Views: 11
  • IMG_0038.jpg
    IMG_0038.jpg
    66 KB · Views: 11
Top