What's new

Building a stealth 3 drawer IKEA grow cabinet

zlock

Member
Back again! My last grow was a year or two ago under a different name (which I can't remember the password to, nor the email that was used). Again life has changed (as it always does I guess) and I've moved several hundred miles away from my previous location and rather than deal with the black market, I've decided to do another micro-grow to supply myself with quality bud for personal consumption.

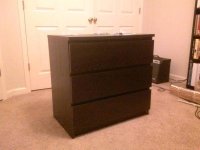
Stealth is still top priority though, so I decided to go the IKEA route and build a cabinet that will match other furniture in my bedroom.

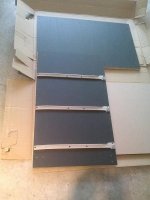
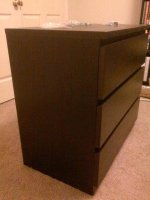
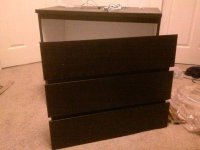
For $79, IKEA sells a 3 drawer chest that looks about the right size for what I'm doing. 32"x31"x19" roughly.

I got it home and started putting it together, so I figure now's about the right time to start a thread.

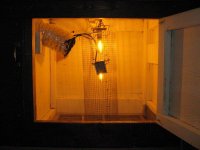
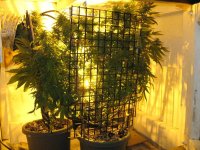
My plan is to use a 150w HPS (possibly with an additional 70w HPS) and do a vertical SOG with 8-10 clones rotating through.

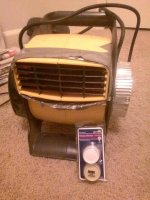
Cooling an odor control will be a Stanley blower fan with an added adjustable dimmer switch to control the speed (sound) sucking through a carbon scrubber.

I'll update this thread as the cabinet comes together :biggrin:

Day 1
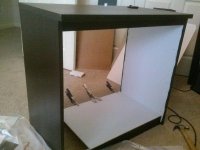
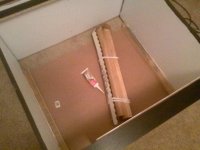
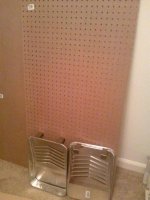
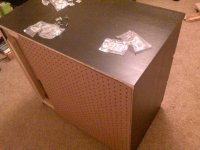
Before assembling the cabinet, I removed the tracks for the drawers since they won't be used.

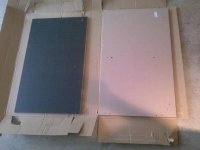
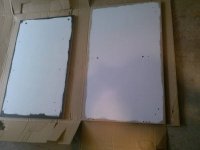
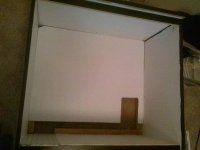
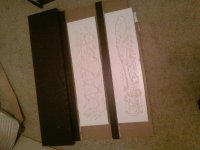
Interior walls painted flat white (3 coats), and 1/4" MDF cut for the floor and the back wall (the cheap cardboard back wall that came with the kit won't do)

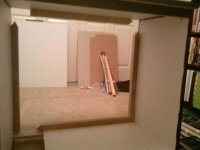
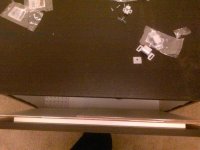
Right now I think I'm going to have the fan blow out the back, and air will come in through the bottom of the back wall. Still working out the design, but I think I see how it's gonna go...
 

Attachments

  • 001.jpg
    001.jpg
    43.5 KB · Views: 18
  • 005.jpg
    005.jpg
    45.8 KB · Views: 22
  • 004.jpg
    004.jpg
    41 KB · Views: 21
  • 002.jpg
    002.jpg
    34.5 KB · Views: 19
  • 003.jpg
    003.jpg
    29 KB · Views: 19

zlock

Member
will you CF and fan be in the cab?

Yes, as of now the plan is for the Stanley blower to sit on it's side (intake up) with the carbon filter extending upwards toward the ceiling. The outlet will go straight out the back of the cab, I'm brainstorming ways to disperse the air better so it's not just a violent wind blowing out the back of a cabinet in the room.
 

zlock

Member
Back! Had lots going on over the last several days and haven't done as much as I'd hoped with the cab.
I've got an idea I'm going to try out for the back wall/ventilation of the cabinet. Basically there will be two walls on the back of the cabinet, the outside will be pegboard that will allow air to flow in and out without any obvious signs of ducting or fans or anything on the back or sides. Spaced an inch or so forward from the pegboard is the actual wall which will keep light in and be where the intake / exhaust will go.

The rear wall inside the cabinet stops about 2.5" from the bottom floor. I got the idea to use paint trays (for rolling paint) from Home DePot as light traps so I picked a couple up and will play around with them, I think it can be done the way this cabinet is.

So anyway, I'm going to try and get it so that the intake (through a piece of pegboard as part of the floor, as well as along the lower rear air vent) is sufficient and the exhaust air dispersion is efficient enough to keep temperatures under control and circulation at maximum.

To space the two rear walls evenly and provide a way to mount them, I used Liquid Nails and wooden stakes from Home DePot (quick, cheap, and convenient) to make a sort of frame or mounting surface along the four sides of the back.

I'll update with any changes or modifications to this idea.

Next steps:

-Making a front door to the cabinet with the drawers and a piece of MDF:biggrin:
-Wire dimmer switch into the fan to provide more control over airflow and sound volume
 

Attachments

  • a10.jpg
    a10.jpg
    38.5 KB · Views: 12
  • a9.jpg
    a9.jpg
    38 KB · Views: 16
  • a8.jpg
    a8.jpg
    60.4 KB · Views: 13
  • a6.jpg
    a6.jpg
    38.3 KB · Views: 16
  • a7.jpg
    a7.jpg
    43.3 KB · Views: 13

omgwt

Member
Looks great zlock, i want to do something similar myself later this year, maybe just for mother and their babies but the idea is great.

Anyway.. Have you thought about the noise that fan will make to properly cool 150 and possibly 220 watts of HPS bulb? I would probably personally try to use insulated ducting and put a computer nexto the cabinet and say that it was a server of sorts.
 

zlock

Member
I'm not sure about the noise yet, the cabinet isn't yet at the point where I can test it but I have been brainstorming ideas for keeping the sound isolated.
For starters, gaining more control over the fan speed. I didn't do my homework before jumping in on this one, so the dimmer switch I got at Home DePot won't work (and I already ripped and used the paper from inside the packaging as a tray to fill my vape wand... doh!).
Gotta rethink that.

Also, I saw in the insulation section of the store they sell small pieces of foam insulation 1-2" thick. I could easily use this and make a box that wraps around the fan, and I'm figuring out how to mount the fan so that it doesn't transmit vibrations through to the walls of the cab.

It doesn't have to be 100% soundproof, I'll probably have a desk fan or air purifier or something sitting on top of the cabinet to use in the event anyone else would be around it to cover up any noise that does get through.
 

omgwt

Member
Sounds like you have most of it planned out pretty good, I like your ideas, but don't give up on the dimmer idea... I'll show you what I use for my fan, it's a speed regulator.

22717648-origpic-572a76.png


Costs around 30-40 euros and works wonders... It's possible it might make some additional motor-noise by using it, but it doesn't harm it like I said... I actually put my fan inside a paper box and filled it with some insulation - and voila that noise was gone too... My tent doesn't sound more than my computer right now. And I'm cooling a 400w HPS.
 

zlock

Member
Good to know, omgwt!
Having precise control over fan speed would be such a great benefit... turn it down lower when needed, and/or crank it up when sound is not important!

Right now I'm trying to figure out the front of the cabinet. There are 3 drawers (the fronts of, at least) and two strips of wood / particle board that go between the 3 drawers. I kinda wish I had left the back open and/or set the front of the cabinet up before getting this deep into construction because I could have set the two strips where they would normally be installed and glued the front wall inside the cabinet with them in place, which would have made it easier to do the drawers too.
Anyway, can't go back in time and taking this thing apart at this stage would be extra difficult because of all the liquid nails used.

I'll figure something out though.
 

SweetDee

Member
Htg supply has small inlines and fan control both for 100 bucks .That or maybe hook up some high cfm / static pressure fans for 15- 30 bucks total . Research is key and ventilation is as important as lights esp with our micros .
 

SweetDee

Member
Htg supply has small inlines and fan control both for 100 bucks .That or maybe hook up some high cfm / static pressure fans for 15- 30 bucks total . Research is key and ventilation is as important as lights esp with our micros .
High cfm /static pressure fans used for server or computer . Delta has tons of data sheets you can check out to make sure you know what you are getting in a f an. .
 

zlock

Member
Ordered a fan controller online, should be here this weekend. Found it on Amazon for under $25, glad I'll have control over the fan speed.

Also got the front door of the cabinet assembled. After cutting out a sheet of MDF to fit the size of the opening in the front (required two pieces of MDF glued together), the next step was to line up where the two drawer divider strips (or whatever you want to call them) should be positioned, and glue them on the front side of the door. Once they set, the next task was creating a mounting surface for the 3 drawers to be attached, since they stick out in front of the divider strips.

This is where I probably should have done some more thorough thinking. I had 5/8" to fill, and the easiest/cheapest way to accomplish this was to buy white particle board shelves at Home DePot, trim them to size so they fit, and glue them between the drawers and the front of the cabinet door.

They did a fine job, and the front of the cabinet looks great, except it's HEAVY. If I were to do it again, I'd probably use two strips of wood for each drawer instead of sheets of particle board for weight savings.

Either way, it looks great. I also picked up some cabinet latches (the magnetic ones and the roller latch ones, whatever the technical name is... see pic) which will (hopefully, considering the weight) hold the front door in place. As it is, the front door will stay in place just by the size/shape alone, but the latches will provide more support and prevent it from falling out. The door will just come off when I need access, hinges would only complicate the matter.

I'm thinking that I'll use four 5.5"x5.5"x6" square pots with the 150w HPS in a vertical setup, each pot with a vertical screen to train with.
Not sure which seeds to use, I know at least two will be from the C99 seeds I've got... the other two though? I've got a few choices....
 

Attachments

  • b5.jpg
    b5.jpg
    42.7 KB · Views: 19
  • b4.jpg
    b4.jpg
    49.2 KB · Views: 14
  • b3.jpg
    b3.jpg
    39.6 KB · Views: 20
  • b1.jpg
    b1.jpg
    48.8 KB · Views: 18
  • b2.jpg
    b2.jpg
    40.1 KB · Views: 18
  • b6.jpg
    b6.jpg
    54 KB · Views: 13
  • b7.jpg
    b7.jpg
    45.3 KB · Views: 17

dontstepongrass

M.U.R.D.A. / FMB crew
Veteran
if you cool-tubed it, you could prob get away with a 250w in there...

in my micro cab, the lights (276 watts of cfls, 12 x 23w) are in an air-cooled box which is separated from the grow chamber with 1/4" lexan. this allows me to use all cpu fans to keep everything in check. can you say "quiet" ?

some food for thought...
 

zlock

Member
Welcome, SourRebel!
Glad to have you aboard!

Sam (Don't step on the grass... hopefully got the right reference?)
My last grow was a 70w + 150w vertical, no cooltube but a desk fan blowing upwards over the bulbs to where the exhaust fan duct was picking up air so there was some additional cooling assistance.
Since space is tight as is, and I intend to filter the air before the exhaust fan, ducting a cool-tube would be slightly more involved. Do-able, but I wonder if the benefits are worth it?
I'm looking forward to getting everything wired up and taking it for a test run to see what temps will be like. I may do the fan blowing upwards thing again, or if need be I'll separate the fan/filter side and run a duct and cool-tube setup.

Right now I'm working on sealing up the front door panel from light and air (though air shouldn't be much of a problem, since the air being sucked into the cabinet will get filtered)

With the door installed, I've traced (through the back of the cab) where the door panel wall is at. I'm going to use those 1"x2" stakes from Home DePot to make a frame with about 1/8" gap from where the front wall will be. Then along the outside of the frame will be foam weatherstripping to keep light in.

Once that's done, it's electrical time!
 

Attachments

  • c2.jpg
    c2.jpg
    41 KB · Views: 19
  • c1.jpg
    c1.jpg
    95.9 KB · Views: 20

zlock

Member
Unexpected challenge... The door is freakin' heavy and the cabinet latches are weak.
Now taking suggestions for ways to keep the front of the cabinet on from the inside. I'm thinking one option, though not ideal, would be to put hinges on the bottom.... would make it slightly more difficult to access the plants though.
Or some sort of screw hook on the sides of the front panel and eye-screws inside the cabinet, and put the door on from a downward angle?
 

Latest posts

Latest posts

Top