
touchofgrey
Active member
I have once again remodeled my cabinet. In my last chapter, I ripped out my 250 watt air cooled hood and converted it to a 250 watt vertical bulb with 4 plants in 1 gallon containers tied to a pair of vertical trellis'. That run is here if you're curious. The switch worked out pretty good with a 30% increase from my horizontal scrog yields over the past few years.
But my cabinet is only 2.7 SF footprint so a 250 watt bulb in there is really overkill and I've been thinking for a while I could get almost as much yield with a 150 setup. With the bare bulb I was fighting high temps from the light that I also think hurt yield. Better g/w and less heat seems like a win so I switched out to a 150 and took the opportunity to fix some other things while I was at it.

I moved the electrical around a bit to fit better with my vertical trellis setup and put in a couple direct wire timers to get rid to the plug in type I had before. I also installed new irrigation lines for the blumats with cool auto shut off disconnects for the drip lines so I can now easily remove the plants for training or trimming without having to drain and restart the whole irrigation line.
While dealing with the heat issues on my last run I switched out my original panasonic 50 cfm fan for a 110 cfm model. But it was from their "whisperfit" line and was much noiser. It still didn't quite cut it for a 250 watt light and this was in winter with a lower ambient so I upgraded to a 130 cfm 2 speed panasonic WhisperGreen FV-13VKS3 that is quiet as a mouse and has the option to run at a selected low speed and kick on full speed when a switch is turned on.
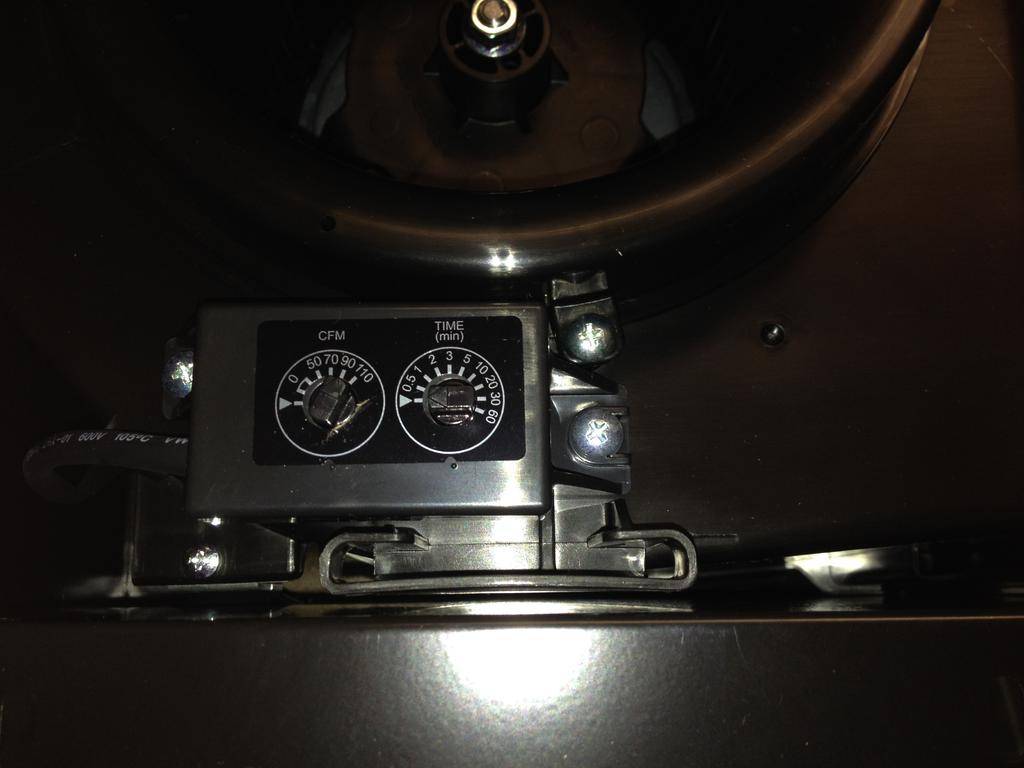
This is the selector switch. You can preset the low speed anywhere from 50 to 110 cfm. I'm currently running it at 50 with a 63 deg ambient for a cabinet temp of 74. For the switch I used a cooling thermostat so it will run at a selected speed until a high temp is reached and the fan turns on full blast. It's not needed now but will come in real handy in the summer when my ambient temp is in the 70's.

The next generation is ready to go. My chore for the weekend is to get them up potted.
But my cabinet is only 2.7 SF footprint so a 250 watt bulb in there is really overkill and I've been thinking for a while I could get almost as much yield with a 150 setup. With the bare bulb I was fighting high temps from the light that I also think hurt yield. Better g/w and less heat seems like a win so I switched out to a 150 and took the opportunity to fix some other things while I was at it.
I moved the electrical around a bit to fit better with my vertical trellis setup and put in a couple direct wire timers to get rid to the plug in type I had before. I also installed new irrigation lines for the blumats with cool auto shut off disconnects for the drip lines so I can now easily remove the plants for training or trimming without having to drain and restart the whole irrigation line.
While dealing with the heat issues on my last run I switched out my original panasonic 50 cfm fan for a 110 cfm model. But it was from their "whisperfit" line and was much noiser. It still didn't quite cut it for a 250 watt light and this was in winter with a lower ambient so I upgraded to a 130 cfm 2 speed panasonic WhisperGreen FV-13VKS3 that is quiet as a mouse and has the option to run at a selected low speed and kick on full speed when a switch is turned on.
This is the selector switch. You can preset the low speed anywhere from 50 to 110 cfm. I'm currently running it at 50 with a 63 deg ambient for a cabinet temp of 74. For the switch I used a cooling thermostat so it will run at a selected speed until a high temp is reached and the fan turns on full blast. It's not needed now but will come in real handy in the summer when my ambient temp is in the 70's.
The next generation is ready to go. My chore for the weekend is to get them up potted.


")


