What's new
  • Happy Birthday ICMag! Been 20 years since Gypsy Nirvana created the forum! We are celebrating with a 4/20 Giveaway and by launching a new Patreon tier called "420club". You can read more here.
  • Important notice: ICMag's T.O.U. has been updated. Please review it here. For your convenience, it is also available in the main forum menu, under 'Quick Links"!

Cobra420's Dual 150w HPS Cabinet

Cobra420

Member
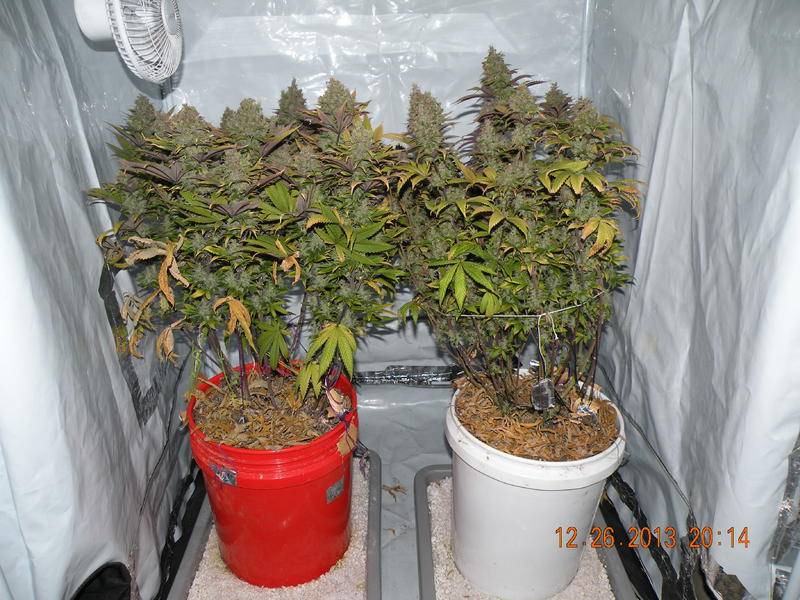
And lastly, A few pics of the 2 plants flowering in my 600w tent. With out these two, the cabinet would be empty...

picture.php


picture.php


picture.php


picture.php


picture.php


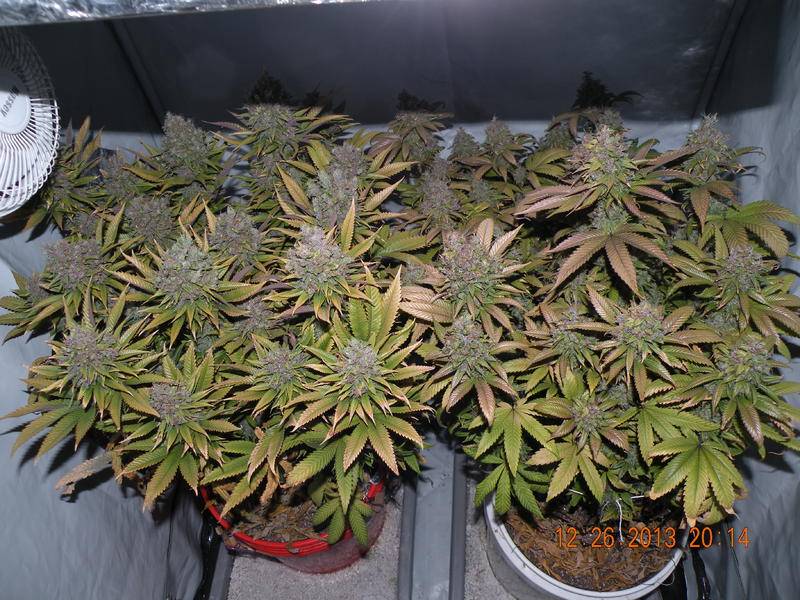
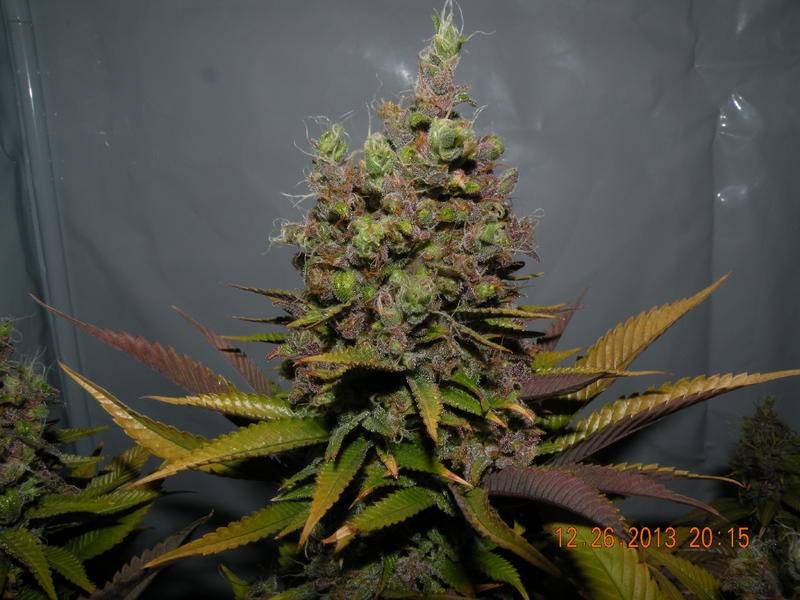
I've been watching the trichs on this plant and feel it's getting close. I'm shooting for 80% Milky 20% Amber. It's been in 12/12 for 77 days now. Patience is a virtue lol.
 

Chiefbig

Active member
Hey Cobra plants are looking wonderful. I am curious as to your cloning method do you use distilled water in the shot glass do you ph the water at all? I'm about to switch from 150w cfl to 150w hps and from the looks of your grow I'll probably have denser nugs with the hps grow over my previous two with cfls.
 

Cobra420

Member
Hey Chiefbig, thank you for stopping back in. For cloning, I use tap water straight out of my faucet. I'm on city water so I can't say how well water would do, but if I had to guess I think it would work fine. I don't do any pHing or add anything to the water. I fill it up from the faucet and put the plants in. Same for refreshing the h20, I pull the plants out, rinse the glass out, refill and place the plants back in. I've had success just topping off the jars when needed as well. Simple, easy, fairly low maintenance and effective. Once spring rolls around and I can hook my rain barrels back up, I'm going to start experimenting with rain water. I want to see if and how well it works.

So far, I'm loving these 150 watters. I think you are going to enjoy them as well. If you haven't already, check out the 150w Club. Just browsing through that thread made me want to try them out. Tons of people running them very successfully. If you have a fairly small space to work with, 150's are great.
 

atk7

Active member
Nice setup in the dual 150 cab ! I have recently started a very similar setup but closer to a ngb style cab with dual 150 hps in cool tubes but both are in a common flower chamber instead of separated. Its 36wx24dx48h and a veg /mother/clone area area of 24wx24dx30h. I'm interested in your self watering containers do you have more details on them? Especially what you plan to put together for the three gallon pots.
 

Cobra420

Member
Welcome atk7, thank you for stopping in. That is awesome on the ngb style build. I hope everything goes smoothly for you. I was going to go that route with possibly a 400w but I wanted to use the largest cabinet I could find. It was easier for me to keep the center piece in, for structure and just throw a couple 150's in it. I was going to go the cool tube route as well but I couldn't seem to keep it simple with the way I wanted everything set up. I would have had to place the bulbs incorrectly and don't think I would have gotten the best footprint.

The self watering containers are from designs I found online. The first one I found used a 2 liter soda bottle. I only drink water so I used what I had. 1 gallon water jugs. What I did, was I took two water jugs. The first one, we'll call it the plant holder, I took and cut the bottom off of it at the base. I then drilled 1/4" holes into the lid of the jug. I went about 3-4" from the lid and drilled a few holes for aeration. Then I packed the plant holder with perlite until it got to just under the drainage holes. After that, I packed in the soil. I took the second jug, we'll call it the reservoir, and I cut it about 4-5" from the base of the jug. I took the plant holder and placed it lid side down into the reservoir. I then take a funnel and fill the reservoir whenever it's getting low. It uses perlite as a wick to keep the soil moist. What I like about these, is that I can cut the top jug to whatever size I want to hold up to 1 gallon of soil. Here's a couple pics to kind of show what's up.

The "plant holder" sitting in the "reservoir"
picture.php


The "Reservoir"

picture.php


For the 3 gallon containers I maybe making, I'll build them identical to the way I built my 5 gallons. For those, I needed 2 - 5 gallon buckets, about 2' of 1" pvc pipe and a 6" net pot (you could use smaller, I wouldn't use larger though because it won't leave you enough room for the pvc pipe). Also, I've noticed some differences in the way some people use these. I've noticed some people use beer cups with slits in it instead of the net pot. I used the net pot because I have an abundance of them and I felt it was sturdier than the cups. I also noticed people that fill the net pot with soil. I decided to use perlite in my net pots since I wasn't sure how well the soil would do being submerged 24/7.

I had typed up the process, but I feel this site and video would show you better than I could explain it lol.

Wiki link.

http://en.wikipedia.org/wiki/Sub-irrigated_planter

Even better, a youtube video. You'll see they use the beer cup instead of a net pot. Reading through the comments, there appears to be quite a few ideas floating around about what to use for the wick.

http://www.youtube.com/watch?v=lE8OrdUZQKk&list=PL1B565A57322A5457

With my 5 gals, I had to cut 3 small even pieces of pvc pipe to use as "stilts" in the res. When I placed my plant holder in the res, the net pot would push back up into the plant holder a little bit. So to counter that, I placed these stilts in the res for the plant holder to sit on. As long as you don't spin the 1 bucket without the other, it works like a charm. I'm going to be making 4-12 more 5 gals very soon so when I do, I'll make sure to take lots of pics and post a walkthrough on the process. If you have any other questions, feel free to ask.

#1cheesebuds, welcome and thank you for stopping in. These plants have a wonderful aroma to them as well. If the smoke is as good as their looks, the wife will be one happy stoner. Excited to get some good genetics running. One of these days...
 

atk7

Active member
Cobra thanks for the info on the sip containers. I had read about them some time ago and had forgotten about them .The links were great . Subscribing and pulling up a chair to watch your progress, and I think I will give the sips a build also as i am looking for a more self maintaining water system as I have to leave town frequently for a few days at a time and even though my wife is here her plate is full and doesn't need to take care of my hobbies as well, so these look like they will fit the need very nicely. Now to find the pots that I can use that will fit my flower space most efficiently LOL perhaps I can post a pic of how I ended up setting up my diy cool tubes to get the bulb placement for best coverage.
 

Cobra420

Member
Anytime atk7, thank you for subscribing. I hope the containers help you out. An awesome thing about them is they are practically fool proof. If you needed the wife to water, its easier than easy. Add water into the res until you get a little bit to come out of the overflow and you're set. The hole in the res, makes it impossible to over water, just make sure you have something under the container to catch any run off or you'll have a wet cab lol. If the containers you are using have a large enough res, you could go quite a few days without having to water.

As for container size, using a homemade organic mix, I'm starting to see how the more mix I have, the better. I'm guessing for you, it's going to depend on the amount of plants you would like to run in your cab. For instance, in one side of my cab, I figured I could run 12 - 1gals, 4 - 3gals or 1 - 5+gal. If I wanted to try something smaller than the 1gals, it all comes down to container size then for plant numbers. Looking at your dimensions, you have 6sqft. I have about 3sqft per side in my cab. So knowing the amount of plants you want to run will help you figure out your container size. The way I look at it, the more plants you have, the less they will need to be vegged to fill that space and vice versa.

The show will really be taking off here soon. This run at the moment is more of a "test run" to see what would be involved running a 12 plant sog using these containers. My original plan was to run 12 - 1 gals on each side, 24 total. Then doing a perpetual and harvesting 3-6 every 18 days. So far, I like the 1 gals, but in all honesty, I dabble in many activities so the least amount of work for the most gain, to me is the way I have to go lol. What is even funnier, is that I was planning on doing all of that while hand watering... I knew nothing of these containers. Talk about always having to water lol. So, next run, expect to see either a single or quad mod scrog in the cabs. Then again, I may even run one on each side to do a side by side and see how I like them. Oh the possibilities.

I'd enjoy seeing your cab setup. The main reason I opted out of the cool tubes is the fact that I'm picky lol. I couldn't figure out a clean way to keep the lights exhaust and the cabs exhaust separate. Everything I would come up with, was complicated and I enjoy keeping things simple.
 
looking really nice Cobra! :tiphat:
very clean setup, loving those self irrigated diy pots you made. i will have to make some of these soon, give it a go. thanks for the idea.
that bagseed strain looks very nice aswell.. sativa dominant forsure. im gonna pull up a seat and watch on.
Keep it Green
C.G.
 

Cobra420

Member
Welcome to the show Canna_Gnome, thank you for stopping in. It was months of planning and research to get the cabinet to where it is today and I appreciate the comments. I'm really digging these containers! The least I could do is give back to this community. I wouldn't have gotten into this hobby if it wasn't for this site. If I can make some one else's hobby easier and more enjoyable, it would be a big plus in my book.

It's funny you mention about the bag seed. It's looking fantastic right now but I still feel it has some time to go. Everything I've been reading about when to harvest tends to say if you think it's ready, add another week. By that philosophy, I'm hoping to harvest it at some point next year lol. It has been plumping up, purpling, foxtailing and growing new hairs all over! I've been watching the trichs and feel it should go longer. I was thinking about it the other day, with the amount of time it's been flowering, I was wondering if it had some sort of sativa in it. I believe you're right on that one.

Thank you for stopping in Deftoner, I appreciate the comment. I'm excited to see how these plants in the cabinet are going to look compared to my flowering tent. The 2 in my flowering tent have been hand watered most of their life, just recently I placed large containers of perlite under them and have been bottom watering them to keep them hydrated. The ones in the cab look much healthier at this point in flower than the two in my tent did around the same time. It's amazing how much water these plants can consume.
 

webecat

Active member
Nice cab set up. I didn't think a cutting would root with out an air stone running. Good to know.:tiphat:
 

Cobra420

Member
Welcome webecat, thank you for the comment and stopping in. Yup, just cuttings in a shot glass of water. Super simple. I've been using it for other plants as well with great success. For cannabis, it took me some time to figure out how much lighting the cuttings needed. At first, I had too much with them under the 110w pll. They would attempt to grow and turn yellow and look kind of rough once rooted. Then I tried under a 15w strip light and the same thing happened. So I tried raising it a few feet from the container and the same thing.

I noticed I had 2 more strip lights sitting around and after doing some more research felt I may need a little more lighting, just not as much as the 110pll provided. So I added a second strip light for a whopping 30w and have them both sitting on top of the container the clones are in. This seems to be the sweet spot for me because the clones, once rooted, stay green, healthy and look like they do when they were first cut.
 

atk7

Active member
C420 have u ever checked the temps in your cloner? Have been checking other threads on cloning and was curious what temp your setup averaged. I have been trying different setups but because of the area I live and the location of my grow had been having pretty low strike rates mostly due to low temps but have that resolved now. its been a lot.of trial and error but having a lot of fun and learning a lot . I built my cab to dissapate heat and I did real well on that point so I will be ok come summer but had to make winter modifications to the airflow to keep some heat recirculating. All part of the leaning process that can only be learned with hands on expierience LOL
 

Cobra420

Member
atk7, I put a thermometer in my cloner the other day and have been watching the temps. The cloner is in my basement that's partially heated. It's sitting inside of a cabinet with 2 - 6" holes in its sides. As of the past couple days, the temps seem to be around 62-65 degrees. Our heat was off the past day or two and it got COLD so it's a little colder down there than normal. I'll keep an eye on them and let you know what they average.

As for the plants in the cab, they are looking fantastic! The 12 plant sog plants are getting super top heavy and falling over. The plants in the other side are fattening up nicely too. They all are looking extremely healthy. The 6 clones I took earlier are looking great and I have a few more that were just planted that are coming along nicely.

The 2 plants in my tent are still chugging along. 90 days 12/12. They are mostly purple now and look awesome. They smell amazing and look to be finishing up nicely.

I've run out of room in my gallery so as soon as I figure out how to up my limit, more pics will be on the way.
 

atk7

Active member
Sorry to hear about the heat issue at your place! Hopefully that has been remedied . Thanks for the update on the cloned temps I thought they would be higher than that. My current clone attempt I am trying to keep the root zone above 80 and so far things are looking much better than the other methods i have tried looks like my strike rate is going to be the best so far at least 80% vs the 20% I got on my last attempts. Hopefully I can get a sog going with this batch. Can't wait to hear how the tent finished up they look great.
 

atk7

Active member
Also liked your self water sip buckets so well built myself some 2gallon buckets they are working out nicely so far I can just leave them for 5 days and no issues with drying out. I will post some pics of that later also. Had a small issue of one of my 150s quit lighting and determined it was a failed igniter have another on order so should ha e it back on line soon. One advantage to the dual setup is at least with them both in the same area they continue to get light although reduced but not an emergency crisis so did not have to run out and buy a whole new ballast just jumped on line and ordered the part for 1/10 th the cost.
 

atk7

Active member
thanks for the great idea

thanks for the great idea

Thanks for the great idea here is the new buckets in the flowering area
 
Last edited:

yoyoman

New member
Hi Cobra! Congrats, they are looking great! I would like to know if you use some fetilizer. If so, how do you use it? Thanks
 

Cobra420

Member
atk7, Haha, the heat issue has been temporarily resolved. Good thing we have a wood stove and an abundance of firewood. As for the temps in the cloner, I may have to wait until this cold spell passes. It's around 57 degrees in it as we speak lol. With only having the stove going, the basement gets no heat at all. The cuts I have left in there appear to be doing fine though. I'm sure these temps will halt rooting quite a bit.

I'm glad to hear you are having more success with rooting. That's one thing I feel I've done even after some failures and that's keep on trying until I got it and then it's smooth sailing from there. The clones I had taken pictures of awhile ago are in soil and doing great. I have quite a few of them at the moment, 15+ to be exact lol. Probably won't use all of them, but I look at it more as practice.

As for the tent, I gave them the chop on 20-1-14, 101 days of 12/12 :laughing:
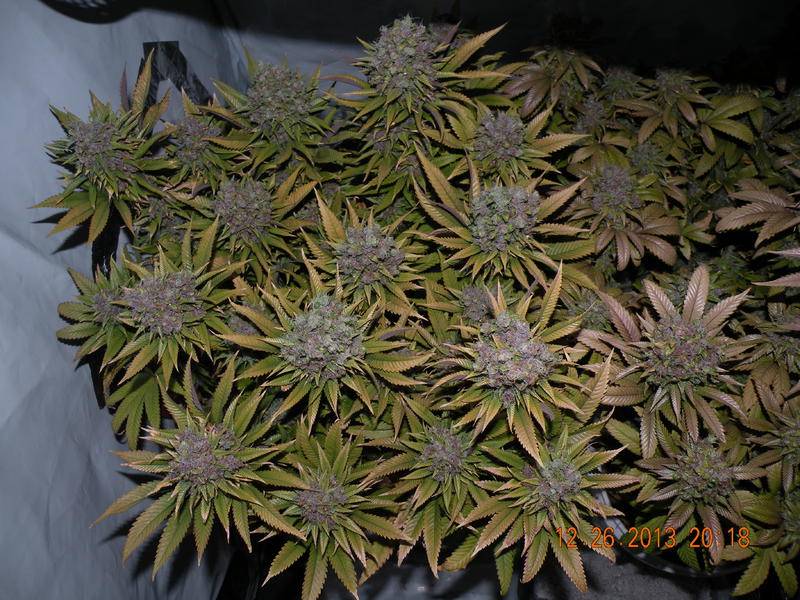
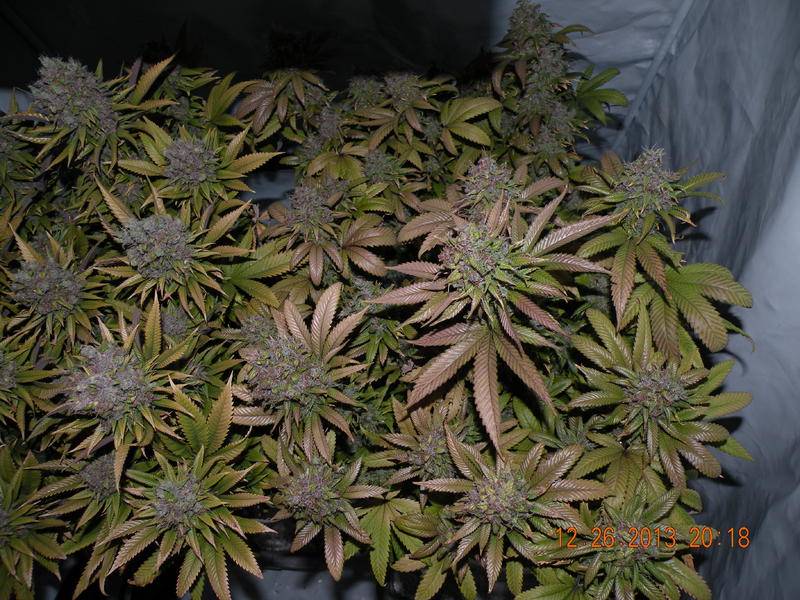
. I have a feeling they could have been chopped awhile ago but that is what my sog experiment is going to be for :biggrin: I hung both plants in the tent they were grown in with the fan turned down fairly low until 27-1-14. Last night, they were both trimmed and jarred. I was able to fill 4 x 1/2gallon mason jars, 2 for each plant.

Each jar has a hygrometer and all seem to be reading a little different. 2 jars are around 60-62% while the other 2 are around 56%. It has been less than 24 hours so I'm hoping given a couple more days, the 2 lower jars will raise in humidity some. They smell fantastic at the moment. The wife sampled some last night and said she enjoyed it so we'll see what happens.

As for the sog, I think you'll love it, I feel it's a little more work than I'd rather be doing, but I can really see the potential in them. My goal for the 16 x 1gals is to harvest a couple a week to see what kind of difference there is in smoke at different times in flower. It should help dial in harvest times for my strains.

The sips to me have been my favorite way of growing so far. Add water and watch... Can't get much easier than that. I hope they do you good. I know the 2 x 5 gals I have in the cab are looking WAY better now than the 2 I just harvested when they were at this time in flower. Just shows how much water these plants really need.

With the 150, I have something for you. The light on the left side of my cab, only seems to turn on once I open the cabinet door... I'm thinking a connection has worked it's way loose or something with the igniter, I don't know . Isn't really making too much sense to me lol. It's good you were able to get that resolved. I don't know what I would have done in my situation. I guess having the extra power outlets in the cab would have benefited me in that scenario.

Your containers look AWESOME!! I hope they work good for you. I notice you have some rubber tubing or something attached to the bottom of the buckets. Curious on what that's all about? Cab looks clean too. Great job!

yoyoman, welcome to the show and thank you for stopping by. I do use fertilizers but they are added in when I mix up my soil. I used blood meal, bone meal, cottonseed meal, alfalfa meal, kelp meal, crab meal, gypsum, dolomite lime, oyster shell, azomite and green sand. The blood, bone and dolomite are getting the axe once I finish off their bags.

I mixed it all up with equal parts peat, home made leaf mold, homemade compost, homemade worm castings, perlite, and vermiculite. I water it with casting tea until it was moist like a rung out sponge. Then I let it sit for a few weeks. So, the organisms in the mix break down the ferts and that then feeds the plants. I add de-chlorinated h20 (rain water in the spring-fall) to the reservoirs on occasion and let the plants do the rest.

So far, deficiencies have been a thing of the past. The plants appear to love this mix. I've been able to go from transplant to harvest with what I have in the soil. Now, in my experience with this method, the larger container you use for soil, the better. That's why I'm going to be using 5 gals in the cab for now on and 5-10 gals for in my tent. More soil, more nutes for the plants to use if needed. The joy of a living soil.
 
Top