What's new
  • Happy Birthday ICMag! Been 20 years since Gypsy Nirvana created the forum! We are celebrating with a 4/20 Giveaway and by launching a new Patreon tier called "420club". You can read more here.
  • Important notice: ICMag's T.O.U. has been updated. Please review it here. For your convenience, it is also available in the main forum menu, under 'Quick Links"!

Bedside Locker Micro Grow

terra-wrist311

New member
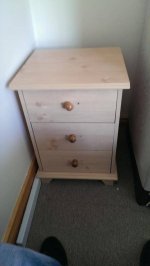
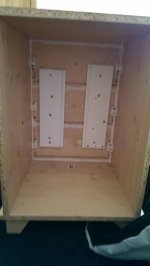
Hello everyone, complete and utter newbie here. Got a small bedside locker which is 360mm l x 360mm d x 480mm h and intend on doing my first grow.
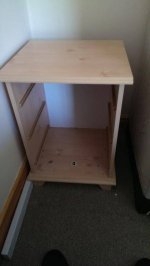
Second hand cabinet bought for pennies. Perfect :dance013: Drawers have been pulled out and all dismantled. Only thing kept is the front face. Used two of the wooden boards from the drawers to screw them flat to be attached to the main cabinet again with right angle brackets. For the stealthy look. And sealed all the front face and gaps with white sealant.
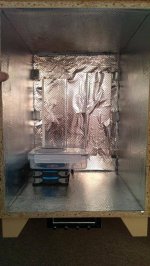
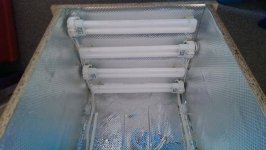
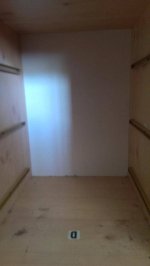
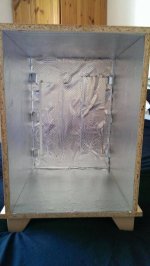
Lined the complete inside with mylar and spray adhesive (cost next to nothing again and still loads left over for a future project). All easily done apart the front face which needed a bit more ingenuity (f'in and blinding really lol).
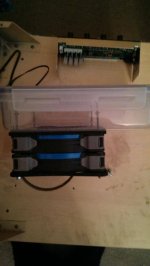
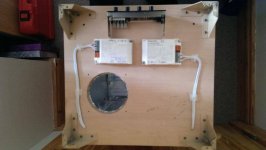
I intend on everything to be accessable from the back panel. Here's the pics of the work so far.
Any advice or input will be greatly appreciated. FTW.
 

Attachments

  • Original Complete.jpg
    Original Complete.jpg
    24.5 KB · Views: 13
  • Original Minus Drawers.jpg
    Original Minus Drawers.jpg
    22.8 KB · Views: 12
  • Original Internal View.jpg
    Original Internal View.jpg
    14.7 KB · Views: 14
  • Custom Cad Internal View from rear.jpg
    Custom Cad Internal View from rear.jpg
    23.2 KB · Views: 12
  • IMAG0256.jpg
    IMAG0256.jpg
    42.4 KB · Views: 11

terra-wrist311

New member
I'm looking very closely at ventilation, heat and odour control now. I'm looking at 2 corsair sp120 pc fans attached piggy back blowing through a homemade carbon scrubber. 1 more 80mm fan for a passive intake and to control the heat from the lights and another inside to circulate the air.
The carbon scrubber I'm making out of a tupperware lunch box with holes/slots cut in the bottom or sides. Cover in mesh and filled with activated carbon. The lid I will cut another hole in to attach to the bottom of the cab(it's sits on feet and I have extra 40mm of hiding space below), and then the fan assembly bolted on top inside the cab.
I want to integrate a thermostatic fan speed controller as well to control all the fans according to the temperature in different areas (e.g. next to lights, in the canopy, intake air temp and exhaust air temp) as well as keep noise a minimum and negative pressure for the scrubber. Thinking of using a scythe kaze controller. The ks01-bk looks perfect for the job. Just a few more things I have to look in, powering it from the mains safely being the main one.
The lights I intend on using 3-4 CFL 23W bulbs mixed between 2700k and 6500k. Going to get surface mount fittings as I don't like the whole surge protector and adapter method as it will take up more vertical space than the latter. Want to keep electricity costs to a minimum too. If I can get the whole thing to run around the 100W mark it would be perfect. Here's hoping.
What do you think about the plans so far? Anything I might have missed?
 

littlegrow

Active member
errm thermometer lol, its sounding good so far :D, can't think of much else :D, apprently the activated carbon reduces the airflow a bit
 
sounds alot like my box. id just get 1 120mm fan for exhaust and 2 60mm fans for intake and put them on opposite sides that way the air is move evenly dispersed throughout the cab. coolerguys.com has some sweet cabinet fan kits as well as fan controllers. as for odor control ive read that ona block works great for micro grows. but id keep a carbon scrubber just for back up if things get real funky. also a 4" draft box.( its a small box with flaps that goes on ventilation systems. can be found in the ventilation isle at home depot or lowes) you can disassemble it and use the bigger side to mount to your fan and you have a easy way to attach your scrubber, just clamp it to the 4" ducting hole or duct tape and bam done :dance013:
ill have pics in my thread when i get the balls to post them lol
 

Neekz

Member
^^ What he said...^^
One 60mm on the side lower corner opposite exhaust, one at canopy blowin across! Perrr cuh!
 

terra-wrist311

New member
Cheers Urban and neeks for the advice. Do you think a single 120 fan will push through a scrubber alright?
2 60 fans running attached to a ldf at the back. I think it'll cause too much noise and vibration imo, compared to a single 80 slowed down with the controller, but it would be nice to have a bit more evenly distributed air flow.
What's your grow cab like then urban? Haven't been able to find anyone that has the same idea of fan controller in their gc's Seen a few posts people talking about it, but no photos or opinions on how good it actually works.
More parts to be ordered tomorrow. Should keep me busy on my annual leave from work and the missus won't be getting ignored with me on here all the time. Lol.
 

Neekz

Member
I control my fans with a variable voltage wallwart from wallmart. Was like $15, gives out 1300mah of juice and you can select from 2v up to 12v with a slider switch (Changed volt's, changes fan speed, not all fans mix well with PWM type controller's...). I have no worry's of noise and my ambients are atleast 80+ everyday so I run em at 7.5V, pretty high. The trick to getting the 120mm's to work with a scrubber, is design, and the fan itself. Higher CFM, as well as higher static pressure both help here. Silverstone makes some pretty high SP fans, but my Coolermaster high cfm/lower db $7 fan is close by a hairline margin... Haven't gotten around to fashioning a scrubber yet, but will do soon! Only reason 2 are being recomended is just incase you have to mount the intake in a not so optimum position in terms of airflow to the canopy, the other fan would be to circulate pulled in fresh air. If you position the intake right, completely un-necessary... Oh and the missus will either love or hate the IC, all depends on how addicted you get, good night :tiphat: ....
 
120mm fan should scrub fine. just dont over due the scrubber. currently my cab is just passive intake because my intake fan took a dump but i plan to get another fan and a controller from coolerguys, im just going to get there controller this time and replace my crap phone charger set-up. i think im going to completely redesign my cab though after find a 70w hps light at lowes
 

terra-wrist311

New member
Just ordered my fans. 2 x 120 for the exhaust, might be able to get away with one, but got 2 just incase I do need to stack them for the scrubber or one could go kaput on me sometime. Better looking at it, than for I say.
Then 1 x 80mm fan for the intake. This I intend on the intake being passive, but no harm in having one incase the temps needs dropping around the lights a bit or to increase air movement a bit.
Hoping to get my fan controller next week. Seen this as a bit of a must have with the scrubber and trying to keep things stealthy. Then my lights to wire if I get a chance too.
Could anyone recommend any good reliable timers for the lights. I don't mind spending a little extra for good ones that won't burn the place down.
 

terra-wrist311

New member
Got my fans today. Coming along slowly, but surely. Not really done anymore work on the cab yet because of illness.
Still not sure about the timer I'm going to use yet. Keep hearing about them giving up and the possibility of a fire risk. Neither will be good.
Keep 'er green everyone.
 

Attachments

  • IMAG0259.jpg
    IMAG0259.jpg
    58.2 KB · Views: 10
Got my fans today. Coming along slowly, but surely. Not really done anymore work on the cab yet because of illness.
Still not sure about the timer I'm going to use yet. Keep hearing about them giving up and the possibility of a fire risk. Neither will be good.
Keep 'er green everyone.

ahh none sense if you can breath you can grow :biggrin:
my walmart timer works just fine, get a manual timer not a digital one. digital timers are a pain to setup. ive been using this timer for 6 months with no problems, just be careful not to accidentally bump to pins when your cleaning, etc. i was very confused one day i woke up and my plants were still sleeping... i think my dog stepped on the timer which is why i have it mounted in my cab now
keep us posted
 

Cabinet Ninja

Member
Veteran
Great looking little cab you're building there terra!

Just a heads up for you before you drop a few quid on spiral CFLS. Check out these PL-L lights. The 24w lights will fit your cabinet length wise (just) if you use the 2g11 sockets that the same site sells as well.

the main advantage of these PL-L lights over standard CFL lights is that you get a much more even light distribution, they have a lower profile and produce less heat due to using an externaly mountable (in relation to cabinet) balast!

With your dimensions, you could fit 6 of those 18w bulbs side-by-side for a whopping 108w. That would really be pushing it, as you'd only need 4 in there at most. That would still gibe you a huge 72w of decent light in there while allowing you to still keep things at a healthy temp.

Check out my grow thread (link in sig) to see my PL-L cab for a indea of what can be done ;).

:tiphat:
 

terra-wrist311

New member
Thanks Urban. Manual pin type timer will do the job. The timer will be well out out the way, no need to worry about bumping it.
Got my fan controller and others bits and bobs for the ventilation/scrubber ordered. Hopefully I'll have a better update in the next week.
Hey CabNinja. I was looking at PL-L lights before but couldn't find ones short enough to fit(mainly because I didn't know where and what I was looking for, duh lol). Thanks for that link, and have made my mind up finally about the lights. Dulux flat lamps. From what I read they are as narrow as PL-Ls height wise, but a lot wider and 3 x 36w lamps will fit perfectly. I like the idea of having the ballasts outside the cab too. Help with temperature control and keeping things steady I think.
Keep 'er green.
 

terra-wrist311

New member
Another update. Have been busy this last month on the cab. Got the exhaust and scrubber almost sorted. Sort of had to have a change of plan with it. The scrubber and all except one fan are inside the cab to try and keep noise at the minimum possible level. The way I've planned it is one 120 fan on the bottom outside the cab, then another inside using the thickness of the wood on the bottom as a spacer, then another one butchered for a spacer between the 2nd fan and scrubber. Using silicone pc gaskets between everything to seal it all up properly and dampen any vibration too.
Scrubber itself I made out of a clik lok lunch box. Absolute b****** to get a 120 hole drilled in without cracking it. Going to have 2-3 layers of carbon filter foam/activated carbon granules in the box itself. Using a homemade metal mesh screen for support over the fan side hole.
For the lights I went with 4 x 24w pl-l running off 2 ballasts mounted under the box behind the fan speed controller. The wiring took quite a bit of time with wanting to keep all the wiring white and neat. Trying to get the wire into lamp sockets was a PITA. Found the best way is to push in a tiny screwdriver in first to loosen up the clamps, then the wire. Went together easy after that.
That's it all for now. Just waiting on a few more things coming to get everything done and finished.
Keep 'er green everyone
 

Attachments

  • IMAG0267.jpg
    IMAG0267.jpg
    25.6 KB · Views: 11
  • IMAG0269.jpg
    IMAG0269.jpg
    67.9 KB · Views: 10
  • IMAG0274.jpg
    IMAG0274.jpg
    30.6 KB · Views: 11
  • IMAG0275.jpg
    IMAG0275.jpg
    48.8 KB · Views: 11
Awesome Pl-l setup. I want to get those myself but my budget won't allow it at the moment. Did you get those from 1000bulbs.com? I plan to run 5 42w lamps in my flowering cab eventually. When the beans gonna sprout?
 

mcsamuels

Member
Looking sharp man! I have a similarly sized cab but decided to got the LED route after being unable to deal with heat issues using CFL in a previous build.

Good luck matey, I'll be followin'
 

littlegrow

Active member
looks good but with heat rising where is your extraction as you have cool air coming in from the bottem and hot air going out from the top somewhere
 
Top