What's new
  • Happy Birthday ICMag! Been 20 years since Gypsy Nirvana created the forum! We are celebrating with a 4/20 Giveaway and by launching a new Patreon tier called "420club". You can read more here.
  • Important notice: ICMag's T.O.U. has been updated. Please review it here. For your convenience, it is also available in the main forum menu, under 'Quick Links"!

MPD's Ultimate Stealth Grow Box Gets Massive Lighting Upgrade

mpd

Lammen Gorthaur
Veteran
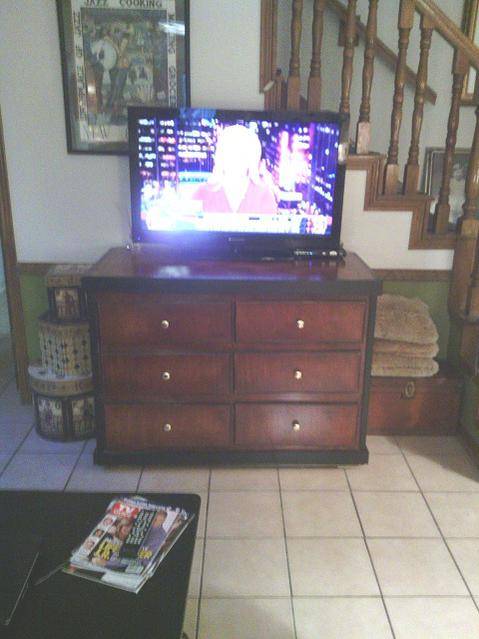
Here we go. A beautiful antique finished dresser. Hand built and sitting in my den with the widescreen television on top of it. My house is tastefully decorated in a manner that says these people are doing a-okay - nothing unusual or illegal going on here. I want to apologize for the little spot in all the photos. There is something wrong with my phone so you have this nagging little black spot in all the photos. (bummer)


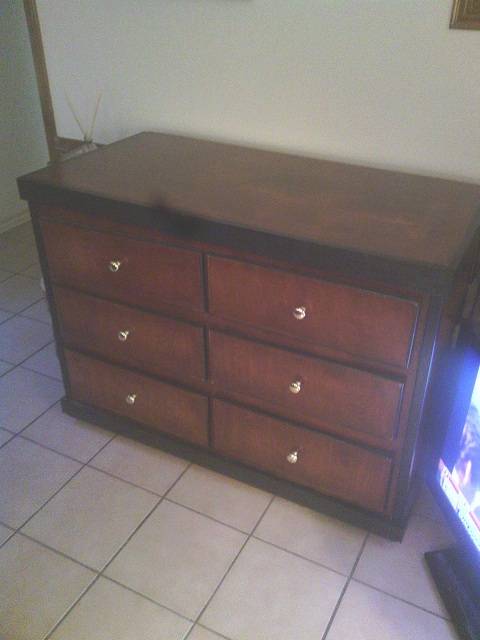
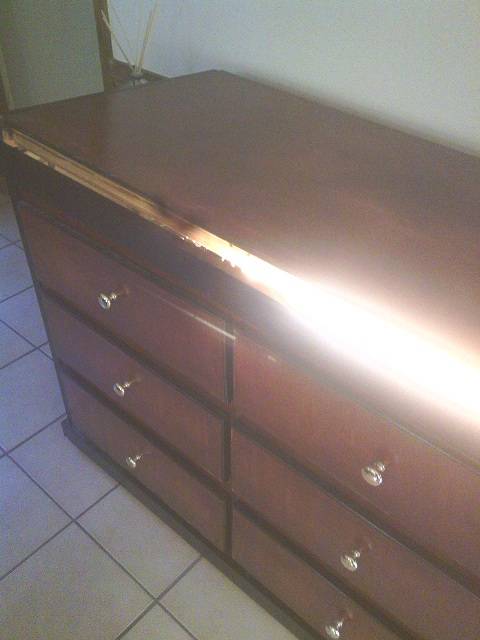
Here's a closer picture of my dresser that I call the Presidio (check out my construction thread below or my album for details on how I built this beast). Note the rich wood tone that came from three (3) coats of stain followed by three (3) coats of polyurethane lovingly brushed on, sanded smooth and recoated again and again. She's really a beauty.


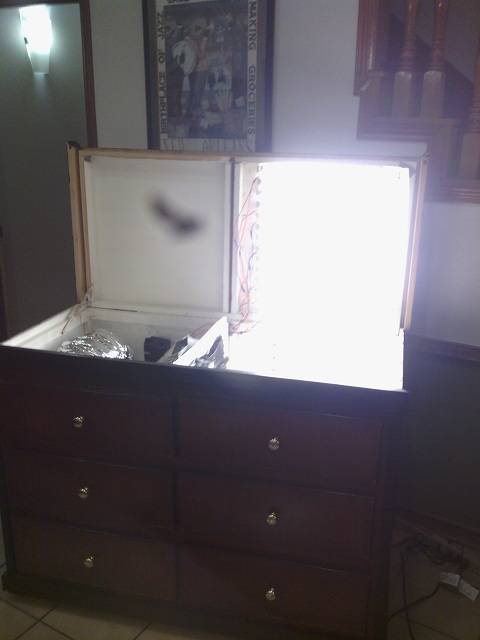
Oh my goodness! The top is rising! There is light coming out of this thing! WTF is going on here?


Holy shit! The light is so bright the camera can't take a good picture! You are staring at 192 watts of T8 U-Bend lamps putting out an impressive 67 watts per square foot that is equivalent to 53 watts of HPS output per square foot for the grow space.


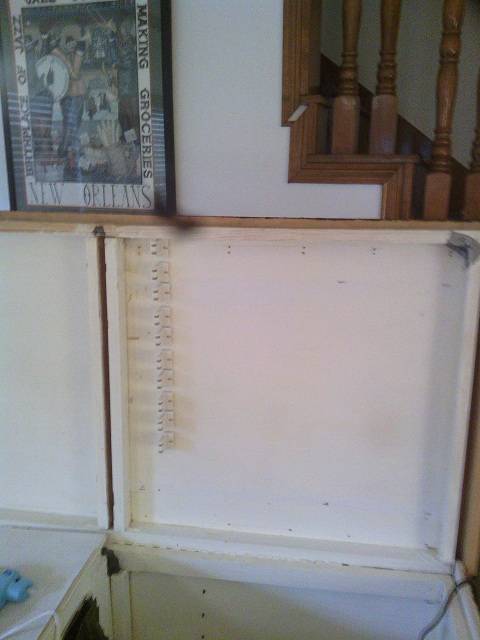
Okay, so let's start. I ripped out the old CFL lighting system and began by attaching the lamp holders that I purchased from Atlanta Lighting (online). U-Bend lamps have two (2) lamp holders per lamp and I had the lamps with the 1-5/8" spread (the most narrow they make so I could crowd in more tubes for more power! - vendor was Superior Lighting and I bought the 82CRI, 3000K U-Bends that put out 1925 lumens at 24 watts per lamp (bought a case of the lamps and had them delivered to my door)). Initially, these were done by attaching the lamp holders to the lamps (so I got the right distance offset for the lamp holders) and then hot gluing them to the surface. Once the hot glue set I then used a wood screw to permanently attach each lamp holder (hot glue alone will not hold them - trust me, I found out the hard way).


More in the next frame.
 

mpd

Lammen Gorthaur
Veteran
And here we are with them all glued in place and ready for the wood screws.


Then I stapled a piece of 3-mill Mylar to the back so that I would have a reflector to reduce the heat absorption by the lid and increase the efficiency of the overall lighting system.


The next task was to wire up the transformers. I used the Sylvania 4-lamp Quicktronix ballasts (I bought 2 from 1000bulbs.com and had them delivered to my door - lowest price on the web!). This meant that the common side of the lamps had to be jumpered together because there are 4 power leads but only 2 common leads. So each pair of lamps had to be jumpered. Furthermore, the lamp holders are not shunted so each lamp holder had to have a jumper wire to shunt its output so that everything would work. Here is the finished wiring of the system ready for the transformer to be hooked up.


I then hooked up all of my leads. I used butt splicers for all the wire (I got the wire, the splicer and the butt splices all from Lowes). This means I never have to worry about a wire coming undone or a wire nut falling off and shorting out a lamp. I then used cable run grommets to secure the wiring so that everything could be neatly tied off with zip-ties. Once that was done I began installing the lamps themselves. Here we are halfway done.

There were a total of eight (8) 24-watt lamps in the lighting plan. As I previously stated this gives me 192 total watts of output power for the grow area that is just a tad bigger than 3 square feet. That works out to an astounding 67 watts per square foot of output power down to the plant canopy. Here's the finished mounting job.


mpd

Lammen Gorthaur
Veteran
Once I was done I closed it up and ran it for two hours to see what would happen. The ambient room temperature is 75 degrees. As the thermometer below shows the temperature just under the lights rose to 94 degrees - a 19 degree jump in ambient that is completely acceptable given the amount of output power that is being transmitted by this assembly into my little grow box area.


And here is the other side of the box. In here we find an intake plenum, a piece of insulated duct work (got it at Home Depot) a TDS silent fan (got it online for $89 I think) another piece of insulated duct work, my homemade duct fan muffler (note the construction program link in my signature below) then another piece of duct work (uninsulated) to the filter and then from the filter box out of the grow box. This is as silent as these get. With everything off in my house there is a slight noise that sounds like background noise from the A/C system which is whisper quiet. Even with the television set to its lowest volume you cannot here this box operate. Completely silent and completely beautiful. Nothing to give away the game.


That's how MPD does high-yield stealth grow boxes to perfection. This is the Presidio. :woohoo:
 
Last edited:

wildgrow

, The Ghost of
Veteran
That is bad-ass!

You said U-shaped bulb and I thought of the old T12 horseshoes... those T8s are nice.

Did you gain any clearance by upgrading?
 

mpd

Lammen Gorthaur
Veteran
About a half an inch. The lamps are only 1" and the lamp holder holds them out 1-1/4" while the CFL's were out there around 2".
 

mpd

Lammen Gorthaur
Veteran
The next task was to reinstall the Mylar sheeting on the interior sides of the growing chamber. You only need it to hang down below the light pattern depth so I ran it down to about an inch above the bottom lip of each side.


Once the Mylar was in place (and you really don't want to screw around with the 1-mil Mylar, it isn't worth it - get the 3-mil stuff) I reattached the shelving support brackets that will hold the adjustable height shelves.


The box is designed for a total of three (3) shelves now and we can do three (3) plants at a time with a total grow height of around 28" (including the pots!), but two (2) plants is what is more ideal when you are doing LST and FIMMing to get real bushy plants.


And now we are done. Here's a shot of the box sitting with its fold-down front cover in the open position. As you can see, you have access to whatever you need to get at in the box.


And here it is closed up again.


Now you are ready to grow some plants with a complete stealth profile and grow fairly large ones at that all the while enjoying a beautiful piece of furniture right in the middle of your house. Be sure to check out my first grow with this new set-up. I am using Female Seeds version of Bubblegum and you can find the link in my signature.
 
Last edited:

wildgrow

, The Ghost of
Veteran
Quality cabinetry and some damn fine stealthification MPD.

Now I want to see how well she works!
 

mpd

Lammen Gorthaur
Veteran
Thanks, wildgrow. We will be finding out. I should have sprouts in the box before the weekend is out.
 
Top