What's new

12 + 4 Ebb and Grow

AnonMe

Active member
Hello everyone.

Long time listener, first time caller.

I've got a few grows under my belt now, but I am by no means an expert. I usually go with DWC under a screen and generally get quite a good harvest.

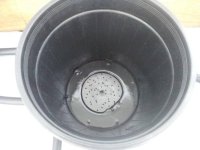
This time around, I've decided to go with a flood and drain or ebb and flow system. As many of you know these systems are often referred to as ebb and grow. I don't want to get into semantics but there are those that say "ebb and grow" is a product made by CAP while others say when you grow large bushes in an ebb and flow its called ebb and grow.

I don't care what you want to call it. For me I like the term flood and drain.

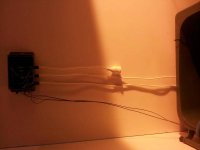
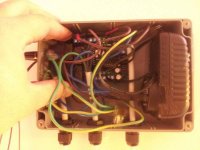
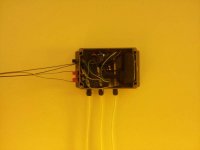
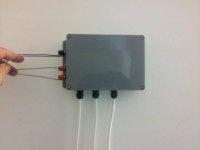
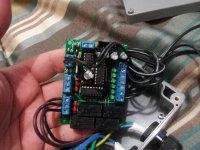
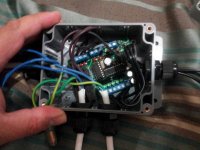
So I took a look at the CAP and other systems which look like very good systems. There is even a DIY on these forums for your own controller. Kudo's to the author of that. It was a brilliant tutorial and I recommend anyone interested to look it up. I wont be creating a DIY on how to make my controller as it gets a bit technical and well frankly, its my baby. I will be creating a couple to give to some fellow growers I know. They require you to adjust some of the per-programed parameters once the unit has done a couple of wet runs. Mainly delay stop of pumps. More on that later.

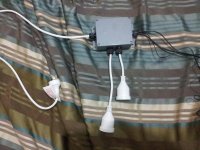
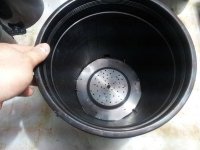
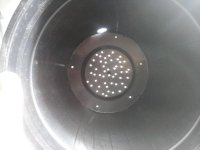
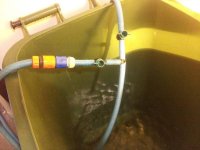
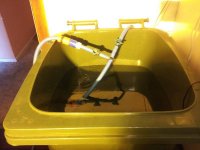
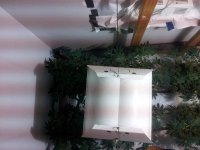
So my controller philosophy was to run a control card on 24VDC. Bring 24VDC down to a low float and a high float, and switch the 240VAC flood and drain pumps via on-board relays. The emphasis in the beginning was to create a controller that was compact and able to be mounted out side of the grow area or up high away from any potential floods (I am yet to have one with this system).

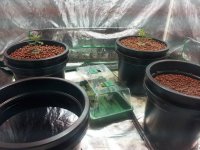
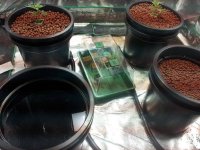
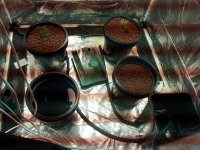
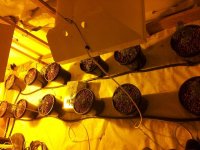
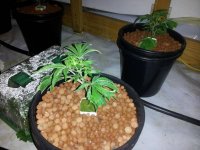
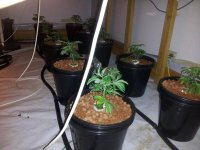
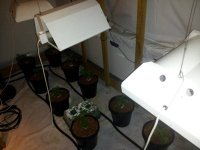
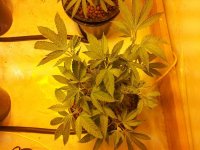
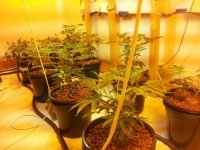
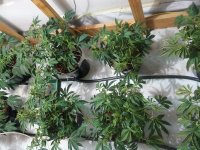
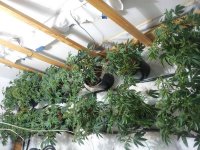
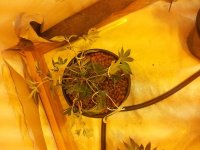
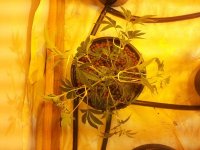
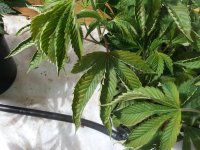
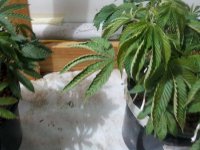
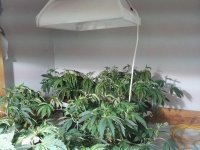
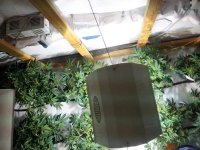
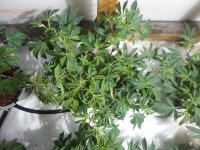
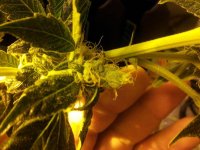
The title of this thread is 12+4 because I was only able to secure 4 clones to start my project. With 3 x 600w digital ballasts and 4 x 400w magnetic ballasts I conducted a plan to grow the 4 clones to a size where I could obtain 20 or so clones. Then select the best 12 to go into a larger room. I done this is a small tent. I am not sure of the dimensions. It looks to be about a meter and a half by a meter and a half? For lighting I used one of the 400w magnetics with a MH conversion bulb. Once clones were obtained I let the plants recover and fire new shoots for about 2 weeks then switched to flower. I was fully aware that stretch would be an issue but I wanted to give them a few weeks to get some new shoots going. As it is, they are into their 4th week and should have all their stretch out the way by now but their very "node-y" and I the 600w HPS is at max height. I will suffer burn no doubt about it but will do my best to limit it.

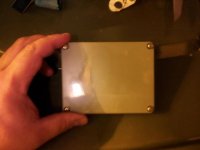
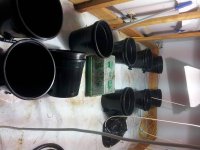
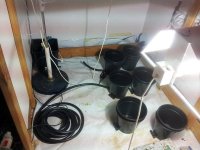
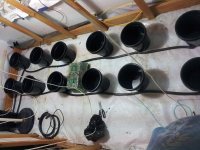
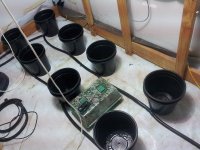
So I will attach some pictures of my controller/project box I have constructed and then continue with some more posts. If there is a delay I may have snuck off to bed. Its almost 1am here and I usually go to bed around 12.
 

Attachments

  • 20120731_121111.jpg
    20120731_121111.jpg
    65.8 KB · Views: 8
  • 20120731_121055.jpg
    20120731_121055.jpg
    57 KB · Views: 10

AnonMe

Active member
I am trying to locate a decent 24vdc power supply that is small enough to fit into that box. Once that happens, the whole unit will be very compact and functional. In the end I will most probably create my own 240 to 24vdc psu but for now $15 at my local electronics store gets me a pretty reliable power pack which I am using for these. It lives external to the project box and plugs into a wall socket. My second version sees a bigger box with the power pack inside.

I am also thinking of putting some user interface gear on the outside.

I was thinking of a thumb wheel to adjust how many flood cycles in a 24hr period. At the moment everything is hard coded into the chip so any adjustments requires me to be onsite to edit code and update the chip.

Currently I have the flood period set to 30 minutes, 4 times a day. This seems to have given me good results so far with out me needing to adjust it.

Anyone familiar with the ebb and flow(grow) products available on the market or control electronics in general is probably familiar with the horizontal float I am using.

I have attached a picture of the early days (remember the tent is in week 4 flower). You can see the flood at max height.

By the way, I cant remember this strain. Its a green house seeds strain with the word shark in it. I think great white shark? I forget :) I gave the beans to a friend who has done a few grows so far with it. I took his 4 clones and gifted him free access to my private seedbank. Share and share a like with the genetics my friends. Between us we have build up quite a collection and have some nice crosses as well. Their my favorite because they are not stabilized and back crossed. You really do not know what your going to get some times and there is one that came from two unlikely crosses that my friend and I always talk about. Its a shame we never got to share it with the world and we lost that gem.
 

Attachments

  • 20120731_120943.jpg
    20120731_120943.jpg
    60 KB · Views: 7
  • 001
    001
    99.2 KB · Views: 31
  • 20120826_234905.jpg
    20120826_234905.jpg
    71.4 KB · Views: 6
  • 20120826_234811.jpg
    20120826_234811.jpg
    72.4 KB · Views: 12

AnonMe

Active member
So as I have said, that room is about 4 weeks into flower. These pictures were taken at different stages. Once I have everything caught up and documented here I can start posting pictures as I go.

The bud picture here is pretty close to how they look now. I must have taken that one maybe half a week ago.

The stretch is killing me. The canopy was quite dense when I switched over and I think the bottom 2/3 of the plant was not getting any light at all. It was pretty dark under there. I think this might have compounded my stretch a bit as the bottom 2/3 elongated pushing the canopy up.

Last week I got down in there and gave the base of the girls a trim and also thinned out the canopy a bit allowing a bit more light penetration.

I should probably tell you about my nutes too.

I am using Dutchmaster original. I've always liked DM, but I have not experimented with much else. I use to always use the DM advanced but now days I just grab the original. Its a couple of bucks cheaper and I notice NO difference.

I would love to try something like the Lucas formula but I what I am doing now works.

So Pretty basic really, mainly because I dont want to throw too many variables in the mix while I dial in my controller.

Veg:
Dutchmaster Original A+B

E.C. about 2.0 (1.8 - 2.5)
pH adjusted to 5.5 and allowed to drift all the way up to 6.5 before water added until original level is reached, E.C. checked, pH adjusted back down to 5.5


Flower:
Dutchmaster Original A+B
Dutchmaster Potash+

E.C. about 2.3 (2 - 2.8)
pH adjusted to 5.5 and allowed to drift all the way up to 6.5 before water added until original level is reached, E.C. checked, pH adjusted back down to 5.5

I use a wheel-e-bin for my reservoir which is 220L, or is it 240? I forget. I find one bin full takes a 1L bottle of A and B perfectly.
 

Attachments

  • 20121023_155627.jpg
    20121023_155627.jpg
    96 KB · Views: 7
  • 20121023_155038.jpg
    20121023_155038.jpg
    21.3 KB · Views: 7
  • 20120826_234934.jpg
    20120826_234934.jpg
    83.8 KB · Views: 5
  • IMG 3628
    IMG 3628
    58.6 KB · Views: 16

AnonMe

Active member
oops forgot to mention...

You can see my square control bucket there. If you look closely you can see two float switches at the bottom. Originally I put the low float too low. Rather than bugger around plugging the hole I left it in place and disconnected it. I just put another float a little higher. I should also elaborate on my control philosophy some more. If the unit is in the flood mode, it ignores the bottom float. The res pump starts and fills the control bucket. Once the top float is reached, the pump continues to run for another 20 seconds. In the drain mode, the reverse happens. Top float ignored, control pump starts, bottom float is made and pump continues for another 30 seconds.

I experimented with code to solve the problem of bouncing levels, start stoping pumps and killnig them (and relays). This was the most elegant of solutions that I came up with. If the float is made, the pump reactivates instantly. So if it is in flood mode and its filled, ran for 20 secs then off... and the pots balance out causing the level to drop. The pump will start right away. There is no delay on, only a delay off in both the flood and the drain cycle. This ensures the water level goes past the floats a bit.

This is the area where I need to code the delay depending on the capacity of the pots or what ever. When I went from the 4 pot system in the tent to the 12 pot system (I will show you soon) I had to adjust the timer a bit. I think I went from 15 seconds to 25 or 30.
 
Last edited by a moderator:

AnonMe

Active member
okay!

Almost caught up.. but I went to bed. My apologies. Thanks admin's for correcting my previous post.

Here are some self explanatory pictures of the 12 pot system.

Again, a wheel-e-bin 220L res. 12 x 250mm pots (the tent had 4 x 300mm pots).

I just grab some pots from my local hydroponic supplier and they all come PRE-DRILLED for a gromit and connection which is quite annoying. Everyone in my area does it. In the end I just used them because I slip one pot inside another. The hole is covered by the external pot and since I am using clay balls nothing falls through.

I drill small holes in the internal pot and put my washed clay in there. The whole thing is easy to use as I can swap pots around, or rotate them which is a big advantage. Probably overload of photos and its hard to see whats going on but I took action shots of the first time it was filling up in the first wet run as well as construction shots.
 

Attachments

  • 20121023_154904.jpg
    20121023_154904.jpg
    53.3 KB · Views: 10
  • 20121023_154934.jpg
    20121023_154934.jpg
    47.5 KB · Views: 7
  • 20121023_154943.jpg
    20121023_154943.jpg
    27.4 KB · Views: 6
  • 20121023_154958.jpg
    20121023_154958.jpg
    36 KB · Views: 6
  • 20121023_155007.jpg
    20121023_155007.jpg
    54.6 KB · Views: 6

AnonMe

Active member
So a few more shots.

I tried to get a shot of the whole room by standing in the far corner and holding my camera up high. End result? My fat gut in the shot. Apologies.

Many people might say move the plants more central line but I do like to leave a little shuffle path along the front for emergency's. Both rows are more towards the back of the room. It was really hard coming up with a pattern to lay out the pots and how many I should have.

In the end I settled for 4 pots per light. I don't think this is ideal because the best light is directly under the globe and there is no plant there, but it will fill in and you would not be able to see the floor from the view of the globe once I am done.

So when I swapped the 400w MH for the 600w HPS in the tent, I placed the 400w MH in the center location in the larger room. The plan is to harvest the tent in another 4-5 weeks and swap the lights back. This means I can put some clones back in the tent under the MH and finish off the flower room with 600w HPS. I hope all that makes sense.

So there are 3 lights in the room, all with 4 pots per light, evenly spaced... sorta..
 

Attachments

  • 20121023_165424.jpg
    20121023_165424.jpg
    68.5 KB · Views: 6
  • 20121023_165056.jpg
    20121023_165056.jpg
    65.1 KB · Views: 10
  • 20121023_165001.jpg
    20121023_165001.jpg
    33.3 KB · Views: 8
  • 20121023_164936.jpg
    20121023_164936.jpg
    37.9 KB · Views: 6
  • 20121023_155148.jpg
    20121023_155148.jpg
    41.4 KB · Views: 5

AnonMe

Active member
If you look at the middle photo in the previous post you can see the outside pot with the inner pot removed. All these pots have 3 plastic tabs inside them. Generally speaking they are a non-issue. That is of course until the drongo's at my local drill the hole RIGHT next to the tab. End result? I have one pot that has a slight leak. The gromit pushes onto the tab and as a result the seal is broken. Another reason why I would prefer to drill these things out myself. Other problems with pre-drilled I have come across is the hole being too low. Its not rocket science but if the hole sits right on the base of the pot, then when you put the gromit + fitting in the pot will not sit flush. Instead it will sit on the fitting. When full of water this pushes the fitting upward as the pot tries to sit flat. As for my current tab problem though? I've thrown some calking around the external of the fitting to no avail (too impatient to let it cure properly, my own fault). I might just get another pot/gromit/fitting and cut out the existing pot and replace it. The pot in question is the one on the first line of pots (central to the room) and 2nd from the end with the control bucket.
 

AnonMe

Active member
In these photo's you can see the new controler I have made.

I've put it inside a larger box and now I can get the power supply in there.

Previously I had 4 cable glands entering the box;

240vac supply
24vdc supply + high float + low float (all in the same gland)
Res pump
control pump

Now I have 3 cable glands, and 3 banana plugs with screw fittings
240v supply
Res pump
Control pump
Float common
low float return
high float return.

I prefer the new design for the simple fact that the 24vdc power supply is all contained in the box. Also, you can connect/disconnect the floats with out taking the cover off the box. Previously you would have to run them in through the gland and screw them to the controller card.

This makes it much easier for me to send this unit over to my mate in QLD. I will program it with pretty forgiving settings and all he has to do is poke wires into the banana connectors and screw them down. No tools required. Also the unit now only takes up one wall socket. Before with the external power supply it took up two.

You can also see how I set up my pumps/hoses.

I only run one hose between the res/control bucket. I just put the pumps on each end. There is a T-Piece that goes to a valve and connector. This valve I leave cracked open and it acts as a syphon break when the pump stops.

YOU NEED THIS TO STOP THE RES GRAVITY FEEDING YOUR CONTROLLER BUCKET AND FLOODING YOUR GROW!

It also acts as a great place to connect your hose. Since I bring the hose in from outside and turn it on this becomes very handy. I am a one man operation so I would have to anchor the hose then go outside and turn it on or it will flick all over the place.

Also, to drain the res I just turn off the main valve, open the cracked valve fully and connect a drain hose to the shower in the next room. I then unplug the res pump and plug it directly into the wall socket.
 

Attachments

  • 20121023_155506.jpg
    20121023_155506.jpg
    21.9 KB · Views: 8
  • 20121023_155823.jpg
    20121023_155823.jpg
    40.4 KB · Views: 10
  • 20121023_155413.jpg
    20121023_155413.jpg
    45.3 KB · Views: 13
  • 20121023_155435.jpg
    20121023_155435.jpg
    17.5 KB · Views: 12
  • 20121023_154801.jpg
    20121023_154801.jpg
    14.4 KB · Views: 6

AnonMe

Active member
So here are some up-to-date pictures;

These 12 little darlings have been in their new homes for about 4 days. I took one shot then my lights went out so I took a couple in the dark.
 

Attachments

  • 20121030_111457.jpg
    20121030_111457.jpg
    68.4 KB · Views: 11
  • 20121030_111553.jpg
    20121030_111553.jpg
    66.9 KB · Views: 11
  • 20121030_111617.jpg
    20121030_111617.jpg
    58.5 KB · Views: 6
  • 20121030_111629.jpg
    20121030_111629.jpg
    41.3 KB · Views: 9

AnonMe

Active member
And here is the girls in the tent as of today.

4weeks and 2 days since the 12/12 switch. I checked my calander :D
 

Attachments

  • 20121030_111905.jpg
    20121030_111905.jpg
    72.4 KB · Views: 9
  • 20121030_111826.jpg
    20121030_111826.jpg
    98.1 KB · Views: 8
  • 20121030_111731.jpg
    20121030_111731.jpg
    120.4 KB · Views: 8
  • 20121030_111718.jpg
    20121030_111718.jpg
    102.2 KB · Views: 5
  • 20121030_111707.jpg
    20121030_111707.jpg
    85.3 KB · Views: 8

AnonMe

Active member
Just checking in, I dont really have much to add as of yet. I think the clones in the 12 pot have got their feet wet and are doing well. Just starting to see some new growth but I jumped in and had a shot at fim'ing them. I've always grown under a screen but thought I would do a quick and easy fim attempt to help bush them out a little.

Also raised the lights a little. Two of the girls have leaves with the sides rolling up and appear to be struggling a little. I think its because they went right under a 600w HPS but I've raised the lights a little and I will monitor.

Keep safe my friends.
 

AnonMe

Active member
Great looking set up man. Will tag along to see how this comes out. Have fun and welcome.


Thanks for dropping in chubbynugs. Sorry I havn't keep up the post count but I will try and dedicate some time now to uploading some pictures. Most of these pictures were taken between now and my last post (a couple of weeks?) and the girls have undergone some changes.

I LST'ed them and have been quite happy with my efforts so far. Some were more high stress training, we were not without incident lol. Managed to split the main stem on two of the girls but they have since recovered well and one of them is probably one of the best.
 

Desert Hydro

Active member
Veteran
awesome build man. ive built a few small setups but nothing too crazy. i attempted an undercurrent but the uniseals just wouldnt seal on round buckets that well. some held and some didnt. i was gonna try again but i just gave in and bought a greentrees multiflow system and a 6 pot add on today. i used to have an ebb and grow and it was great. sold it when i moved and downsized. been running coco and i will be glad to be back to active hydro.

good job and good luck!
 

AnonMe

Active member
Here is my part process of LST.

I went for the tape and string method which worked a treat. Was able to really get these girls bending!
 

Attachments

  • 20121109_222218.jpg
    20121109_222218.jpg
    79.1 KB · Views: 6
  • 20121109_222224.jpg
    20121109_222224.jpg
    80.9 KB · Views: 7
  • 20121109_222231.jpg
    20121109_222231.jpg
    72.8 KB · Views: 9
  • 20121109_222242.jpg
    20121109_222242.jpg
    80.3 KB · Views: 7

AnonMe

Active member
First to shots are older shots... 3rd onwards are not so old..

Shows them bushing out a few days after being tied down.
 

Attachments

  • 20121116_123459.jpg
    20121116_123459.jpg
    98.4 KB · Views: 8
  • 20121116_123449.jpg
    20121116_123449.jpg
    102.8 KB · Views: 4
  • 20121116_123439.jpg
    20121116_123439.jpg
    106.7 KB · Views: 7
  • 20121109_222259.jpg
    20121109_222259.jpg
    60.3 KB · Views: 8
  • 20121109_222255.jpg
    20121109_222255.jpg
    64.2 KB · Views: 10

AnonMe

Active member
I had some issues which maybe someone can help me with.

I posted this over on another smaller forum but unfortunately because of the small user base I have not really got any definitive answers. In the mean time I will continue with the grow and hope it all irons out.

The issue:
I've noticed where the HPS bulbs are the plants dont seem to do so well. The globes are a substantial distance from the cannopy (see later pics) but the leaves are very yellow and some roll up which to me indicates heat or moisture stress.

However, the temerature if anything is TOO COLD. I dont have a thermomitor in there but I recon it would sit between 18-24 degrees at cannopy (I have a finely calibrated back of the hand haha)

Also you can see that the globes are actually over an empty floor space. Not directly over the plants. I am hoping they fill in to cover these spaces. Each light (3 in total) covers 4 plants. So if you imagen the shade, there is one plant off from the corner of the shade a little.
If I was to represent it with keyboard charactures it would look like the below;

: | : : | : : | :

There is a birds eye view of this in a latter picture to give an idea.

So the plants are looking bad on one side and good on the other, wall facing side.

My neutrients are a little high at this point as I was trying to counter this yellowing by throwing more nitrogen at it. Not sure if this is the correct thing to do but remarkably they were still eating more nutes than they were water.
I would adjust my nutes to the following when I mixed them up initially
E.C. 2.20
pH 5.5

After a few days, when water had dropped enough for me to think I should top it up I would check again and get the following;

E.C. about 2.10 or 2.00
pH about 6.1

When ever I topped up with water I would check E.C. and pH and did not stick to a schedual but if it looked out of range too much I would adjust first the E.C. then the pH.

During this time I also took a precaution of raising the lights just a tad. I already think their too high and I have an oscilating fan and an airconditioning system that everyone would be jellous of!!
 

Attachments

  • 20121116_123706.jpg
    20121116_123706.jpg
    80 KB · Views: 11
  • 20121116_123603.jpg
    20121116_123603.jpg
    84.9 KB · Views: 9
  • 20121116_123551.jpg
    20121116_123551.jpg
    53.4 KB · Views: 15
  • 20121116_123512.jpg
    20121116_123512.jpg
    71.5 KB · Views: 8
  • 20121116_123506.jpg
    20121116_123506.jpg
    55.4 KB · Views: 7

AnonMe

Active member
So in one of these birds eye shots you can see a plant and if you notice, overall general appearance the bottom left of it is a little more yellow than the top right... Hard to see from the photo. The HPS is off to the bottom left of the plant.

Not sure if its just too much light and not being able to move the nutes up to the leaves fast enough. Its quite cool in the room (even during an Australian summer) and perhaps the cold is slowing the plants transporation process too much? Any advice is appreciated.

For the record too, I am back down to running an E.C. of 1.80.
2.2 was just an experiment to see if I could pump it up a bit greener. I didnt really notice much difference. I wont get to see if 1.8 is more dialed either as I have also just turned to 12/12 so things will change from here on in anyway.

I dont think the issue is enough to cause too much drammer to the plants themself. Might inhibit my yeild a little.

I forgot to mention, I also increased the feed frequency and shortened the feed duration. Forgot exactly what I set it as, but its definately one flood every 2 hours. I was doing 1 flood every 6 hours and I think they really could take a bit more. They seem to like the 2 hourly feeds. I reduce the time from 30 minutes to (I think) about 12 minutes. I am not sure if its the established roots or the new schedual but they seem to have put on a bit of extra growth since changing. Could be a coincidence tho.
 

Attachments

  • 20121116_124120.jpg
    20121116_124120.jpg
    73.1 KB · Views: 6
  • 20121116_124135.jpg
    20121116_124135.jpg
    63.4 KB · Views: 7
  • 20121116_124146.jpg
    20121116_124146.jpg
    82.5 KB · Views: 8
  • 20121116_124024.jpg
    20121116_124024.jpg
    45.9 KB · Views: 4
  • 20121116_123730.jpg
    20121116_123730.jpg
    103.7 KB · Views: 5

AnonMe

Active member
Was having some trouble posting these pics and lost my comments lol. So this is a short version.

These are the buds out of the 4x tent.

They are really small. Not impressed with this strain at all in terms of yield but my people really love the smoke.

Next run I am hoping for some better genetics. Something with a bit more yield. On the plus side I only need 3 ounces off each in the 12x room to equal my old record of 36 ounces out of that room. Last time was with 4x400HPS, 3 bubblers of celtic berry under a screen. I would LOVE to get about 5 ounces off each one of these but the structure of the plant is very sparse.

She stretches like no other, shooting for the roof before dotting thumb size buds up the stalks which never ever fill in.

Anyway, here are some really bad shots :D
 

Attachments

  • 20121120_133251.jpg
    20121120_133251.jpg
    60.3 KB · Views: 5
  • 20121120_133258.jpg
    20121120_133258.jpg
    62.4 KB · Views: 4
  • 20121120_133338.jpg
    20121120_133338.jpg
    64.3 KB · Views: 9
  • 20121120_133415.jpg
    20121120_133415.jpg
    85.4 KB · Views: 7
  • 20121120_133545.jpg
    20121120_133545.jpg
    122.1 KB · Views: 8

Latest posts

Latest posts

Top