What's new
  • Happy Birthday ICMag! Been 20 years since Gypsy Nirvana created the forum! We are celebrating with a 4/20 Giveaway and by launching a new Patreon tier called "420club". You can read more here.
  • Important notice: ICMag's T.O.U. has been updated. Please review it here. For your convenience, it is also available in the main forum menu, under 'Quick Links"!

Wiring GE 15306

Norkali

Active member
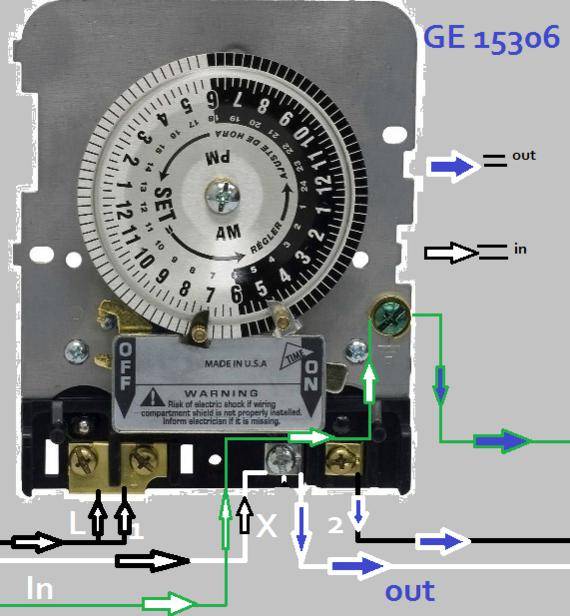
Hello everybody....just wanted to make sure that I'm correct before I wire this new timer up...using a new 12 gauge heavy duty extension cord cut in half... So I connect both ends of the neutral (white) wires to the one 'X' post correct? Same with the ground, both connect to the single ground post? And How do I connect the single hot wire to both 'L' and '1'? With a little piece of wiring in a u shape between the two? (As shown in the third picture...) Thanks guys.

picture.php

2011-06-17_152822_ge_timer.jpg


I know this isn't the timer, but should I connect the incoming hot to 'L' and '1' as '2' and '3' are connected below?
EH10-wiring-289.jpg


Or should I return this and get an Intermatic, which looks like it doesn't have a split with the incoming hot...?
 

rives

Inveterate Tinkerer
Mentor
ICMag Donor
Veteran
You have it figured out correctly regarding wire placement. In the picture, L and 1 are already jumpered together. The text below the first picture talks about a "removable bridge" there - if that bottom horizontal piece is in place between the two terminal clamp plates, it is already jumpered. If not, a "U" shaped wire will work fine.
 

Norkali

Active member
Oh wow.....I just realized that I got two different timers....a 15306, and a 15350....damnit (I must have labeled the timer incorrectly in the first pic..)...the 15350 clearly shows the bridge you are talking about...but I cannot see one on the 15306...hmmmm...time to take it back I suppose...I don't need/want to mess around with a 'U'

What do you say Rives?..and thank-you.
 

rives

Inveterate Tinkerer
Mentor
ICMag Donor
Veteran
Well, it's up to you but if there are clamp plates on the terminals, it would be a very simple matter to take care of. Cut a length of wire about 1-1/2" to 2" long, strip each end, and bend it in half. Put the incoming feed wire from your extension cord end on one side of the terminal screw on "L", and one end of your new jumper on the other, and tighten the screw. Slip the other end of the jumper into place on "1", tighten the screw, done.

Why would you prefer to avoid doing it this way?

*edit* what are the other differences between the two timers? Are they both 120v?

**edit** I just pulled up instructions for both, and they appear to be identical. Not sure why one would be missing the jumper. Somebody get to the box first?
 

Norkali

Active member
I figured the bridge would be a more solid contact and less prone to nicks/loose connections versus me wrangling about with a set of pliers... :biglaugh: I just like things to be a solid as possible, but have a good track record so far doing very simple electrical things such as 4-5 outlet replacements that all work well. *knocks on wood*

The U method does sound easy, but there is also the fact that Amazon has the Intermatics for $45 right now and I got the 15306 for $55...:dunno:

edit: I think that you're right regarding somebody getting to it first...the knockouts were already missing on either side...

edit: The only other difference that I see is that the 15306 is NEMA 3R and the 15350 is NEMA 3, both 120v
 

rives

Inveterate Tinkerer
Mentor
ICMag Donor
Veteran
I hate getting something that somebody has returned!

I've never dealt with a GE, but have used the Intermatics for years and they would be hard to beat.
 

Norkali

Active member
I hate getting something that somebody has returned!

I've never dealt with a GE, but have used the Intermatics for years and they would be hard to beat.

I think that I'll return the 06 that was already used and knocked out...and order an Intermatic...no reason that I couldn't use two different timers for two different lights...wow it feels good to finally be using a legitimate timer and not a cheapo $15 thing...

Thanks again rives.

"You must spread some Reputation around before giving it to rives again."
 

TokerAce

Member
That style timer kicks ass! But please DO NOT use an extension cord cut in half! They are made cheap as they can get with sub par wire! Romax is not that expensive and will definatly not break down or melt on you!!!

Bsafe
 

rives

Inveterate Tinkerer
Mentor
ICMag Donor
Veteran
That style timer kicks ass! But please DO NOT use an extension cord cut in half! They are made cheap as they can get with sub par wire! Romax is not that expensive and will definatly not break down or melt on you!!!

Bsafe


While I somewhat agree with not using a cheap extension cord, I've never seen a problem with the wire itself - the problem usually develops with the female cord cap. On the other hand, romex is definitely not the correct wire to use. Solid wire is not meant for installations where it is subjected to repeated movement, it will work-harden and break. Also, the insulation and jacketing on romex isn't intended for an application where it is unprotected - it is actually pretty thin and susceptible to damage.
 

Norkali

Active member
Interesting point you guys...which was/is one of my biggest concerns, correct wire (romex vs. extension cord,) and my conclusion was that a heavy-duty extension (12 gauge, thick heavy-duty sheathing/jacket - $32 for 25 ft.
yoinks.gif
- name brand 'Contractor Grade' ) was more 'acceptable' than exposed romex, which is supposed to be a big no-no, correct?
 

rives

Inveterate Tinkerer
Mentor
ICMag Donor
Veteran
Interesting point you guys...which was/is one of my biggest concerns, correct wire (romex vs. extension cord,) and my conclusion was that a heavy-duty extension (12 gauge, thick heavy-duty sheathing/jacket - $32 for 25 ft. View Image - name brand 'Contractor Grade' ) was more 'acceptable' than exposed romex, which is supposed to be a big no-no, correct?

Correct. The quality spectrum for pre-made extension cords is all over the map, ranging from the cheap Chinese junk with stiff jackets that can be torn with your thumbnail and no spring tension in the female cord cap, to the contractor cords that are as good or better than a custom-made one with SO or SJ cord and quality cord caps.
 

Norkali

Active member
Hmmm...well I'm about to get to it and I ran into a frustratingly noobish problem...did I buy the right connectors or what? They are both exactly 3/4'' and won't fit...different connecter or what guys? Thanks.


picture.php

picture.php
 

rives

Inveterate Tinkerer
Mentor
ICMag Donor
Veteran
It's hard to tell from that angle, but it looks to me like you need to take out one more concentric ring on the knockout. Those small knockouts generally start with 1/2", the next ring is 3/4", the next 1", and so on. Set the lock ring over the top of the knockout ring, and the lock ring diameter should be just a bit smaller.
 

Norkali

Active member
So knockout the ring to 1''? Edit: I see what you mean, the next ring should be perfect....didn't even realize that I could knock another bit out...
 
Top