
This is something I've been tinkering with on and off for over a year, having built and tested a prototype version of the microcontroller setup using CFLs to grow an Arjan's Haze #3 and a Nirvana NLxHaze in mid-2010.
Box is nearly finished, genetics are vegging nicely, so may as well kick off this thread.
There's a lot to cover, so here are the core elements of the grow box:
- 70W HPS, vertical bare-bulb.
- 3x DIY LED bars @ 16.8W each (50.4W total)
- 1.01 square foot of usable space in a U shape. 120W/sqft. woot.
- Organic all the way. <3 haha
- Arduino microcontroller running my own software: controlling scheduling, heating/cooling, monitoring temps and humidity to CSV file on an included SD card
- Configured with four states: sunrise, day, sunset, night. Different target temps, lighting configs and hot/cold tolerances for each state
- LCD readout showing cycle state (day/night/etc), internal temp+humidity, external temp+humidity so I don't need to open the box to get an idea of what's going on.
- extreme budget cabinetry. I suck so bad at anything involving wood.
Genetics
Got some seedlings cooking. Dutchgrown "Select Mix", Sam Skunkman (mixed) x (haze x skunk) freebies, and seeds from a buddy who grows just this strain for his serious back pain. The high is a little uninteresting, but I find it is amazing medicine for anxiety. I have some other genes I'll probably pop later.
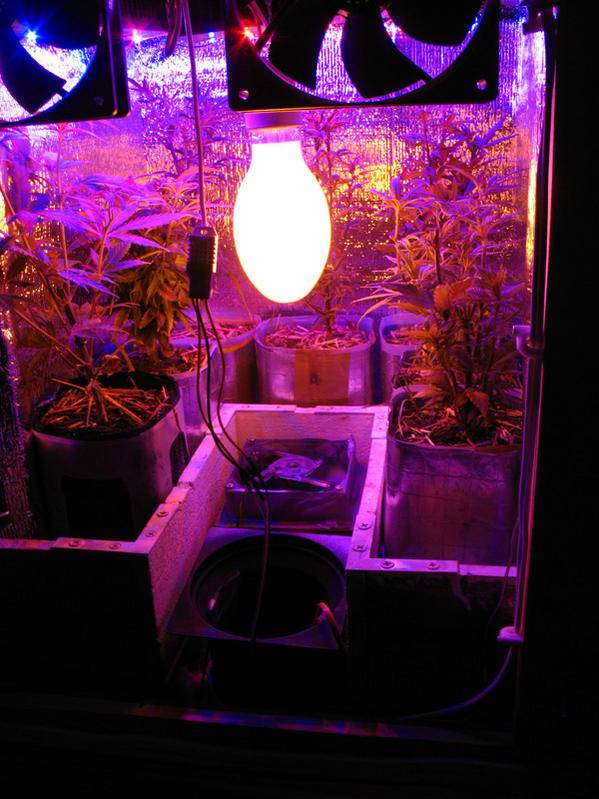
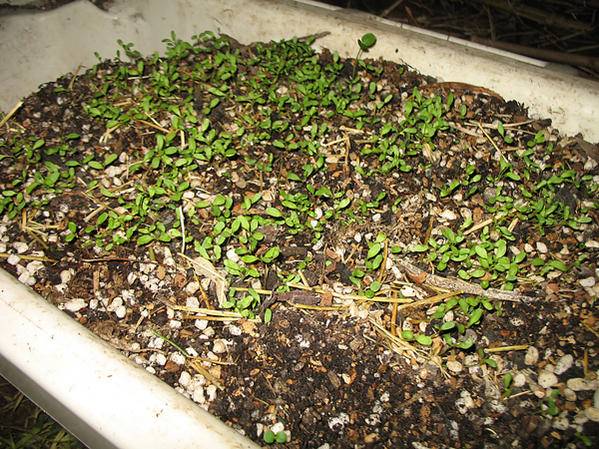
Here they are vegging in my veg box:
As you can see, the LEDs are a decent distance from the plants and there's pretty much zero stretching. So far I'm very happy with the performance of the LEDs and the heating plate that is under the tray.
Progress shots of cab build
front: bedside drawer I found on the side of the road, with a sealed box built on top for electronics/electrical.
Front slides out for easy watering access.
Floorplan
6x 1.5L (0.5 gallon) pots, 2x 1L, 2x ~700mL. To get 1gr/watt I'd need to pull 1/2oz. from each 1/2gal pot, 1/4oz from the 4 smaller ones. I reckon that's entirely do-able on a second round once I've got things worked out. Plants will be staked back against the walls so they can grow toward the HPS
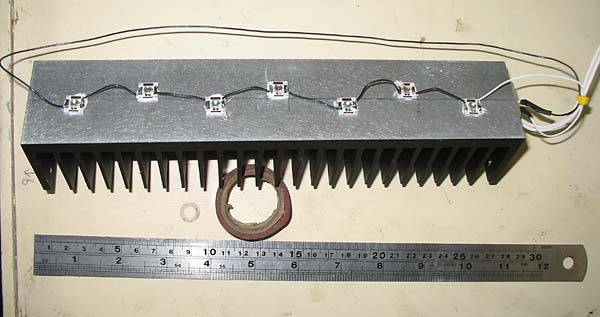
LEDs
3 of these bars, with 3 red Cree XPE and 4 royal blue Cree XPE, both brightest bin available. Heatsinks aren't breaking a sweat.
Back
10" clearance from top of the pots to the bottom of where the LEDs will be. I'm using the LEDs for veg at the moment, they run at maybe 10°C above ambient at the very most. I can hold them and they're just barely warm after running for 20 hours with minimal ventilation, so no dramas when the plants grow into them.
HPS is directly above an low-powered intake fan that will be activated whenever the light is on.

update - light it up
Circulation fans will go at the top, blowing from the back towards the carbon bed at the front
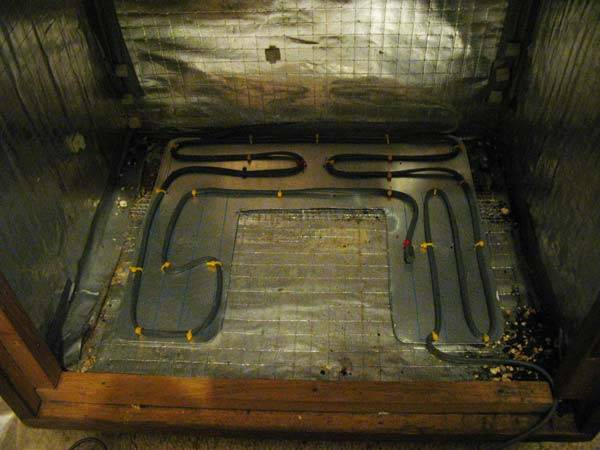
Heating plate
currently in the veg box, but this is made to fit the slide-out floor of the microvert box
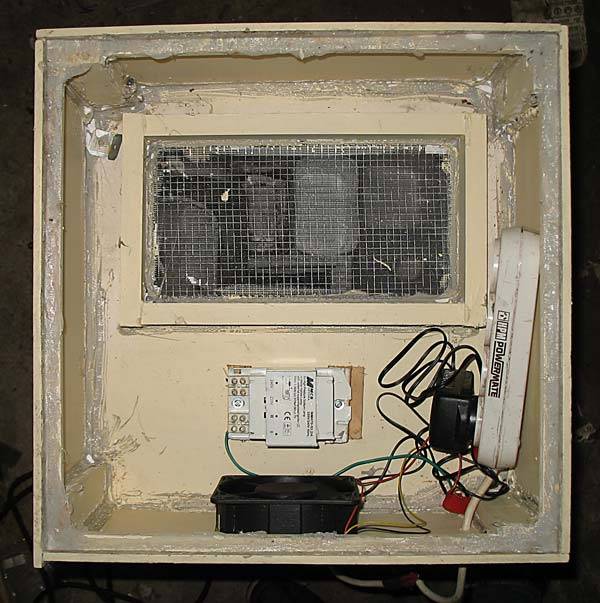
Electronics & electrical compartment
Not wired up at all yet, just temp-wired the fan for air-leak testing. Microcontroller and relays will be on a board mounted above the carbon bed. Temperature readings of this space will be logged as well, with humidity absorbtion materials added to prevent corrosion of the electronics.
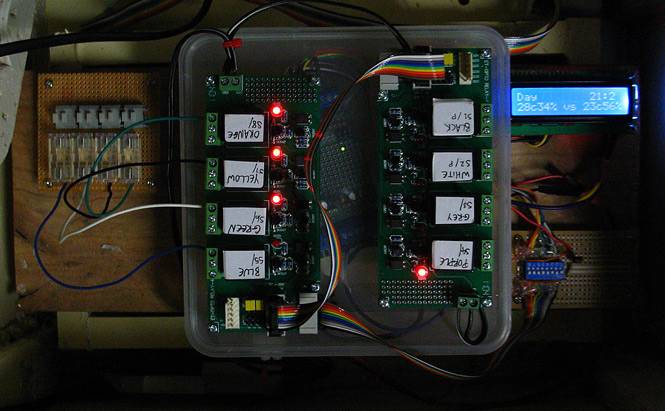
update - finished microcontroller board
Every 5 minutes, sensors are logging the following to CSV
- internal temp
- internal humidity
- intake temp
- intake humidity
- control room temp
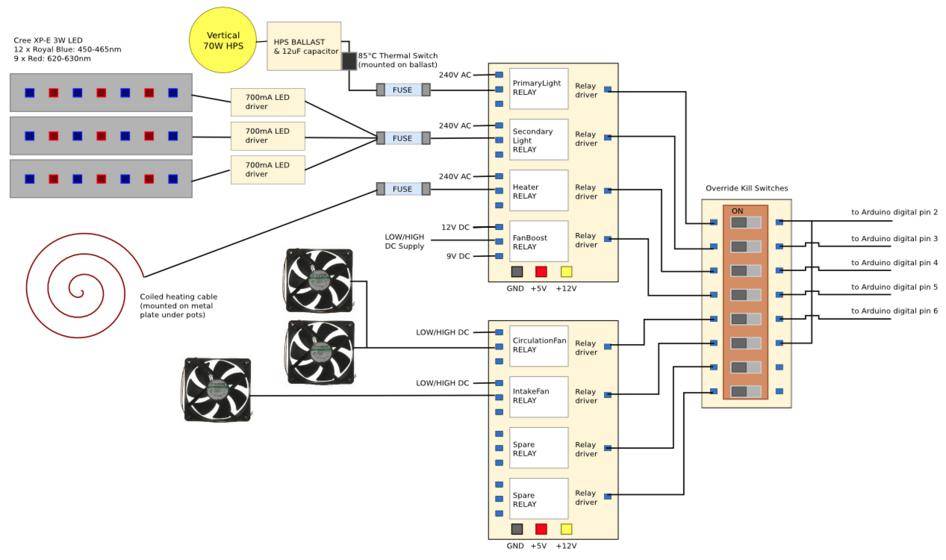
Device wiring
This diagram shows how grow equipment being controller by the microcontroller are wired up. It doesn't show the various sensors or the SD card reader and independant clock used by the microcontroller.
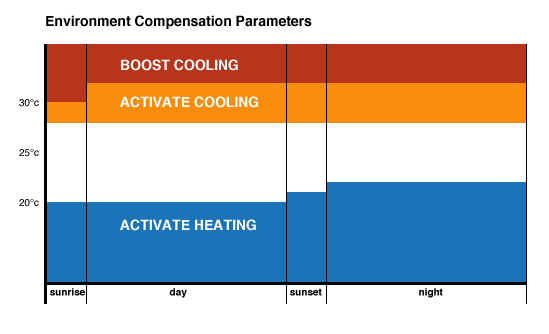
Environmental compensation
The microcontroller is set to attempt to compensate for temperatures that fall outside of a specified range. The "sunrise" period will have the LEDs active but not the HPS, this is to keep early morning temps down and reduce stretching. Sunset is lights out. The following diagram represents my intended flowering temperature ranges:
If anyone has any suggested alterations to the above targets, I'm all ears")
Soil
I've been brewing this soil for more than six months. Feeding it teas, amending it, growing green manure in it. It's partially recycled and absolutely packed with life. Currently growing some alfalfa in it which will get turned in before use. The seedlings are now in this mix and are loving it.
Any specific questions or suggestions, hit me!
p.s. I will be releasing the source code once the new version has been running for a month or so. If anyone wants help setting up arduino monitoring stuff for their grow I'll help where I can. I'm a software dev for a living, but this is my first and only arduino/C++ project.
Box is nearly finished, genetics are vegging nicely, so may as well kick off this thread.
There's a lot to cover, so here are the core elements of the grow box:
- 70W HPS, vertical bare-bulb.
- 3x DIY LED bars @ 16.8W each (50.4W total)
- 1.01 square foot of usable space in a U shape. 120W/sqft. woot.
- Organic all the way. <3 haha
- Arduino microcontroller running my own software: controlling scheduling, heating/cooling, monitoring temps and humidity to CSV file on an included SD card
- Configured with four states: sunrise, day, sunset, night. Different target temps, lighting configs and hot/cold tolerances for each state
- LCD readout showing cycle state (day/night/etc), internal temp+humidity, external temp+humidity so I don't need to open the box to get an idea of what's going on.
- extreme budget cabinetry. I suck so bad at anything involving wood.
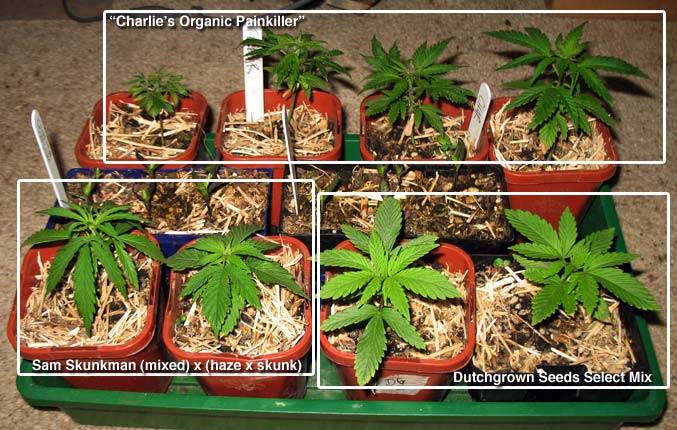
Genetics
Got some seedlings cooking. Dutchgrown "Select Mix", Sam Skunkman (mixed) x (haze x skunk) freebies, and seeds from a buddy who grows just this strain for his serious back pain. The high is a little uninteresting, but I find it is amazing medicine for anxiety. I have some other genes I'll probably pop later.
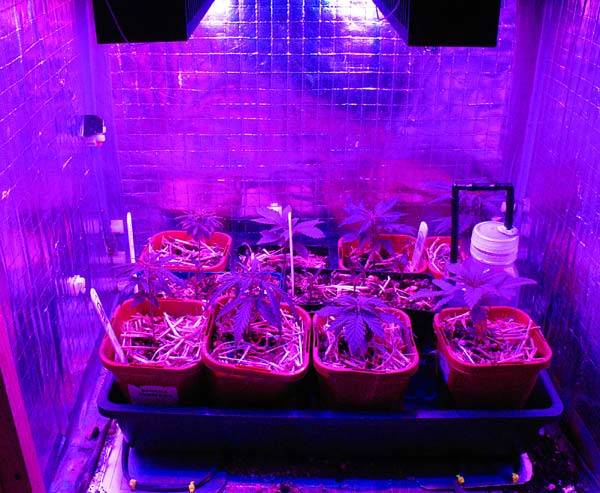
Here they are vegging in my veg box:
As you can see, the LEDs are a decent distance from the plants and there's pretty much zero stretching. So far I'm very happy with the performance of the LEDs and the heating plate that is under the tray.
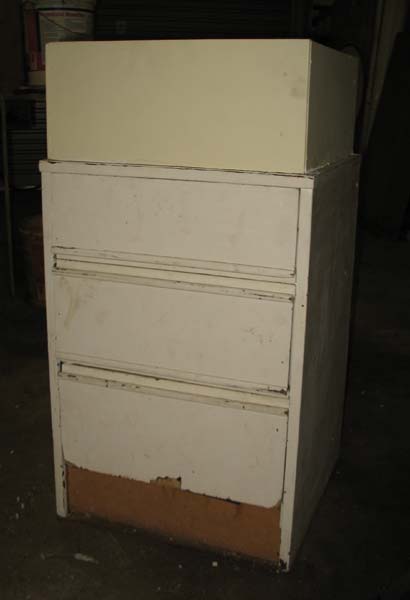
Progress shots of cab build
front: bedside drawer I found on the side of the road, with a sealed box built on top for electronics/electrical.
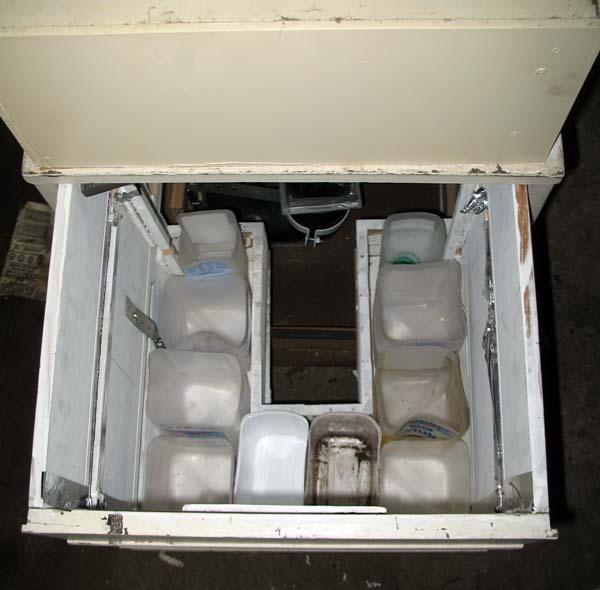
Front slides out for easy watering access.
Floorplan
6x 1.5L (0.5 gallon) pots, 2x 1L, 2x ~700mL. To get 1gr/watt I'd need to pull 1/2oz. from each 1/2gal pot, 1/4oz from the 4 smaller ones. I reckon that's entirely do-able on a second round once I've got things worked out. Plants will be staked back against the walls so they can grow toward the HPS
LEDs
3 of these bars, with 3 red Cree XPE and 4 royal blue Cree XPE, both brightest bin available. Heatsinks aren't breaking a sweat.
Back
10" clearance from top of the pots to the bottom of where the LEDs will be. I'm using the LEDs for veg at the moment, they run at maybe 10°C above ambient at the very most. I can hold them and they're just barely warm after running for 20 hours with minimal ventilation, so no dramas when the plants grow into them.
HPS is directly above an low-powered intake fan that will be activated whenever the light is on.
update - light it up
Circulation fans will go at the top, blowing from the back towards the carbon bed at the front
Heating plate
currently in the veg box, but this is made to fit the slide-out floor of the microvert box
Electronics & electrical compartment
Not wired up at all yet, just temp-wired the fan for air-leak testing. Microcontroller and relays will be on a board mounted above the carbon bed. Temperature readings of this space will be logged as well, with humidity absorbtion materials added to prevent corrosion of the electronics.
update - finished microcontroller board
Every 5 minutes, sensors are logging the following to CSV
- internal temp
- internal humidity
- intake temp
- intake humidity
- control room temp
Device wiring
This diagram shows how grow equipment being controller by the microcontroller are wired up. It doesn't show the various sensors or the SD card reader and independant clock used by the microcontroller.
Environmental compensation
The microcontroller is set to attempt to compensate for temperatures that fall outside of a specified range. The "sunrise" period will have the LEDs active but not the HPS, this is to keep early morning temps down and reduce stretching. Sunset is lights out. The following diagram represents my intended flowering temperature ranges:
If anyone has any suggested alterations to the above targets, I'm all ears
Soil
I've been brewing this soil for more than six months. Feeding it teas, amending it, growing green manure in it. It's partially recycled and absolutely packed with life. Currently growing some alfalfa in it which will get turned in before use. The seedlings are now in this mix and are loving it.
Any specific questions or suggestions, hit me!
p.s. I will be releasing the source code once the new version has been running for a month or so. If anyone wants help setting up arduino monitoring stuff for their grow I'll help where I can. I'm a software dev for a living, but this is my first and only arduino/C++ project.


