What's new

dmt's medical film tables

meltybubble

Member
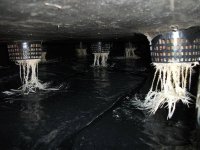
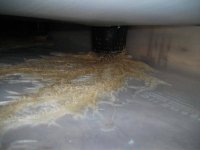
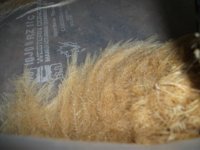
I find capillary matting gives me better grows,it ensures roots get air,food,water as they need.It holds water between feeds.
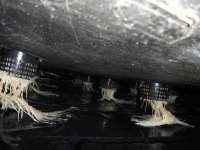
When used the roots intertwine and go round the edges inwards making a healthy rhyzone,fast growth. imho.
Root matts with and without show how good they are.The matts with matting are always fatter and healthier,more roots more shoots.
:tiphat:
peace.
 
T

the med man

day 7 flower

day 7 flower

sorry for being a little late. d and me both were out of town this week for builds and networking,

this is the start of week 2 bloom and they are blowing up. vagpuncher has been joining me since day 1 as hes a close friend and never believed the yields and quality i was getting from them, and he is triiiiipin lol

heres some pics. as per usual, the plants have more then doubled in mass in the last 7 days.

i wouldlike to show the bc community especially how medical grows should be treated. here is my apprentice in full garb. learning the ways of the walk. your space must be treated like a lab, a production site for medicine. if you want to get 2.5 to 3 pounds a kilowatt, then the room and the plants must be treated with the utmost respect. if not bugs and or other parasites will reek havoc on your grow, which means lower yields, quality and more work and expenses. and i take meds, mine or other clients, with the utmost of care and seriousness, which i really find lacking amongst most of our peers out here.

i was in a couple production sites this week from lower mainland to kelowna, alberta and manitoba, and the more east i went, the more respected the production sites were. maybe the more east you go the more time on your hands you have? lol

anyway, enjoy the update,

mm
 

Attachments

  • DSCF1213.jpg
    DSCF1213.jpg
    97.6 KB · Views: 17
  • DSCF1214.jpg
    DSCF1214.jpg
    78.3 KB · Views: 11
  • DSCF1216.jpg
    DSCF1216.jpg
    67.4 KB · Views: 14
  • DSCF1217.jpg
    DSCF1217.jpg
    64.1 KB · Views: 10
S

shuswap

nice my girls have grownlike smallbushes i added co2 lastnight and will take a few more pics tonight and show u the progress
 
T

the med man

grapefruit is very bushy, i always said that gf was blueberry x bc big bud. its has all the characteristics of both of those parents,

mm
 
S

shuswap

im grabbing camera and headed over to the grow thanxs for the co2 info now of course i want to know more,what are you aiming your room temp day/night and rh as i will be using the ac for some dehumid i also have a 75 pint dehumid wondering what to aim for with co2 and a sealed room in both departments,thanxs again and enjoy.
 
T

the med man

day 14 bloom/ big day on site

day 14 bloom/ big day on site

so day 14-21 subject to strain is a big day for the mfts/mm method.

e strip off all but the top 4 nodes and leave 4-6 branches. i know for a fact shuswap is gona try to pull noobie and say hes decreasing yield lol, but its the furthest thing from the truth. from 60 plants we got 1/2 a garbage bag filled with thickc branches and leaves.

i dont care how nice the side branches look they take away energy from the fist sized nugs that should be growing at the top of the canopy. vagpuncher and my apprentice were both gnawing their teeth after i showed them a textbook 14 day mm method palm tree. remember, the med man method is all about a lil work now to reap the rewards in 8 weeks. piopcorn and wierd lil nugs are unacceptable in my bags. and who wants to spend time trimming it anyway? it will lower yield and overall quality and increase chances of outbreaks in parasites. be ruthless (no pitty), only leave 4 leaves plus the crown of every branch.

i have to go back today and finish the scrog as my drill died and could only start the scrog mechanism; u need 4 32 inch 1x1 per table. pre drill each unit with 2 x 2.5 inch screws. attach at every corner of the table, tbc

mm
 

Attachments

  • DSCF1239.jpg
    DSCF1239.jpg
    126.9 KB · Views: 11
  • DSCF1240.jpg
    DSCF1240.jpg
    58.3 KB · Views: 11
  • DSCF1235.jpg
    DSCF1235.jpg
    101.4 KB · Views: 12
  • DSCF1234.jpg
    DSCF1234.jpg
    102.5 KB · Views: 10
  • DSCF1233.jpg
    DSCF1233.jpg
    92.1 KB · Views: 13
  • DSCF1232.jpg
    DSCF1232.jpg
    105.3 KB · Views: 12
  • DSCF1231.jpg
    DSCF1231.jpg
    110 KB · Views: 11
  • DSCF1230.jpg
    DSCF1230.jpg
    90.3 KB · Views: 10
T

the med man

scrog mechanism

scrog mechanism

4x32 inch 1x1

predrill 2 2.5 inch screws
 

Attachments

  • DSCF1237.jpg
    DSCF1237.jpg
    55.9 KB · Views: 11
  • DSCF1236.jpg
    DSCF1236.jpg
    48.5 KB · Views: 12

teemu shalanie

WeeDGamE StannisBaratheoN
Veteran
gotta listen to the med man method I know I have had less of a yield then MM cause Im scared to remove all that stuff I lov side branchs, lol
looking good!!, gotta strip em down to build em up......
TS
 
S

shuswap

no way im not scared i started a few days ago removing some lowerones trying todo afew a day till sunday then shes edward scissor hands ,this is what i wanted to see mm thanxs please showme the screen asw well
 
T

the med man

the scrog

the scrog

i usually buy the 10 or 12 x 6.5 ft trellis but my supplier only had the 8 footers in stock, kinda wack but whatever.

mft scrog: attach all the 1x1 x 32 inch scrog studs at the furthest most edges on the width wise corners.

- place the trellis over the canopy , make sure she is so tight u have to stretch it a bit to get her to fit

- inch the screen down until you reach the tallest branches, bend them away in the direction they are growing, like a starfish

- once all tallest branches are scrogged, inch trellis down again until the next set of branches can be bent outwards, repeat until all the branches are being scrogged

- over the next 4 weeks keep an eye on all the branches, they may need bending and training still in the next 4 weeks as they will continue stretching and filling in all the space
 

Attachments

  • DSCF1245.jpg
    DSCF1245.jpg
    125.2 KB · Views: 10
  • DSCF1244.jpg
    DSCF1244.jpg
    112.7 KB · Views: 11
  • DSCF1243.jpg
    DSCF1243.jpg
    106 KB · Views: 11
  • DSCF1242.jpg
    DSCF1242.jpg
    113.7 KB · Views: 9
  • DSCF1241.jpg
    DSCF1241.jpg
    100.7 KB · Views: 11
T

the med man

day 21 bloom

day 21 bloom

the only issue is the plants are outgrowing their homes. plants grew like 2 inches a day this week,

mm
 

Attachments

  • DSCF1285.jpg
    DSCF1285.jpg
    49.6 KB · Views: 10
  • DSCF1283.jpg
    DSCF1283.jpg
    50.3 KB · Views: 9
  • DSCF1282.jpg
    DSCF1282.jpg
    125.3 KB · Views: 11
  • DSCF1281.jpg
    DSCF1281.jpg
    124.6 KB · Views: 9
  • DSCF1280.jpg
    DSCF1280.jpg
    113.3 KB · Views: 10
  • DSCF1278.jpg
    DSCF1278.jpg
    72.2 KB · Views: 10
  • DSCF1277.jpg
    DSCF1277.jpg
    106.9 KB · Views: 11
  • DSCF1275.jpg
    DSCF1275.jpg
    78.4 KB · Views: 14
  • DSCF1274.jpg
    DSCF1274.jpg
    95.2 KB · Views: 11
  • DSCF1273.jpg
    DSCF1273.jpg
    116.5 KB · Views: 11
T

the med man

day 21 bloom

day 21 bloom

more pics,

mm
 

Attachments

  • DSCF1310.jpg
    DSCF1310.jpg
    83.5 KB · Views: 12
  • DSCF1308.jpg
    DSCF1308.jpg
    123.7 KB · Views: 10
  • DSCF1303.jpg
    DSCF1303.jpg
    32 KB · Views: 11
  • DSCF1299.jpg
    DSCF1299.jpg
    136.8 KB · Views: 8
  • DSCF1297.jpg
    DSCF1297.jpg
    92.7 KB · Views: 11
  • DSCF1290.jpg
    DSCF1290.jpg
    92 KB · Views: 11
  • DSCF1291.jpg
    DSCF1291.jpg
    39.8 KB · Views: 12
  • DSCF1287.jpg
    DSCF1287.jpg
    108.6 KB · Views: 10
  • DSCF1307.jpg
    DSCF1307.jpg
    104 KB · Views: 10
S

shuswap

when are u putting the screen on them? okay i see the screen but i was under the impression that u bent the tops over to form a starfish look,or bent the tops over and grew them sideways which ive had a fuck of a time trying to do,looks like i gotta spend a few more hours done there tomorrow,so basically just trying to give each branch one square on the netting correct?
 
S

shuswap

one other thing i have noticed happening on one of the tables is that the drain hole is dripping down the underside of the tableand not getting back into the res,have u seen this before,trying to come up with a simple fix,tonight i placed some plastic under the stuff going thru the drain hole and the osb bottom tryingto have a better effect of aiming it down,will see what happens
 
T

the med man

dude, read the thread, my last post before these ones is called the scrog, and all the directions are there, peace,

mm

when are u putting the screen on them? okay i see the screen but i was under the impression that u bent the tops over to form a starfish look,or bent the tops over and grew them sideways which ive had a fuck of a time trying to do,looks like i gotta spend a few more hours done there tomorrow,so basically just trying to give each branch one square on the netting correct?
 
T

the med man

the only prob ive ever had is some mold from water splashing up and hitting the tables near the drain, all the drain is is 4 razor to 6 razor cuts over the drain hole, theyou use your hand to strch it out and thru the hole. sounds like you just cut out a circle eh?

mm

one other thing i have noticed happening on one of the tables is that the drain hole is dripping down the underside of the tableand not getting back into the res,have u seen this before,trying to come up with a simple fix,tonight i placed some plastic under the stuff going thru the drain hole and the osb bottom tryingto have a better effect of aiming it down,will see what happens
 
S

shuswap

no circles lol x pattern cut with a knive,fixed all good yeah your instructions said like a star fish and i took tha as scrogging them sideways or hort instead of vert,no worries ne and others are all learning here thanxs
 

Latest posts

Latest posts

Top