Well my two week old bagseed has been doing quite well. The five DJshort Blueberry that I've been germinating for the past six days seems to be a bust though...until five minutes ago when I found a bean thats decided to come to life. I'm thanking BobbySparkle for that lol.

You are using an out of date browser. It may not display this or other websites correctly.
You should upgrade or use an alternative browser.
You should upgrade or use an alternative browser.
ganjasuiteseat
Member
t
MagicChef
Member
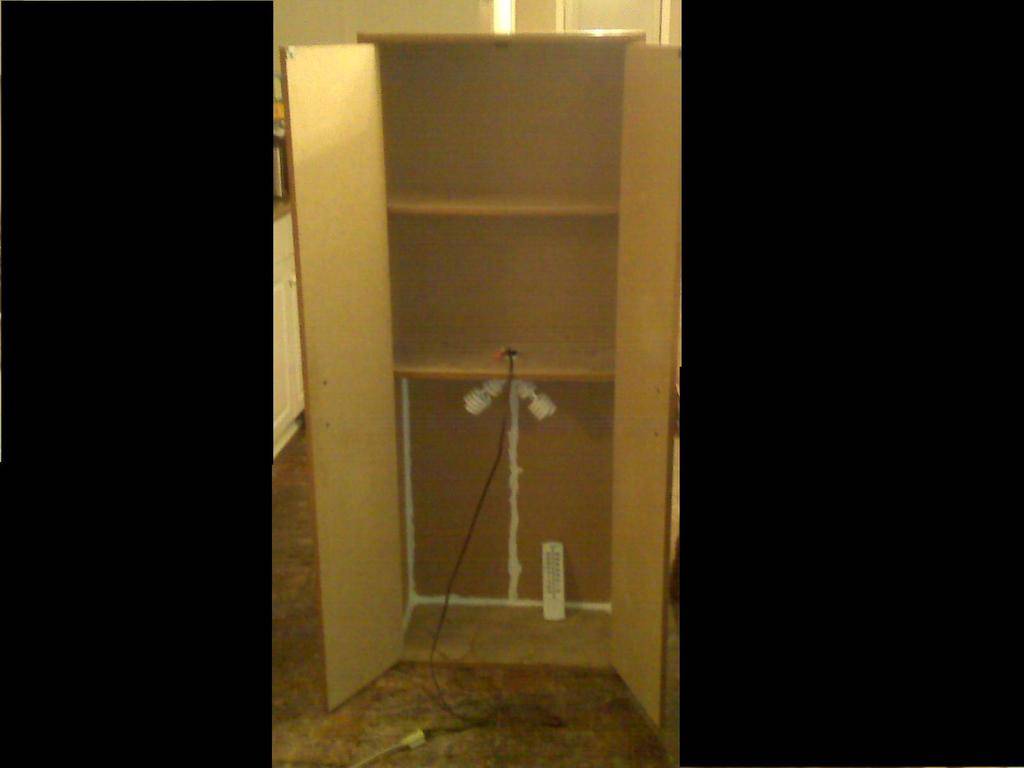
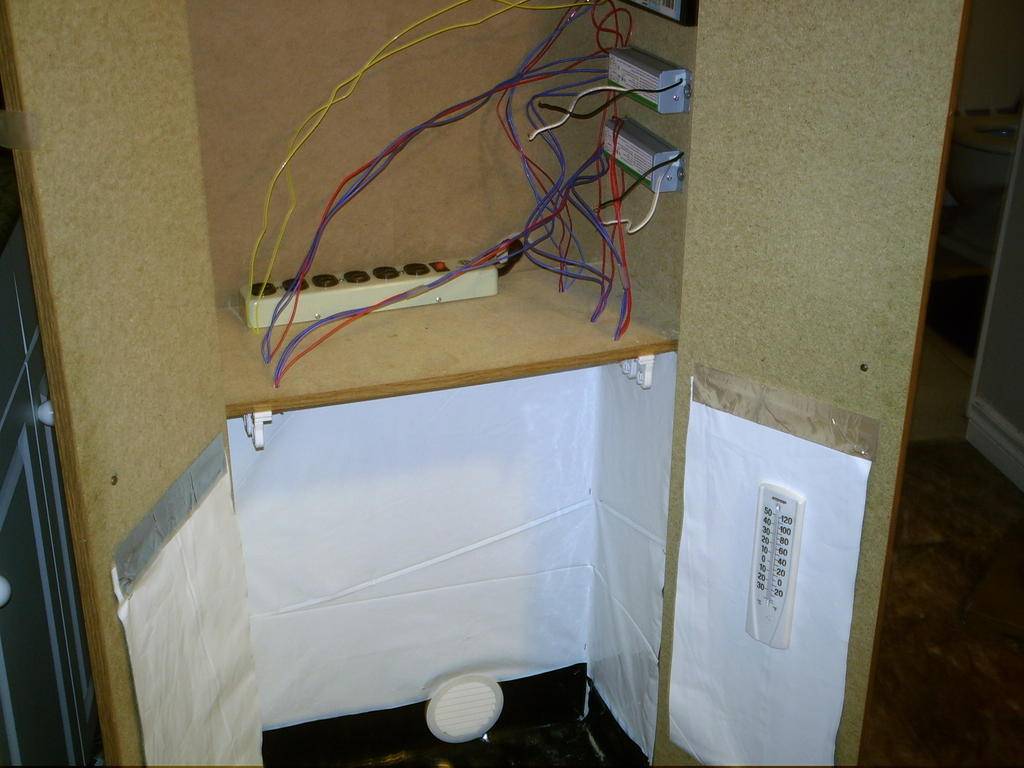
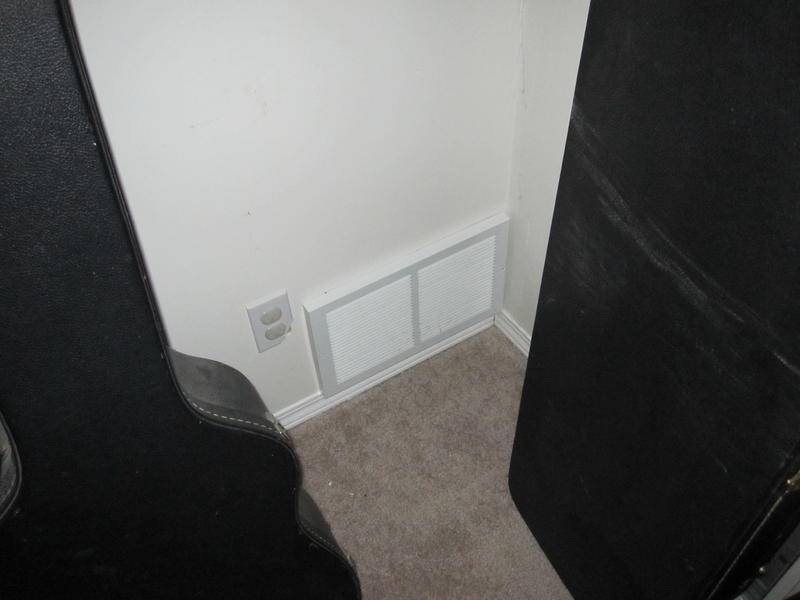
Some pics of my al most completed reno on my cab. Cleaned 'er up and just have a few things left. I still need to get some pantyhose and pack my carbon scrubber, as well as tidy up the utility room wiring...


 https://www.icmag.com/ic/picture.php?albumid=26232&pictureid=575816
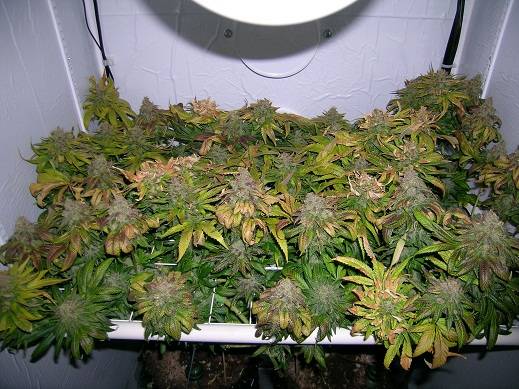
Two grows under my belt with my cabinet now and it has proven it self to produce over 1/2 lb per grow.
Very nice!
Simon
Cab
Cab
Heres a peek at my grow. Its a old 70's house bar turned into a micro prepetual grow cab.
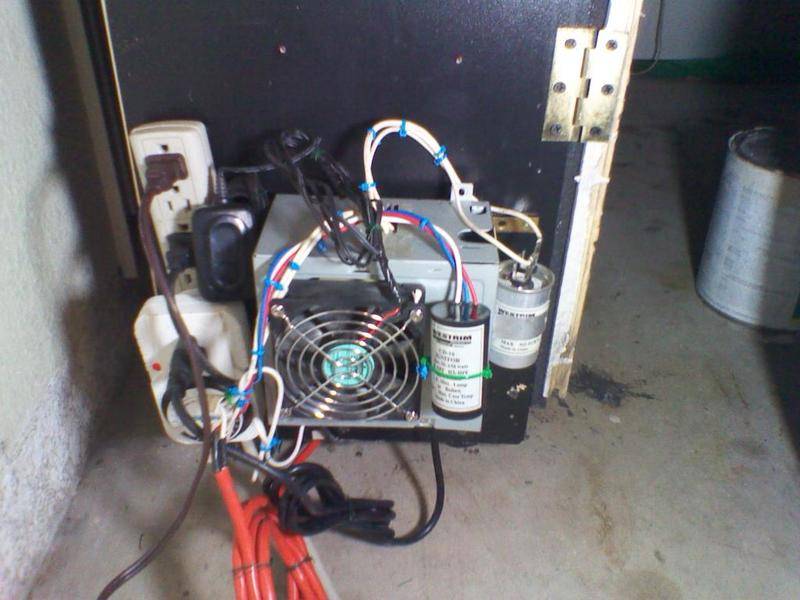
The computer box air cooled 150w hps ballast
This is after my rebuild. My first grow was the cab as a whole. I had light leaks and was not as efficient as I am now, but I grew some supurb ganja for my 1st full cycle as a noob.
Now its all set up and running, heres my vegg chamber

last but not least, heres where my ladyz strut their stuff

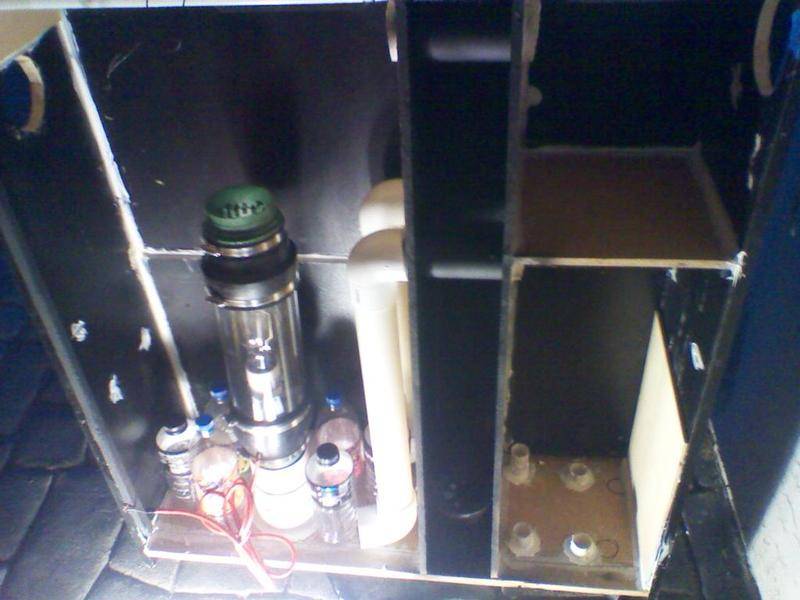
If you look in between the two main chambers theres a slim room for dryin medz. I have my 4in elecient on the outside of the cab into a d.i.y. carb filter
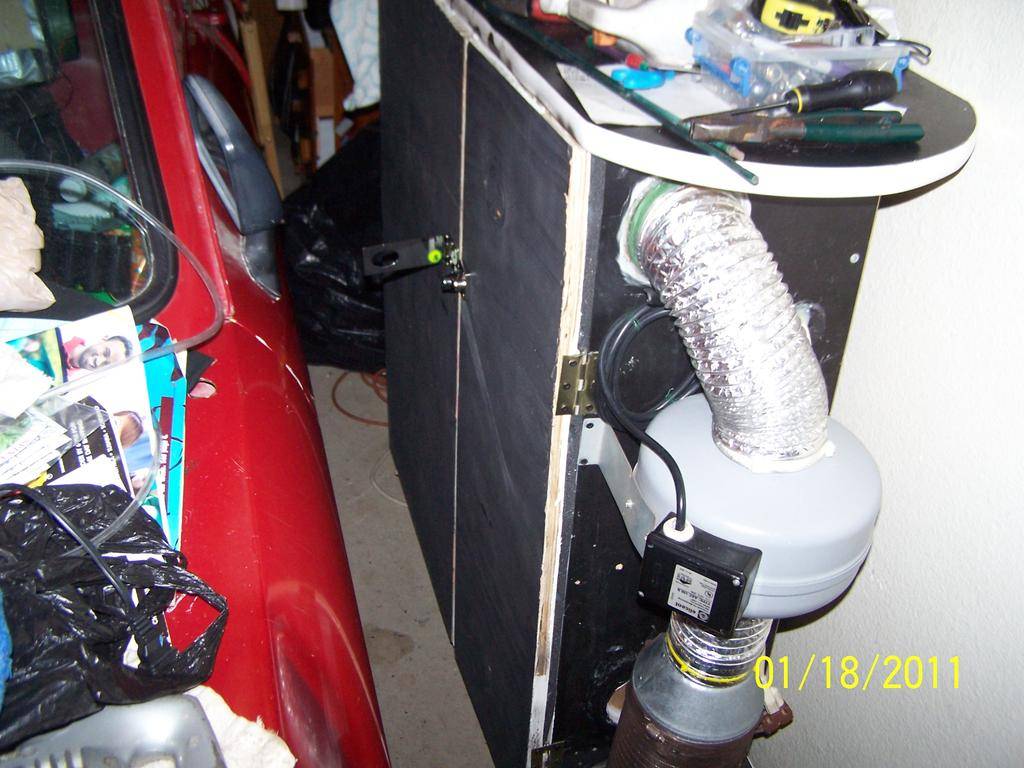
My bar looks like this from the front, my canfan is hidden when its in its home and it looks like this from the front

heres the back, light and air tight for the most part. Thanks to some of the vets here on IC that gave me advice along the way, I have a cab that can continuously keep me with fresh meds every two weeks once my mother is able to produce some young ladys for my prepetual buddsickle sog. Keep it Green Thumb..
Cab
Heres a peek at my grow. Its a old 70's house bar turned into a micro prepetual grow cab.
The computer box air cooled 150w hps ballast
This is after my rebuild. My first grow was the cab as a whole. I had light leaks and was not as efficient as I am now, but I grew some supurb ganja for my 1st full cycle as a noob.
Now its all set up and running, heres my vegg chamber
last but not least, heres where my ladyz strut their stuff
If you look in between the two main chambers theres a slim room for dryin medz. I have my 4in elecient on the outside of the cab into a d.i.y. carb filter
My bar looks like this from the front, my canfan is hidden when its in its home and it looks like this from the front
heres the back, light and air tight for the most part. Thanks to some of the vets here on IC that gave me advice along the way, I have a cab that can continuously keep me with fresh meds every two weeks once my mother is able to produce some young ladys for my prepetual buddsickle sog. Keep it Green Thumb..
K
kayaN0W
Heres my babies 4 weeks in ")


Ate the pie, spilled the punch...but I've a new cab.


I built it for an Auto Flower seed run I'm doing.
*cough* shameless plug https://www.icmag.com/ic/showthread.php?t=205214
Kinda went overkill on most of it, but its working very well for me.
I built it for an Auto Flower seed run I'm doing.
*cough* shameless plug https://www.icmag.com/ic/showthread.php?t=205214
Kinda went overkill on most of it, but its working very well for me.
S
staff11
Simon, I saw that you used the 4" louvers as well, are they light proof?
I built just a little bigger sized NGB style cab to use my DIY dual 150 HPS/reflector combo, it's 24" x 27" x 36" tall, with the veg and utility chambers also slightly larger.
I would like to use a few of them for airflow passing from the veg room to the utility/fan room which is right above but I need them to be light proof.
I know the 8" x 8" are completely light proof, but I have heard various opinions on the 4 inch.
Alright well i've finally decided to post my cab, 600w HPS, Lumatek adjustable digital ballast, 6" Vortex, 6" Carbonaire filter, and a bunch of custom mods including an Arduino.
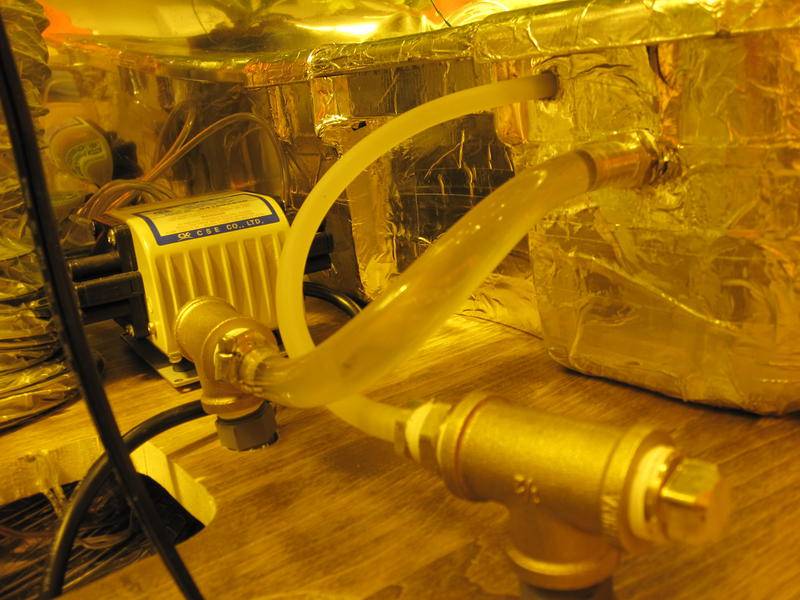
DWC setup with a 2gal bucket resivoir that is used to top up the main rez every 60 minutes by having the arduino automatically turn on a relay which runs the pump in the bucket seen in the bottom level of the cab.
The arduino also controls two tri led green light bars. It monitors a light resistor and a magnetic switch on the door, if the light levels are low enough and the door is opened a relay is automatically triggered and the green lights will turn on. A thermal resistor is also hooked up to the arduino and the output is displayed on a 4 character blue LCD display in the wiring cab.
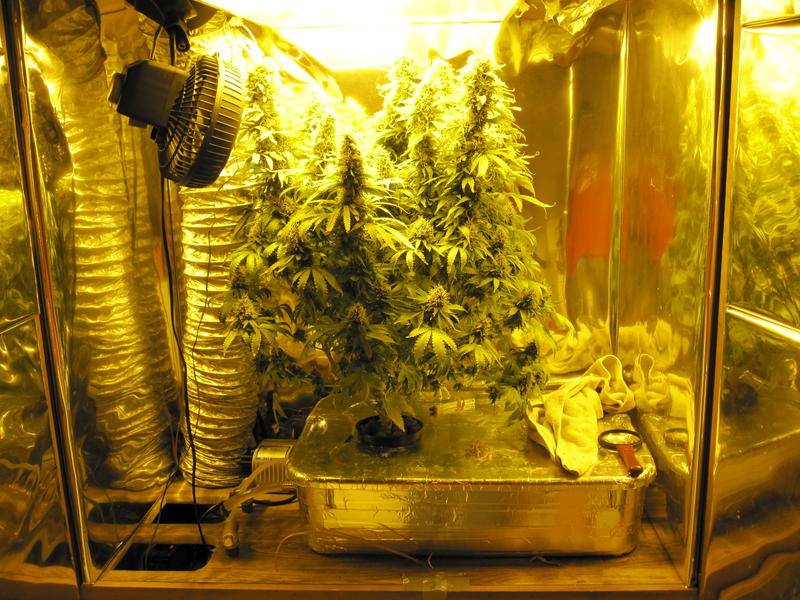
The reflective panels are about 1/2" thick foam panels glued together edge to edge and wrapped in mylar, I also used the glue gun to hold the mylar together on the back, the panels on the doors are held on with velcro so I can adjust the fitting and block all the light leaks. Which these panels do very effectively. Just make sure theyre cut nice and straight.


1/4" feed and 1/2" drain lines, fed into 3/4 inch plumbing after the brass T's. The 1/2" drain just keeps up with the 1/4 inch feed with a pump behind it so for those planning your systems remember to always go up a couple sizes, I would have gone 1/4" feed to 3/4" drain comfortably, the 1/2 inch fitting just cuts it too close. Also you can see the wire for the door switch infront of the rubbermaid.

I use this style fan controller
http://www.plantlightinghydroponics.com/cap-variable-speed-fan-control-p-2263.html
I recomend it over the other popular style Dial-A-Temp
http://www.hydroshop.ca/english/environmental-control/fan-control/sunlight-supply-dial-a-temp.html
the dial-a-temp doesnt provide nearly enough range of adjustability, it made almost no difference on my vortex fan going from full power to all the way dialed back.


A Magnetic reed switch, used to tell if the door has been opened

Patches of velcro to hold the mylar/foam panels on

Magnet for door switch.


Intake from the main room in the basement which is a/c'd into the cab, keeps temps nice and low.


You can see here where I used foam to fill in the gaps behind the cabinet so it only draws cold air from the next room, I also hacked in the plug from a computer power supply into the back, so the cabinet has a detachable power cord. And of course the two 120mm computer fans that help move air into the cab, theres a bigger passive intake on the one side below that I put in just incase the fans ended up restricting air, which they probably do with the blower at full speed, so when everythings turned down to keep things quiet the passive intake doesnt move much air but as the blower draws more and more the passive intake allows a unrestricted path.

The left is a screw terminal block that I turned into a ghetto power distribution block, puts out 5v and 12v from the two different old router wall warts, I use the 5v for the computer fans in the back that help move intake air along and for everything hooked up to the arduino, 12v is for the LED light bars.
On the top right of the picture is the relay module that I use, you give it 5v, ground and a 5v signal wire which is hooked up to a output on the arduino, so when the code turns on output pin 3 in this case it fires the relay and activates whatever I have hooked up to it. Im using 2 right now one for the night lights and one to turn on the water pump every hour for 5 minutes to top up the main rez, this way I dont add too much heat to the water, with the pump running 24/7 it brings up the rez temp 2-3 degC. Also if I go away and the top up bucket runs dry the pump wont melt itself pumping air, 5 minutes at a time of dry pumping isnt going to hurt it.

Heres the arduino
http://www.sparkfun.com/products/9218
If any of you are computer and electronics savvy and havent heard of these do yourself a favour and look it up, the DIY possibilities of this thing are endless.
But yea this guy reads all the sensors and activates the relay modules, also figures out the temp from the temp sensor and spits it out on the small LCD.
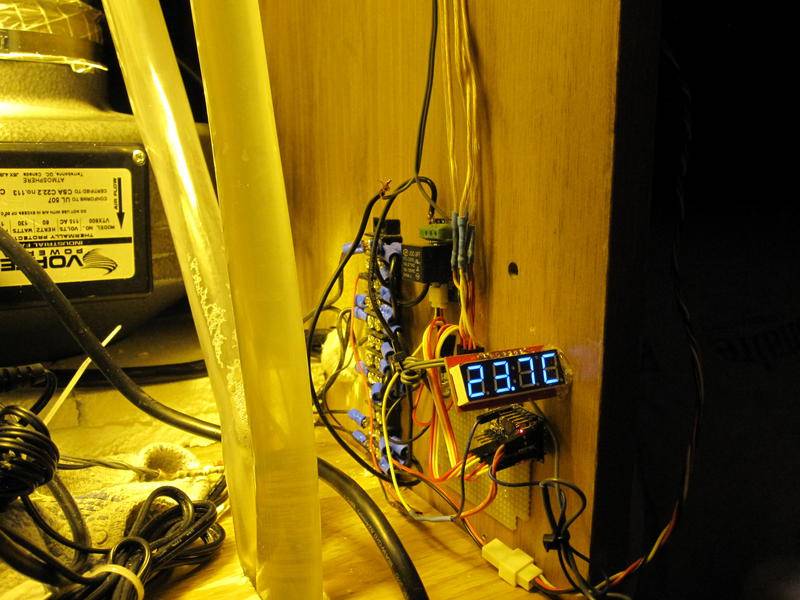

5V and 12V power sources, I had 2 options use these or put a spare computer power supply in here which would take up a ton of room and be a lot more work, thankfully it seems that routers usually come with some pretty decently powerful adapters so problem solved!

The ballast was getting quite uncomfortable to touch from the heat, it's in the exhaust chamber with the carbon scrubber, and that area feels like 8 deg hotter than ambient. Anyways I hot glued a fan to the top of the cab and angled it at the heatsink, keeps it much cooler now.


Pic of the plant with the night lighting activated, ooohh pretty colors !
DWC setup with a 2gal bucket resivoir that is used to top up the main rez every 60 minutes by having the arduino automatically turn on a relay which runs the pump in the bucket seen in the bottom level of the cab.
The arduino also controls two tri led green light bars. It monitors a light resistor and a magnetic switch on the door, if the light levels are low enough and the door is opened a relay is automatically triggered and the green lights will turn on. A thermal resistor is also hooked up to the arduino and the output is displayed on a 4 character blue LCD display in the wiring cab.
The reflective panels are about 1/2" thick foam panels glued together edge to edge and wrapped in mylar, I also used the glue gun to hold the mylar together on the back, the panels on the doors are held on with velcro so I can adjust the fitting and block all the light leaks. Which these panels do very effectively. Just make sure theyre cut nice and straight.
1/4" feed and 1/2" drain lines, fed into 3/4 inch plumbing after the brass T's. The 1/2" drain just keeps up with the 1/4 inch feed with a pump behind it so for those planning your systems remember to always go up a couple sizes, I would have gone 1/4" feed to 3/4" drain comfortably, the 1/2 inch fitting just cuts it too close. Also you can see the wire for the door switch infront of the rubbermaid.
I use this style fan controller
http://www.plantlightinghydroponics.com/cap-variable-speed-fan-control-p-2263.html
I recomend it over the other popular style Dial-A-Temp
http://www.hydroshop.ca/english/environmental-control/fan-control/sunlight-supply-dial-a-temp.html
the dial-a-temp doesnt provide nearly enough range of adjustability, it made almost no difference on my vortex fan going from full power to all the way dialed back.
A Magnetic reed switch, used to tell if the door has been opened
Patches of velcro to hold the mylar/foam panels on
Magnet for door switch.
Intake from the main room in the basement which is a/c'd into the cab, keeps temps nice and low.
You can see here where I used foam to fill in the gaps behind the cabinet so it only draws cold air from the next room, I also hacked in the plug from a computer power supply into the back, so the cabinet has a detachable power cord. And of course the two 120mm computer fans that help move air into the cab, theres a bigger passive intake on the one side below that I put in just incase the fans ended up restricting air, which they probably do with the blower at full speed, so when everythings turned down to keep things quiet the passive intake doesnt move much air but as the blower draws more and more the passive intake allows a unrestricted path.
The left is a screw terminal block that I turned into a ghetto power distribution block, puts out 5v and 12v from the two different old router wall warts, I use the 5v for the computer fans in the back that help move intake air along and for everything hooked up to the arduino, 12v is for the LED light bars.
On the top right of the picture is the relay module that I use, you give it 5v, ground and a 5v signal wire which is hooked up to a output on the arduino, so when the code turns on output pin 3 in this case it fires the relay and activates whatever I have hooked up to it. Im using 2 right now one for the night lights and one to turn on the water pump every hour for 5 minutes to top up the main rez, this way I dont add too much heat to the water, with the pump running 24/7 it brings up the rez temp 2-3 degC. Also if I go away and the top up bucket runs dry the pump wont melt itself pumping air, 5 minutes at a time of dry pumping isnt going to hurt it.
Heres the arduino
http://www.sparkfun.com/products/9218
If any of you are computer and electronics savvy and havent heard of these do yourself a favour and look it up, the DIY possibilities of this thing are endless.
But yea this guy reads all the sensors and activates the relay modules, also figures out the temp from the temp sensor and spits it out on the small LCD.
5V and 12V power sources, I had 2 options use these or put a spare computer power supply in here which would take up a ton of room and be a lot more work, thankfully it seems that routers usually come with some pretty decently powerful adapters so problem solved!
The ballast was getting quite uncomfortable to touch from the heat, it's in the exhaust chamber with the carbon scrubber, and that area feels like 8 deg hotter than ambient. Anyways I hot glued a fan to the top of the cab and angled it at the heatsink, keeps it much cooler now.
Pic of the plant with the night lighting activated, ooohh pretty colors !
Last edited:
whatsupdoc
Member
God damn. Helluva first post. Nice!
BobbySparkle
New member
I want it!!!
