
hey all,
so this is my first grow. first cab build. first attempt at this kind of orientation as far as my research has shown.
i live in a small apartment. there is no extra bedroom, bathroom, large closet, or even floor space. the only available real estate was a 23.5" x 138" x 22.5" (HxWxD). basically i had the head room of a PC micro grow, with double the depth, and 11 and a half feet of width. I thought about going with t5's or CFL's and doing a sog type grow, but my top priority is quality. HPS seems to be the most idiot-proof way of achieving that.
I figured with a single light point i didn't really need all that space, so i could section off about 3 feet for a mother/veg cab. i also realized that if i put the light in the middle of the flowering cab, i could grow on either side of it and double my production. here is an early sketch up of my design.
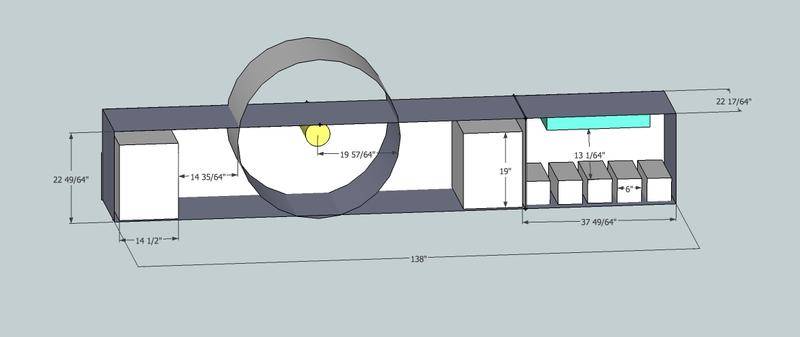
the first thing i realized is that i'd have to turn the light vertically because i couldn't fit the cool tube and ducting in the horizontal orientation (19" cool tube plus 6" ducting in a 22.5" space). my next idea was to run the ducting out of the ceiling, through the (shared) attic space, and out the roof, thus eliminating the need for a carbon filter. the cable is routed through the attic, so i started to feel nervous about the possibility of my landlord or some utility guy having to get up there and spotting a ventilation system coming out of the vicinity of my bedroom closet. new plan- vent out the bottom, scrub the exhaust, keep it all in the closet.
*i am prop 215 and sb420 compliant, but i didn't get my landlord's approval to "modify" our closet with a 6" hole and 8 x 1.5" holes, so that's where the need for stealthiness comes in.*
anyway, caulked every corner and crack. slapped a fresh coat of flat white on the whole thing. installed a partition between the veg and flower sections.
the partition wall is 1/4 ply. i cut an 8"x4" rectangle and fabricated one of scrubninja's (nearly) light proof louvers. caulked it all in place. i now realize that it's not light proof enough, and i'll be adding a baffle to 100% light proof it.


i drilled four 1.5" passive intake holes along the bottom edge opposite from the louver. lighting is 1 x 23w 6500K t5 strip and 2 x 15w crappy office t5 strip lights. i think the warmer 15w t5's help widen my spectrum, which i'm fine with, but i'd like to throw another of the grow tube 6500K's in there just to maximize the space. here's a shot with my babies in there.

next i built my cadillac carbon filter (i call it a caddy cause it's beefy and purrs real smooth) based on my memory of RM's pro style filter. mine is a bit more streamlined imo with the mesh being the most exterior part (no batting zip tied to the outside) and an easily removable end cap for quick and painless refills. attached it to my 8" in-line can fan, another reducer, and an adjustable 90 deg elbow. here it is installed, raised on three leftover plugs from my intake holes. i'll get a shot today of the inside of the cab, but it's really clean, and my cool tube just drops right into it.


today i give the hps a test run. i still need to build the baffle for the partition, and build my modular screens for the vertical scrog aspect of the grow. i'll update this post with a shot of the whole thing opened up so you all can get a better idea of it, plus shots of the screens and baffle once those are built. i'll probably also throw some pvc P-traps or something in the intake holes to cut down on the space ship lighting effect our clothes closet now has:
if you don't think this is gonna work, that's cool, but i'd rather hear some constructive suggestions if anyone's got some. i'm under a pretty serious budget.
i got a 400w lumatek dimmable digital ballast and an eye hortilux 400w hps that will go in the cool tube in the flowering cab. i know it's overkill but i expect to upgrade to a larger space in the next few years and figured it'd be a good investment. i still haven't decided whether to do this grow under the full 400w or maybe turn it down to 250. any opinions?
thanks for checkin in!
so this is my first grow. first cab build. first attempt at this kind of orientation as far as my research has shown.
i live in a small apartment. there is no extra bedroom, bathroom, large closet, or even floor space. the only available real estate was a 23.5" x 138" x 22.5" (HxWxD). basically i had the head room of a PC micro grow, with double the depth, and 11 and a half feet of width. I thought about going with t5's or CFL's and doing a sog type grow, but my top priority is quality. HPS seems to be the most idiot-proof way of achieving that.
I figured with a single light point i didn't really need all that space, so i could section off about 3 feet for a mother/veg cab. i also realized that if i put the light in the middle of the flowering cab, i could grow on either side of it and double my production. here is an early sketch up of my design.
the first thing i realized is that i'd have to turn the light vertically because i couldn't fit the cool tube and ducting in the horizontal orientation (19" cool tube plus 6" ducting in a 22.5" space). my next idea was to run the ducting out of the ceiling, through the (shared) attic space, and out the roof, thus eliminating the need for a carbon filter. the cable is routed through the attic, so i started to feel nervous about the possibility of my landlord or some utility guy having to get up there and spotting a ventilation system coming out of the vicinity of my bedroom closet. new plan- vent out the bottom, scrub the exhaust, keep it all in the closet.
*i am prop 215 and sb420 compliant, but i didn't get my landlord's approval to "modify" our closet with a 6" hole and 8 x 1.5" holes, so that's where the need for stealthiness comes in.*
anyway, caulked every corner and crack. slapped a fresh coat of flat white on the whole thing. installed a partition between the veg and flower sections.
the partition wall is 1/4 ply. i cut an 8"x4" rectangle and fabricated one of scrubninja's (nearly) light proof louvers. caulked it all in place. i now realize that it's not light proof enough, and i'll be adding a baffle to 100% light proof it.
i drilled four 1.5" passive intake holes along the bottom edge opposite from the louver. lighting is 1 x 23w 6500K t5 strip and 2 x 15w crappy office t5 strip lights. i think the warmer 15w t5's help widen my spectrum, which i'm fine with, but i'd like to throw another of the grow tube 6500K's in there just to maximize the space. here's a shot with my babies in there.
next i built my cadillac carbon filter (i call it a caddy cause it's beefy and purrs real smooth) based on my memory of RM's pro style filter. mine is a bit more streamlined imo with the mesh being the most exterior part (no batting zip tied to the outside) and an easily removable end cap for quick and painless refills. attached it to my 8" in-line can fan, another reducer, and an adjustable 90 deg elbow. here it is installed, raised on three leftover plugs from my intake holes. i'll get a shot today of the inside of the cab, but it's really clean, and my cool tube just drops right into it.
today i give the hps a test run. i still need to build the baffle for the partition, and build my modular screens for the vertical scrog aspect of the grow. i'll update this post with a shot of the whole thing opened up so you all can get a better idea of it, plus shots of the screens and baffle once those are built. i'll probably also throw some pvc P-traps or something in the intake holes to cut down on the space ship lighting effect our clothes closet now has:
if you don't think this is gonna work, that's cool, but i'd rather hear some constructive suggestions if anyone's got some. i'm under a pretty serious budget.
i got a 400w lumatek dimmable digital ballast and an eye hortilux 400w hps that will go in the cool tube in the flowering cab. i know it's overkill but i expect to upgrade to a larger space in the next few years and figured it'd be a good investment. i still haven't decided whether to do this grow under the full 400w or maybe turn it down to 250. any opinions?
thanks for checkin in!


