
Chef Dude
Member
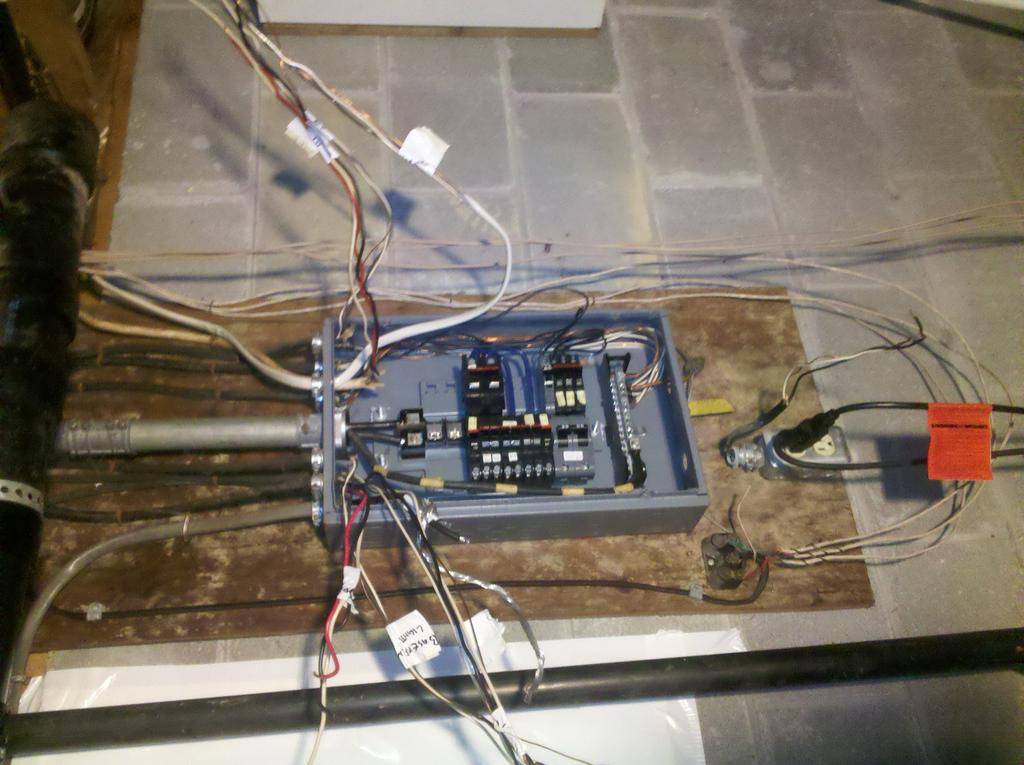
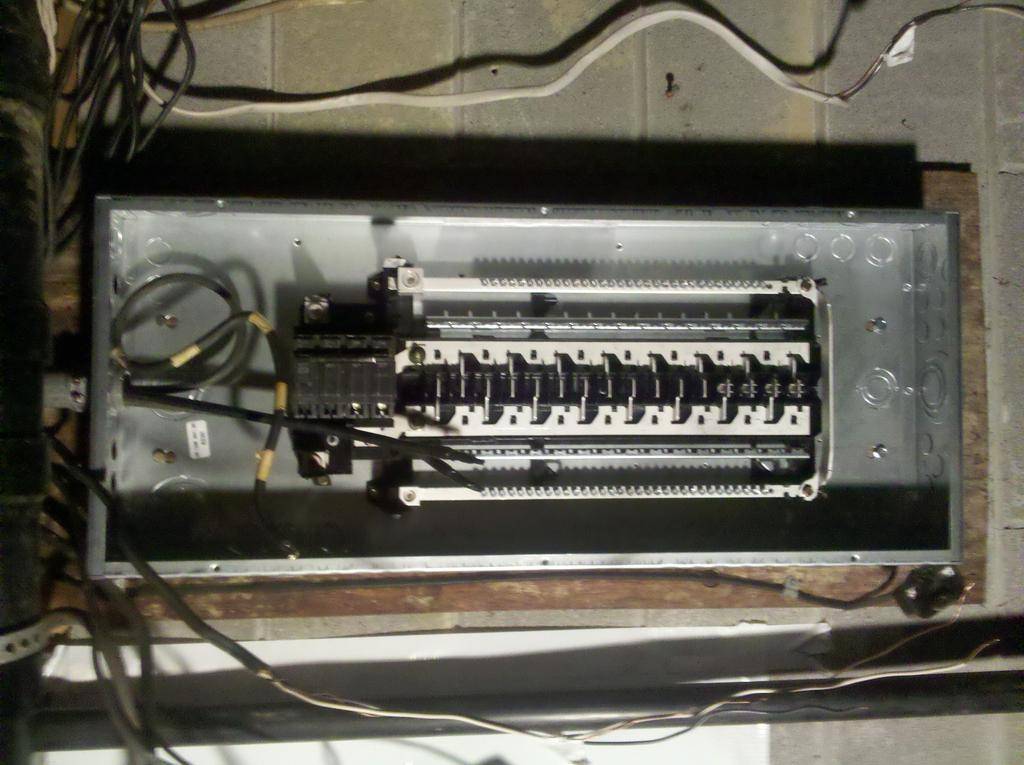
Hello all, its been a while since I have posted anything and i apologize for that but my partner and I have been very busy with great things. Today I am putting in a new electrical load center (circuit breaker box). The reason for the upgrade is that the current load center only pushes 125 amps and has no main breaker. The old box is original to the house circa 1960's, and is a main lug design with the old federal style breakers. These breakers are hard to find and expensive when you do, and also I will be operating 5400 watts of light which will pull just under 60amps, and push the old load center to its absolute limits without taking into account the ventilation and other necessities of the room. Here is a picture of the original load center prior to dismantling it.

Notice at the top where the three main power feed wires enter from the meter, they go directly to lugs with no power kill switch in between. This wouldn't necessarily be a horrible thing if there was a main kill switch somewhere else on the structure, but the only way i have to cut power to the house completely is to pull my electric meter. As you can imagine this could arouse suspicions in one way or another since the meter has a numbered metal seal on it. You usually would call an electrician to do this job, who would in turn call the power company and get it set up. However, since I am doing my damnedest to not raise any suspicion in a new neighborhood, I have enlisted the help of my uncle who has extensive knowledge in the area and knows how to get around all the red tape in a safe manner. That last statement being said, I do not encourage anyone to attempt this without some sort of knowledgeable supervision, although an easy task the slightest mistake could kill you. A healthy fear and respect is of the utmost importance when dealing with high voltage lines. And above all, DO NOT GET HIGH BEFORE WORKING WITH ELECTRICITY!!!! You don't want to end up one of those stories...
Ok so the first step is to go find a trusted friend, with some experience in the field preferably. If this is not an option I highly recommend doing very thorough research before attempting.
Next you and your friend will want to go through the circuits one by one and identify and label them with what they control as well as the amperage of the breaker they were on, and if it was wired for 120v or 240v. You can tell the difference between 120 and 240 because a 240 will have two hot(usually black and red) coming from the cable that both connect to the same breaker, along with the normal ground and common wires. This is very important!!! If you forget or skip this step you will most likely wire something incorrectly and end up starting a fire, burning up appliances and equipment, or worse electrocuting yourself.
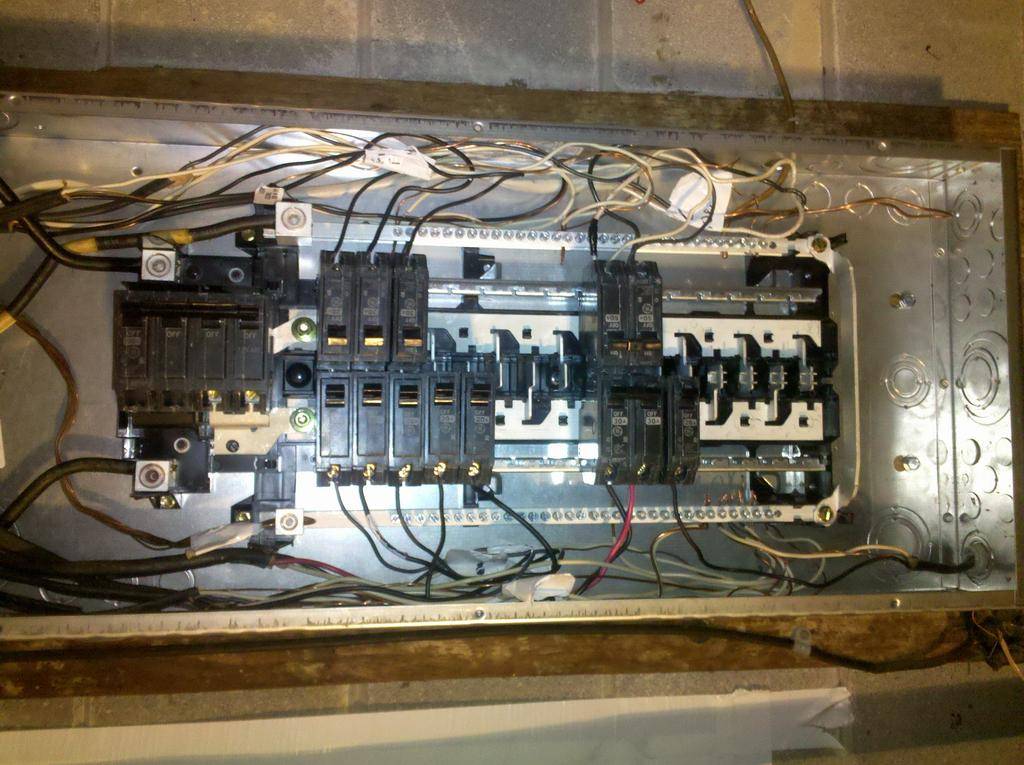
notice in the picture above that we are dismantling one circuit at a time and labeling it after identifying it. At this point the panel is still very much live and dangerous, be very mindful of what you touch and what else it might be touching. Also use great care to never touch the box with your non-work hand, i.e. - when loosening the screw that holds the black hot wire onto the circuit breaker, keep the hand that isn't using the tool down at your side and not near the box itself. To remove a circuit you will first switch it to the "off" position, then carefully loosen the screw/saddle that holds the "hot" wire(usually black or red) and remove, pulling completely away from the box. Then carefully trace the "common" wire(usually white) and the "ground" wire(usually bare copper) from where they meet the hot wire at the cable to where they terminate on the ground bar. Loosen that particular screw on the ground bar and carefully remove them. At this point you will want to label and tape together these three wires, and bend them up away from the box and out of your way for now. Continue until there are no circuits connected to the breakers at all.
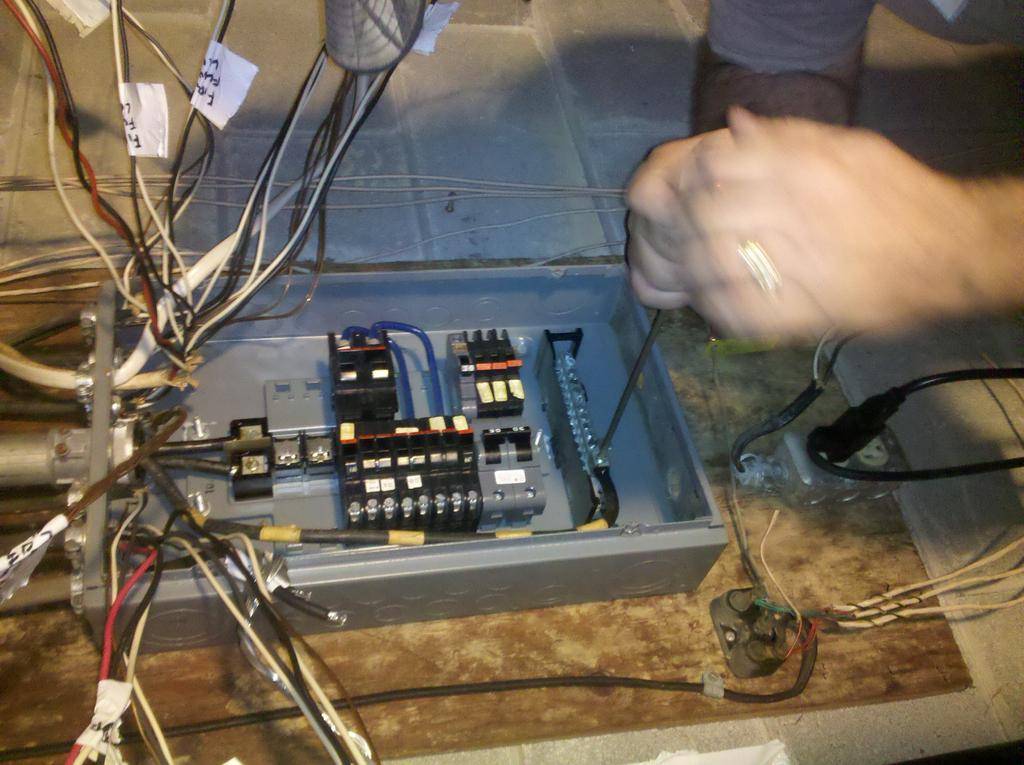
Notice in the picture above the ground strap made of end over end copper wire that connects the weather conduit(metal pipe where the mains come from) to the ground bar, you will remove this first.You will also see to the right of the box a very thick copper wire about 3/8 inch thick that grounds to the ground bar from a ground stake or a pipe somewhere else in your house, this will need to be removed and bent out and away from the box now too. the main ground line will run directly to a large lug fastener on your ground bar(silver in color with many screws), remove that next and pull out and away from the box.
Once you have all the circuits disconnected and labeled, you will loosen the romex collars at the top of the box, just the two phillips screws (on top and outside the box, around each cable), and very carefully pull each cable up and out of the box being careful not to touch anything that is still live with either your hand or the wires you are removing. Once you have removed all of the cables to the various circuits throughout your house from the box itself its time to start disconnecting the box.
This next step is the dangerous one as we still have two live mains coming into the service panel and no way of killing the power to them without calling unwanted attention to ourselves. This is where it comes in handy to have an expert, in this case my uncle "BlueShark" (also protoge to myself and my partner "has_some_sinse"). As shown You will want to disconnect the two main wires one at a time being very careful not to touch the metal on the screw driver, the box itself, or anything else that might ground you. Once you have the lug loose, then take a pair of rubber handled pliers and carefully pull the main out and securely place a wire cap on the exposed end. Repeat this step on the other main and be sure to get the caps on tight and securely. If needed you can also use a good electrical tape, just be sure to do a little overkill on the wrapping job. After these are capped/taped then the box is no longer live and you are able to remove any other ground cables that were not accessible before. Next remove the collar that holds the box to the conduit pipe at the top where the mains come in.
After you have removed the collar then remove any mounting hardware that holds the box to the wood panel on the wall. At this point the box will be loose and you will be able to slowly pull it down and off of the wall, making sure to guide the wires easily through the hole and being very mindful of the caps or tape not to damage or knock them off. Once off of the wall remove the main collar from the old box. Set the old load center and circuits aside and ready the new box to be mounted on the wall. Do this by punching out all of the holes for the main collar and also the individual circuit cables, on the top and sides of the box. then you will install the main collar from the old box and new romex cable collars onto the new box. Its a good idea to count your individual cables and knock out enough holes for each cable to have its own. If possible try to put them all through the same part of the box as well. This is more for cosmetics but you want to make sure you do your best and that it is as safe as possible. So take the time to make it look organized and professional. You will be able to look back on a job well done and also not be one of those growers who give us all a bad name by leaving a place worse than they got it...
Below is a picture of the new load center, it is a 200amp GE with room for 40 circuits, its a bit of overkill but I would rather have more power than i need than not enough
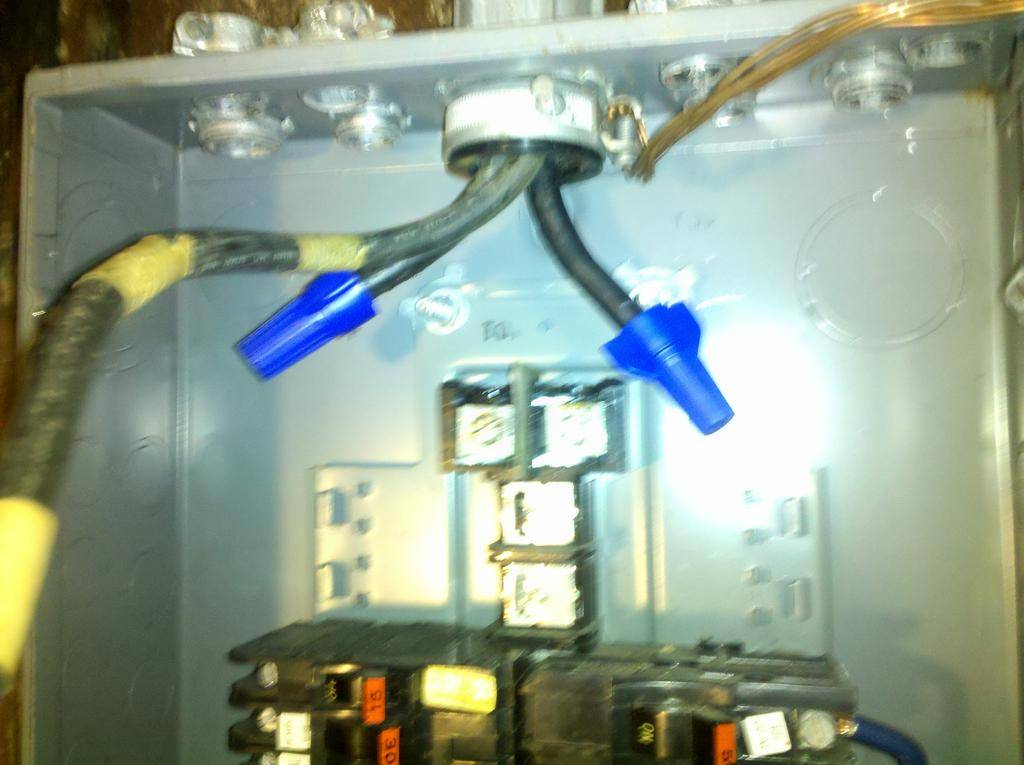
Ok, once you have your new box ready to mount, very carefully have one person hold the box and the other guide the mains through the collar, this can be a bit tricky. Once you have the mains fed through mount the new box securely, making sure its level of course. After you have the new box mounted you will begin to install the grounds to the new load center. Firs install the main ground to the ground bar(longest of the mains usually, pictured with white stripes above). Do this by inserting the bare end of the ground wire into the receptacle and tightening the lug. Next you will attach the ground wire from the collar to the ground bar, in this case i have two large lugs on the new box so I affixed this ground to the remaining one. Next you will attach the 3/8 inch thick ground wire through a knockout in the side of the new box to the ground bar, position does not matter for this.

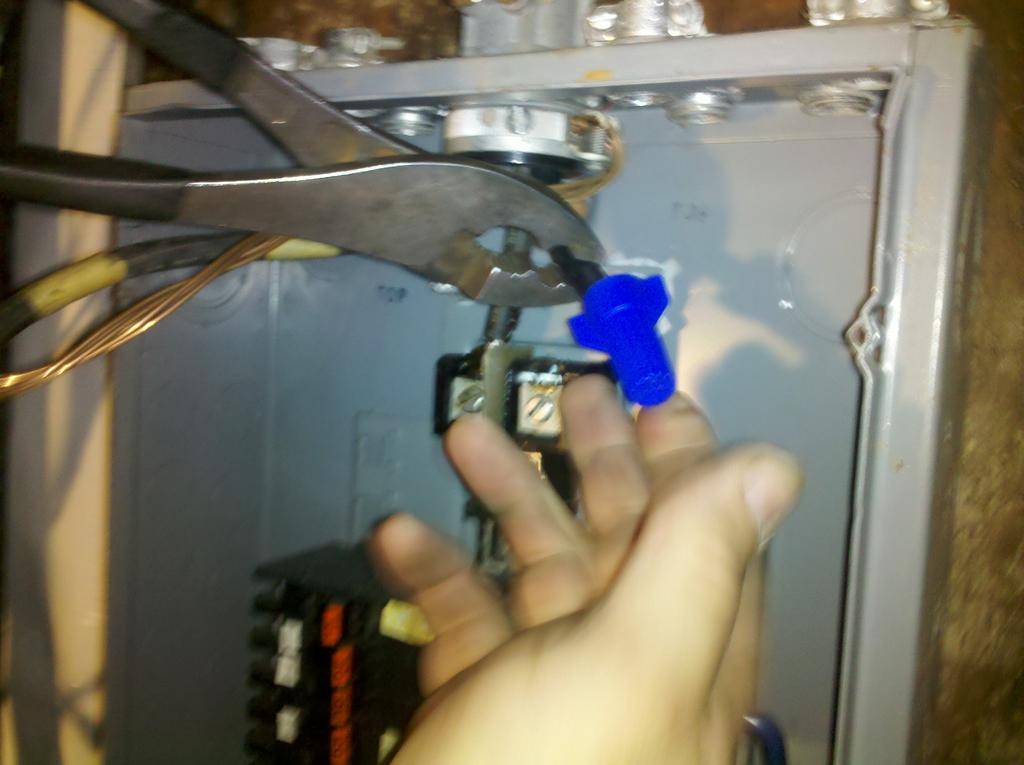
Now take the two "hot" mains and carefully shape them to fit in the box and go to their designated spot(its good to put them back in the same way you took them off !!Before moving on make sure that the main breaker in the new box is in the off position!! The next step is another dangerous one as you will be exposing the mains again to attach them to there respective places on the new load center. Firmly hold one main at a time in a pair of rubber handled pliers and take off the cap or tape. Now using only one hand and not touching anything else, use the pliers to guide the main into its place and then use an alan key to tighten it down permanently.
Now that the mains are attached the box is live when the main breaker is in the on position, so make sure it stay off until you are ready to test. Carefully pull through each romex cable for the individual circuits one at a time and connect them. Do this by hooking the black "hot" wire to the screw/saddle on the new circuit breaker, then install the breaker(in off position of course) to the main board. Now take the corresponding common or white and the ground or bare copper, and affix them to a place on the ground bar. I like to put them through the same hole so it's easier to service later. For 240 circuits be sure to use a DPST circuit breaker(looks like two with one switch between them) and attach the red and black hot wires to seperate screw/saddles on the breaker, then attach the ground and common the same as usual. Do this until you have re-installed all the circuits to the house. Once finished it should look neat and organized and all connections should be double checked for accuracy and tightness. Run through the list of circuits and respective amperage for each and double and triple check for accuracy.
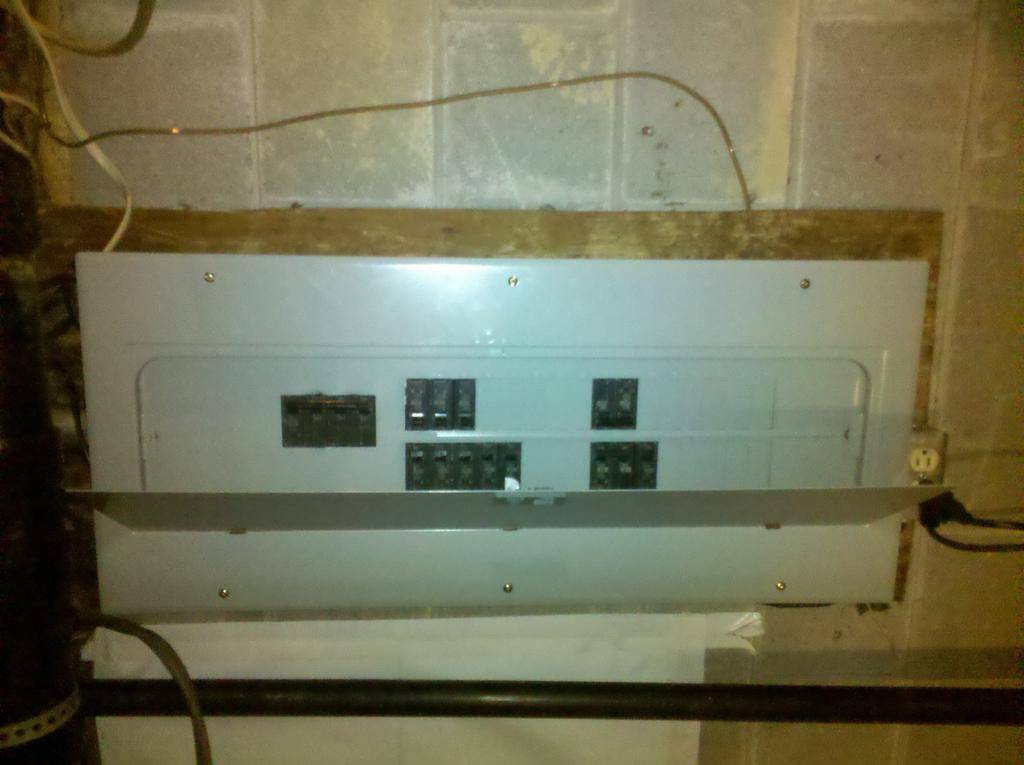
After you have double checked everything its time to test the new load center. Make sure that the individual circuits are all in the off position and then turn the main breaker to the on position. Now one by one flip the breakers on and check that the circuit is functional. when you have finished with this its a good idea to hook up a DVOM to various points and test circuit continuity. Now that you are sure the new load center is 100 percent functional and secure, you will need to ready the cover to install it and complete the job. Do this by knocking out the corresponding holes in the face cover to match the position of the breakers. When you have it ready install with the provided screws and you're done. When finished it should look like this.
I will have more to add in a few days as i start to get the electrical ran for my lights and ventilation. I hope this helps.
Notice at the top where the three main power feed wires enter from the meter, they go directly to lugs with no power kill switch in between. This wouldn't necessarily be a horrible thing if there was a main kill switch somewhere else on the structure, but the only way i have to cut power to the house completely is to pull my electric meter. As you can imagine this could arouse suspicions in one way or another since the meter has a numbered metal seal on it. You usually would call an electrician to do this job, who would in turn call the power company and get it set up. However, since I am doing my damnedest to not raise any suspicion in a new neighborhood, I have enlisted the help of my uncle who has extensive knowledge in the area and knows how to get around all the red tape in a safe manner. That last statement being said, I do not encourage anyone to attempt this without some sort of knowledgeable supervision, although an easy task the slightest mistake could kill you. A healthy fear and respect is of the utmost importance when dealing with high voltage lines. And above all, DO NOT GET HIGH BEFORE WORKING WITH ELECTRICITY!!!! You don't want to end up one of those stories...
Ok so the first step is to go find a trusted friend, with some experience in the field preferably. If this is not an option I highly recommend doing very thorough research before attempting.
Next you and your friend will want to go through the circuits one by one and identify and label them with what they control as well as the amperage of the breaker they were on, and if it was wired for 120v or 240v. You can tell the difference between 120 and 240 because a 240 will have two hot(usually black and red) coming from the cable that both connect to the same breaker, along with the normal ground and common wires. This is very important!!! If you forget or skip this step you will most likely wire something incorrectly and end up starting a fire, burning up appliances and equipment, or worse electrocuting yourself.
notice in the picture above that we are dismantling one circuit at a time and labeling it after identifying it. At this point the panel is still very much live and dangerous, be very mindful of what you touch and what else it might be touching. Also use great care to never touch the box with your non-work hand, i.e. - when loosening the screw that holds the black hot wire onto the circuit breaker, keep the hand that isn't using the tool down at your side and not near the box itself. To remove a circuit you will first switch it to the "off" position, then carefully loosen the screw/saddle that holds the "hot" wire(usually black or red) and remove, pulling completely away from the box. Then carefully trace the "common" wire(usually white) and the "ground" wire(usually bare copper) from where they meet the hot wire at the cable to where they terminate on the ground bar. Loosen that particular screw on the ground bar and carefully remove them. At this point you will want to label and tape together these three wires, and bend them up away from the box and out of your way for now. Continue until there are no circuits connected to the breakers at all.
Notice in the picture above the ground strap made of end over end copper wire that connects the weather conduit(metal pipe where the mains come from) to the ground bar, you will remove this first.You will also see to the right of the box a very thick copper wire about 3/8 inch thick that grounds to the ground bar from a ground stake or a pipe somewhere else in your house, this will need to be removed and bent out and away from the box now too. the main ground line will run directly to a large lug fastener on your ground bar(silver in color with many screws), remove that next and pull out and away from the box.
Once you have all the circuits disconnected and labeled, you will loosen the romex collars at the top of the box, just the two phillips screws (on top and outside the box, around each cable), and very carefully pull each cable up and out of the box being careful not to touch anything that is still live with either your hand or the wires you are removing. Once you have removed all of the cables to the various circuits throughout your house from the box itself its time to start disconnecting the box.
This next step is the dangerous one as we still have two live mains coming into the service panel and no way of killing the power to them without calling unwanted attention to ourselves. This is where it comes in handy to have an expert, in this case my uncle "BlueShark" (also protoge to myself and my partner "has_some_sinse"). As shown You will want to disconnect the two main wires one at a time being very careful not to touch the metal on the screw driver, the box itself, or anything else that might ground you. Once you have the lug loose, then take a pair of rubber handled pliers and carefully pull the main out and securely place a wire cap on the exposed end. Repeat this step on the other main and be sure to get the caps on tight and securely. If needed you can also use a good electrical tape, just be sure to do a little overkill on the wrapping job. After these are capped/taped then the box is no longer live and you are able to remove any other ground cables that were not accessible before. Next remove the collar that holds the box to the conduit pipe at the top where the mains come in.
After you have removed the collar then remove any mounting hardware that holds the box to the wood panel on the wall. At this point the box will be loose and you will be able to slowly pull it down and off of the wall, making sure to guide the wires easily through the hole and being very mindful of the caps or tape not to damage or knock them off. Once off of the wall remove the main collar from the old box. Set the old load center and circuits aside and ready the new box to be mounted on the wall. Do this by punching out all of the holes for the main collar and also the individual circuit cables, on the top and sides of the box. then you will install the main collar from the old box and new romex cable collars onto the new box. Its a good idea to count your individual cables and knock out enough holes for each cable to have its own. If possible try to put them all through the same part of the box as well. This is more for cosmetics but you want to make sure you do your best and that it is as safe as possible. So take the time to make it look organized and professional. You will be able to look back on a job well done and also not be one of those growers who give us all a bad name by leaving a place worse than they got it...
Below is a picture of the new load center, it is a 200amp GE with room for 40 circuits, its a bit of overkill but I would rather have more power than i need than not enough
Ok, once you have your new box ready to mount, very carefully have one person hold the box and the other guide the mains through the collar, this can be a bit tricky. Once you have the mains fed through mount the new box securely, making sure its level of course. After you have the new box mounted you will begin to install the grounds to the new load center. Firs install the main ground to the ground bar(longest of the mains usually, pictured with white stripes above). Do this by inserting the bare end of the ground wire into the receptacle and tightening the lug. Next you will attach the ground wire from the collar to the ground bar, in this case i have two large lugs on the new box so I affixed this ground to the remaining one. Next you will attach the 3/8 inch thick ground wire through a knockout in the side of the new box to the ground bar, position does not matter for this.
Now take the two "hot" mains and carefully shape them to fit in the box and go to their designated spot(its good to put them back in the same way you took them off
!!Before moving on make sure that the main breaker in the new box is in the off position!! The next step is another dangerous one as you will be exposing the mains again to attach them to there respective places on the new load center. Firmly hold one main at a time in a pair of rubber handled pliers and take off the cap or tape. Now using only one hand and not touching anything else, use the pliers to guide the main into its place and then use an alan key to tighten it down permanently.Now that the mains are attached the box is live when the main breaker is in the on position, so make sure it stay off until you are ready to test. Carefully pull through each romex cable for the individual circuits one at a time and connect them. Do this by hooking the black "hot" wire to the screw/saddle on the new circuit breaker, then install the breaker(in off position of course) to the main board. Now take the corresponding common or white and the ground or bare copper, and affix them to a place on the ground bar. I like to put them through the same hole so it's easier to service later. For 240 circuits be sure to use a DPST circuit breaker(looks like two with one switch between them) and attach the red and black hot wires to seperate screw/saddles on the breaker, then attach the ground and common the same as usual. Do this until you have re-installed all the circuits to the house. Once finished it should look neat and organized and all connections should be double checked for accuracy and tightness. Run through the list of circuits and respective amperage for each and double and triple check for accuracy.
After you have double checked everything its time to test the new load center. Make sure that the individual circuits are all in the off position and then turn the main breaker to the on position. Now one by one flip the breakers on and check that the circuit is functional. when you have finished with this its a good idea to hook up a DVOM to various points and test circuit continuity. Now that you are sure the new load center is 100 percent functional and secure, you will need to ready the cover to install it and complete the job. Do this by knocking out the corresponding holes in the face cover to match the position of the breakers. When you have it ready install with the provided screws and you're done. When finished it should look like this.
I will have more to add in a few days as i start to get the electrical ran for my lights and ventilation. I hope this helps.
 BS
BS")

