
Phil-Bundy
New member
Greetings all. I am a long time grower & reader of this site and am very grateful for all of the shared knowledge. This post is for the beginning farmer who wants to grow some killer buds in a stealthy cabinet, but doesn't have the time/inclination/$$$ for all of the complexity that a lot of the "gourmets" on this site get into. Don't get me wrong, I am in awe of the buds those guys are able to produce but, imho, it's all gotten a bit out of hand. I just want to have a little garden I can attend to a couple of times a week that will produce a variety of potent buds. Keep in mind the mantra - "keep it simple, stupid".
So, for anyone getting started, here is a simple set-up and method:
Seeds:
This is clearly the most critical factor, and the strains available today are truly incredible. Don't cheap out, but it's not necessary to spend big dollars on the hot new strains. Pictures in this post are of a CH9 Super Haze I got from The Attitude - 5 females for $30 (US). Just that will keep me growing for a year (more if you count the free ones they throw in)! Definitely go for the female seeds, as that allows you to train the plant to your cabinet from the start.
Growing Method:
I guess, compared to most of the guys here, I am an old timer. I started growing bagseed in dirt pots on my balcony when I lived at the beach in Southern California. To force flowering, I would just throw them in my closet when I got home from work - simple but effective. Then I bought a house, and had a couple of plants in the garden. I built my first cabinet in the mid '90s after seeing adds for the "phototron" in HT. It was fairly big as I had to get 5 or 6 plants vegged up before I could sex them and ditch the males so I could bring 2-3 females to full flower. I wanted to switch from dirt to hydro, but all the methods looked like a real pain in the ass with pumps, reservoirs, timers, ppm monitoring, etc. I finally read an article on bubblers, and that looked simple/cheap enough to give it a shot. After a couple of weeks of watching the phenomenal growth rates, I was hooked. This breakthrough, combined with the easy availability of female seeds now, allowed me to drastically shrink my cabinet and maximize my yield. Here is a summary of my method, which I will break down in more detail (with a few pics) further on.
First, I take just one seed and get it sprouted in some dirt. Invest a few $$ in a heat mat and you shouldn't have any problems getting quick, consistent sprouts. Once the leaves are out, I put it in the cabinet with just the CFLs on for 18 hours of light. After a week or so, I transplant it to the bubbler, turn on the HPS light also, and watch it take off. I cut the growing tips (topping) twice, so I have 4 main branches. Once these get going, I put a screen panel w/ 1" openings on top of the plant and start training. After a week or two of veg, I switch the light cycle to 12/12 and as the plant stretches, I keep tying the tallest branches down tight to the screen. I am not trying to grow a christmas tree with a big center bud, I am trying to grow a rectangular slab of buds that maximize the space and light available. Once the stretching stops, I just top off the reservoir once or twice a week and don't fuss with anything until harvest time.
Stealth:
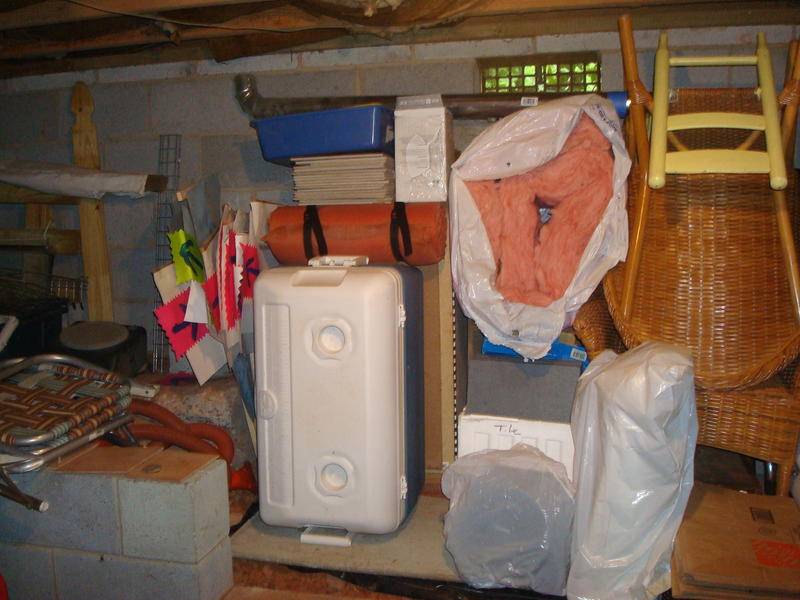
I am truly amazed at the variety of fake speakers, PC cases, Ikea cabinets and such that people have come up with to disguise their little gardens. But, once again, that's way too much effort for me. My simple method of disguise is to find a spot where a little cabinet can live in anonymity - in a corner of the basement, garage, closet, etc. Here is what mine looks like:
The Cabinet:
Since I only want to grow some bud for personal use, I don't need any clone, veg, flower, mother chambers all with different lights, timers, medium ,etc. Since one harvest will easily last me 6 months, I just grow one seed from sprouting till harvest and change my light timer settings once! Simple! If I had access to clones at a dispensary, I could skip the sprouting part.
So, here is the cabinet revealed:
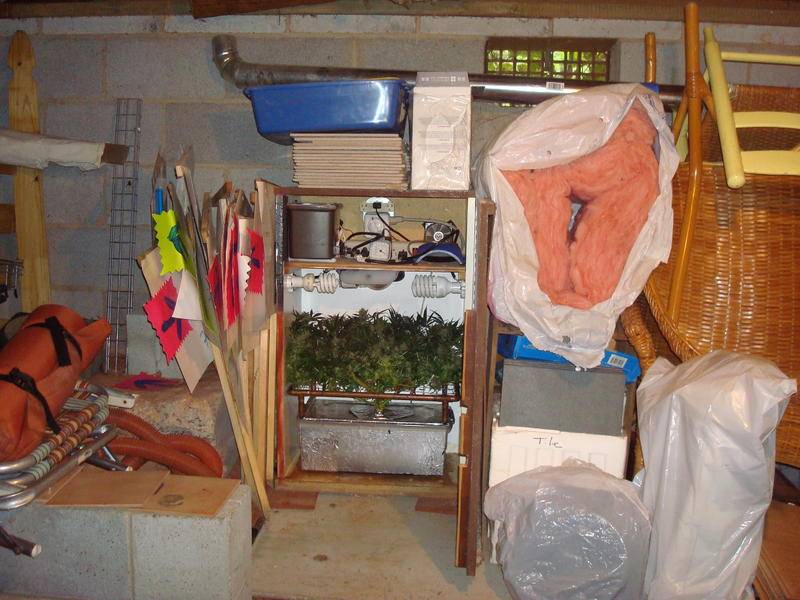
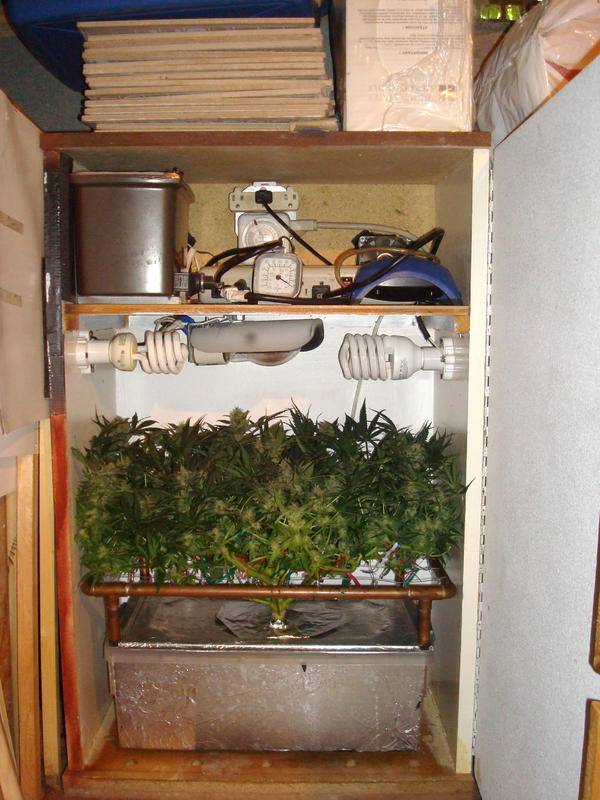
The grow chamber is on the bottom, and is 20" wide by 11" deep and 24" high. The upper area (7-1/2" high) is for all the goodies - plugs, timer, ballast, air pump and 2 computer fans. Since I keep the plant tied down to the screen, I have no need for a lot of height or movable lights. Here is a bigger picture:
To ventilate, I drilled holes in the bottom around the edge (not under the reservoir) and in the separating shelf, with the 2 fans blowing air out at the top. That way, cool air comes in the bottom and the hot air is exhausted at the top and never gets near the res or plant. I maintain mid 70s temps at the plant even in the summer - just keep the dark period set for the hot afternoon, and the light periods at night/morning when the air is cool.
The cab is made out of 3/4" MDF (fine wood particles glued together). Don't use plywood, as that will warp, expand, etc as humidity changes. Put some polyurethane on the bottom, as that surface will get splashed with water, and paint the sides with a white gloss oil based paint (forget all that mylar nonsense). A piano hinge on the door and a bit of neoprene around the edges does the job.
Lights & Electrical:
First of all, install a proper junction box at the top rear of the box and wire to an existing plug/junction with a heavy wire. Wire a 2-plug GFCI outlet into the j-box - if you get a short, don't want to start a fire. One plug will get the timer, and the other plug gets the air pump as you want that to run 24/7. Use a heavy duty, grounded (3-prong) timer and attach a power strip (w/ circuit breaker) to the timer. Plug the fans and light cords into the power strip.
For lights, I used to use just the big U-shape fluorescent bulbs in my old, big cabinet. I found that when I added an HPS to this system, I got bigger, denser buds. So, for the compact cabinet I have 2 compact fluorescents and one 40 watt HPS that was a security light I got cheap ($40) at Lowes. This supplies plenty of light, but doesn't overheat the space.
The fans came from Ebay - I got 2 super quiet fans that hook up to a single power source (phone charger type plug).
Bubbler:
The size of my bubbler tank is what set the size of my cabinet. I found a low, rectangular plastic tub with sturdy top that holds about 3 gallons of fluid. I made the cabinet just big enough to fit the tub with space around the edges for the ventilation holes. It is critical that you make sure this tub is light-tight, otherwise you can get algae growth. Since paints will let some light through, the simplest way to ensure total blackout is to spray the tub exterior with some adhesive and stick on aluminum foil.
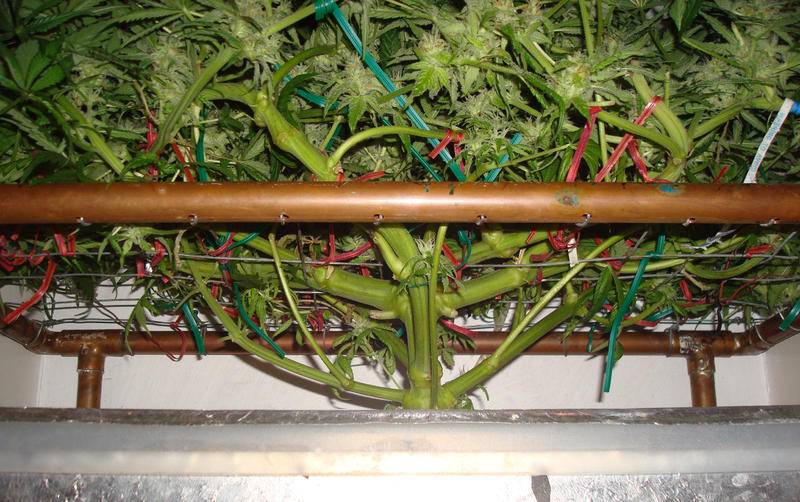
I found an inexpensive "super quiet" aquarium air pump at Wal-mart, and just ran the air line through one of the ventilation holes in the shelf and through a small hole at the top of the tub's side. Do not run the tube through the lid, as you want to be able to take the top (with the plant, roots & screen) off to work on it and leave the heavy tub full of fluid in the cabinet. You should buy 2 identical tubs so you can pull the plant off and put it on the 2nd tub if you want to tie down some branches, change the water, etc. The air is pumped to a flexible bubbler that is weighted so it stays on the bottom. I curl it up into a spiral right under the roots. The screen was made from some copper piping and wire, but a piece of chicken wire will work fine. The important thing is to secure the screen to the lid of the tub so that as the plant grows, it doesn't push the screen up. I just screwed through into the plastic lid. Cut a hole in the lid that will fit your net pot (use a small one), and you are done.
Nutrients:
This is where I think people tend to go overboard, and spend a lot of $$$ unnecessarily. I have tried a lot of the additives and exotic nutes I read about in this forum, and for me, any increase in yield/flavor/potency is WAY overshadowed by the cost and complexity. I am back using the General Hydroponics Flora-series that I used for my first hydro grow, with a couple of teaspoons of Cal-Mag Plus added per gallon. I just follow the dosages on the bottles for the growth stages, and my plants are always healthy and growing strong.
I start with a weak solution in the reservoir, and as the plant grows bigger I just add more concentrated solutions. I will only do one reservoir change once the flowers are going strong - about 2 months into the grow. For the last week, just use plain water that has been pH adjusted to about 6.
For water, I think all of the reverse osmosis stuff is unnecessary. I use plain tap water with a drop of aquarium treatment that removes the chlorine. Adjust pH to about 6 with vinegar (down) or baking soda (up). Don't waste money on chemicals for this.
Training:
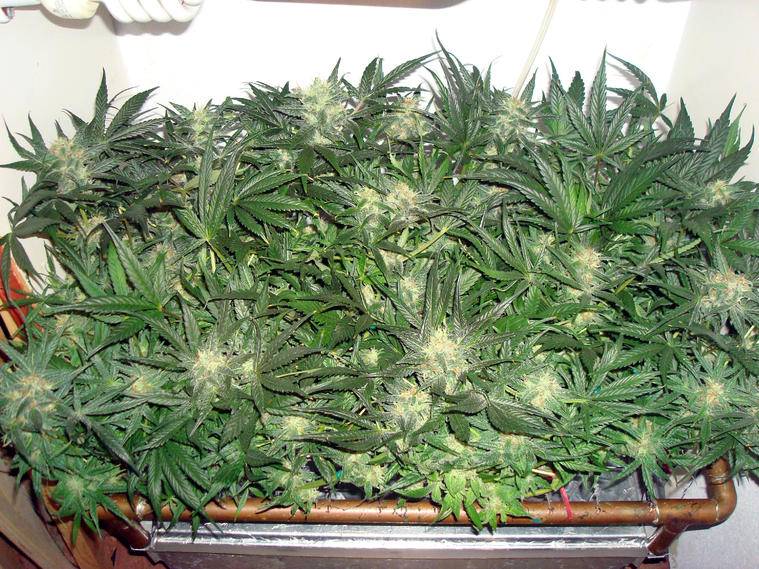
The main trick to getting a good yield with this little cabinet is training your plant so it is a flat slab that gets uniform light. Just let the branches poke through the screen, and tie them down with garden twisties. Be ruthless, bend them into pretzel shapes as the plant stretches, and keep them tight to the screen. This will produce a solid brick of buds. I don't get any of the big, soda-can sized main colas that I see in these forums, but my total yield of walnut-sized nuggets is probably a lot more. Here is what the bottom of the plant looks like when trained:
And here are a few more shots of my current plant - still a few weeks away from harvest:

I hope this helps a few of you get growing, and thanks to all the posters for contributing to my education.
Cheers
So, for anyone getting started, here is a simple set-up and method:
Seeds:
This is clearly the most critical factor, and the strains available today are truly incredible. Don't cheap out, but it's not necessary to spend big dollars on the hot new strains. Pictures in this post are of a CH9 Super Haze I got from The Attitude - 5 females for $30 (US). Just that will keep me growing for a year (more if you count the free ones they throw in)! Definitely go for the female seeds, as that allows you to train the plant to your cabinet from the start.
Growing Method:
I guess, compared to most of the guys here, I am an old timer. I started growing bagseed in dirt pots on my balcony when I lived at the beach in Southern California. To force flowering, I would just throw them in my closet when I got home from work - simple but effective. Then I bought a house, and had a couple of plants in the garden. I built my first cabinet in the mid '90s after seeing adds for the "phototron" in HT. It was fairly big as I had to get 5 or 6 plants vegged up before I could sex them and ditch the males so I could bring 2-3 females to full flower. I wanted to switch from dirt to hydro, but all the methods looked like a real pain in the ass with pumps, reservoirs, timers, ppm monitoring, etc. I finally read an article on bubblers, and that looked simple/cheap enough to give it a shot. After a couple of weeks of watching the phenomenal growth rates, I was hooked. This breakthrough, combined with the easy availability of female seeds now, allowed me to drastically shrink my cabinet and maximize my yield. Here is a summary of my method, which I will break down in more detail (with a few pics) further on.
First, I take just one seed and get it sprouted in some dirt. Invest a few $$ in a heat mat and you shouldn't have any problems getting quick, consistent sprouts. Once the leaves are out, I put it in the cabinet with just the CFLs on for 18 hours of light. After a week or so, I transplant it to the bubbler, turn on the HPS light also, and watch it take off. I cut the growing tips (topping) twice, so I have 4 main branches. Once these get going, I put a screen panel w/ 1" openings on top of the plant and start training. After a week or two of veg, I switch the light cycle to 12/12 and as the plant stretches, I keep tying the tallest branches down tight to the screen. I am not trying to grow a christmas tree with a big center bud, I am trying to grow a rectangular slab of buds that maximize the space and light available. Once the stretching stops, I just top off the reservoir once or twice a week and don't fuss with anything until harvest time.
Stealth:
I am truly amazed at the variety of fake speakers, PC cases, Ikea cabinets and such that people have come up with to disguise their little gardens. But, once again, that's way too much effort for me. My simple method of disguise is to find a spot where a little cabinet can live in anonymity - in a corner of the basement, garage, closet, etc. Here is what mine looks like:
The Cabinet:
Since I only want to grow some bud for personal use, I don't need any clone, veg, flower, mother chambers all with different lights, timers, medium ,etc. Since one harvest will easily last me 6 months, I just grow one seed from sprouting till harvest and change my light timer settings once! Simple! If I had access to clones at a dispensary, I could skip the sprouting part.
So, here is the cabinet revealed:
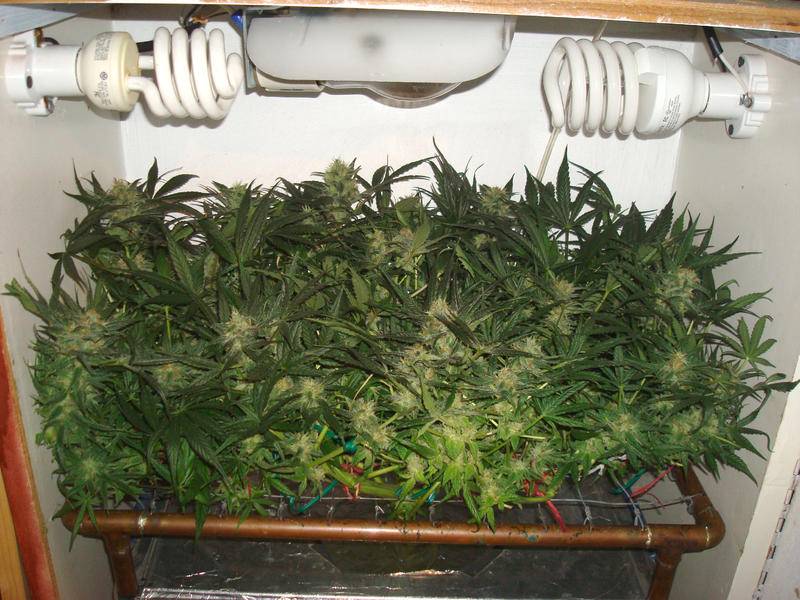
The grow chamber is on the bottom, and is 20" wide by 11" deep and 24" high. The upper area (7-1/2" high) is for all the goodies - plugs, timer, ballast, air pump and 2 computer fans. Since I keep the plant tied down to the screen, I have no need for a lot of height or movable lights. Here is a bigger picture:
To ventilate, I drilled holes in the bottom around the edge (not under the reservoir) and in the separating shelf, with the 2 fans blowing air out at the top. That way, cool air comes in the bottom and the hot air is exhausted at the top and never gets near the res or plant. I maintain mid 70s temps at the plant even in the summer - just keep the dark period set for the hot afternoon, and the light periods at night/morning when the air is cool.
The cab is made out of 3/4" MDF (fine wood particles glued together). Don't use plywood, as that will warp, expand, etc as humidity changes. Put some polyurethane on the bottom, as that surface will get splashed with water, and paint the sides with a white gloss oil based paint (forget all that mylar nonsense). A piano hinge on the door and a bit of neoprene around the edges does the job.
Lights & Electrical:
First of all, install a proper junction box at the top rear of the box and wire to an existing plug/junction with a heavy wire. Wire a 2-plug GFCI outlet into the j-box - if you get a short, don't want to start a fire. One plug will get the timer, and the other plug gets the air pump as you want that to run 24/7. Use a heavy duty, grounded (3-prong) timer and attach a power strip (w/ circuit breaker) to the timer. Plug the fans and light cords into the power strip.
For lights, I used to use just the big U-shape fluorescent bulbs in my old, big cabinet. I found that when I added an HPS to this system, I got bigger, denser buds. So, for the compact cabinet I have 2 compact fluorescents and one 40 watt HPS that was a security light I got cheap ($40) at Lowes. This supplies plenty of light, but doesn't overheat the space.
The fans came from Ebay - I got 2 super quiet fans that hook up to a single power source (phone charger type plug).
Bubbler:
The size of my bubbler tank is what set the size of my cabinet. I found a low, rectangular plastic tub with sturdy top that holds about 3 gallons of fluid. I made the cabinet just big enough to fit the tub with space around the edges for the ventilation holes. It is critical that you make sure this tub is light-tight, otherwise you can get algae growth. Since paints will let some light through, the simplest way to ensure total blackout is to spray the tub exterior with some adhesive and stick on aluminum foil.
I found an inexpensive "super quiet" aquarium air pump at Wal-mart, and just ran the air line through one of the ventilation holes in the shelf and through a small hole at the top of the tub's side. Do not run the tube through the lid, as you want to be able to take the top (with the plant, roots & screen) off to work on it and leave the heavy tub full of fluid in the cabinet. You should buy 2 identical tubs so you can pull the plant off and put it on the 2nd tub if you want to tie down some branches, change the water, etc. The air is pumped to a flexible bubbler that is weighted so it stays on the bottom. I curl it up into a spiral right under the roots. The screen was made from some copper piping and wire, but a piece of chicken wire will work fine. The important thing is to secure the screen to the lid of the tub so that as the plant grows, it doesn't push the screen up. I just screwed through into the plastic lid. Cut a hole in the lid that will fit your net pot (use a small one), and you are done.
Nutrients:
This is where I think people tend to go overboard, and spend a lot of $$$ unnecessarily. I have tried a lot of the additives and exotic nutes I read about in this forum, and for me, any increase in yield/flavor/potency is WAY overshadowed by the cost and complexity. I am back using the General Hydroponics Flora-series that I used for my first hydro grow, with a couple of teaspoons of Cal-Mag Plus added per gallon. I just follow the dosages on the bottles for the growth stages, and my plants are always healthy and growing strong.
I start with a weak solution in the reservoir, and as the plant grows bigger I just add more concentrated solutions. I will only do one reservoir change once the flowers are going strong - about 2 months into the grow. For the last week, just use plain water that has been pH adjusted to about 6.
For water, I think all of the reverse osmosis stuff is unnecessary. I use plain tap water with a drop of aquarium treatment that removes the chlorine. Adjust pH to about 6 with vinegar (down) or baking soda (up). Don't waste money on chemicals for this.
Training:
The main trick to getting a good yield with this little cabinet is training your plant so it is a flat slab that gets uniform light. Just let the branches poke through the screen, and tie them down with garden twisties. Be ruthless, bend them into pretzel shapes as the plant stretches, and keep them tight to the screen. This will produce a solid brick of buds. I don't get any of the big, soda-can sized main colas that I see in these forums, but my total yield of walnut-sized nuggets is probably a lot more. Here is what the bottom of the plant looks like when trained:
And here are a few more shots of my current plant - still a few weeks away from harvest:
I hope this helps a few of you get growing, and thanks to all the posters for contributing to my education.
Cheers

