What's new

Ice-tube cloner from WallyWorld

justanotherbozo

Active member
Veteran
I dont think I can say it enough....


The system has been worked out....

buy a thermometer as well they have a pet dept ....

around 3 bucks as I recall.....

temps over 80 82-83 is ideal for me....

temps over 80 82-83 is ideal for me....

Compress the vermiculite quite a bit....


let us know how you did on your first batch....

hey man, hope all is well with you and yours.

anyway, i just wanted to add my voice to yours in that this has all
been worked out already so noob's should just follow directions.

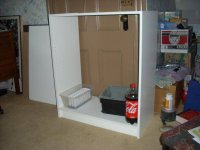
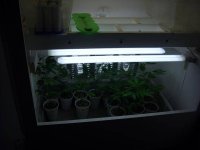
oh yeah, here's a couple pics of my new clone box, lol, i'm just now finishing it!

anyway, i'm doing my first run right now and i'll let you know how it
all works out.
 

Attachments

  • DSCI1614-1.jpg
    DSCI1614-1.jpg
    44.8 KB · Views: 26
  • DSCI1617.jpg
    DSCI1617.jpg
    40.4 KB · Views: 30
  • DSCI1678.jpg
    DSCI1678.jpg
    57 KB · Views: 30
  • DSCI1918.jpg
    DSCI1918.jpg
    30.1 KB · Views: 28
1

10jed

Wow bozo! That seems like a lot of juice for clones! I bet those suckers jump real fast once they hit the dirt. My flower cab only has 250W of flouro. Ha!

Just to follow up on my mod version of this, through a few rounds of testing, I have not seen any difference in cloning speed or root size when going between tubes that were larger than the ice cube tray and tubes that were smaller. I have settled on the larger tubes just because it is a little easier to work with them. Also on my first version using a t shirt scrap & rubber band for a bottom cap didn't prove to be any different than using a small hole in a plastic cap.

Currently I am using clear 50ML sample vials that I found at a science supply store. They came with a threaded cap and have an inside diameter of 1". I have picked my keepers from my 4 Apollo 11's and with both my keeper male and keeper female, I have been 100% getting them to root, and the other 2 (2 more males btw) were taking longer and maybe giving me 80% largely do to my impacience and inability to give the parent plant what they need to keep them as healthy as the other 2. Early on I had a few fail once they hit the dirt but I am now letting my roots grow to a couple of inches before planting and using a better soil mix that includes some coco and a lot more perlite.

I also love germing my seeds in these tubes. Nothing simpler, and other than some shitty r****rman beans that were dead anyways I have had perfect seed germination. My veg/mom area is very small so the ease of being able to bury the stems up near the coletons (sp) when transferring to soil, helps me keep my plant height down for moms and vegging plants. The seedlings seem to all push soil within 2-3 days so far and I haven't been using any kind of humidity control.

Also, since I am using amended organic soil for my grow, I started using time release Osmocote on my moms once the soil fizzled out and I found for the 2 plants that were giving me troubles in the cloner and taking more than a couple of weeks, a few of the Osmocote pellets in the res helped keep them happy. Roughly 1 pellet for every 2 tubes is what I have been using. Surprisingly those pellets don't dissolve in the res even after a month. I'm using the 6month version because it has all the micro nutrients in it along with the NPK. I was going to buy hydro nutes to do what burntrope is doing in his res but it seemed like a big expence for just a few drips in the cloner, and I already had the Osmocote stuff so I tried it and it seems to work great. YMMV

Jed
 
i just finished my second round and after about 12 days my roots had taken over the tubes. what about germing your seeds in these. do i just use it the same and pop in seed instead of a clone. i tried once using peat but it did not work at all as it was harder to keep moist. i think i shoulda stuck with vermiculite maybe. i have some 3p from nirvana that i would like to germ in a few weeks but i dont wanna lose them like i lost my last 5 bubblisious to a stupid mistake.
 
1

10jed

i just finished my second round and after about 12 days my roots had taken over the tubes. what about germing your seeds in these. do i just use it the same and pop in seed instead of a clone. i tried once using peat but it did not work at all as it was harder to keep moist. i think i shoulda stuck with vermiculite maybe. i have some 3p from nirvana that i would like to germ in a few weeks but i dont wanna lose them like i lost my last 5 bubblisious to a stupid mistake.

I use straight vermiculite and just poke a hole about 1/4" - 1/2" down and cover them up. In a few days they pop up!

jed
 
awesome! i knew i shoulda used it the same as clones. i dont know what i was thinkin using the peat. it will be a few weeks before i can try again cabs too full atm. how long does it take for a bean to show root thru the bottom of the icetube??am i looking at about the same time frame as my clones??

also whats the smallest cutting u have gotten to take root? my 1st round i took one that was 3/4 to 1 inch long and it took. it was small at first but when i put it in the dirt it quickly caught up with its sisters. this last round my cuttings were 2" at the most and they took with np.
 
just ran my second set of beans(3ppp) thru the cloner/germinator. i had 5 seeds to start with, 3 was placed in the cloner and the other 2 in peat pellets.. as of lastnight all but 1 had popped and i expect it to by tonight.the 2 that popped in the cloner popped about 12 hours sooner than the 2 in the peat pellets.
 

Budley Doright

Active member
Veteran
I have in the past used two different grades of vermiculite in the cloners....

the more coarse grade typically used in horticulture...and a fine grade thats used by lowes in the smaller bags....

My small experiment showed that the finer grade works a little better.....

Its also pretty difficult to break the more coarse stuff down into the more granular finer grade.....


I didnt try a blender but it might be worth a try.....


Both grades did work but there were a few more cuts that didnt make it in the course vermiculite cloners than the fine grade......
 

georgiepeorgie

New member
Gratitude

Gratitude

Burnt Rope.... A great big thanks. I am always looking for simple and efficient ways to improve my grow. This is as cheap and easy as it gets. I appreciate you taking the time to share and apologize for those that that have nothing better to do than knock a great idea. I don't recall you having said that this is something everyone has to do!!!! I have my new Wal-Mart cloner with 22 cuttings kicking along at day 5. Checked on a cutting this morning and I already have a few roots. My Bogglegum Clones Love Ya!!!!! Again much thanks and peace.:jump:
 
T

theJointedOne

:laughing::laughing: yeah thats what im talking about. Clean looking setup george!

this seems like it keeps plants alive as well as clones them so it would be great for sexing clones off plants of unknown sex.

:dance013::dance013::dance013:
 

GeorgeSmiley

Remembers
Veteran
Just did a run tonight. Just too easy. I honestly don't pay any attention to them except for watering.

So I have to look at photo's or my notes to get dates. I took some on 2/19 and forgot about them. They ran out of water and 1 clone died. I forgot again and checked them today.... they had roots coiled around the bottom. 03/07 They're yellow but that'll only be a day or two for new growth.

BTW, don't try and pull the stem, just rips the roots. I do not plant the vermiculite. I wash it off under tap water and plant them bare root into beer cups. I also have 100% success with this.

Tonight I took clones of 8 strains, only 2 trays. I think in that cabinet I could fit all 4 of the walmart trays and some 16oz rooting clones if I put a shelf in there. I think I'll just keep clones in there till rooted then they go on a shelf under some cfl's

Rambling cuz i'm high lol

picture.php


picture.php


Dry erase/magnet board for keeping track of it all.
picture.php


No matter how high tech a grow room gets it's hard to replace this method. I treat them like crap and ignore them and they still root under 17 days,

Cheers
Smiley
 

Budley Doright

Active member
Veteran
Hay george....

Im curious... if I had to do it all over again I wouldnt number my cloners the way I did at the start of the thread...


These days my cloners are A, B, C, D

and across the top 1-9

For new plants I normally take 3 clones....

so this might be in cloner A and column 1

I can also think of the 3 individual cells as...

A,1,1 A,1,2 and A,1,3


what do you have going on with your numbering????
 

GeorgeSmiley

Remembers
Veteran
Yeah across the top etc didn't work for me at all when I added 10 strains. I need to keep them in blocks so I do 9 hole block to the letter and 3 letters to the tray. Picture is much easier

picture.php


It's looks more manageable etc when you start removing strains, so instead of top row and half of next, it's block A is gone etc. Also if a seed plant shows male, removing 1,2 or 3 blocks of clones from diff trays just keeps it neater. Diff strokes diff folks.

Right now, I have 4 full size trays and my original cut in half trays.

smiley
 

Gebr'el

Member
Burnt Rope......give thanks....this is the one method my system is missing...a reliable cloning method that keeps my schedule. its funny sometimes when u see certains methods and u say "why da hell i didnt c dat one?!" lol nuff respect brudda...i usuall peat pellet mines but not with the timing and reliability as this one. with this i can expect to put my four cuts in the chamber on time every week to keep my perpetual on point. again i say give thanks. Guidance and Protection from the Most High, Peace n Luv.
Gebr'el
 

Budley Doright

Active member
Veteran
Gebrel.... I was chatting with a friend on this point....

If I were you I might consider air layering....

You would have to keep a mom.... but could start with big plants right out of cloning....


I think the most important thing with air layering is to remove the bark and the cambrium....

right down to the white layer below....

I used rapidrooters breadwrapper plastic and some clear airline tube and a syringe to water......

I happened to do the highest branch....apical dominance.... but it worked very well...

If I were legit as in medical thats the method I would use....


If anyone wants some info on how to air layer....


post and I think I can help.....
 

Budley Doright

Active member
Veteran
Normally Im not up at this hour but let me fill in a bit....

First I grew my mom at about a 45degree angle.... which caused all the branches to grow upward from the main stem....


In my case I chose the highest most apical branch to air layer....

Then on the stem I carefully cut two concentric circles into the 'bark'

then I removed all the material between the two cuts...about 1/2 inch apart.....

make sure that all green tissue is removed down to the white tissue under the green...

sorry Im two lazy to find the name of that stuff.....

once you have the white ring..... be a little anal about removing all green material.....

take a rapid rooter.... cut into the rooter half way so you can slip the rapid rooter around the stem.....

I then used 2 pieces of wire to hold the rapid rooter in place....


Next I used a bread wrapper and a 6 inch piece of airline hose to water the air layer....

Wrap the rapid rooter using about long 1 inch strips of bread wrapper.... at the top of the rapid rooter also wrap in the airline tube.....

the airline tupe will stick out from the wrapping.....


once its wrapped nicely tie it off.....

use a syringe to water every few days....

In my only attempt...I had nice roots in 10 days....


once you see roots coming from the rapid rooter....

you can either cut the branch away from mom..... if there are enough roots....

or enclose the rapid rooter in something like a beer cup.....

the beer cup will need a hole for the stem...and must be cut down the side to slide the cup over the air layer.....

If you have a good bunch of roots coming out of the rapid rooter its probably not necessary to add more medium....

Just cut the layer away from mom....

and make sure it doesnt wilt....

if it wilts put a plastic bag over the plant for a day or two.....


good luck...

If you have any q's ask em....but Im off to bed......
 
the 3ppp i germed in the cloner a couple weeks ago took off after transplant. almost ready to run clones off of them for sexing. i dont pull on the plant to remove it either. i just pop the blue caps off and push them out onto a tray with the back of an inkpen. is there a reason for washing the vermiculite from the roots? should i wash them also? i havent been.
also the last run of bubblisious that went thru the cloner actually started vegging before i could make room in the cab for transplant(14days??) thats a sweet setup ya got there gs. wish mine was like that.
 

Budley Doright

Active member
Veteran
Good to hear you arent looking for a refund....

If you follow the directions including temps this is a great cloner.....

no question....


I dont remove the verm....


as far as pushing the clone out.... I use a penney

a penney is the perfect size....take off the caps ....

put the penney in the bottom of the tube...and push with a pencil.....


Welcome to the this is the best cloner you dont plug in club...


rotflmfao.....
 
its definitely green. yeah i have one of those fish tape thermometer on the side of the tub for checking temps and it sits on a heating pad with timer for adjusting them.
the timer also works to keep heating pad from cutting off after an hour of use. damn safety feature!
 
Top