What's new

150w HPS Club and Resource Guide......

stuck

New member
Hey stuck,

You should host your images here @ ICMag. swecan wants to install some certificates because you used https in your links.
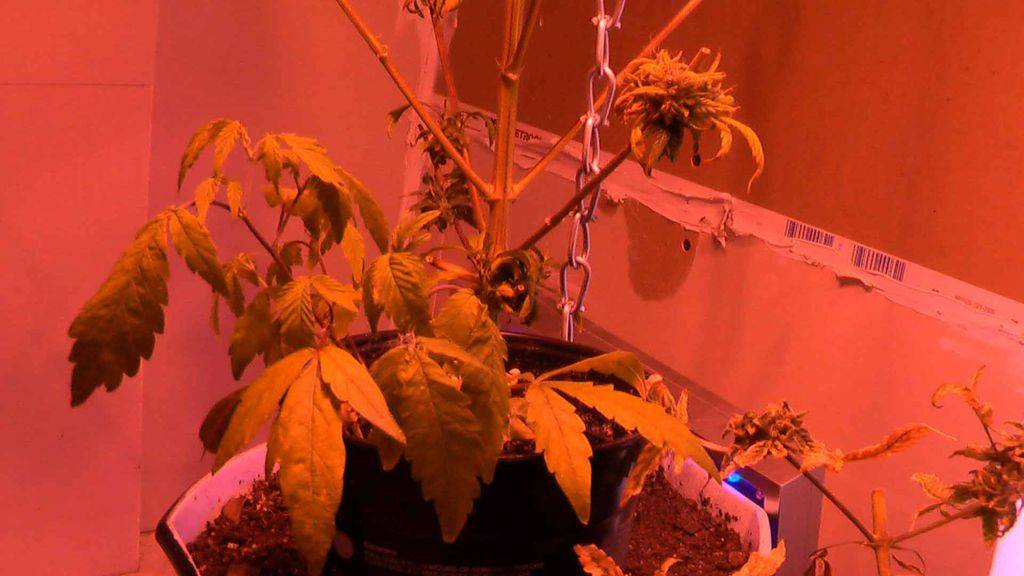
BTW, Nice plants :canabis:

thanx :biggrin:

forgot about that certification(spelling?), swecan uses a fake certifikation an old one, to make safer or something.

Changed it now, and the pics are now hosted @ icmag
 
K

krushonkush

Catman...I agree a 100%.. only not on the pro thing!! lmfao! Thats why I feel I should
have veg longer. I had to use all the litttle shit just to fill the screen. Next run I'll try to
veg longer filling the screen with hearty branches and cut the little shit off,ya dig?
I ran a perpetual with my 400 and just hated the work involved.
Your grow looks great,very happy girls too. Keep up the hard work it shows! puff,pass..:joint:
 

hgl

Active member
Wouhooo!! Just finished a growing box with a 150W HPS! May I join the club? :)

Here's my setup:
side_open.jpg


My link
http://www.icmag.com/ic/showthread.php?t=153255
 

vintner

Careful, I just had my bullshit meter recalibrated
Veteran
I'm getting a 150 watt HPS to replace the CFLs I have now. Do you think this will increase temps in the cab? It is 3 ft. Wide 4ft tall, and 2ft deep. The cabinet is metal.

Welcome to the 150 watt club greenpharmd :wave: 
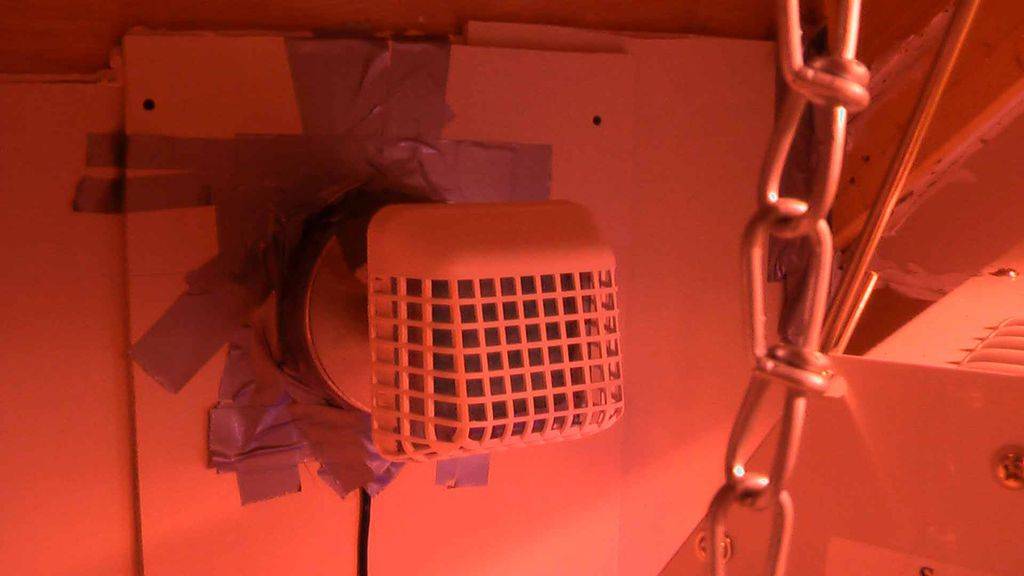
The simple answer to your question is yes, temps in your cab will increase when the light is on. However, if you have adequate ventilation, this shouldn't be an issue at all w/a 150. Why don't you tell us a bit more about how your cab is ventilated. Mainly exhaust.
Stay safe :rasta:
 
G

grumblez

Hey 150W members! I worked on rule #2 yesterday....Don't Smell.

I'll post up some picks of my brand new DIY carbon scrubber when I get them all done and have the unit installed. I think out of all the ones I have seen made up here on ICMAG I just assembled the easiest and cleanest one yet. Scissors and duct tape are the only tools needed -- no messy carbon granules or panty hose involved. The over all product is a little more expensive (~ 50s buck for parts) but has a no fuss no muss aspect I cannot ignore.

I have no clue if it works yet (have not installed it) but will provide some info once it has been online for a day or two to report.

My issue? I grow in a large space and have two fans in there creating positive pressure in order to keep temps down with 2 x 150 HPS and a CFL or two thrown in. I currently have two reveg's with more bud left on the stump than usual since these were my first reveg attempts and I wanted to ensure some growth. Those buds are stinky bastards right now and I can smell the girls when in my stairwell if the right combo of factors occur.

Look for the post in the next 24 hours or so. I will be installing today!
 

bengie187

Member
Help!!!!.....I have been using the Sun system 150 watter and i woke up this morning to find my light not on.....When i orderd my light package i got a new bulb which was normal base rather than the mogul which come with the pakage....so i went out and puchased an converter to the smaller size which i thought would fix the problem but still no light meaning either the Transformer or the ignitors not working.....i have power to my switch so i know that its not my wiring......My question is there a way to check the power after the ignitor and after to tranformer to see which component is mafuncitioning??? If i need a power reader thinger i got one

At this time its about 3 hour into my day cycle so i would like to have this problem quelled before the end of the day......Thanks all
 

hoosierdaddy

Active member
ICMag Donor
Veteran
grumblez, having fans inside the grow area will not effect the temperature or the pressure of the box. All they can do is create turbulence with the air inside and that is it.
The pressure and temps are effected by the intake and exhaust.

Although creating positive pressure in the box is one way of taking care of air exchange and temp control, it needs to only be done in a professional set-up, or the grower will always have issues with odor escape.

The area needs to have negative pressure, and it is best obtained by having a passive hole intake that is approx twice the size of your exhaust port.
The exhaust port should be fitted with a fan that can exchange the air in the room at least every 3-5 mins. Odor control need to be affixed to this exhaust port and fan, be it at the front end and pulling through the filter, or at the exit end of the run pushing air through the filter.

This link explains what I am talking about in more layman type details.
http://www.icmag.com/ic/showthread.php?t=100823
 
G

grumblez

My Exhaust

My Exhaust

Hoosier, I remember the exhaust debates here in this thread even.

I had an ocillating fan and a box fan in my closet which is pretty big. It is under a stairwell that has a landing and there is a wall that divides it into a U shape from a bird's eye view...I used the frame of the well to throw up a wall to block some light for when the closet door to the compartment is open.

I had no formal intake or exhaust at all up until this point. I have some good genetics coming in thanks to REZDOG and decided to clean out the space and put in something to deal with the lingering smell of the two revegging stumps I have going (along with my 1st successful clone - which was my 1st period) and the stock I will be farming from the new beans once I get cracking.

I do not know how to make a thread or my own to put this, so here it all is.

Started with these ingredients. Had a hard time finding the filter material, was looking for a much smaller package and prolly overlooked it 2 prior visits at least 14 times.


The parts list is as follows:

200+ CFM inline fan with self-lubricating bearings - 25 bucks shipped
carbon material (sheets) - 10 bucks home depot
6" to 4" flange - 5 dollars home depot
dryer vent cap/basket - 10 bucks home depot
scissors and duct tape (already had them).

first I took apart the dryer basket and removed the louvers.


then I attached the base of the basket to the flange. very snug fit here and had to finagle the parts together.


I then cut the filter to fit the basket. The filter comes with a plastic mesh that makes me want to try a SCROG and a prefilter (green) material along with the activated carbon layer.

You use the grating to cut a square that would keep the filter from being sucked into the fan.


I cut the grate with the right most "stub" sticking out further so that it would insert into one of the holes used to mount the louvers that I removed. This idea seemed clever and made me think that this could have very well been my smart idea of the day.


After the grate is in place affix the carbon layer. I doubled up since I am expecting the funk from the OJD's SSSDH and the CHEMHAZE x Chemdog.


Next up is the prefilter and then to secure the whole enchilade to the basket housing with duct tape, our grey friend!


Then I attached that whole thing to the inline fan so that it SUCKED THROUGH the filter, not BLOW through it.

Here is a shot of that.


And here it is mounted where it is vibrating so badly it sounds like I have a Cessna idling in my basement at the moment.


Here is my clone rocking out. Just picked up some fox farm happy frog to transplant her into. in another 2 weeks I take a cut of her and flower her out to hold me over until I start rocking the new strains.

I believe I have negative pressure now in the room. I ditched the box fan since temps dropped by 3 degrees with the exhaust and I felt it was time to drop that cumbersome and loud (yet conveniently cheap) bastard.

I now have a single oscillating fan on to keep the girls firm and well-stalked and this thing. The passive intake would be the doorjamb area and wherever else there are pinholes in my construction. Once I get the mounting done right I think I will be happy. This fucker moves some air...you can feel the evacuation power when sitting near it powered up. I hope it operates well under slight drag...I asked the vendor and he had no clue.


for shits and giggles here are some graphics I did while hanging with the pre-release thread last week. It was fun watching all the lurkers converge to say the least.


DiscoBiscuit

weed fiend
Veteran
Nice scrubber design, grumblez. That's a first for me. The graphics are sweet too, especially the first Rez.

Here's some Tangerine Haze at 63 days. Will probably chop at 72.

picture.php


and the veg scrog, 6 weeks under the screen

picture.php
 

Pipedream

Proudly Growing My Own Since 1969
Veteran
Grumblez - I've been using that exact filter material for a few years now. In fact, there is a link to it in the very first post of this club's thread. From my experience with it, I think you may need a bit more area and additional multiple layers of material. After experimenting with it for a good few months, my final configuration is as follows.

My filter basically looks and opens like an aluminum shoebox. The dimensions are 6"x6"x10".
I have a 5" square fan taking up one complete end, and just open grill work on the opposite end with a six inch duct flange.. If you remove the lid, you see six sheets of the carbon filter material, on-end, in designated slots, each seperated by a 1/2 inch air space. Each sheet is 6x6 and fills the complete cross-section of the box. The negative pressure created by the exhaust fan is more than enough to keep the lid tight against it's gasket and prevent leaks.

While it works fairly well, the filter material must be changed after each flower cycle. Additionally, my previous versions that were either smaller in cross-section or used fewer layers of material, just couldn't keep up with the smell of the flowering plants.

Good luck. PD
 
G

grumblez

Thank you for the advise, Sir. I believe I got the idea for this filter material from said link you posted...I bookmarked it during my earlier days on ICMag as a lurker-only type.

I have two layers now...I figure I will give it a whirl...I will have 4 plants in the flower box at once, with one or two coming mature at the same time....we'll see how it goes. My first issue to overcome is he fan vibrations as it is mounted. I need to either bolt her down or suspend her from something stretchy to eliminate the acoustic issue. My stairwell is acting like an amplifier of sorts...

We'll see! I'll get pics in with any improvements I make.

Disco, that is some lovely nugget action you have yourself there...
 

DiscoBiscuit

weed fiend
Veteran
grumlez, a little bit of gasket material such as sponge, etc will muffle the mid to high frequency vibration noise. You'll still get some noise but it's easier to cover with tramp noise like a fan, radio, aquarium. Your suspension idea would be even quieter.
 
G

grumblez

Neoprene would do. They use that beneath studio monitors to isolate the cabinets from the surface they rest on.

If the bungie does not clear it up I suppose I will need a gasket. Neoprene will be the stuff.
 

vintner

Careful, I just had my bullshit meter recalibrated
Veteran
I just used a hunk of old carpet remnant. Cut down on vibration noise a lot. Course there was no quieting the $12 HD bathroom exhaust fan I was using at the time. Now I have a 4" vortex that's suspended by bungy cords. No noise at all :rasta:
 

Latest posts

Latest posts

Top