What's new

It's ALIVE!

durtbag

Member
Well almost.....
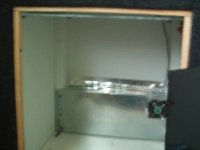
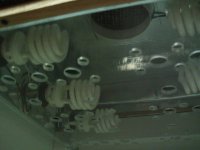
I've built another box once again. This time taking on a new approach. I think this one is number 7. I've built so many since I started this hobby it's hard to keep track of the years past. Started when I was 15 years old. Working with less then addiquiet(sp?) tools, and wood that I scored from dumpster diving.
Somewhere inbetween there and here I started to create furniture. Using 3/4" birch or oak, teak trim, ect.
I guess thats when my passion started to become my obsession.
I've built pieces that stood 6' tall and had about 8oz worth of bud neatly tucked away, and people would come over for bible study, realators(sp?), even had the cops over once, and nobody had a clue. False doors, flase drawers, ect.
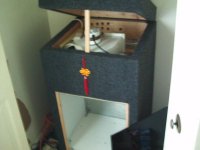
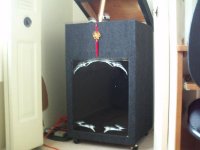
Well now I'm 34, have the right tools for the job, right materail, ect. However this time I'm not in hiding! No more false doors and the like. My attitude had changed abit I guess you could say.
Don'y get me wrong.....I'm not advertising. I just had anew idea in my head and ran with it:joint:
So here we go....or grow:woohoo:
 

durtbag

Member
front view...

front view...

The front if ya can't tell is 1/4" plexiglass. I spray painted the back with rubberized paint for vehical bumpers. This stuff has an unreal grip on surfaces. On the back side of this glass I covered it with duct tape to give a reflective surface. I do this alot, and like using it. It's tuff on abuse, easy to wipe down, and does a great job with the lighting.
The whole box is coverd with sub-woofer felt. Now this is something new for me. First time using this stuff. I was thinking that this might be a rough going step, but it was pretty easy. I used vehical grade spray on glue for this. Way better grip then the standard 3m spray.
On the bottom we have 2" castors that are rated for 125lb. They help alot when it comes to movin this thing around. My guess on the weight of this is somewhere around 100lb. Maybe alittle less.http://www.icmag.com/ic/picture.php?albumid=10712&pictureid=208002
 
Last edited:

durtbag

Member
inside view...

inside view...

Now what your viewing is the inside. This is my intake manifold as I like to call it. On the far right you'll notice the pc fan. I've ripped this from a pc I found in the trash afew years ago. I knew it would come in handy sometime. This little sucker is very powerfull!
Behind the duct work and to the left of the fan are 1" holes drilled in the back with a pvc 90's atteched to act as a light trap. Works like a charm!
To seal everything up I've again used duct tape.
Now the other picture is a view of my current lights...cfl's 26w daylight. These will be changed over to 42w when the time comes.
But again this is 1/4" plexiglass, with varius holes drilled out positioned under the lights. Now before I get flammed....Let me say that this is not ment to be a heat sheild. Rather an airflow director I like to call it. Once again this works better then I thought it would. I didn't think I would keep it when I came up with the idea, but I had to at least try it and see for myself. Well I'm glad I did! I'm really tickled pink over it! More on that later....
The ceiling is sheet metal. Duct work for houses ect. I have a 250cfm blower attech(sp?) which is connected to a speed control.
The ceiling has an arch to it. So when the box is sealed up and lights are on the hot rising performs great! I havn't needed to turn on the blower. In fact I really havn't had the need to turn on the intake either. But all of this will be used as it should for healthy plants. It's just nice to know that I have alot of room for options ...no what I mean?
 

Attachments

  • FILE0230.jpg
    FILE0230.jpg
    28.6 KB · Views: 10
  • FILE0229.jpg
    FILE0229.jpg
    31.4 KB · Views: 8

durtbag

Member
overhead view...

overhead view...

This shows how I decided to arrange the guts of the box. Very clean if I say so myself. I left myself room for my carbon scrubber, however it's not shown in the photo.
The only business I have left to finish is drilling the front plexiglass for locks on either side, and attach some rubber trim around the door jam.
So I hope you all enjoy the view.
P.S. Sorry about my camera skills
 

Attachments

  • FILE0232.jpg
    FILE0232.jpg
    31.2 KB · Views: 8
  • FILE0238.jpg
    FILE0238.jpg
    36.1 KB · Views: 8
K

KermitTheHermit

durtbag, that fabrication looks like nice work. I've been wondering about building a plexiglass heat shield like that. How do you cut and drill that stuff? Have you ever used it with HID lights? I'm wondering whether it loses any transparency over time; becomes opaque at all?
 

durtbag

Member
Hey Tokesolo,
Thanks for the kinds words. I put alot into this one! I think first up will be Mandala's Speed Queen, although I do have some pretty good bagseed I've been collecting over time.

Thank you too Kermit,...Means alot when others are able to enjoy your efforts.
As for the plexiglass I wouldn't use it because of the heat issue w/ hids. In other peices that I've built over the years I would just order a peice of tempered that would fit for my purpose. In most cases..(all of them actually), I only needed to place a min. order which at the time was around $16.00US. The stuff is pretty cheap considering you'll prolly end up never replacing it.
But on the other hand...(to be honest here..)..If you design/build right then you might be able to get away with it. I'm sure someone on here will flip because of this, but I've seen worse things that slide when the conditions are right. But Like I said this isn't ment to be a heat shield in anyway. It started just as an experiment since I had the stuff on hand. Turns out it's perfect!
What I had in mind was to use it as a airflow director. I wanted the air to pass through the bulbs and around them....No where else. If there was any kind of air going elsewhere I'd flip my noodle!
The glass holds up DAMN well too! I did a test run with ventilation. Gotta make sure that if ventilation cuts out on ya for any reason then things don't go south in a hurry...know what I mean? I'd like to think I covered this when I was in the drawing stages of this by having the metal ceiling, and the exaust directly above the lights. Without any air passing through the box and 26w lights running for 6hr. There was,'t any issue in the box, or where the guts are stored. The ceiling got hot as hell, but this had no effect on absolutly anything! I couldn't belive it! The heat dissapates(sp?) through-out the metal I guess.
Now the glass did get abit hot, but I could still touch it. I wouldn't want to keep my fingers on it for more then maybe 5 seconds though. But keep in mind this glass has a rating for 1/8" stuff to be at 820F, this is 1/4" that I'm using, that has holes drilled throu-out.
Anyway I turned on my intake...(small pc fan), and in roughly 4-5min. time everything became cool to the touch again. Ambient temps. in the house is 72F...so I'm pretty pleased.
When it came time to make the cuts I used a saber-saw for this. Drilling I used standerd bits. You wanna make sure that their sharp, and the tip has a triangular bore on it. Cuts this stuff like butter.
In the past I've used standard hole-saws for this and found that they actually make ugly holes...lol.
I'm sure overtime this stuff will break-down like everything else, but I couldn't tell ya about transperency. You'd be better off asking someone who works in a tanning salon.
 

facelift

This is the money you could be saving if you grow
Veteran
Looks like the Cerwyn Vega Audio stand at my old place of employment.

I see big buds in your future!
 

seany

Member
Hey Durt, 19 years worth of practice aye! Your cab is fantastic! I'm using a pc case at the moment but was looking into using a speaker. May start a new grow cab in the new year. I've heard good things about speed queen. I'm working with bag seed at the mo, it's great coz you don't really know what your gonna get with them! Good work dude

Seany
 

durtbag

Member
Thx Seany,
Hey quick with the math too...hehe. I'm sitting here counting on my fingers to see if your correct....lol. I feel old now....lol.
For shitz-n-giggles I also built a pc box afew years ago when they became somewhat popular on Overgrow. I'll tell ya what.....taking apart a pc and throughing it back together with bulbs, fans, ventilation holes, ect. wasn't an easy task! I remember the biggest issue I had to deal with was light leakage. It took some thinking to get that worked out.
In the end it worked out great for my clones, and moms. I think I still have it in the attick too.
I wouldn't knock backseed. I've grown much bagseed over the years, and never had a bad batch yet. In fact, every bagseed bean that I've grown turned out nothing like from what I got it from. Always better.
 

Helis

Member
This cab looks very good! I love the plexi air director, seems like a brilliant idea.
I'll be watching this... Come on back and let us know how things are :)
 

durtbag

Member
Ok time for an update...

Ok time for an update...

Hey kids!
I gotta bit more work done so I'd thought I'd drop on bye and show some of the progress...or lak ther-of.
These little gurls..(fingers crossed), are exactly 2 weeks of age..from seed of course, for the new comers to this hobby.
2 of them are Speed Queen from Mandela, and the other 1 belive it or not was the freebie...Skunk#1XHaze. They've been sitting in some perlite/SP.moss/Lime mix that I did up myself. The container's were cut down little Half-N-Half jobs that you'd use for coffee. This photo shows them about 10hrs after transplanting them to these cut down half gallons.
Now there sitting in my soil mix that should last them for...well ever really...haha.
They havn't been hit with any nutes as of yet. So just as soon as it appears that they've takin to their new containers, I'll hit'em up with 1/4 strength. However due to my mix having worm castings, that actually will be the first bit of goodness that they get. So maybe I might hold off just abit longer. Guess we'll see right?
As far as progress on this box, All I've done was add the in-wall digi timer, and hard wired the lights to it, and threw in a digi temp. guage.
...oh yea lets not forget my horrifiying attemp at mylar. I've NEVER been any good at hangin this crap!
I do have some keyed locks to install on the face, but the plexiglass front fits so damn perfect that I'm affraid to mess it up by drilling for locks:nanana:
I also need to throw on the timer faceplate cover.
The grated floor that you see will be framed underneth, and have cable hooked up to it, to allow for the floor to move closer to the lights. I got all the room in the utility area, that I'm pretty confident that I can put a tiny hand crank in for the use of adjusting the floor through the cable.
Other then that through, this box is just about complete!
Wish me luck...please!

On a side note:
I remember asking this in OG yrs back with no clear explination. Has anynone ever noticed that certain strains show droopyness just before lights out? Why?
I'd like to see if this can be answered now. It's been afew yrs like I said, and more research has been done. I also remember Krusty from OG tellin me that it might have something to do with co2 levels, and or just a natural hunkerin down for the night kinda thing.
 

durtbag

Member
Hey guys thx for the comment.
Well this cab is working as I've planned. My experiment with the 1/4" plexiglass is fantastic! I'm TRULY amazed how well the blower is cooling this whole thing with the blower hooked up 2 a dimmer which is set at a very low rate. With the top of the cab and the door off you can't hear anything operationg till your head is about 8"-12" from the blower.
This photo shows the 2 speed queens that are at 4 weeks, and were just topped. Unfortunatly I just let them go yesterday. They were males, and I don't have the time for any males right now. So what I have left is the SkunkxHaze which has been topped and is not even close to showing any sex yet. Not sure why....thinking i'll be doing yet another transplant on her in the next few days.
But I also have 2 more speed queens pumpin along now at just afew days past a week.
I'm sure soon enough I'll have some decent mothers that are worthy enough to be grown out.

These photo's are abit old now by about 5 days to a week. So when I can find the time I'll show how the SkunkxHaze is coming along. However she/he is in one of the photo being shown......she's on the far left.
 
Top