
Hey, I am new here but have been browsing around and was inspired by several of the projects on here so I decided to try my hand at one. Now this is my first time trying to build a box, however I am not completely new to building things. I have minor experience in construction, electrical wiring, and car ventilation and I hope those will be of use to me in this project.
Now onto my idea. I am looking to use a mini-fridge that I own however I have run into one major problem with my idea (this I will tell you about later in my post). To make things even more difficult, I am looking to build this without any permanent changes or damage to the actual mini-fridge body or workings itself.
So before I go into my major problem, let me show you my plans for the box itself.
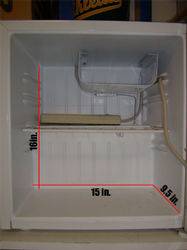
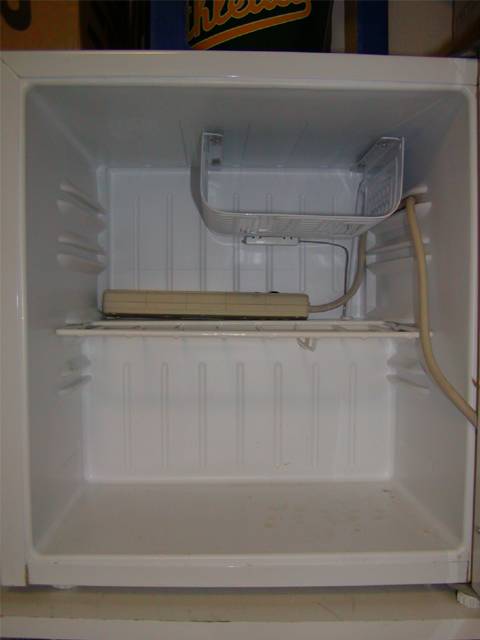
Here is the interior of the fridge itself with some minor dimensional markings. The actual area for the plant itself will be roughly 12 inches high (after installing lights and fan), 15 inches wide (allowing screen growing), and 9 inches in horizontal depth.
The back shelf area (where the electrical components will sit) is about 5.25 inches deep. The wire for the power strip feeds out of the side of the fridge through where the door and the body of the fridge meet.
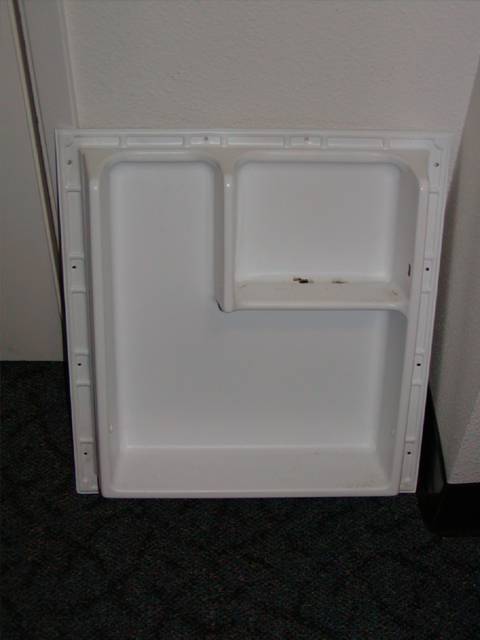
To keep the interior area large enough, the first thing I did was unscrew the door paneling which actually would have limited my grow space (horizontally speaking).
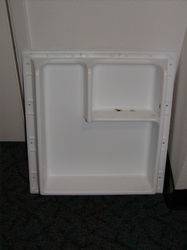
This left me with just the flat interior of the fridge door.

Ah, don't you love foreign manufacturing?")
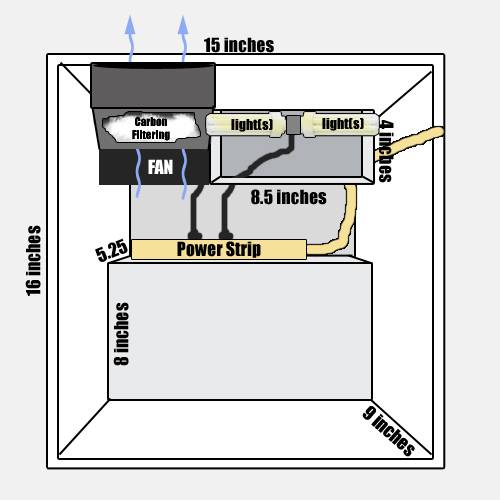
Now onto my interior plans. These are simple mockups that I created, so please excuse any inaccuracies in measurement or crap like that (I have a gridlined paper notebook with more accurate plans drawn out).
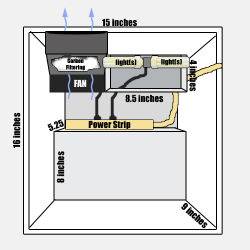
First is a front-up view of the design. As you can see, The light(s) will sit in the upper right area with the wiring fed back through the ice tray to the power strip in the back. The fan will literally sit next to the lighting area and will feed the air up from an intake at the bottom of the fridge. Using some of the carbon filter tutorials on here and some other forums, I plan to build a design that will fit comfortably inside of a vent section that will feed the air up and out toward the upper section of the door.
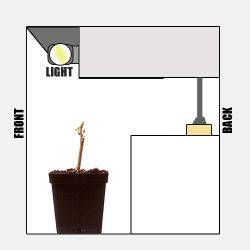
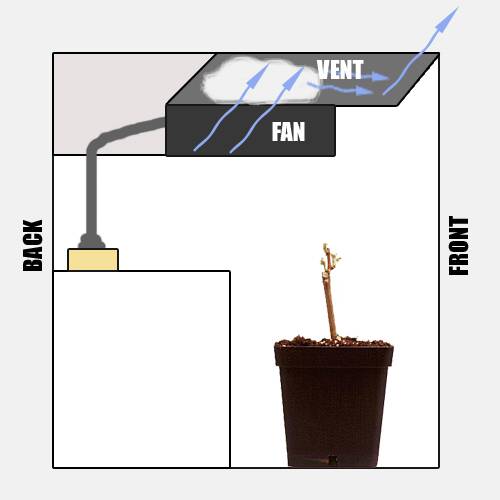
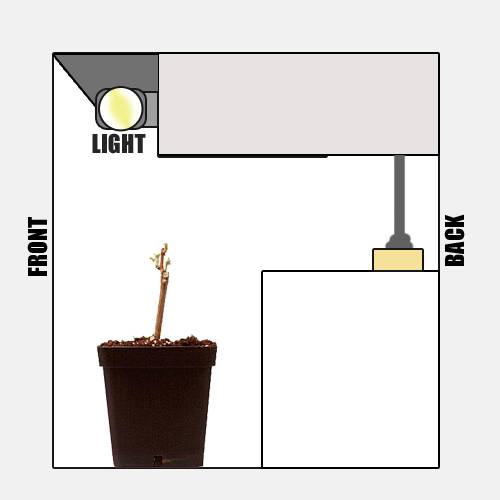
Here are some side views of the design.

Now, you may ask, how do I plan to get the ventilation set up without cutting holes into the body of the mini-fridge itself? Well, that is where the door comes in.
To help seal the fridge when it is running normally to keep things cold, the fridge uses a 1/2 rubber lip that runs along the the entire lining of the door.
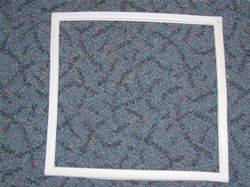
This is what I plan to help seal the box while still letting the flow of air to work.
When I took off the interior door panel, I was left with a 1/2 to 2/3 inch crack all around the entire fridge area where the door and body meet.

*apologies for the blurriness.
What I plan to do is mount the rubber lip to the body of the fridge so it will line the entire opening like it usually should, only this piece will be the one area I am willing to cut up.
At the top of the fridge, where the ventilation feeds toward the door, I plan to cut out the rubber lip area and have a small shaft of the vent (about 6 inches by a 1/2 inch) feed out to the level of the exterior. If you have ever pulled apart a car's interior ventilation system, you will find sections that work like this where a wider vent section feeds down to a thinner one causing the air to push our at a high rate of speed.
For air intake, I plan to do something similar at the bottom of the unit fed through the gap between the body and the door (with a light trap), so that the air flow will come in from the bottom and up out the top of the unit, hopefully reducing the heat inside as well.
To help seal the box better, I plan to use the screw holes used for mounting the front panel
*See surrounding edge of door
to mount a thin wooden lip that will slide in next to the rubber exterior fridge lip. Heavy caulking between will help to seal the deal.
Hope the description is good enough. Now onto my main problem.
Since I don't wish to remove any of the interior components of the fridge, this means that the refrigerant will remain in the fridge as well. While there is a large container in the outside rear section of the fridge, which I am guessing is what holds the majority of refrigerant (it looks like a large round metal bulb), there is still a chance that some residual may still be in the interior ice tray. The ice tray itself is metal but has built in tubing in which the refrigerant feeds through it to make it colder than the rest of the fridge.
*You might be able to see the tubing in the back, behind the wire for the power strip
In case you don't know, refrigerant is contained at a specific pressure and as the temperatures change, so does the that pressure. While looking at the back of fridge, I found a tag that read that the higher level of pressure for the refrigerant was 300gpsi (meaning the pressure should not exceed that number). After doing some calculations, I found the temperature related to that pressure is only around 71 degrees F. Which is a major problem.
Since the lighting will be mounted up right outside of the ice tray, it will most likely be the area where the most heat is produced. Even if the fan works to draw the residual hot air out of the box, the physical heat put off by the lights may be enough to significantly heat the metal ice tray. Which results in running the risk of increasing the pressure of the residual refrigerant that is sitting within the ice tray tubing. The pressure related to 85 degrees F is roughly around 492gpsi (almost 200 over the limit)
I don't know what happens if the pressure exceeds the maximum limit, but I am sure it isn't good.
So that is my problem. Since I wished not to remove any of the working components of the fridge, I don't know what to do.
Does anyone have experience with refrigerant? Do they know how it works or whether my concern is even a real one to worry about? It looks like the metal ice tray can be removed, but I haven't been able to do so yet. Does that seem like a viable option?
Anyways, that is my plan overall. Other than helping me with my main problem, what do you think about the design? Do you feel it could work well? Any major thing I missed in my design concept? Feel free to C&C.
And thanks in advance to everyone who helps me out with this. I really hope that I can get it to work as my main hope is to build something that is well hidden and does not look anything like a grow box. I live in an apartment and it is rather close quarters overall. This fridge will sit on a ledge above my closet area (a little above eye level), so it is high enough that when the air kicks up and out of the grow fridge through the top vent, it will be completely unnoticeable to people inside of the room.
I guess if this doesn't work out, I can start on a pc grow box, or I have an old speaker that sits at about 3 feet high, 1 foot wide, and 1/2 foot deep, but I'd prefer not tearing that apart as I inherited the speakers from my grandfather (yes, they are old but they work great).
Thanks again to all for reading this really long and over-detailed post.
Oh, I am still working out the details needed for the type of fan needed as well as the lights, but I will calculate that out as soon as I get this design off the ground and started with all my problems taken care of.
Now onto my idea. I am looking to use a mini-fridge that I own however I have run into one major problem with my idea (this I will tell you about later in my post). To make things even more difficult, I am looking to build this without any permanent changes or damage to the actual mini-fridge body or workings itself.
So before I go into my major problem, let me show you my plans for the box itself.
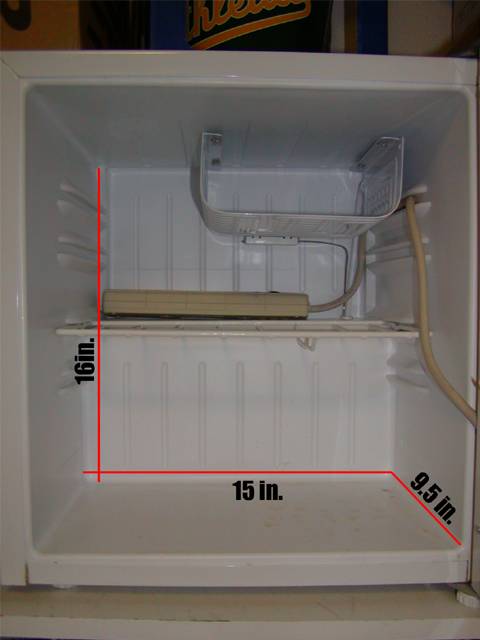
Here is the interior of the fridge itself with some minor dimensional markings. The actual area for the plant itself will be roughly 12 inches high (after installing lights and fan
The back shelf area (where the electrical components will sit) is about 5.25 inches deep. The wire for the power strip feeds out of the side of the fridge through where the door and the body of the fridge meet.
To keep the interior area large enough, the first thing I did was unscrew the door paneling which actually would have limited my grow space (horizontally speaking).
This left me with just the flat interior of the fridge door.

Ah, don't you love foreign manufacturing?
Now onto my interior plans. These are simple mockups that I created, so please excuse any inaccuracies in measurement or crap like that (I have a gridlined paper notebook with more accurate plans drawn out).
First is a front-up view of the design. As you can see, The light(s) will sit in the upper right area with the wiring fed back through the ice tray to the power strip in the back. The fan will literally sit next to the lighting area and will feed the air up from an intake at the bottom of the fridge. Using some of the carbon filter tutorials on here and some other forums, I plan to build a design that will fit comfortably inside of a vent section that will feed the air up and out toward the upper section of the door.
Here are some side views of the design.
Now, you may ask, how do I plan to get the ventilation set up without cutting holes into the body of the mini-fridge itself? Well, that is where the door comes in.
To help seal the fridge when it is running normally to keep things cold, the fridge uses a 1/2 rubber lip that runs along the the entire lining of the door.

This is what I plan to help seal the box while still letting the flow of air to work.
When I took off the interior door panel, I was left with a 1/2 to 2/3 inch crack all around the entire fridge area where the door and body meet.

*apologies for the blurriness.
What I plan to do is mount the rubber lip to the body of the fridge so it will line the entire opening like it usually should, only this piece will be the one area I am willing to cut up.
At the top of the fridge, where the ventilation feeds toward the door, I plan to cut out the rubber lip area and have a small shaft of the vent (about 6 inches by a 1/2 inch) feed out to the level of the exterior. If you have ever pulled apart a car's interior ventilation system, you will find sections that work like this where a wider vent section feeds down to a thinner one causing the air to push our at a high rate of speed.
For air intake, I plan to do something similar at the bottom of the unit fed through the gap between the body and the door (with a light trap), so that the air flow will come in from the bottom and up out the top of the unit, hopefully reducing the heat inside as well.
To help seal the box better, I plan to use the screw holes used for mounting the front panel
*See surrounding edge of door
to mount a thin wooden lip that will slide in next to the rubber exterior fridge lip. Heavy caulking between will help to seal the deal.
Hope the description is good enough. Now onto my main problem.
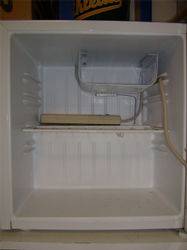
Since I don't wish to remove any of the interior components of the fridge, this means that the refrigerant will remain in the fridge as well. While there is a large container in the outside rear section of the fridge, which I am guessing is what holds the majority of refrigerant (it looks like a large round metal bulb), there is still a chance that some residual may still be in the interior ice tray. The ice tray itself is metal but has built in tubing in which the refrigerant feeds through it to make it colder than the rest of the fridge.
*You might be able to see the tubing in the back, behind the wire for the power strip
In case you don't know, refrigerant is contained at a specific pressure and as the temperatures change, so does the that pressure. While looking at the back of fridge, I found a tag that read that the higher level of pressure for the refrigerant was 300gpsi (meaning the pressure should not exceed that number). After doing some calculations, I found the temperature related to that pressure is only around 71 degrees F. Which is a major problem.
Since the lighting will be mounted up right outside of the ice tray, it will most likely be the area where the most heat is produced. Even if the fan works to draw the residual hot air out of the box, the physical heat put off by the lights may be enough to significantly heat the metal ice tray. Which results in running the risk of increasing the pressure of the residual refrigerant that is sitting within the ice tray tubing. The pressure related to 85 degrees F is roughly around 492gpsi (almost 200 over the limit)
I don't know what happens if the pressure exceeds the maximum limit, but I am sure it isn't good.
So that is my problem. Since I wished not to remove any of the working components of the fridge, I don't know what to do.
Does anyone have experience with refrigerant? Do they know how it works or whether my concern is even a real one to worry about? It looks like the metal ice tray can be removed, but I haven't been able to do so yet. Does that seem like a viable option?
Anyways, that is my plan overall. Other than helping me with my main problem, what do you think about the design? Do you feel it could work well? Any major thing I missed in my design concept? Feel free to C&C.
And thanks in advance to everyone who helps me out with this. I really hope that I can get it to work as my main hope is to build something that is well hidden and does not look anything like a grow box. I live in an apartment and it is rather close quarters overall. This fridge will sit on a ledge above my closet area (a little above eye level), so it is high enough that when the air kicks up and out of the grow fridge through the top vent, it will be completely unnoticeable to people inside of the room.
I guess if this doesn't work out, I can start on a pc grow box, or I have an old speaker that sits at about 3 feet high, 1 foot wide, and 1/2 foot deep, but I'd prefer not tearing that apart as I inherited the speakers from my grandfather (yes, they are old but they work great).
Thanks again to all for reading this really long and over-detailed post.
Oh, I am still working out the details needed for the type of fan needed as well as the lights, but I will calculate that out as soon as I get this design off the ground and started with all my problems taken care of.

