
A few of you have asked me about this directly, and I'm seeing a growing trend of people adopting vertical planting arrangements in their gardens. This method is result of several years of R&D, primarily conducted by myself and bobblehead, with input from other members along the way. The goal on my end has always been to find a simple, reliable, scalable method for watering plants in my vert SOG garden. Anyone that has attempted this using pumps knows it's very difficult to get even amounts of nutes to each plant. Blumats seemed to be the answer, and to an extent they were, but potential runaway and clogging issues ultimately ended that venture. So I went back to drip using what was learned from the blumats, gravity is your friend. This system is simple, relatively cheap to implement, works for both vertical and horizontal feeding arrangements, and is easily scaled to any size/shape of garden. It is principally no different from any other drip setup with one exception. Gravity from the elevated res pressurizes the feed lines instead of a pump. This allows for much more even pressure distribution in the lines vs. a pump. As a result it's a lot easier to adjust so each plant gets the same amount of water/nutes. Here's what you'll need:
1. An elevated reservoir. Size is dependent on your available space, and the gardens needs. Can be anything from a gallon jug to a 200+ gal. tank. It's important to remember the bottom of the res needs to be at least 1ft, possibly more with a smaller res, above the soil line to achieve proper "head" (the gravity created pressure that makes this work ).
2. One solenoid for every 10 plants as a general rule. You can get away with more if you have decent head and flow. I think due to the nature of their design any battery operated solenoid should work with nearly zero pressure (PSI), but I'm not 100% on that. These work very well, and have a built in timer. http://www.irrigationdirect.com/cat...519/s/rain-drip-r673-replacement/category/31/
3. Manifold line (PVC, vinyl tubing, air compressor hose, etc). Needs to be between 1/2-1" (1" flows a little better, but 1/2" is sufficient to get the job done). The solenoid I linked has 3/4" input and outputs, so an all 3/4" setup is also an option. This setup is very flexible design and materials wise (use what's available to you). For those of you that don't know, the manifold line is simply the slightly larger hose/pipe you tap your 1/4" drip lines into.
4. 1/4" vinyl drip line. Can be found in the sprinkler aisle of most home improvement stores. You will need enough for one run from the manifold line to each plant, so keep that in mind when calculating. Also all runs must be of equal length, so measure the furthest plant from the manifold line and use that length of line for every other plant. Doesn't matter if there is excess line on some plants, keeping them all the same length helps ensure equal flow to each plant.
5. 1/4" shut off valves. You will need one for each plant. These will be found next to the 1/4 drip line.
6. 1/4" Straight barb fittings. One for each plant. These are used to connect the 1/4" line to the manifold line. If using pvc for your manifold you will need top hat grommets like pico uses here https://www.icmag.com/ic/showthread.php?t=62654, or similar method of connecting 1/4" drip line to pvc. Some good illustrations of the basic concept we are creating in there also. Just without the pumps, and on a vertical plane. Also found in sprinkler aisle.
7. Optional, but I highly recommend them. 1/4" tee fittings. Again one for each plant. These are used on the plant end of the 1/4" drip lines to spread the nutes/water more evenly in the pot. Again, sprinkler aisle.
8. Bulk head fittings used to connect your res to you solenoid, manifold line, etc. Can be found in the plumbing aisle of most home improvement stores.
9. Hole saw sized for your chosen bulkhead fitting (you want the outside edge of the hole saw to match up with the outside edge of the bulkheads threads). Guarantees you'll get a water tight fit with the bulkhead, but depending on what your res is made of, a razor knife might work just as well. I design and build grow rooms for a living so I'm pretty anal about shit being perfect, but for your average home grower small details maybe less critical. Up to you, but if it leaks on ya because you used a knife don't come crying to me about me.
10. Various fittings (PVC, Barbed, sprinkler, etc), pipe tape/dope, pvc glue, etc, required to put your unique design together.
Alright so those are the critical pieces, you can put them together a million different ways for the same end result. I'll detail my setup below as an example, it's up to you figure out how to best implement it into your space.
I use a 65 gal. tank on the ground feeding a 35 gal elevated res. This allows me greater capacity while keeping a majority of the water on the ground . It also affords me an easy way to aerate and mix my res by using an overflow on the elevated res (lil trick I picked up from using blumats). It works like this. I have a pump move water from the 65 gal res up to the 35 gal.
The 1/2" green hose on the right is connected to the pump in the lower res. The other hose is unrelated, ignore it.
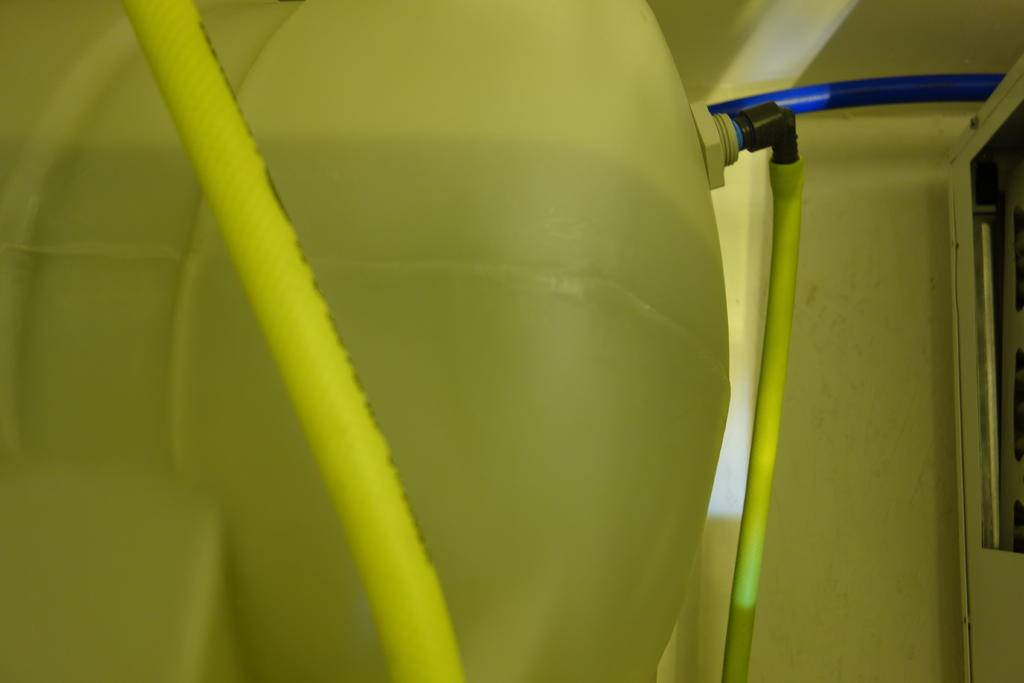
On the opposite side I have installed a 1" overflow (having it bigger than the fill hose ensures it will never overwhelm the overflow and flood my upper res).
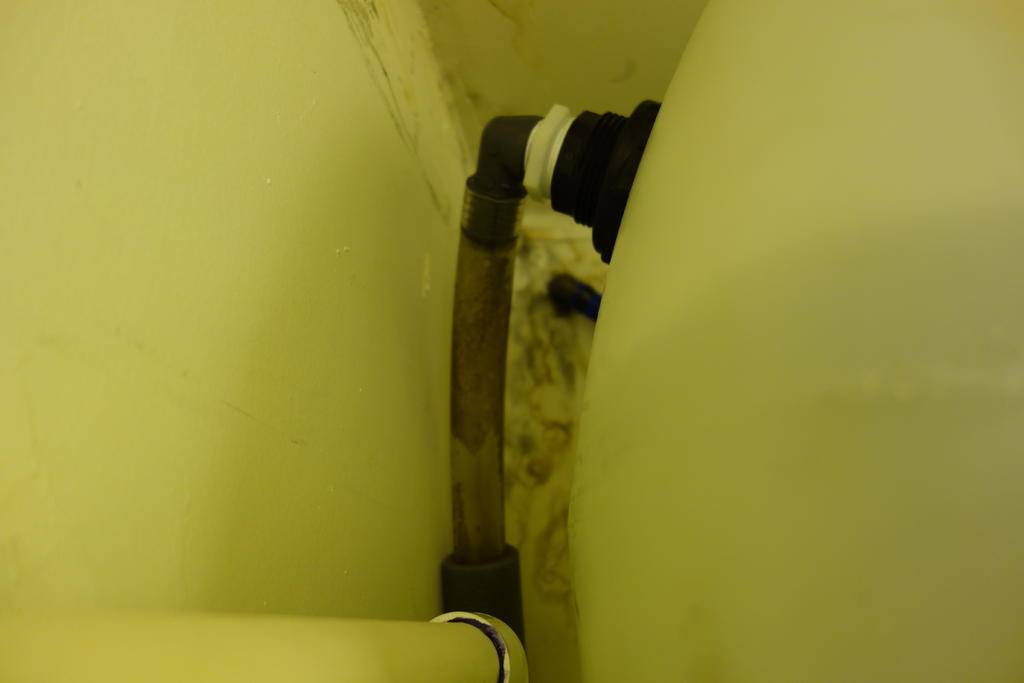
This overflow is connected to the lower 65 gal. res. The resulting waterfall action creates tons of dissolved oxygen and ensures the nutes stay mixed.
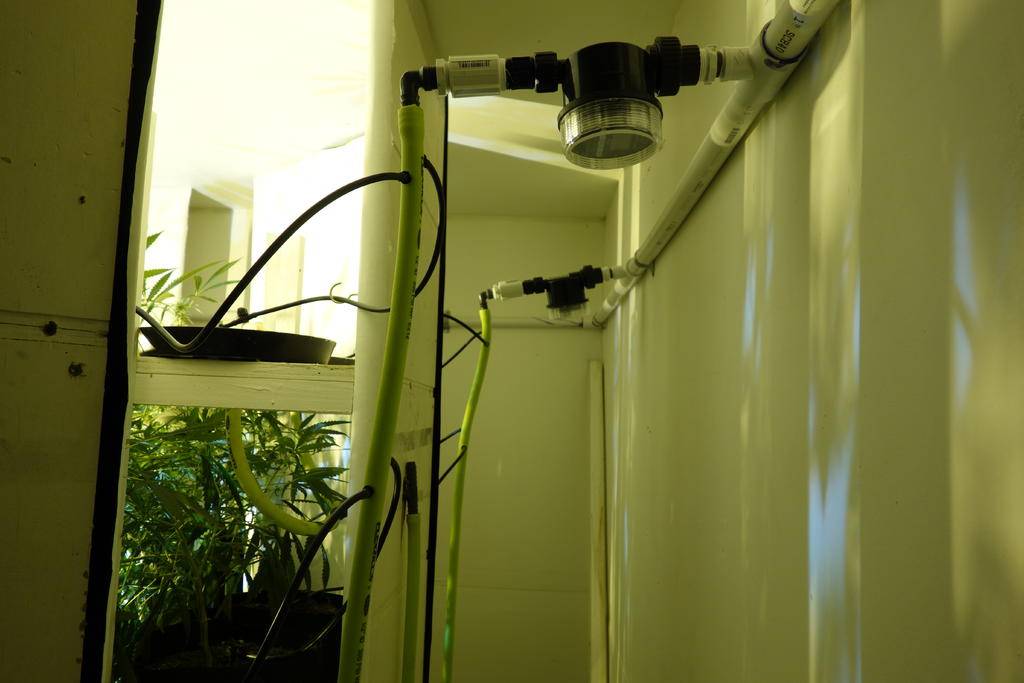
In most smaller setups you would probably attach the solenoid directly to the elevated res, then followed by the manifold line. The unique nature of my setup required me to do something a bit different. I encircled my rack setup with pvc, essentially creating an extension of my elevated res. I then tapped into the pvc between each section of my rack, attaching a solenoid to feed a max of 8 plants each. I then attached a length of flexzilla (highly flexible green air compressor hose. Great shit!) to the other side of the solenoid. This acts as the manifold line part of my drip setup. You can use 1/2" vinyl tubing found with the 1/4" drip line, or anything else you find suitable. From there I tap 1/4" straight barbs into the flexzilla. These attach to the 1/4" drip line, and run to each plant.
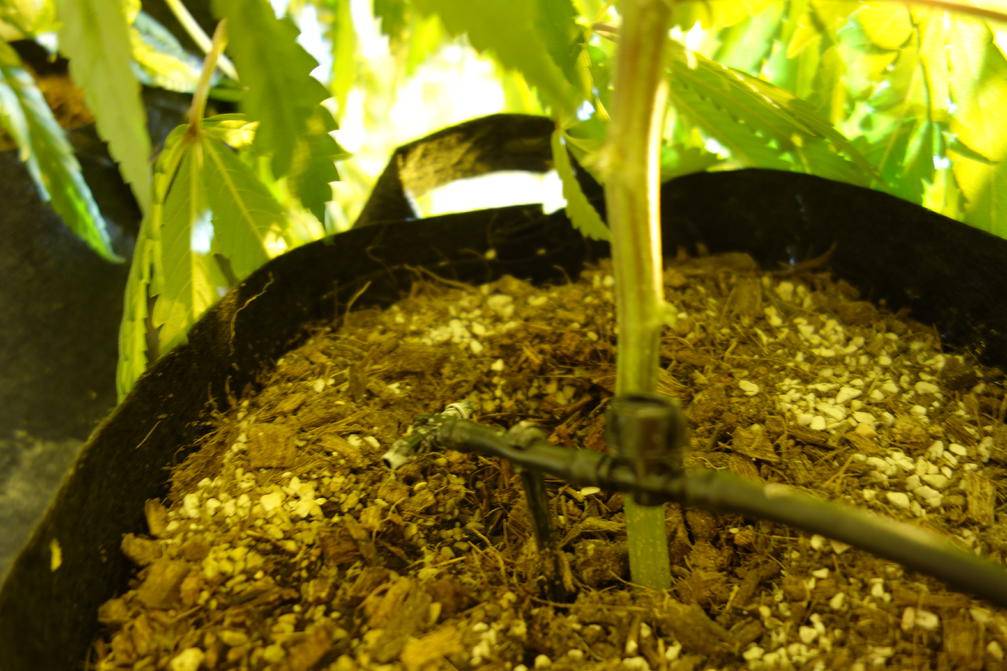
On the plant side I place a 1/4" shut off valve a few inches from the end of the 1/4" drip line. This is used to both adjust flow to individual plants, and to shut off individual lines when they are not in use (handy if your numbers vary). On the very end I place a 1/4" tee as an aid to spread to the water/nutes. Because there are no actual drippers in the design, chances of lines clogging due to salt build up is almost non existent. My garden is remote, so unwavering reliability is very high on my list of priorities.
1. An elevated reservoir. Size is dependent on your available space, and the gardens needs. Can be anything from a gallon jug to a 200+ gal. tank. It's important to remember the bottom of the res needs to be at least 1ft, possibly more with a smaller res, above the soil line to achieve proper "head" (the gravity created pressure that makes this work ).
2. One solenoid for every 10 plants as a general rule. You can get away with more if you have decent head and flow. I think due to the nature of their design any battery operated solenoid should work with nearly zero pressure (PSI), but I'm not 100% on that. These work very well, and have a built in timer. http://www.irrigationdirect.com/cat...519/s/rain-drip-r673-replacement/category/31/
3. Manifold line (PVC, vinyl tubing, air compressor hose, etc). Needs to be between 1/2-1" (1" flows a little better, but 1/2" is sufficient to get the job done). The solenoid I linked has 3/4" input and outputs, so an all 3/4" setup is also an option. This setup is very flexible design and materials wise (use what's available to you). For those of you that don't know, the manifold line is simply the slightly larger hose/pipe you tap your 1/4" drip lines into.
4. 1/4" vinyl drip line. Can be found in the sprinkler aisle of most home improvement stores. You will need enough for one run from the manifold line to each plant, so keep that in mind when calculating. Also all runs must be of equal length, so measure the furthest plant from the manifold line and use that length of line for every other plant. Doesn't matter if there is excess line on some plants, keeping them all the same length helps ensure equal flow to each plant.
5. 1/4" shut off valves. You will need one for each plant. These will be found next to the 1/4 drip line.
6. 1/4" Straight barb fittings. One for each plant. These are used to connect the 1/4" line to the manifold line. If using pvc for your manifold you will need top hat grommets like pico uses here https://www.icmag.com/ic/showthread.php?t=62654, or similar method of connecting 1/4" drip line to pvc. Some good illustrations of the basic concept we are creating in there also. Just without the pumps, and on a vertical plane. Also found in sprinkler aisle.
7. Optional, but I highly recommend them. 1/4" tee fittings. Again one for each plant. These are used on the plant end of the 1/4" drip lines to spread the nutes/water more evenly in the pot. Again, sprinkler aisle.
8. Bulk head fittings used to connect your res to you solenoid, manifold line, etc. Can be found in the plumbing aisle of most home improvement stores.
9. Hole saw sized for your chosen bulkhead fitting (you want the outside edge of the hole saw to match up with the outside edge of the bulkheads threads). Guarantees you'll get a water tight fit with the bulkhead, but depending on what your res is made of, a razor knife might work just as well. I design and build grow rooms for a living so I'm pretty anal about shit being perfect, but for your average home grower small details maybe less critical. Up to you, but if it leaks on ya because you used a knife don't come crying to me about me.
10. Various fittings (PVC, Barbed, sprinkler, etc), pipe tape/dope, pvc glue, etc, required to put your unique design together.
Alright so those are the critical pieces, you can put them together a million different ways for the same end result. I'll detail my setup below as an example, it's up to you figure out how to best implement it into your space.
I use a 65 gal. tank on the ground feeding a 35 gal elevated res. This allows me greater capacity while keeping a majority of the water on the ground
. It also affords me an easy way to aerate and mix my res by using an overflow on the elevated res (lil trick I picked up from using blumats). It works like this. I have a pump move water from the 65 gal res up to the 35 gal.The 1/2" green hose on the right is connected to the pump in the lower res. The other hose is unrelated, ignore it.
On the opposite side I have installed a 1" overflow (having it bigger than the fill hose ensures it will never overwhelm the overflow and flood my upper res).
This overflow is connected to the lower 65 gal. res. The resulting waterfall action creates tons of dissolved oxygen and ensures the nutes stay mixed.
In most smaller setups you would probably attach the solenoid directly to the elevated res, then followed by the manifold line. The unique nature of my setup required me to do something a bit different. I encircled my rack setup with pvc, essentially creating an extension of my elevated res. I then tapped into the pvc between each section of my rack, attaching a solenoid to feed a max of 8 plants each. I then attached a length of flexzilla (highly flexible green air compressor hose. Great shit!) to the other side of the solenoid. This acts as the manifold line part of my drip setup. You can use 1/2" vinyl tubing found with the 1/4" drip line, or anything else you find suitable. From there I tap 1/4" straight barbs into the flexzilla. These attach to the 1/4" drip line, and run to each plant.
On the plant side I place a 1/4" shut off valve a few inches from the end of the 1/4" drip line. This is used to both adjust flow to individual plants, and to shut off individual lines when they are not in use (handy if your numbers vary). On the very end I place a 1/4" tee as an aid to spread to the water/nutes. Because there are no actual drippers in the design, chances of lines clogging due to salt build up is almost non existent. My garden is remote, so unwavering reliability is very high on my list of priorities.
 .
. 
")
 . Sadly it was still in development a year ago
  . I had the working model setup about 6 months ago, but I needed to do some real world testing before sharing with the community at large


 .
. 
