What's new
  • Happy Birthday ICMag! Been 20 years since Gypsy Nirvana created the forum! We are celebrating with a 4/20 Giveaway and by launching a new Patreon tier called "420club". You can read more here.
  • Important notice: ICMag's T.O.U. has been updated. Please review it here. For your convenience, it is also available in the main forum menu, under 'Quick Links"!

Winogradsky Column

Hookahhead

Active member
Now that I had my "selective enrichment" figured out, I needed to collect my sample. Again if we refer back to the Enrichment / Isolation page, we see that we can also be more selective in how we collect our sample. If we look back at our pictures of the idealized Winogradsky column, were looking for the organisms living just above the mud, in anaerobic conditions.

While I was in University, I took a class on Limnology, which looks at the Ecology (Biological, chemical, geological and physical attributes of inland waters). In this class, we used a variety of devices to collect plankton samples from different areas (horizontal and vertical). Thinking back on that, and utilizing an idea I already had, I was able to craft a nice piece of sampling equipment!

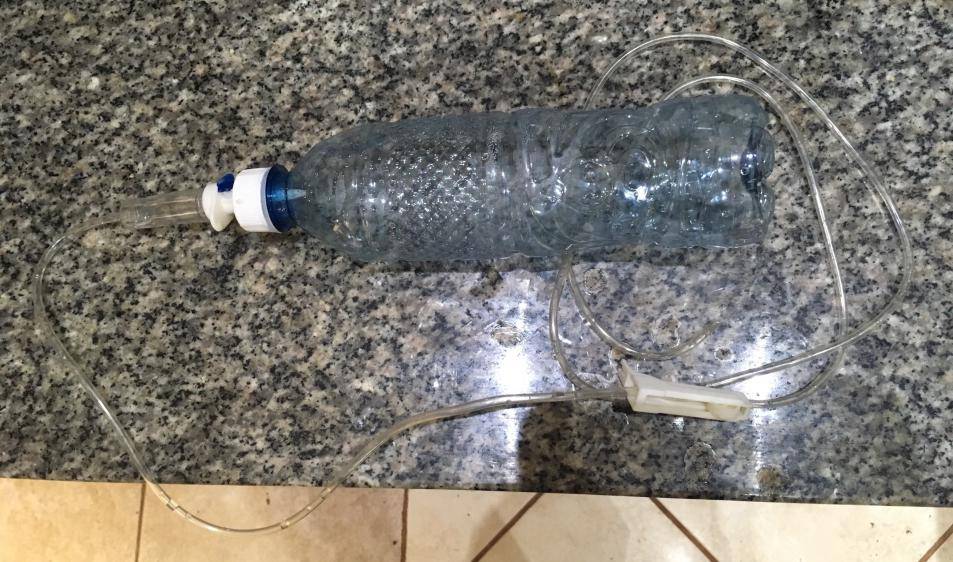
Simple enough... Plastic bottle with a hole cut in the cap. This one happens to be 600 mL but any size should work.
picture.php


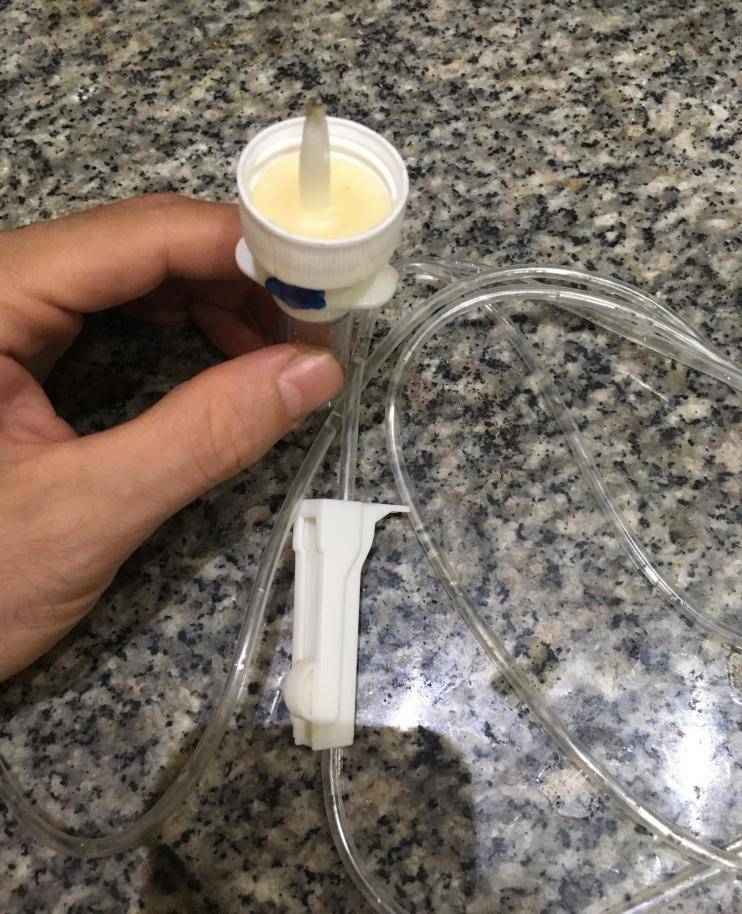
I have access to the tubes that run between an IV drip bag (saline) and the IV port. These are a waste from a veterinary practice, they are a "disposable" item and used new every time. The part that connects to the IV port is cut and disposed of before I receive them. It's just a piece of plastic tubing with a "pinch valve" on it. This allows you to control the flow of fluids moving through it. The end that is still attached is the part that would be inserted into the IV bag, and is therefore not contaminated with any blood/diseases. This part is inserted through the cap. I heated wax from a tea light, and poured it around the inside of the cap to make a better seal. I accidentally burned the tip with the candle haha! After the wax had set up, but was still soft, I twisted the bottle on and allowed it to cool.

picture.php


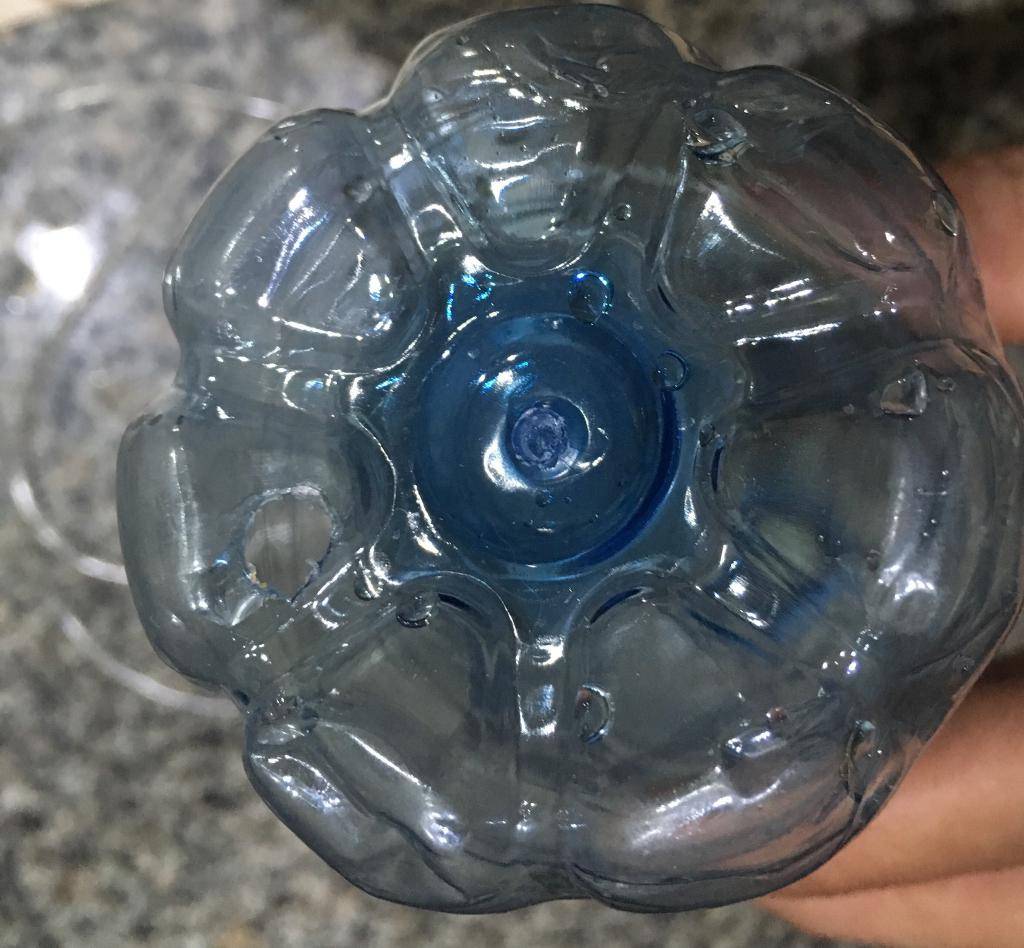
The last step was to cut a small hole in the bottom, this will be how air/water get into the bottle without creating a vacuum.

picture.php


I had the idea to use this exact same setup as a sort of "drip system" for times when I'm away. Here we will use it in reverse, and allow it to gently fill with water. This is done to prevent kicking up sediment and the mixing of layers, as well as keeping the sample from mixing with the air as much as possible.

picture.php
 
Last edited:

Hookahhead

Active member
So down to my little river I go, this time I go just around the bend where the deeper pool is. A stream or river will alternate between "riffles" and "pools". Riffles are the shallow, rocky areas where water moves quickly. These tend to be highly oxygenated. The pools are the deeper areas. The water tends to move slower, allowing sediment to fall out and the microbial life eats up all the oxygen. If we want to find anaerobic organisms, we should be looking in areas likely to be anaerobic. There was no green algae growing in this area. Those are oyster mushrooms growing off that log.

picture.php


My rubber boots aren't that high, so I waded out as far as I could (just past the branch). I wasn't able to make it to the deepest part. Then I used my fancy sample extractor by closing the pinch valve and inserting the plastic bottle into the water. Hold it by the cap, and put what would be the bottom of the bottle in first. Since the pinch valve is closed, it will trap a giant air bubble inside. I positioned the end of the bottle about an inch above the sediment. Once the bottle was in position, I opened the pinch valve, allowing the air to vacate, and water to enter due to the pressure difference. The snorkel system eliminates air bubbles that may oxygenate or mix the sample. Remember to collect your sample upstream, so that any sediment you generate with your feet will be washed downstream. After your bottle is full with your sample, close the pinch tube and gently lift the bottle out of the water, pointing the bottom of the bottle upward so that your sample does not run out the hole. Sorry, I don't have a photo of this step because I was working by myself.

Once I made it back to land, I transferred the sample to my collection bottle. This works exactly how the IV does. Hold the bottle with the cap facing down, insert the tube to touch the bottom of the collection bottle, and open the pinch valve. This allows the sample to drain into the collection bottle with minimal oxygenation. I collected 2 samples in this manner. They are nice and crystal clear, with no visible particles.

picture.php


I brought my 2 samples back to the house to add my nutrient mix. One is a 600ml bottle where I added the recipe as written above. The second bottle I wanted to experiment with adding acetic/lactic acid instead of the MSG. I used about 20 mL white vinegar 4%, and 7.5 mL freshly made LAB serum. However, I wasn't paying attention and added the MSG to it as well. I plan to set up a sample with just acetic and/or lactic acid in the near future.

picture.php


The red capped one is the acetic/lactic/glutamic mix and the other is my "improvised" recipe. The ppm of the sample before any additional ingredients was 209 ppm, with a pH of 7.0 (using pH drops/chart). After adding the nutrient mix, the red capped one had a ppm that was unreadable by my crappy meter and the pH was 4.5. The improvised mix had an unreadable ppm as well, but a pH of 6.5. From what I currently understand, between 6.5-7 may be ideal. These will be placed outside tomorrow morning, and we will follow along their progress here.

picture.php
 
Last edited:

h.h.

Active member
Veteran
I leave the caps loose when fermenting. The escaping gas keeps things from coming in. No explosions.
You could alternately run a tube from the cap into a container of water.
 

Hookahhead

Active member
I leave the caps loose when fermenting. The escaping gas keeps things from coming in. No explosions.
You could alternately run a tube from the cap into a container of water.

Yeah an airlock would be best. I have since replaced the caps and tightened them. There isn’t any where near the activity of something like a “typical” ferment. I was just afraid to have major gas buildup in a glass container. I don’t really want to pick glass shards out of myself or the dogs haha.

I won’t be able to grab a picture today, but I wanted to give an update of what I saw this morning. The Winogradsky columns still don’t have much of a noticeable change. However, after only 4 days the “selective media” that doesn’t have the vinegar/LAB serum is very cloudy and has small filaments floating in it. The one with the LABs/vinegar had many small bubbles after the first day. I’m guessing this was respiration from the LABs. This trial is still relatively clear, and lacking in filaments. I acquired a few more bottles for running some more tests, as well as the PERFECT container for a new Winogradsky column. I’ll post some photos soon.
 

Microbeman

The Logical Gardener
ICMag Donor
Veteran
I was just afraid to have major gas buildup in a glass container. I don’t really want to pick glass shards out of myself or the dogs haha.

I was fermenting grape juice with water kefir microbes in glass bottles designed for this...supposedly; Beer bottles with the rubber and ceramic top held by a wire clasp. I had some bottles on the kitchen table for 2 days prior to going into the refrigerator.

I was sitting just around the corner in the living room with my dog and cat when BOOM!!....I thought someone was shooting at me through the window because that is where the glass hit...15 feet away. I was about to hit the floor for cover when my brain kicked in and realized it was an exploding bottle. The 3 foot corner of wall saved me and my pets from serious injury or death. I have been shot at in my life and this was every bit as frightening.

I no longer use glass for any fermenting.
 

h.h.

Active member
Veteran
It doesn’t ferment til it does.
You can also use a ballon over the top.

Useing an egg would add a bit of N to the mix aiding fermentation. If you don’t like raw, use hard boiled.
Yeah an airlock would be best. I have since replaced the caps and tightened them. There isn’t any where near the activity of something like a “typical” ferment. I was just afraid to have major gas buildup in a glass container. I don’t really want to pick glass shards out of myself or the dogs haha.

I won’t be able to grab a picture today, but I wanted to give an update of what I saw this morning. The Winogradsky columns still don’t have much of a noticeable change. However, after only 4 days the “selective media” that doesn’t have the vinegar/LAB serum is very cloudy and has small filaments floating in it. The one with the LABs/vinegar had many small bubbles after the first day. I’m guessing this was respiration from the LABs. This trial is still relatively clear, and lacking in filaments. I acquired a few more bottles for running some more tests, as well as the PERFECT container for a new Winogradsky column. I’ll post some photos soon.
 

Hookahhead

Active member
Yeah sorry for the confusion everyone, and thank you for your concerns. Just to clarify, only the Winogradsky column is in a sealed glass bottle. The other 2 experiments are in plastic bottles. I absolutely do not recommend sealed glass for normal fermentation, where a simple sugar source is being consumed rapidly by the microbes such as beer, kefir, kombucha etc.

However, after my initial panic I think I’m ok with the Winogradsky column. Cellulose is the only added sugar source, and this is much harder to break down. I don’t think an explosive amount of CO2 will be generated.

Champagne bottles are designed to hold pressure. If you used a regular cork, it should pop before the bottle ever has enough pressure. This is why the cork is wired on in champagne, and where the classic “pop” sound comes from when you open the bottle. For plastic, I would recommend soda bottles, which are also designed to hold pressure. Here we have plastic Coca Cola bottles that can be returned for a discount on a previously refilled one. These bottles are made with thicker plastic as they are intended for multiple uses.

Useing an egg would add a bit of N to the mix aiding fermentation. If you don’t like raw, use hard boiled.

From what I was reading, they recommended adding only an egg yolk. It was claimed that this was to be a source of sulfur for the sulfur bacteria. I added MgSO4 (Epsom salt), but this might not be the same since it’s a sulfate and not elemental sulfur.
 

Hookahhead

Active member
Selective Media - Day 5

Selective Media - Day 5

Selective Media - Day 5

picture.php


The one on the left is the selective media made using only MSG. The one on the right has MSG, vinegar, and LAB serum. As you can see the one on the left picked up some color today and looks kind of muddy/rust orange. Like I said, yesterday morning the left one was cloudy looking with many visible particles. I think we’re on to something here! The one on the right looks like it might just be starting to get cloudy? I’m happy with the speed these are progressing, thanks for following along!
 

Hookahhead

Active member
Quick Update: The Winogradsky column has a light brown color on the side facing the sun. There appears to be a small red spot near the top of the mud. Not much has changed in the cultures today. The vinegar one definitely has visible material floating in it. I suspect that the lower pH has caused things to slow down a bit. It’s also reasonable to think that it will probably be a bit more selective of the organisms that thrive in it.

I found an interesting paper that compares PNSB grown on synthetic medium, and that grown on organic medium. The organic medium was “fermented vegetable broth” that was diluted 1:3 before use.

Hydrogen-producing purple non-sulfur bacteria isolated from the trophic lake Averno (Naples, Italy)
The fermentation broth was obtained by the spontaneous fermentation of vegetable residues carried out by the microflora residing on the vegetables, as previously described [6]. The main products contained in the fermentation broth, depending on the stock, were: acetic acid (in the range 2.0-3.0 g/L), lactic acid (in the range 8.0-9.0 g/L) and ammonia (80-100 mg/L). Before being utilized for the experiments with PNSB, the fermentation broth was diluted 1:3 with distilled water and the pH was adjusted from 3.2 to 6.8 with NaOH.

Later on, in the discussion, we come across this:
When Rp. palustris AV33 was grown on a substrate derived from the spontaneous fermentation of vegetable residues, it showed a good capability to produce hydrogen, but the conversion yield in H2 of the lactate contained in the fermentation broth was 30.0%, a value much lower than that observed using the synthetic medium containing lactic acid. On the other hand, in the fermentation broth the growth of the cells was 2.2 times higher (510 against 232 mg/L) in comparison with that observed with the synthetic medium owing to the presence of ammonia and other nitrogen sources which directed the utilization of the acids solubilized in the broth towards the biosynthesis of new biomass instead of H2 production. It is also worth stressing the importance of the addition of Fe for obtaining good efficiencies in the conversion of the substrate in H2, as it was previously found in R. sphaeroides [27]. In this connection, it is worth mentioning that the structural genes encoding a large number of Fe-siderophore receptors and three different nitrogenases, including a Fe-nitrogenase, were shown to be present in the genome of Rp. palustris [3], thus confirming the great importance of Fe for its metabolism.

This is in our favor as we are looking to generate biomass instead of H2 gas. It cites another article published by the authors for the vegetable fermentation recipe.

From vegetable residues to hydrogen and electric power: feasibility of a two step process operating with purple non-sulfur bacteria.
The dark fermentation of the vegetable residues (16 kg of raw residues, coming from the central vegetable market of Florence, submerged in 35 L of distilled water) was carried out by the autochthonous chemoheterotrophic microflora residing on the vegetables; after 6–7 days, the fermentation ceased, owing to the complete consumption of the easily fermentescible substrates. The resulting stratified fermentation broth, containing lactic (3.0–6.5 g/L) and acetic (0.5–1.2 g/L) acids, ammonia40–60 mg/L) and small amounts of ethanol (0.0–0.2%, v/v), was collected and sterilized; the pH of the broth (pH 3) was corrected to 6.8. During this process the colour of the broth changed from yellow to dark brown-black. For this reason, and in order to decrease the ammonia concentration, the fermentation broth was diluted with distilled water until ammonia concentration reached a value of 30 mg/L. After the dilution, the concentration of the other soluble products was: lactic acid 2.6 g/L, acetic acid 0.6 g/L and ethanol 0.02% (v/v).

This is a promising lead to move us into 100% organic PNSB cultivation. We could use LAB ferments, Vinegar ferments, or anaerobic fermented plant teas as our nutrient media. I was already heading that direction, but it’s nice to see the idea backed in the literature.
 

Hookahhead

Active member
Just a few updates...

Winogradsky columns, Day 13
picture.php


There are definitely things growing in there. Doesn’t look like it will be very useful for extraction/isolation however. I will continue to post weekly updates just to watch how it develops.

Winogradsky column, Day 1
picture.php


I made a new column today using slight revisions on the previous trial. I mixed the egg crate, egg shells, and Epsom salt with the mud same as before. However, this time I used a much smaller layer of mud. I added a nice layer of dry sand on top of that. In hindsight I should have let the water settle more before adding the sand. You can see a layer of fine mud is forming on top of the sand as it settles out. I left a lot larger water column this time as I hope it’s more conducive to growing and collecting the PNSB. I also left a small section of air this time too. It’s housed in a sealed glass bottle.

Selective media, Day 9
picture.php


I moved these to an area that gets a short amount of direct sun, instead of entirely indirect lighting. It seems to have worked. I would call the one on the left a success, although it’s more orange than purple/pink/red that I was expecting. This was made using the basic formula with MSG a few posts back. The red capped one never got past the cloudy stage; this is the one that has the vinegar, LABs, and MSG. I think I am going to use the one on the left to inoculate a larger bottle of media.

Selective media, Day 1
picture.php


I put together two more selective media experiments. Both of them were made in a similar fashion as the previous examples. The 1L bottle on the left (white cap) was made following the basic recipe, except the MSG was omitted. Instead 30ml of 4% vinegar was added. It had a pH of 5.0. The 600ml bottle on the right (blue cap) was made following the basic recipe, except that the MSG was doubled to 2g/L. The pH was 6.5.

As always thanks for following along. I encourage others to give this a try. Material cost is only a few pennies, and it’s still warm enough to collect your samples. Also if anyone has any ideas for experiments they would like me to run let me know!
 

St. Phatty

Active member
https://en.wikipedia.org/wiki/Winogradsky_column

Carbon Source + Calcium Carbonate (egg-shells) + Calcium Sulfate (got loads of that)

I was wondering if this means there's a way to enhance my madrone leaf pond. Madrone leaves (carbon source) soaking in water.

Right now the wild birds love it, they come to drink & take baths.

I was going to seed it with some redworms.

Why the emphasis on Calcium ?

If we're building a Primo food supplement for Cannabis - what about Nitrogen, P, K, and Mg ?

If the Winogradsky mix goes a little acidic, would it be allright to add lime ? = more calcium + some magnesium.
 

Hookahhead

Active member
St. Phatty, a Winogradsky column should mimic what is occurring naturally in your pond. The column is just a way to visualize this process. By adding the inputs you have on hand, you may be able to increase the bio activity in the pond.

I’d also like to point out that I am not trying to make an ultimate plant food here. I’m trying to find different medias to cultivate micro organisms that are possibly beneficial to the soil health. I have focused mostly on the purple non sulfur bacteria thus far.

Selective media experiment #1 - Day 14
picture.php

After 2 weeks I think we can end this trial. The media on the left is the basic mix, and appears to be successful. Hopefully I can get some images under a microscope in a few days. I also plan to use this to trial to inoculate more media and expand the culture. The one on the right I’m considering a failure, nothing seems to be progressing further in this bottle.

Selective media experiment #2 - Day 5
picture.php

The bottle on the left (white cap) has vinegar and no MSG. Aside from a few bubbles observed after the first day, nothing more appears to be happening. The bottle on the right (blue cap) has 2x the amount of MSG. It turned cloudy 2 days ago, and today I can see a small amount of orange on the bottom. It looks like it will proceed similar to the white capped bottle above.

I am still trying to find other “selective” carbon sources to try other experiments. From what we’ve observed so far, acetic acid does not seem to be a good food source for the local species I’m collecting.
 

Hookahhead

Active member
Winogradsky column - Day 24
Well as you can see, there is definitely stuff growing. Now I understand why more people aren’t talking about using this tool. It’s great for demonstration, but that’s about it.
picture.php


Winogradsky column - Day 11
Terrible picture, sorry. Green algae have tinted the water layer green. Not much going on in the substrate.
picture.php


Selective media - Day 11
The selective media is definitely the way to go. This turned orange 2 days ago (on day 9), same as the last one. It starts at the bottom a day or 2 before, then the whole thing is colored. It would be interesting to see this period in a time lapse. Again the vinegar showed no activity. I’m not sure how to explain this as I found a few published papers suggesting acetic acid as a food source. I might try one more time with an even smaller amount, or perhaps try buffering it.
picture.php
 

Hookahhead

Active member
Ok so here’s the first 2 experiments officially ending together. I think this is day 25 for the first one and day 16 for the second? I decided to put the two “successful” trials together for comparison instead of using chronological order.

picture.php


The round white cap bottle on the far left of the picture is the “base” mix (pH 6.5). The bottle with the blue cap next to it is the base mix with 2x the MSG. (pH 6.5). The tall bottle with the red cap is the base mix, with added vinegar and LAB serum (pH 4.5). The square bottle with the white cap on the right is the base with without MSG and with 30mL 4% vinegar (pH 5.0).

The base mix had good results and turned a nice reddish orange color. The one with 2x the MSG seems a little bit more saturated, and there appears to be more sediment on the bottom of the container. The LAB, vinegar, MSG mix has some white sediment that you can see in the photo. The last one lacks MSG and LAB serum, and shows very minimal sediment.

On a whim, I decided to inoculate the LAB, vinegar, MSG mix with 1 tablespoon (15ml) of the “base” nutrient bottle that’s the same age. Likewise I inoculated the square bottle with 15mL from the blue cap bottle.

Both of the “successful” trials smelled like sulfur. Not like rotten eggs, farts, or offensive. It smelled more like burnt black powder, think of burnt out fire work casings. I’m thinking maybe this is more elemental sulfur than Hydrogen sulfide, but I don’t know? Both bottles also had a small amount of pressure released upon opening. I forgot to smell the red capped bottle before adding the inoculant. It smelled the same as the inoculant afterwards, so that’s not a fair assessment. The vinegar only bottle smelled like a swimming pool. This is probably due to chlorine gas from the salt (NaCl). Neither bottle had built any pressure. I don’t currently know what any of these observations tell us, but I figured it was good to document it haha.

I also made up 3L of the base nutrient without any substitutions. I inoculated this with 15mL from the bottle on the white capped base nutrient bottle.

picture.php
 

Hookahhead

Active member
Culture expansion - Day 2

The 3L is cloudy already!
picture.php


The 2 failed bottles might be showing a bit of change, but nothing definitive.
picture.php
 

Latest posts

Latest posts

Top