What's new
  • Happy Birthday ICMag! Been 20 years since Gypsy Nirvana created the forum! We are celebrating with a 4/20 Giveaway and by launching a new Patreon tier called "420club". You can read more here.
  • Important notice: ICMag's T.O.U. has been updated. Please review it here. For your convenience, it is also available in the main forum menu, under 'Quick Links"!

ReikoX's Workshop Rebuild 2020

ReikoX

Knight of the BlackSvn
Part I - The Layout

So I've been wanting to upgrade my grow room for over a year now. My original plan was to redo the room after I got my yearly bonus. Unfortunately life got in the way, funds ran out, and I just kept growing.

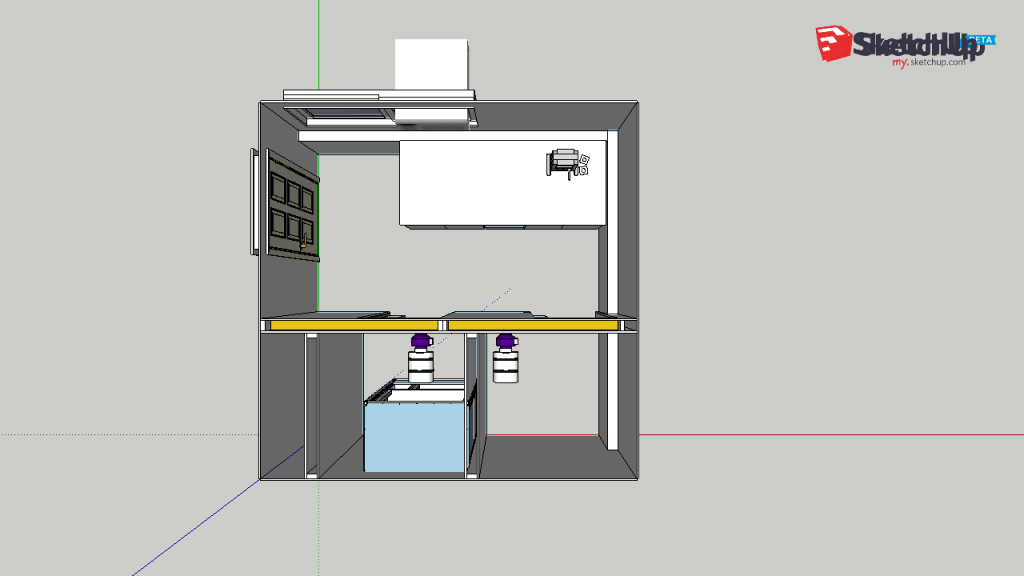
Let's start with what my workshop looks like currently. This is a top down view. The top and right side walls are exterior walls, 3' underground. The other two walls are adjacent to living spaces in the 1/2 basement.

There are a couple of things that I don't like about this room. First are the interior walls of the room itself. The walls themselves are framed, but instead of having sheetrock on them, they have paneling. I've hated this damn paneling since I moved in. Another issue I have is the door frame is about three inches too tall. This leaves a huge gap under the door.

picture.php

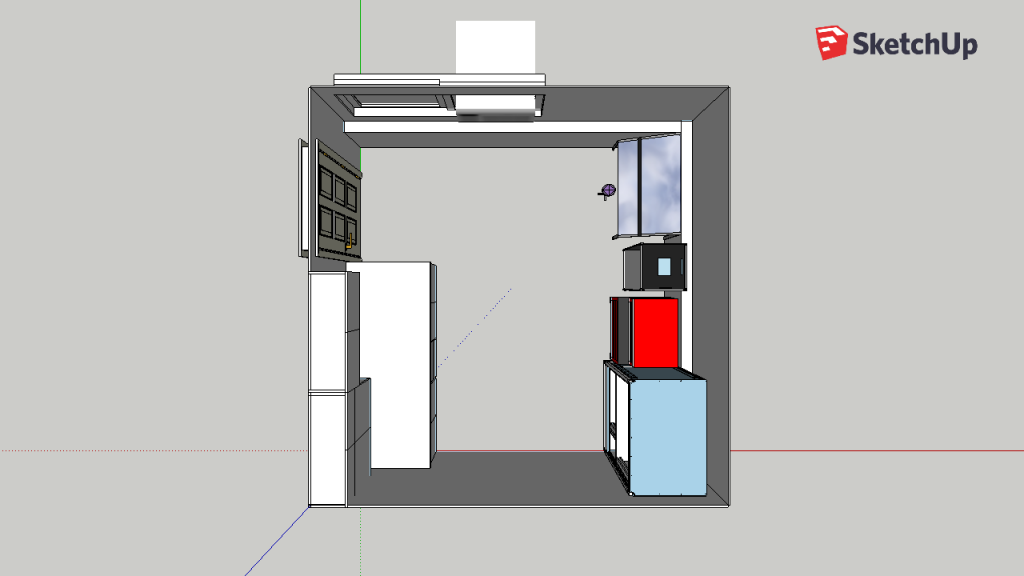
Workshop - current configuration

I have been trying to figure out the layout for quite some time now. I've started a discussion with @Mr.Sparkle about the layout of the room. The room is essentially 10' x 10'. My original idea was to split the room up with two 5' x 5' rooms. But I didn't want to get rid of my workbench or cab. I've grown attached to the no-till cab and the workbench is awesome for pressing rosin etc. The problem with this layout is there is not only 1' 10" between the workbench and the wall, but I could fit my other cab in the "veg" side. This layout also required the use of pocket doors because there is no way to open the doors with only 22" of clearance.

picture.php

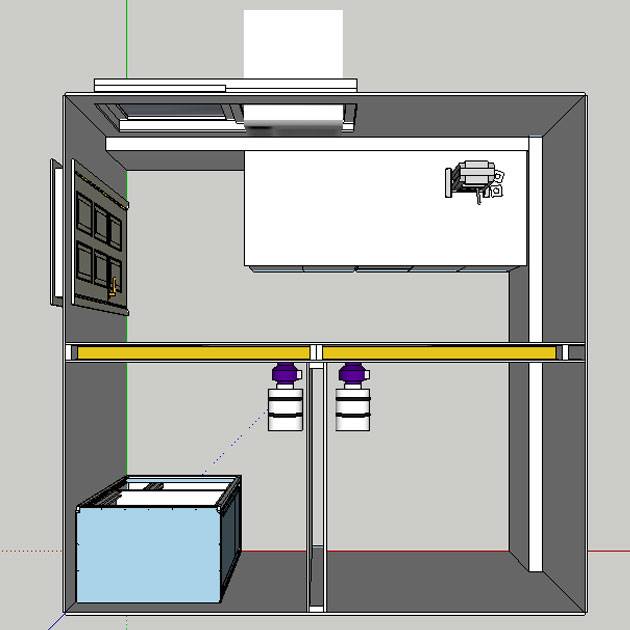
Workshop - version 1.3

The next thing I tried was cutting the workbench in half and turning it 90 degrees. I didn't like the idea of cutting the workbench, plus it left a lot of unusable space in the grow room. It did solve the issue of having to use the pocket doors though.

picture.php

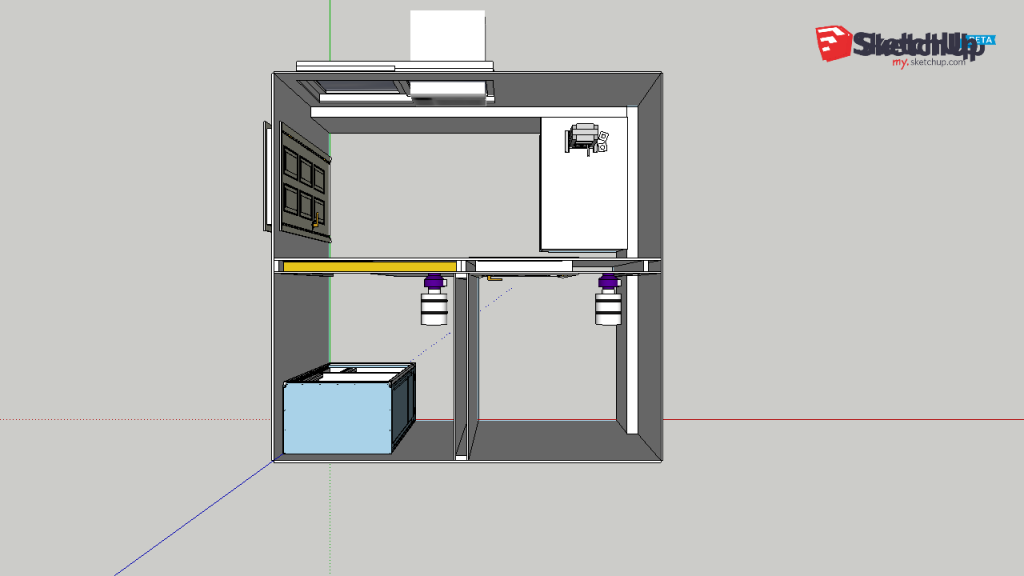
Workshop - version 1.4

After some thought, I decided maybe it would be better to run a 4' x 5' room instead of a 5' x 5' room.. It would give me more room to keep the workbench and still be plenty of room to grow. Now we are getting somewhere.

picture.php

Workshop - version 1.5

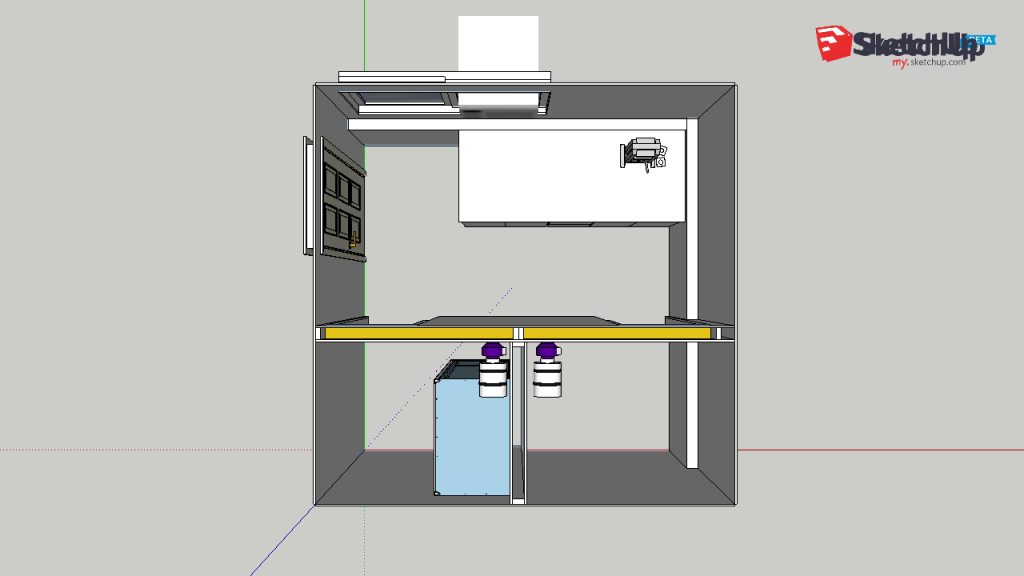
I figured a 4' x 4' grow area would be easier to light, so I played with having two 4' x 4' areas and a small drying area. I didn't really have enough room for the drying closet, it was only about 14" wide, not very useful.


Workshop - version 1.6
picture.php
 

ReikoX

Knight of the BlackSvn
That's when @Mr.Sparkle suggested doing a 60/40 split of the area. This gives me a little bit more room in the veg area, I can put up cabinets or tents for drying and use this area for autos as well. Once I saw the sketch, I was sold.

picture.php

Workshop - version 1.7

A while later, while smoking a doobie in the workshop, I was trying to visualize the space. I grabbed my tape measure and had a wonderful discovery. My room is actually closer to 10' x 11.5'. This gives me a whole lot more room than I thought. In fact, I can turn that workbench around without having to cut it. Finally, I decided I wanted to run a bigger flower side than the veg side. After a few more iterations, I settled on this design.

picture.php

Workshop - version 2.4
 

blynx

WALSTIB
Moderator
ICMag Donor
Veteran
Very cool!
Is this a long-term project? section by section? or all at once?
 

GOT_BUD?

Weed is a gateway to gardening
ICMag Donor
Veteran
Personal opinion, but I've always felt it was a huge pain in the ass to only be able to reach one side of the plants. I want to be able to get to opposite sides or make the plant easily movable. Makes it way easier to defol, water, inspect, etc. But with living soil, you need to have a bed or a good sized pot. I didn't want beds in my big room, so I went with 25 gallon smart pots and built rolling bases for them.

How are you going to grow in your new flower room?
 

ReikoX

Knight of the BlackSvn
Personal opinion, but I've always felt it was a huge pain in the ass to only be able to reach one side of the plants. I want to be able to get to opposite sides or make the plant easily movable. Makes it way easier to defol, water, inspect, etc. But with living soil, you need to have a bed or a good sized pot. I didn't want beds in my big room, so I went with 25 gallon smart pots and built rolling bases for them.

How are you going to grow in your new flower room?

I'm thinking along the same lines as you. The plan is to make three 35-gallon beds on a rolling base. That way they will they still fit through the door, and are kept off the cold floor.
:good:
 

ReikoX

Knight of the BlackSvn
Part II - Flowering

Now that I have the layout pretty much worked out, I turned my attention to the flowering room. This past year, I have experimented with a couple of different methods of growing, but still prefer the no-till bed. I really enjoy the process of feeding my plants by hand, it allows me to spend some time observing the plant for issues. Spending time with my plants is very therapeutic for me. Back when I was thinking of doing a 4' x 4' room, I knew I wanted to do a living soil, but I was torn between doing four 25-gallon pots or one 100-gallon pot.

picture.php

Workshop - version 1.7.1 - four 25-gallon pots

picture.php

Workshop - version 1.7.2 - one 100-gallon pots

Once I settled on the 4' x 6' room, I realized this is basically three 2' x 4' areas combined, This is roughly the same size as my no-till cabinet, so I decided on three no-till beds on castors. This way, I can easily move the beds for maintenance and cleanup. This setup would also allow me to run perpetually if I wanted to, but I have preferred to run full cycles in the past. The plan for the bed is to have a base made of wood and covered in pond liner. This will then have a custom made 30-gallon fabric bed that fits inside the base, just like I made for my previous cab. The base will allow the bed to be moved as well as catching any runoff that may occur.

picture.php

Workshop - version 2.10

With the soil beds all figured out, I turned my attention to the lighting. I was debating building a ChilLED light kit or getting a Fluence SPYDRx. The issue is, these are both designed for a square area like a 5' x 5'. So, I started taking inventory of what I currently have. I already have two identical lights for my workbench, and the parts to build a third. The only thing I'm missing is an extra HLG-240H-24B driver. I decided that, since I wouldn't have to pay for a whole new light rig, I would experiment with some supplemental lighting. I decided to run two Emerson boards, and two Exotic Spectrum boards from Rapid LED.

picture.php

Workshop - version 2.10-flowering

The following illustration shows the light and the different spectrum I have available. The layout is such that each bed will have a ladder style light over it and the supplemental spectrum boards on the side. Starting with the rack, each rack has six 2700K SolStrips (yellow) for flowering and three 5000K Solstips (blue) for veg running at at 40W each. The supplemental spectrum boards each run about 30W and both have two channels that can be independently controlled with a PWM controller. The Emerson board (red) has a combination of Photo Red (650-670nm) and Far Red (720-740). The Exotic Specturm board (purple) has a combination of UVA (390-400nm) and Infrared (840-870nm). With these, and my Bluefish LED controller, I will be able to dim each channel of lights independently. This will allow me to do things such as adding far red before lights on and lights off, simulating sunrise/sunset, and changing spectrum and intensity for flowering and veg. Each of these channels (represented by a different color) will also be able to be turned on and off independently using a Sonoff wireless timer.

picture.php

Workshop - version 2.10-flowering lights

Exhaust is still a work in progress, but the plan is for a ACInfinity Cloudline T8 with carbon filter and a couple oscillating fans for circulation. This will be covered in more detail later along with electrical.
 

packerfan79

Active member
Veteran
Part II - Flowering

Now that I have the layout pretty much worked out, I turned my attention to the flowering room. This past year, I have experimented with a couple of different methods of growing, but still prefer the no-till bed. I really enjoy the process of feeding my plants by hand, it allows me to spend some time observing the plant for issues. Spending time with my plants is very therapeutic for me. Back when I was thinking of doing a 4' x 4' room, I knew I wanted to do a living soil, but I was torn between doing four 25-gallon pots or one 100-gallon pot.

View Image
Workshop - version 1.7.1 - four 25-gallon pots

View Image
Workshop - version 1.7.2 - one 100-gallon pots

Once I settled on the 4' x 6' room, I realized this is basically three 2' x 4' areas combined, This is roughly the same size as my no-till cabinet, so I decided on three no-till beds on castors. This way, I can easily move the beds for maintenance and cleanup. This setup would also allow me to run perpetually if I wanted to, but I have preferred to run full cycles in the past. The plan for the bed is to have a base made of wood and covered in pond liner. This will then have a custom made 30-gallon fabric bed that fits inside the base, just like I made for my previous cab. The base will allow the bed to be moved as well as catching any runoff that may occur.

View Image
Workshop - version 2.10

With the soil beds all figured out, I turned my attention to the lighting. I was debating building a ChilLED light kit or getting a Fluence SPYDRx. The issue is, these are both designed for a square area like a 5' x 5'. So, I started taking inventory of what I currently have. I already have two identical lights for my workbench, and the parts to build a third. The only thing I'm missing is an extra HLG-240H-24B driver. I decided that, since I wouldn't have to pay for a whole new light rig, I would experiment with some supplemental lighting. I decided to run two Emerson boards, and two Exotic Spectrum boards from Rapid LED.

View Image
Workshop - version 2.10-flowering

The following illustration shows the light and the different spectrum I have available. The layout is such that each bed will have a ladder style light over it and the supplemental spectrum boards on the side. Starting with the rack, each rack has six 2700K SolStrips (yellow) for flowering and three 5000K Solstips (blue) for veg running at at 40W each. The supplemental spectrum boards each run about 30W and both have two channels that can be independently controlled with a PWM controller. The Emerson board (red) has a combination of Photo Red (650-670nm) and Far Red (720-740). The Exotic Specturm board (purple) has a combination of UVA (390-400nm) and Infrared (840-870nm). With these, and my Bluefish LED controller, I will be able to dim each channel of lights independently. This will allow me to do things such as adding far red before lights on and lights off, simulating sunrise/sunset, and changing spectrum and intensity for flowering and veg. Each of these channels (represented by a different color) will also be able to be turned on and off independently using a Sonoff wireless timer.

View Image
Workshop - version 2.10-flowering lights

Exhaust is still a work in progress, but the plan is for a ACInfinity Cloudline T8 with carbon filter and a couple oscillating fans for circulation. This will be covered in more detail later along with electrical.

Those ac infinity fans are awesome, incredibly quiet. I love mine. The controllers are really nice to.
 

ReikoX

Knight of the BlackSvn
Part 3 - Veg

With flowering taken care of, let's turn our attention toward the veg room. Since I decided against running a perpetual, I don't need much room in here. Basically, this will be a place to keep my mothers and some clones. The plan is to keep mothers in two-gallon fabric pots and stack them vertically on shelves. Each shelf will have some Bridgelux eb gen2 strips over them and hold two standard 10" x 20" garden trays. Each tray holds two of the pots, leaving me with about 12 mothers at any given time.

An oscillating fan for circulation and a 4" exhaust fan to keep smell down. I debated simply pulling the exhaust though the veg room. I have had good luck with this in the previous designs.

picture.php

Workshop - version 2.10-veg

Inside the veg room, I decided to keep all of the LED drivers and other electronics inside an 24" x 20" electronics enclosure. Each of the SolStick racks is controlled by a HLG-240H-24B (flower) and a HGL-120H-24B (veg) driver. Each driver will have it's own designated channel on one of the Sonoff 4CH 4-channel along with the outlets and, possibly, a ceiling light in each room. I will need to make room for another power supply for the supplemental spectrum boards and the Bluefish LED controller as well as all the wiring to go along with it. It is going to be a tight fit.

picture.php

Workshop - version 2.10-veg - electronics enclosure
 

ReikoX

Knight of the BlackSvn
I spent some time modeling up the no-till beds. The base 36" x 18" x 3" and is made of 1/4" plywood. The bed itself is 35" x 17" x 12" and is made of fabric with a PVC frame. It should hold about 30 gallons of soil. By using the PVC frame, I can make a ScrOG or a trellis as needed. Here is an example of a trellis at 24" with 4" spacing. This way everything can stay modular and I can move all the plants through the door easily.

picture.php

36" x 18" no-till bed

picture.php

Workshop - v2.10 - door clearance

I spent a bit of time trying to [virtually] rearrange the workshop. During the process, I noticed the toolbox and the mini fridge were not really to scale, so I fixed that. Then I went ahead and put in markings for where the doors will open. The only way I could move the workbench from where it is, it really is almost like I made it to fit there, would be for me to switch the flowering and veg rooms. While it does make the door placement much easier to work with in the flower room, the lung room just looks so much move cumbersome.

picture.php

Workshop - v2.11.1

picture.php

Workshop - v2.11.2
 

ReikoX

Knight of the BlackSvn
Spent some time looking at the specs for ventilation. First let's look at the flower room. The flower room is 4' x 6' x 7', so that works out to 168 cubic feet. Since I wont be using CO2, I should try and hit two air changes per minute, or 336 CFM. The room will be powered by a maximum of 1200 watts of LED lighting. Borrowing the calculations for HPS from the Ventilation 101 thread here on ICMag, I need about 380 CFM to maintain a 10° F temperature difference. Those calculations are for HPS, but a watt is a watt right?


The AC Infinity Cloudline T6 is capable of 402 CFM, while the T8 is capable of 740 CFM. At first, the AC Infinity Cloudline T6 seems more suited for my space than the T8. There are a couple of issues with using the T6 which was brought up by @Jellypowered and @Mr.Sparkle. First issue, is the loss of CFM due to a filter. The Cloudline series doesn't have a whole lot of static pressure. The second issue is running the T6 all of the time at full speed instead of running the T8 at a lower speed. Finally the difference in cost. Buying the T8 is about $50 USD more, but if I bought a T6 then needed to buy a T8 I would have to spend about $200 USD more. That's just for the fan, not considering the cost of the filter.
 

ReikoX

Knight of the BlackSvn
Today I spent most of the day disassembling the no-till cabinet. I hat previously removed the light, fan, filter, and no-till bed.

Today I am removing the interior structure. Like most things, I over engineered this cabinet. While disassembling it, I took note of things that worked well, and things that didn't.

The interior electronics were all run through conduit. This ended up working well in the long run. The lights definitely bleached some wires and connectors that were not in the conduit. I removed those and the interior doors on the flower chamber.
picture.php


Underneath the reflectix was some panda film. This didnt work as I wanted originally, but did keep moisture away from the sound deadening board. It has almost a cardboard texture. The panda film didnt work too well for the floor. I had a couple floods and that was starting to decompose.
picture.php


Another thing that worked **very well** was this light trap. It would work very well for an exhaust or intake between two rooms. It being on the floor didnt work, however. It was getting clogged with spilled leaves and dead worms. It is pretty funny, I can tell worms made it from the no-till to my mothers below.

Something thing that didn't work was having the electronics below the flowering chamber. Luckily I never had an issue, but I did get runoff dripping from flower down to veg a couple times. The runoff was able to travel through the light traps.
picture.php
 

ReikoX

Knight of the BlackSvn
With the reflectix and panda film removed, the next layer to this puzzle is this sound deadening board. I painted it with KillZ to prevent it from molding, but I'm certain the panda film would have been enough. This is something that didn't work so well. The majority of the noise the cabinet made was from the exhaust, and the sound deadening board did nothing to eliminate that.
picture.php


Finally, we are getting to the interior frame. This frame is screwed together and glued to the walls. Then the gap is filled with insulation foam. This is something that worked great. Not only did it keep the temperature easy to manage, but it nullified a lot of vibrations.
picture.php


Now the cabinet is empty. I can start to take it apart and dispose of the frame. I plan to move the cabinet itself into storage, I may find a use for it some day.
picture.php
 

tobedetermined

Well-known member
Premium user
ICMag Donor
420giveaway
All very cool, reiko. I am following along . . .

Btw I love the press in your diagrams. I was trying to figure out what it was from the overhead drawings. :bow:
 

ReikoX

Knight of the BlackSvn
I got the storage cabinet taken completely apart and moved into storage, under the house. I just couldn't being myself to throw it I'm sure I will find a use for it someday.
picture.php


I got the interior pieces broken down and ready to take to the dumpster. I ended up saving the wood frame, but cutting down the foam board and sound deadening board.
picture.php


It's amazing how dirty it got behind that cabinet in the last five years or so. I can only imagine what the workbench looks like under it too. This is one thing I wont have to worry about in the new room.
picture.php


I'll be packing all this stuff up in boxes and putting it in storage as well. Some of this will probably be used in the new room.
picture.php
 

ReikoX

Knight of the BlackSvn
While I'm working on the workshop, I have my bonsai mothers in a 16"x16" tent. They were getting quite crowded, so I had to give them a trim. I usually have to do this every couple of weeks.
picture.php


The tent is powered by a 50W LED panel, has a 4" inline fan, and a webcam in it. I just recently added the 6" oscillating circulation fan because the tent wasn't getting warm enough to kick on the extraction fan enough.
picture.php
 

ReikoX

Knight of the BlackSvn
I removed my environmental controls from the workshop. So, I went ahead and packed up my 16" x 16" tent and moved it into my upstairs bathroom.
picture.php


With the 16" x 16" tent out of the way, I also cleared off the drafting table that sat in this corner. My next step will be to remove that shelf. I will also move the toolbox out of the way.
picture.php


This wall is one of the two walls that need to be torn down. I'm hoping the framing is up to code, or it could be a bigger job than I had hoped for.
picture.php


This wall will also need to be torn down. I'll be moving the workbench out of the way and removing the cabinets soon. I am hoping to re-use the cabinets over the workbench. My stash box and rosin press will stay in the workshop during the rebuild.
picture.php
 

ReikoX

Knight of the BlackSvn
Started a little bit of demolition on the workshop. Last week I removed the shelf that was against the west (outside) wall. Apparently this was part of the original construction. The sheetrock wasnt finished and there were no ceiling tiles under it.
picture.php


Turns out the east (interior) wall was sheetrock on the inside of the workshop, and is definitely wood panel on the other side. This had to have be some of the thinnest sheetrock I have ever seen (1/4"?) I'm seriously considering replacing the sheetrock on both sides at once.

I also plan on moving that electrical outlet. I want to replace it with a switch. The switch for the light in this room also controls the light in the family room. I also want to relocate that switch to the family room, it is currently in the laundry room.
picture.php


The north (interior) wall was masonite on the inside of the wall. This wall is already insulated and has OSB behind the insulation. So that should make replacing the paneling in the other room fairly easy.
picture.php
 
Top