
MPD's $42 Super Stealth Fan Muffler DIY Tek w/Loads of Pics
________________________________________
There is nothing more annoying (or downright scary!) than a grow room or cabinet that isn't quiet stealthy. Security demands that we keep things quiet so that nosy people find something else to be nosy about or so that stealth cabinets remain that way. The purpose of this thread is to show you how I designed and built a cabinet muffler designed to reduce the fan noise in my customer growing cabinet to absolute zero. Nothing heard from outside!
I don't know how it will work for your particular fan, but I guarantee you it will be a lot less noisy. You may have to mount a fan box (PM me and I'll help you do that too) and a pre-muffler to make sure your noisy centrifugal fan doesn't give away the game. Follow along and take advantage of the time I took to document this project.
I bought all of the supplies at the local Lowe's. You can find the same things at Home Depot, so either place will work just fine.
First, the material list:
1 - 3" x 5' section of water pipe - $9.18+tax.
2 - 4" to 3" pipe reducers/couplers - $13.22+tax.
1 - 16" by 48" fiberglass wrap insulation package - $5.58+tax
1 - roll of duct tape - $2.99+tax
1 - Tyvek Painter's Smock (Dupont) - $3.99+tax
1 - 1" Hole Saw - $5.87+tax
1 – 3/16” Drill Bit - $1.99+tax
----------------------------------------------------------
You will also need the following:
An electric drill that will accommodate the bit.
A jig saw or hack saw (to cut the pipe)
A hammer
A cardboard shirt box top
A tape measure
A Sharpie marking pen
A pencil
A ruler
A sheet of paper 8-1/2"x11"
Scotch tape
----------------------------------------------------------
I will provide an overview of this muffler project by going through the specifications first, then the actual tek. This is a 12" plastic and fiberglass muffler designed to create an exhaust noise dead zone on the output side of my custom grow cabinet. Silence is important because my grow cabinet sits right in our family room with a 40" HDTV on top of it. This is a focal area in the house and we can't have any noise from the fan system going! I have noticed a slight amount of humming that is covered by the television, but when the television is off you can hear a slight background hum like you would hear from a refrigerator, only less so. So enter the muffler project. This will sit between the fan and the aluminum can filter which will sit in a box and the box will be connected to the outside of the box. Can filters slightly increase the noise of the fan, so we need to eliminate the noise on that side of things. If the fan still makes noise after that I will create a pre-muffler for the intake side of the fan.
So the operation here is to create a muffler body out of a piece of 3" pipe by drilling 1" holes along the pipe. We will then wrap it extra tight with fiberglass insulation. We will wrap the fiberglass insulation with Tyvek (smell insurance) and then wrap the entire body of the muffler with a layer of cardboard. Reducer/couplers on either end will complete the project!
So, let's get started!
-------------------------------------------------
Step One – Create the Drilling Template
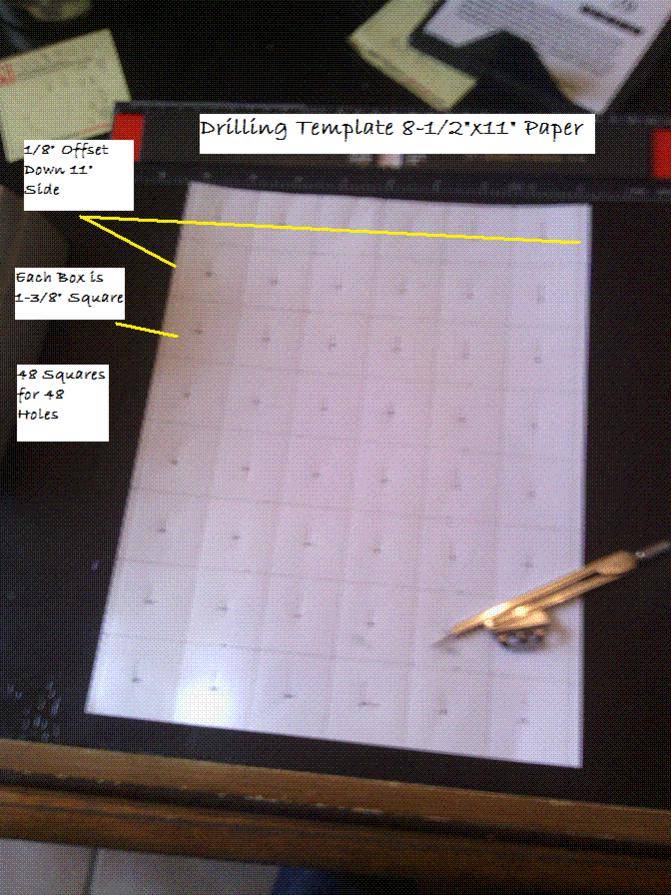
The object of this step is to create a template that will be used to mark the pipe so that starter holes can be drilled and then (eventually) the 1” holes will be drilled. A regular 8-1/2” by 11” sheet of paper wraps around a 3” pipe perfectly – did you know that? Well, if you follow this tek you will soon see this for yourself. The template is a grid and the grid is made up of 8 rows of 6 holes (48 total holes to be drilled). To lay out the holes we lay them out in 1-3/8” by 1-3/8” square boxes. They won’t quite fit correctly across, so you have to first take a ruler and mark off an 1/8” on each of the LONG SIDES of the paper (note the picture below). Once that is done you can start laying out your rows of “hole boxes”. When you are done you should have a grid of 48 boxes on your paper. Once you have the boxes you need to find the center point of each box. Once you have marked the center point you have to punch a small hole in the center. This is so that the Sharpie pen can be used to mark through the paper and on to the pipe itself. I used the pointy end of a common compass to do this task. When you are done it should look like what I have here in the picture (more or less).
Picture of Paper Template
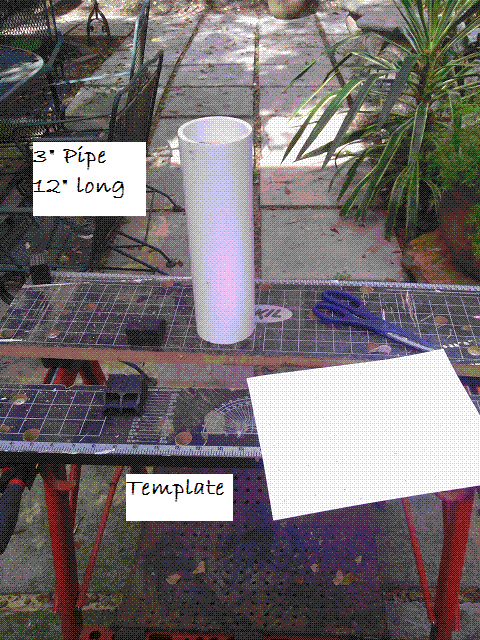
Step Two – Measure & Cut the Pipe
The object of this step is to measure and cut the pipe to the right size. You will need the pipe, the Sharpie marking pen, the measuring tape and the jig saw (or hacksaw if you don’t have a jig saw). Now I set up my project on a sawhorse for stability and I want you to be careful when you are cutting things, so use a sawhorse if you can. Take the pipe and from one end measure off a 12” segment. Mark all the way around the pipe and then take your jigsaw and cut the pipe so that you have a 12” piece to work with. Set the remaining 4’ section of pipe to the side. You are done with it.
Picture of Cut Pipe
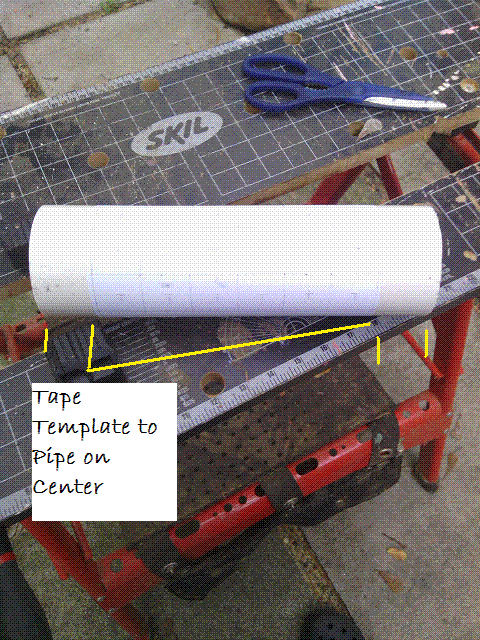
Step Three – Mount the Template & Mark the Holes
The object of this step is to get the template properly mounted on the pipe and then get the hole locations marked using our Sharpie. Take the sheet of paper and align it on the pipe so that the template is in the middle (more or less – no need to be anal about it unless you want to). Tape one end and then wrap the sheet all the way around the pipe until the lines line up at either end, then tape the other end of the template.
Picture of Pipe with Template Mounted
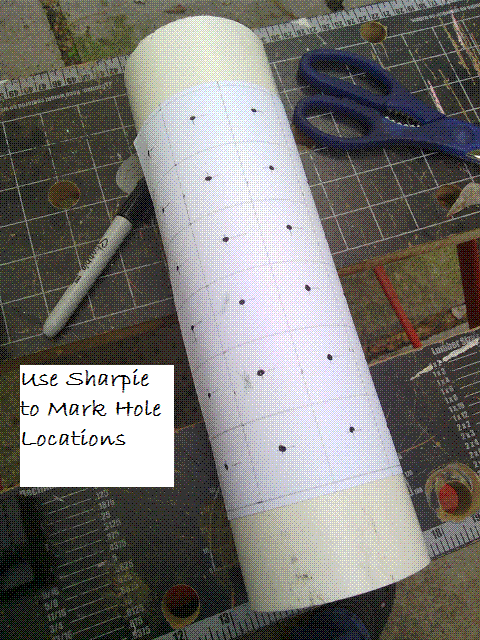
Once you have that done you can go ahead and take your Sharpie marking pen (or other permanent pointed magic marker) and mark each hole location so that you have the pen marking the paper and the pipe. You are now ready to drill.
Picture of Pipe and Template with Guide Holes Marked with Sharpie Pen
________________________________________
There is nothing more annoying (or downright scary!) than a grow room or cabinet that isn't quiet stealthy. Security demands that we keep things quiet so that nosy people find something else to be nosy about or so that stealth cabinets remain that way. The purpose of this thread is to show you how I designed and built a cabinet muffler designed to reduce the fan noise in my customer growing cabinet to absolute zero. Nothing heard from outside!
I don't know how it will work for your particular fan, but I guarantee you it will be a lot less noisy. You may have to mount a fan box (PM me and I'll help you do that too) and a pre-muffler to make sure your noisy centrifugal fan doesn't give away the game. Follow along and take advantage of the time I took to document this project.
I bought all of the supplies at the local Lowe's. You can find the same things at Home Depot, so either place will work just fine.
First, the material list:
1 - 3" x 5' section of water pipe - $9.18+tax.
2 - 4" to 3" pipe reducers/couplers - $13.22+tax.
1 - 16" by 48" fiberglass wrap insulation package - $5.58+tax
1 - roll of duct tape - $2.99+tax
1 - Tyvek Painter's Smock (Dupont) - $3.99+tax
1 - 1" Hole Saw - $5.87+tax
1 – 3/16” Drill Bit - $1.99+tax
----------------------------------------------------------
You will also need the following:
An electric drill that will accommodate the bit.
A jig saw or hack saw (to cut the pipe)
A hammer
A cardboard shirt box top
A tape measure
A Sharpie marking pen
A pencil
A ruler
A sheet of paper 8-1/2"x11"
Scotch tape
----------------------------------------------------------
I will provide an overview of this muffler project by going through the specifications first, then the actual tek. This is a 12" plastic and fiberglass muffler designed to create an exhaust noise dead zone on the output side of my custom grow cabinet. Silence is important because my grow cabinet sits right in our family room with a 40" HDTV on top of it. This is a focal area in the house and we can't have any noise from the fan system going! I have noticed a slight amount of humming that is covered by the television, but when the television is off you can hear a slight background hum like you would hear from a refrigerator, only less so. So enter the muffler project. This will sit between the fan and the aluminum can filter which will sit in a box and the box will be connected to the outside of the box. Can filters slightly increase the noise of the fan, so we need to eliminate the noise on that side of things. If the fan still makes noise after that I will create a pre-muffler for the intake side of the fan.
So the operation here is to create a muffler body out of a piece of 3" pipe by drilling 1" holes along the pipe. We will then wrap it extra tight with fiberglass insulation. We will wrap the fiberglass insulation with Tyvek (smell insurance) and then wrap the entire body of the muffler with a layer of cardboard. Reducer/couplers on either end will complete the project!
So, let's get started!
-------------------------------------------------
Step One – Create the Drilling Template
The object of this step is to create a template that will be used to mark the pipe so that starter holes can be drilled and then (eventually) the 1” holes will be drilled. A regular 8-1/2” by 11” sheet of paper wraps around a 3” pipe perfectly – did you know that? Well, if you follow this tek you will soon see this for yourself. The template is a grid and the grid is made up of 8 rows of 6 holes (48 total holes to be drilled). To lay out the holes we lay them out in 1-3/8” by 1-3/8” square boxes. They won’t quite fit correctly across, so you have to first take a ruler and mark off an 1/8” on each of the LONG SIDES of the paper (note the picture below). Once that is done you can start laying out your rows of “hole boxes”. When you are done you should have a grid of 48 boxes on your paper. Once you have the boxes you need to find the center point of each box. Once you have marked the center point you have to punch a small hole in the center. This is so that the Sharpie pen can be used to mark through the paper and on to the pipe itself. I used the pointy end of a common compass to do this task. When you are done it should look like what I have here in the picture (more or less).
Picture of Paper Template
Step Two – Measure & Cut the Pipe
The object of this step is to measure and cut the pipe to the right size. You will need the pipe, the Sharpie marking pen, the measuring tape and the jig saw (or hacksaw if you don’t have a jig saw). Now I set up my project on a sawhorse for stability and I want you to be careful when you are cutting things, so use a sawhorse if you can. Take the pipe and from one end measure off a 12” segment. Mark all the way around the pipe and then take your jigsaw and cut the pipe so that you have a 12” piece to work with. Set the remaining 4’ section of pipe to the side. You are done with it.
Picture of Cut Pipe
Step Three – Mount the Template & Mark the Holes
The object of this step is to get the template properly mounted on the pipe and then get the hole locations marked using our Sharpie. Take the sheet of paper and align it on the pipe so that the template is in the middle (more or less – no need to be anal about it unless you want to). Tape one end and then wrap the sheet all the way around the pipe until the lines line up at either end, then tape the other end of the template.
Picture of Pipe with Template Mounted
Once you have that done you can go ahead and take your Sharpie marking pen (or other permanent pointed magic marker) and mark each hole location so that you have the pen marking the paper and the pipe. You are now ready to drill.
Picture of Pipe and Template with Guide Holes Marked with Sharpie Pen
")

