What's new
  • Happy Birthday ICMag! Been 20 years since Gypsy Nirvana created the forum! We are celebrating with a 4/20 Giveaway and by launching a new Patreon tier called "420club". You can read more here.
  • Important notice: ICMag's T.O.U. has been updated. Please review it here. For your convenience, it is also available in the main forum menu, under 'Quick Links"!

DIY pro style carbon filter

RM - aquagrower

Active member
first and formost, the design of this filter came from an old OG thread done by Son is Shining, and i'm building it from memory, so all thanks go out to him.

that said, here we go. i'm building this one to fit a 6" vortex, but it can be made bigger or smaller, depending on your needs. we'll need to gather up the parts:


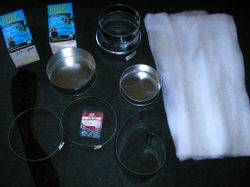
1 - 6" to 7" reducer
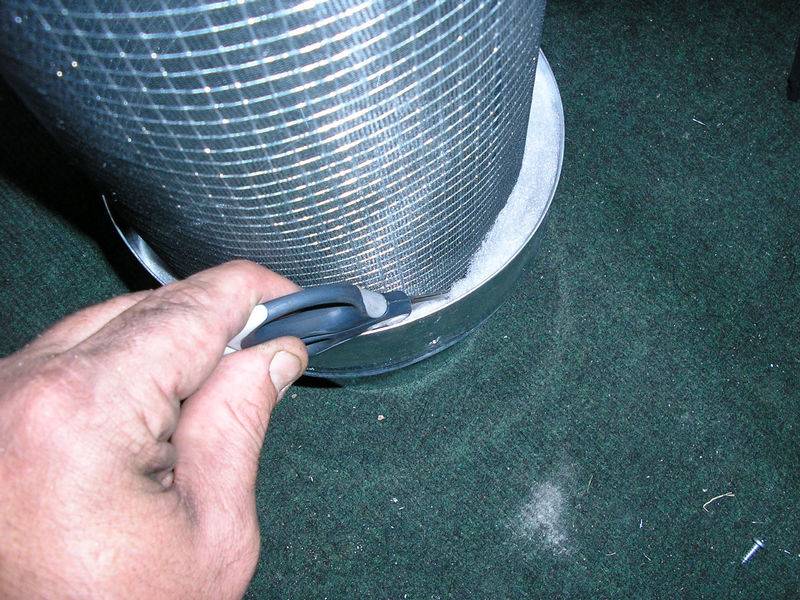
1 - 6" duct cap
1 - 7" duct cap
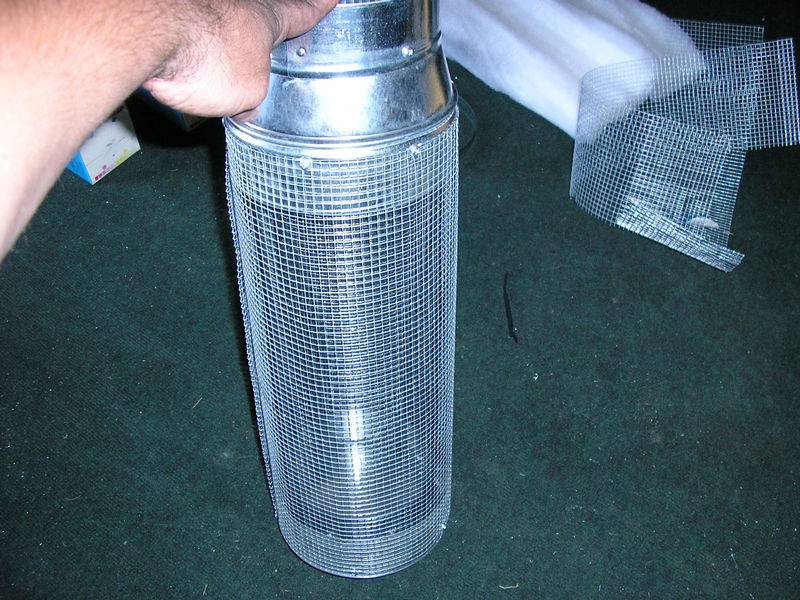
1 - 5' roll of 1/4" hardware cloth
2 - 7" hose clamps
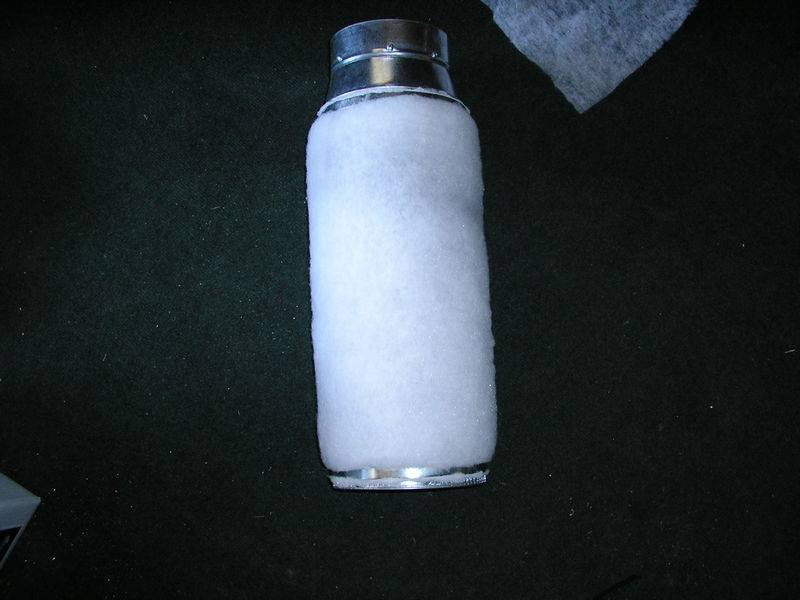
1 - 6" piece of 6" (duct) pipe
1 - pair panty hose
carbon (from pet store)
poly "quilt filler" (from craft store)
sheet metal screws
 

RM - aquagrower

Active member
now that we got all the parts gathered up, let's get started putting this thing together.

first thing is to make the inner core.


1) cut a piece of hardware cloth to fit around the circumfrence of the 6" cap, allowing for a 2" overlap, and zip screw it tightly to the cap. this will be the bottom of the inner core

2) repeat this process at the top, screwing it to the 6" piece of pipe. be sure to leave the top 2" of the pipe clean, so that it can fit into the reducer

3) cut one leg from the panty hose, and carefully put the panty hose over the whole thing. try not to get any "runs" in the hose, as that's what's gonna keep the carbon out of the fan!

that's it, inner core's complete.
 

RM - aquagrower

Active member
now it's time to get started on the outer skin.

1) insert the open end of the core into the 7" side of the reducer, being sure to keep it strait. ya should have an even 1/2" all the way around the core. once the core is in there good and strait, go ahead and run some screws threw the outside of the reducer, securing the core to the reducer


2) cut a strip of the poly, and stuff it into the gap where the core just went. again, this is to keep carbon out of the fan.


3) now cut another piece of the hardware cloth to fit the circumfrence of the 7" end of the reducer, again giving a lap of about 2".

4) screw this around the reducer.


5) now install the 7" cap to the other end.

6) wrap the whole thing with poly, to act as a 'pre-filter' and install the 2 hose clamps

7) trim the excess poly, and we're damn near done


RM - aquagrower

Active member
i know what you're saying, "but RM, how are we gonna get the carbon in there".

well. i'm pretty sure that SiS put the carbon in right before he installed the 7" cap, but seems to me that it would be a PITA to change the carbon at a later time, so i drilled a 3" hole (with a hole saw) in the cap before installation.


i was also carefull to leave a 2" gap between the bottom of the inner core and the bottom of the 7" cap. figured it would be pretty easy to fill the filter (pour and shake, pour and shake, etc.) later, as well as do carbon changes as needed.

i'm not filling this one now, as it just ain't needed at the present time, but after i do, i'll simply cut a 6" round disk, and screw it over the hole.

here's one last pic, looking down thru the filter


that's it, all done, time to pack a bowl. if ya'll got any questions, or if i was fuzzy, on anything, feel free to ask away!

good luck, and grow SAFE!
 

treble

Active member
Nice thread RM AG. I remember something liek this from OG and while there are a few threads here on DIY filters and at least 1 looks like its the orig from OG it needed the steps more clearly illustrated for my feeble mind.

and you have given me a couple great ideas from lookin at your pics. The hardware stores in my part of the world don't carry duct parts. I have to get those from metal shops or duct making factories. Found one who does reducers and collars but no end caps which has left me stuck.....

but you give me an idea on what I can use instead. I am going to try and hack the base off some large coffee cans and try those. Not sure if it will be strong enough as the metals pretty thin in cans I think....but will give it bash and see.

cheers
treb
 

RM - aquagrower

Active member
thanks bartender, i just couldn't believe this hadn't been posted here yet.

coffee cans would work great. the small cans (that we got around here) fir a 4" dryer hose, and the big ones are close anough to 6" to work. could make a nice one for a 4" fan real easy.

it's all in the design. match the size of the inner core to the size of the extracter fan, and allow at least 1/2" of carbon space, before the outer shell. the only thing to take into account is that the thicker the carbon layer, the more cfm's you're gonna loose due to restriction. hell, there's probably a formula.

materials are usually adaptable.
 

cough_cough_eer

Anita Bonghitt
Veteran
Thats the same design I based mine on . I used wood instead of duct work to connect the hardware cloth just becouse im so cheap.
 

HydroManiac

Active member
I made one to but I replaced the pantyhose with some stuff I got at a fabric store that is uses for making those dancers tights. It's a lot more stronger allows air flow just as good and only cost me a few dollars more.


HM
 
G

Guest

id stick with the poly batting. just me tho, glad pantyhose works for ya:smile:
thanks for postin this here mr. threadstarter sir
 
G

Guest

How often are you changing the carbon for Aqua, or envisage you will need to with a skunk grow?

You have runs in your pantyhose hehe.
 

Nugs-N-Jugs

Member
RM - aquagrower, great post thanks for sharing. I have been using the exact model for years now, no regrets on it either.

d4herb, eBay is where I get my bulk carbon from, even with shipping its like 300% cheaper than the pet stores. I only have to change my carbon out every 4-6 months, granted I do have low humidity.
 

RM - aquagrower

Active member
i'm pretty sure SiS's origional design did call for a 1" carbon layer, but i wanted to limit the drag on the fan. that's why i tried to make it to where carbon changes are fairly painless.
 

RM - aquagrower

Active member
i'll let ya know. right now my flower room is empty, so i didn't fill the filter w/ carbon, but i'm not expecting any problems.

the one ya see here is version 2.0. the first one came out looking like shit, and performed even worse. way too much poly fill, and way too much carbon. lots of restriction.
 

0p0rat0r

Member
Thanks alot for this step by step guide. I think I'm going to go with something similar for my new cabinet. One question, do I need a special hole sawing piece that is specifically for sheet metal?
 

senseless

Active member
yea you need a METAL hole saw. you can saw wood with it too. they are like 10-30$ depending on what size you need. most are lifetime garrantee. sp? (im hi)

dont forget EYE PROTECTION!!
 

Latest posts

Latest posts

Top