What's new
  • Happy Birthday ICMag! Been 20 years since Gypsy Nirvana created the forum! We are celebrating with a 4/20 Giveaway and by launching a new Patreon tier called "420club". You can read more here.
  • Important notice: ICMag's T.O.U. has been updated. Please review it here. For your convenience, it is also available in the main forum menu, under 'Quick Links"!

Hazydreams Closet AKA BB 3.0

hazydreams

Active member
Ive kept a wrap on this for a while and for good reason. I'm not the type to build something and show everyone how easy it is, before things are worked out and properly tested. Ive hit some snags with this set up, and ill be the first one to point them out during this post.

Rational: I came to this site after being on overgrow some 7 years ago, and saw this micro grow in a square foot thread. then i looked around and saw big toke was on here and well i remember him from the OG days. I also noticed some others that had migrated this way. i figured id set up shop and give it a run to see if i can smash the square foot record with one plant, and it was gonna be built my way.

The method to the start of madness: I prefer RDWC as a method. I have grown Bio Buckets as well as swc/nft systems with great sucess. In this instance i wanted it all and it had to be small. real small. like three plants in three square feet. with a shit load of light over them. it had to be portable, reliable and some what stealth, and thus begins the journey.

I took a trip to Lowes and found a closet on sale for the rubber maid variety.The size you ask? 40" wide X 55" high X 15" Deep. Already had two compartments, one with a double door and one with a single. :dance013:sweet.

I chose to go with square buckets, trust me the decison was made after years of trying to seal a curved surface (round bucket) to a straight cylinder (barb) and it always f-ing leaks over time, if you bump it, look at it wrong or just dont talk to it nice. screw that FLAT surfaces and DIY BULK HEAD FITTINGS ensure 0 leaks. I have zero tolerence to leaks and its a pet peev of mine.

these first few are of the veg system.

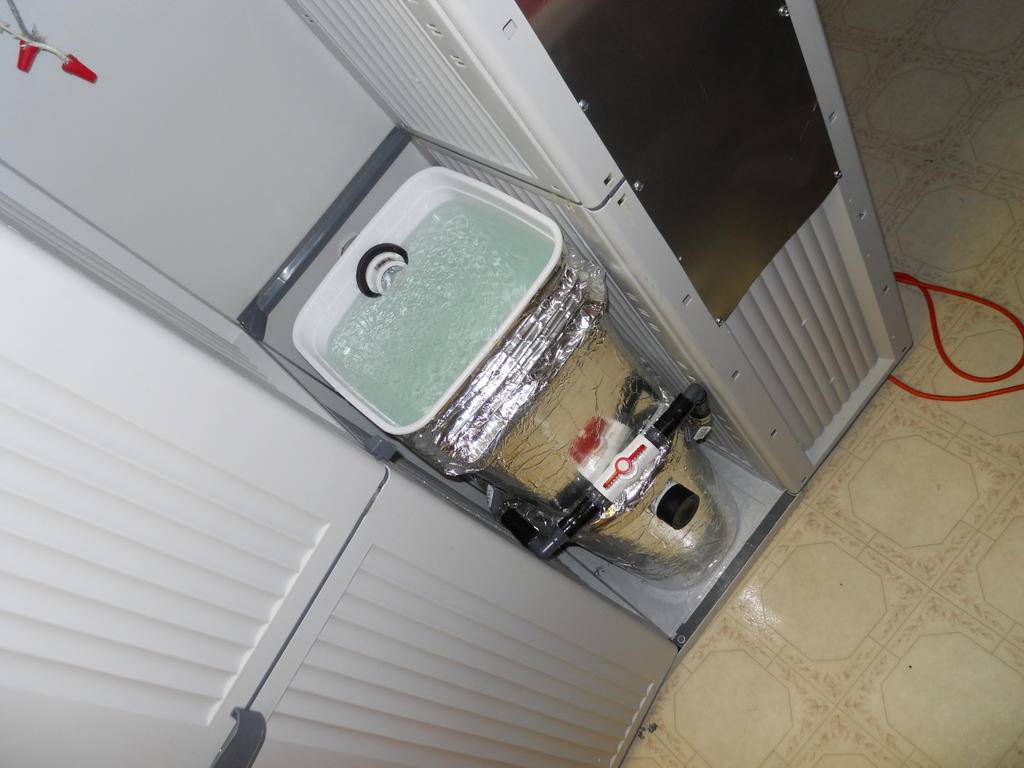
Reservoir for the veg system. total capacity is 15 gallons +-1 gallon. That white bulb in the supply line is a one way check valve. Theres also a venturi that's hard to see thats attached to the air pump with a one way check valve to pump air up into the bucket. The pump is an old 400 gph walmart special. she runs great. an upgrade is coming, you can never have too much turn over in RDWC.

picture.php


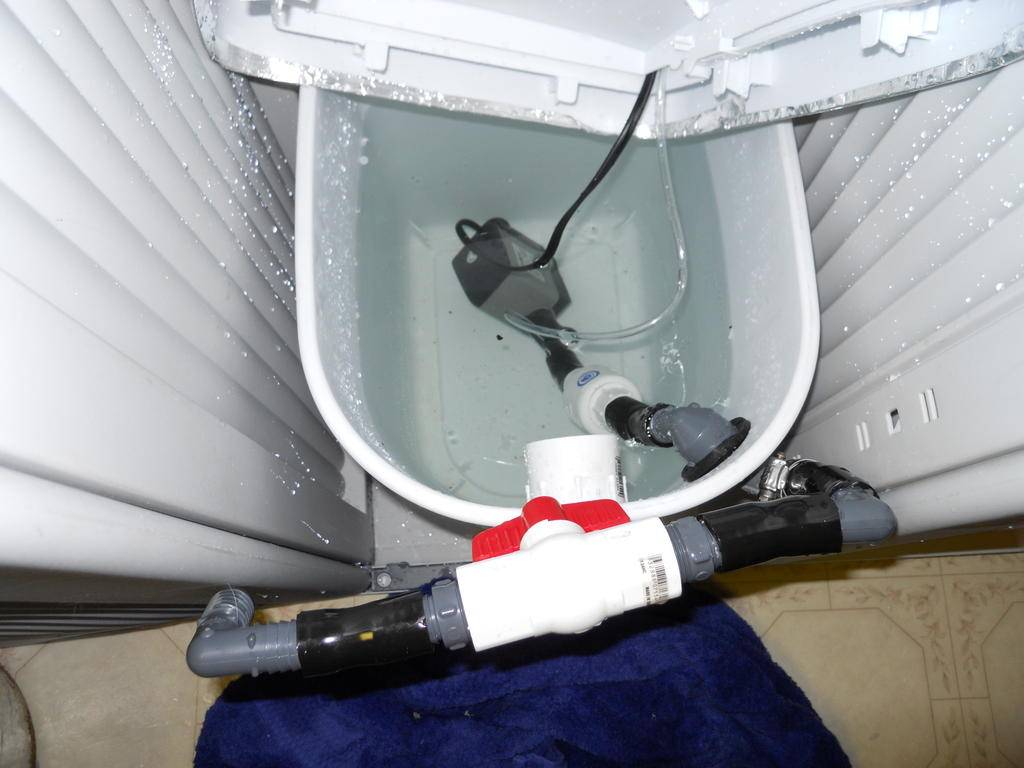
Bucket on top of the reservoir stacked system was the only alternative. the flexible hose to barbs are reinforced with pipe clamps, all though not shown remember NO LEAKS. keep saying it and it will happen. this is a good shot of the DIY bulkhead in the bucket.

picture.php


This shot is of the feed hose that runs into the bucket. that little o ring works wonders. this is a electrical connector from lowes contractor isle. again this was a test fit shot and the worm drive clamps were not installed.

picture.php


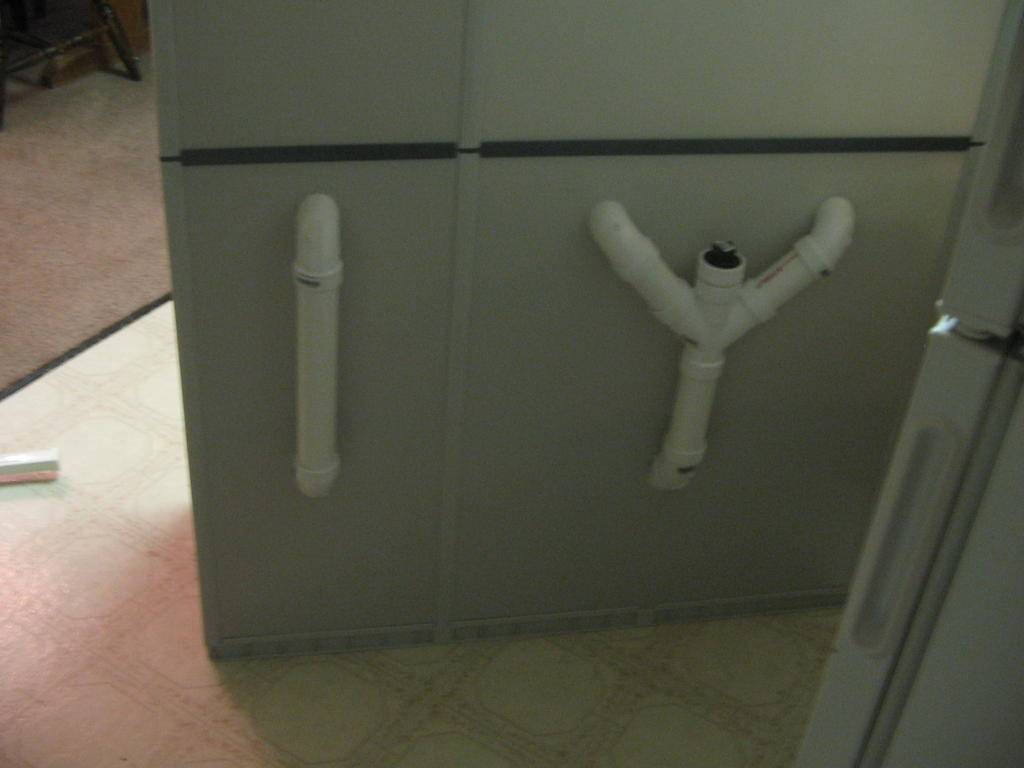
This is a shot of the back of the box showing how i ran the plumbing. 1 1/2 inch pvc, The buckets are connected inside with a rubber fernco fitting and pipe clamps on the inside fo access.

picture.php


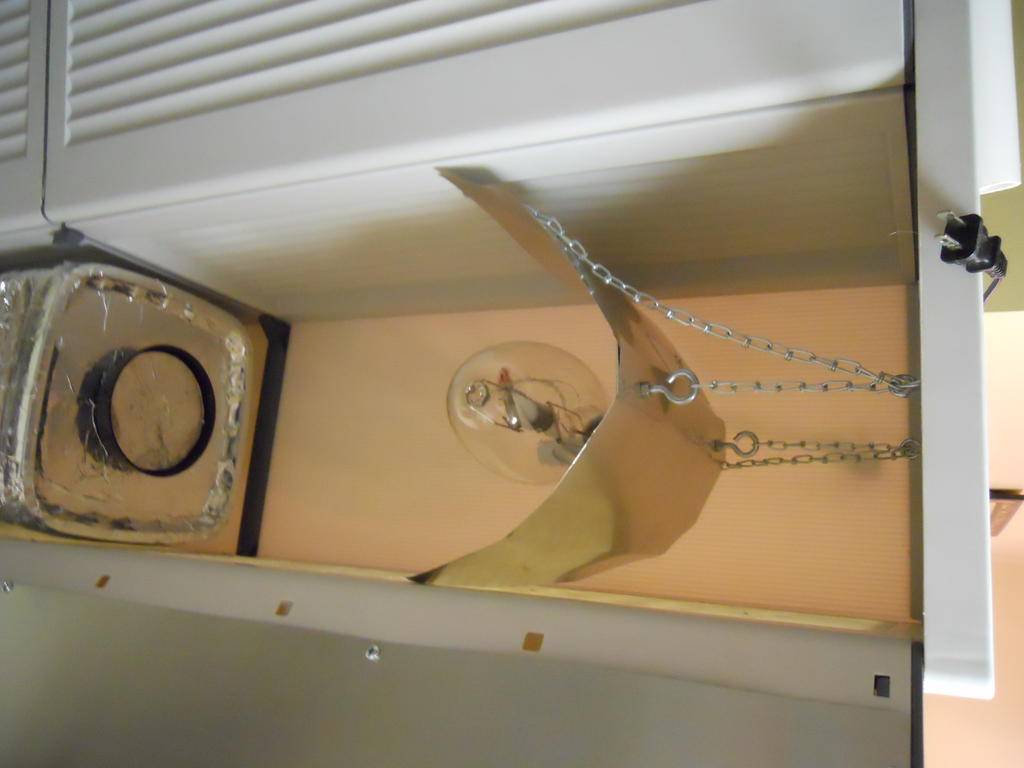
This is the end product minus the aluminum heat sheilds and lava rock in the net pot. That bulb is a 400 watter and in that small space i had it down to 82 degrees with the door shut. at bucket lid height. the ventalation fan i decided to use was a Dayton 235cfm 6 " axial. its hooked up to a speedster at roughly half power now as im only running a 250 watt MH. after experimentation i found no difference in adding more wattage on plant growth, i mean come on people im bumping 250 watts in a 13"x13" foot print. thats way overkill.

picture.php


Veg system lessons learned. Your gonna need a chiller no matter what when cramming 5 pounds of sh*t in a 1 pound bag. Read that again if your even going to try to attempt this setup. In running several crops through i noticed that even with aquasheild applied at the specified rate you are going to accumulate some level of rot due to water temps being high. The only way to ensure this is with the chiller and i have paid the price in low yeilds because of fighting that nasty b*stard off. I have 1- 1/10th hp chiller cooling both the flower and the veg system at the same time. ill post a sketch of how it was done if any one is interested it wasnt too hard.

In veg i used a small 1 foot square screen to train the plant to a scrog'd hedge. My variety right now is a durban which is a sativa, i know its not the best choice but i must make due with whats at hand.


If you have any questions or comments feel free. Ive always taken any help i can get.


But for now that'll do for tonight. Ill post up the flower system, itll take a while to explain that one.

to all. happy tokin

picture.php


LoKey

Member
i bet that cabinet just glows when the lights are on looking at the sides of it lol, well you do mention heat shields weren't installed but would still be like the lost ark, and melt your face off with a 400w in there

side note, the 1 sqft challenge, i do believe they had some ground rules as far as light wattage and size of grow area are concerned.

....... just went over and checked, its on the first post but heres a cut and paste

RULES

Lighting:
CFL:200 watt max
CFL/HID:150 watt max
HID:150 watt max
Spectrum any including UVB lamps

Cab:
Under 1.5 sqft
Hight Max is 3 1/2ft
Must have all sides top and bottom and may not be transparent

Method of Growing:
Any as long as its one time veg and one time harvest
Clone or Seed either is fine


Ok guys the games have begun anyone participating please post the following.


Minimum:

Pics of cab
Cab specs
Light specs
Method of growing
Strain
Medium


not that it matter cause cause its all for fun and if were doing it for the right reasons (learn, be self sufficient, have fun, ect) then it really doesn't matter
 

hazydreams

Active member
Yea i was trying to stick to the rules as tight as possible but i wasnt gonna spend extra money for smaller lights that i already had. Really i wanted to see what a RDWC would do in a square foot. The glowing did neccesitate the addition of heat sheilding for a light block, reflection of light, and peace of mind with two giant street lights in a plastic box.

So far this thing has pulled 33 and 35 grams respectively in two harvests that were hampered by root rot. with the addition of the cooler im looking at a much better harvest this weekend. my best guess puts it around 56g dry of highend stuff. i dont count stems, popcorn, or premature stuff in these numbers, just high end/final trim 1st rate smokable stuff and nothing else.

Im getting the flowering room post together. it should be done tonight in one massive post.

Thanks for stopping by!
 

hazydreams

Active member
The Flowering Room

The Flowering Room

OK people now for the flowering system. I give you 12 pounds of shit stuffed into a 1 pound bag!
picture.php

Taking a RDWC and shrinking it to fit into this space was no small feat. And I paid dearly in time and money making it happen.
Can you do it? sure, is it cost effective? Definitely not.
First obstacle to overcome was finding a reservoir that would give a good capacity while fitting in the spot that was available. I decided on a 20 gallon rubber maid that was cut down slightly to fit. total capacity is around 25 gallons including the buckets. That was the easy part. Plumbing the feed lines, creating the manifold in the bottom right corner of the above picture for even flow, bio filter, dump valve and check valve was the hard part of this whole scenario.
I wanted a single point of exit for all water in the system. My mind set was ease of res changes. That didn’t mean making it happen was easy. After screwing with configurations and accessibility for the bio filter and the various valves needed to “tune” the flow to ensure each bucket fills precisely at the same time (I know I know the OCD is showing through…) I came up with this. Nick named the bag pipe of death.
picture.php

Heres the key to picture. Sorry its blurry.
1. is the return hose for the bio filter, it dumps the filtered and oxygenated water from the venturi/biofilter set up back into the resi.
2. Bucket 1 feed hose.
3. bucket 2 feed hose.
4. Bio filter flow valve.
5. Inlet from the pump.
6. Check valve, Instant shut off if it back flows i put it after the bio filter tee to prevent the system from back-flowing thru the filter and flooding me out as well.
7.Bio Filter, To be packed with lava rock, filter media and some crushed carbon just in case.
8.is the cross over to the bio filter from the valve. Its tight in there man.
9. You can’t see it in this picture but this is the dump valve that will allow me to dump the entire system
10. Bucket 1 control Valve.
11. Bucket 2 control Valve.
12. seems i forgot twelve, lol.
13. Is the venturi. if you look closely you can see the air tube that has a metering block on the end of it so i can adjust the amount of air (SEE SNAG ALERT) . The metering block is to the right of the bio filter.
This whole contraption yields me a couple things.
First, the check valve is placed where it assures an absolute stop of flow back into the res. Second, it allows me to tune the flow into both buckets and the bio filter depending on needs, pump strength and over all age/life cycle of the plant. It also allows me to “hide” the feed tubs so it doesn’t look ugly and crowded. Without touching the valves the buckets were within 10% of one another (timed to over flow with a stop watch). Cranking the number two bucket down a hair solved that and we have even flow. 15 seconds to fill the buckets, the pump is an eco plus 750gph monster, overkill? maybe not, I was hoping I would have to turn the valves down to prevent the pump from over running the 1 ½” pvc drain but that was not the case. What I’m experiencing is head pressure as I’m pumping the buckets up from the bottom. I would have gone with a bigger pump if I had to do it again.
**SNAG ALERT** the bio filter design did not work. Actually it worked better as a colander then a water tight compartment. Thing had so many leaks I was amazed I could fail so hard. I hit the redesign board and came up with several incarnations, right now its disconnected and shut off until I figure out a better (read non leaking) way.
I’ve come to love venturis for air injection. Fish tank owners use them all the time. They won’t replace air stones, I have two large 18” air stones in the Flowering res and one small one in the veg res along with one venturi on each system, (they aren’t shown in the pictures). They do work great job at adding additional air to your reservoir and plumbed correctly will add additional air to your buckets.
this is what my res looks like while under operation.

picture.php


**SNAG ALERT** most venturis come with a metering block that pulls air in due to a pressure difference inside the venturi. This works great as long as the venturi has no head pressure on the outlet side. You cannot use these inline without an air pump. It will spray water all over. Learn from my mistakes...
Biggest problem with the whole system was heat. Originally I was planning on stuffing a 1000w hps (yes I know that’s bat shit crazy) into a cooltube and using two 400 cfm 6” inline fans to cool it, one hooked to the cool tube and one exhausting the flowering room. A friend of mine talked me down after many heated discussions (bad pun sorry) on the topic. A 400 watt MH that I had on hand was eventually used and only one 400 CFM fan was purchased. That is set on a speedster as well and is cooking at about 30% power keeping the room about 4 degrees above ambient. Cool tubes are nice and the only option for my case but I have found that I do hate the footprint it creates.
Heres the cooltube set up. and a shot of the heat sheilds. I have zero light leaks and came up with an slick way to make the vents light proof. I used the concave nature of the door and the heat sheild to creat an air duct. holes on the out side at the bottom and holes on the top to vent into the box. Each hole is 1 square inch of opening and the number of holes was sized in accordance to the airflow needed for the 6" fan.
picture.php


The exhaust vents into a DIY carbon scrubber. It runs on pet store carbon pellets. Its NOT the ideal set up as the exhaust blows into the filter but space constraints dictated this setup. i have no smell problems because R2D2 works awesome.
picture.php


all right im sure ill find things to edit and add to this. its late and im beat.
 

hazydreams

Active member
action shots.

action shots.

@ cheese and 3d-

thanks guys, i tried to make it the end all be all. I try to do thing right the first time, but my over active imagination and limited funds usually are in conflict with each other.

just got back from the 'dro store with some goodies. Ill be pulling out the microscope tonight to check clouds and ambers.


here is some action shots along the way during the 1st and 2nd harvest, these are of the two previous harvest. with the latest ive gotten lazy with photo documentation but i will take shots during harvest though.


This is about 17-20 days from clone. right about when the rot sets in without the chiller.


the screen is a perfect 12"x12" size. the 250W mh is so sick in this space.


This is after transplant @ one month into the flowering side. The system is supposed to be working as a perpetual once a month type system i hit a snag...


the plant really likes 200w/sqft. and overgrew the space in short order. The foilage density is crazy and i learned that pruning out the lower crap is your friend. so much wasted premature stuff.

this is the end result, 33g of high end stuff. but the density was low due to the rot.


thanks to all! what ever questions or comments you have ill field!

i want to pick peoples brain on DIY co2 injection. i want to get a regulator and a set of timers and maybe a relay to run it. but i haven't seen anyone with similar system that is showing any results. i don't want to drop a grand on a co2 computer. this is way to small of a space to spend that type of money.
any input?
 
that looks awsome man im a first time indorgrower trying something simular to ur closet set up i was wondering what type of light is that in the top pic and did u use a diff light for flowering??? price??
 

hazydreams

Active member
that looks awsome man im a first time indorgrower trying something simular to ur closet set up i was wondering what type of light is that in the top pic and did u use a diff light for flowering??? price??

Veg room is a 250w MH

Flowering room 400w MH

Most people will tell you not to use a MH in flower and ill agree youll get a better yeild from an HPS but its hard to NOT use something you have laying around. The 250w digi ballast costs like 150 bucks. 400 w magnetic ballast can be built for as cheap as a 100 bucks if your good with wiring diagrams. more expensive if your trying to buy ready built.

i would advise against anything over 150w/sqft. you didnt list the size of your cab but in my case it took alot of work and oversized fans to get the job done. your mileage may vary.

HD
 
33 grams with a 400w hps..............thats low yeild for that light.....i bet if you had a bigger area you could yeild atleast 200 grams EASY!.....but hey its your project and as long as the buds good.....but you really should be getting alot higher yeild with that much wattage in that small space you should have some massive buds........
 

hazydreams

Active member
i have low numbers for a few reasons.

first off, its not a 400 HPS its a 400 MH that alone is hurting yeild slightly.

Second off, i have a rot problem that occurs due to high water temps, the 1/10th hp chiller is helping that significantly but i have yet to run a full crop from start to finish with it.

Third off i doubt even with a perfect nutrient regime, an indica dominate plant and all the scrogging you'll ever be able to do.i doubt theres more then say two ounces possible from a square foot with the most ideal enviroment.

i will certainly take all help for anyone that is willing to help me try to surpass this number.
 

hazydreams

Active member
ive been seraching for a few days and havent found anything so im asking the micro community.

CO2 injection on a small scale. Has any one tried this in a micro enviroment. Im looking for bottle co2 users here, not looking for yeast and sugar system.

my basic concern is this. I want to set up with a regulator and a Indoor air quality monitor to meaure the level of co2 in the room. i know that theres equations that will get me in the ball park but im worried about plant usuage and leaking as my box isnt 100% air tight, (far from it actually). what im getting at is i want to set the system up with a timer on the regulator and a timer on the fan to purge the system of heat and O2. how often (based on heat) and how much (the million dollar question) are what im after. any one with experience wiring up a relay to shut one item off when the other is running would be awesome.


any one pulled this off without 1k in computers doing the work for you? id def like to hear from anyone who has tried and failed or reached sucess with a similar set up.
 

sx646522

Member
Interesting and inventive setup, HD. I think that before you look into CO2 supplementation, you may want to address your largest issue first, which is light intensity.

What you are running into here is photoinhibition caused by oversaturation. For every environmental parameter, there is a dose-response curve by which plants respond to that factor:

picture.php


In nature, full sunlight actually provides almost 5x the amount of light at which even the most light-tolerant plants experience saturation:

picture.php


If you convert that to PAR, you're looking at around ~1950 micromoles per meter squared per second (µmol.m^2 s^1, or PPFD). For a 400w Metal Halide on a (magnetic) ballast and standard reflector, that equivalent PAR is reached at a distance of roughly ~11-12" beneath the bulb.

Remember, that's still five times the saturation rate for even the hardiest of plants! (of which mj falls into that category)

What putting 400w of HID into that small of an area at that distance does is it goes far past luxury consumption, and straight into toxicity. The effect is over-stimulation of the reaction centers and antenna complexes and increased flavonoid (anthocyanin) and carotenoid production, but those processes (e.g. Non-photochemical quenching (NPQ)) basically take energy away from the building of plant tissues we're interested in. I'd rather not put the plant under additional stress so it can focus on making flowers instead.

Instead of furthering the machinery of photosynthesis, too much PPFD simply enhances the creation of prolonged singlet Oxygen and triplet states for Chlorophyll (in Photosystem II, mainly) resulting in oxidation and photoinhibition, as free radical Oxygen starts running around the system creating havoc. Enough of that can cause bleaching (breakup of the Chromophores), changes in pH gradients across cell membranes, and worse. Higher-energy blues from MH will contribute to this process a bit more than with HPS, also...

In short, the plants are directing too much energy into creating 'sunscreen' (carotenoids and flavonoids) in an effort to keep from 'burning' (from light, not heat) - at the expense of creating a larger useful biomass (calyx to leaf ratio - i.e. buds).

In your space, there is no need to go over a 150W HPS at all - and that's the max I'd consider. More is definitely not better here.

Much past about 60-65W/sq ft of HID (roughly the optimum level shown in Fig. 25-1, above), you'll quickly reach a point of diminishing returns, where an additional 10% of intensity does not equal 10% more biomass - it levels off, and then actually declines.

The D1 protein is instrumental in the repair and 'recharging' of PhotosystemII (PSII), allowing it to 'reset' and continue with photosynthesis. Note that this repair process continually takes place at all light levels, in direct proportion to the intensity received. (Contrary to popular opinion, light saturation doesn't 'start' at a particular irradiance level, and before which the plant was absorbing all of the light without degredation - in actuality, it simply shows where the (continuing and increasing) degradation and re-synthesis of D1 cannot keep pace with the incoming light levels, and this is equivalent to where photoinhibition is said to take place.) The proteins involved in PSII repair simply can't keep pace with the 'demand' brought on by high irradiance levels:

picture.php


Here's a study that might shed some more light (no pun intended) on this process:

Photoinhibition and D1 Protein Degradation in Peas Acclimated to Different Growth Irradiances

That's what you've got with your current setup.

Note that you can still grow some very nice buds with MH, also - as long as the light levels are reduced down to more reasonable levels.
-----

I understand the desire to use existing resources on-hand, but your limiting factor is really your light. Even if temps are ok, your level of irradiance isn't.

The root rot you're seeing is entirely incidental to your light issues; were you to procure a chiller and get the res temps in line, it wouldn't help all that much.
-------
Other than that, very interesting challenge there.

Hope that helps HD. My degree was in biology with a minor in chemistry and I've been using HIDs for about two decades now, been growing indoors and out - any questions, just ask. Good luck!

Cheers mate, :)

-SX
 

hazydreams

Active member
SX this is great information!

I jsut want to ask a few questions, i can tell you def have a grasp on this sort of thing.

On the bellcurve for the dose factor vs relative plant response. how far to the right would you say i am. this question is asked in order to figure out how far im over the acceptable limit.

My reasoning behind additional wattage, i wanted more penetration into an already tight and tall area. i anticipated the square foot to be crowded with stalks from the scrog. maybe this was my ultimate undoing.

On a related note - the last harvest taken down sunday is dried and weighed. 56.1 grams this time around. the addition of the chiller appears to be helping the cause with added density. This plant was still affected by rot and even with the chiller added it only slowed the progress of the root aids. I am eagerly taking the system apart and disinfecting EVERYTHING with bleach before starting back up. I figure if i dont see a serious increase in yield without rot i will turn my attention to the lights and lowering (this sounds very wrong still) my total watts to see if it helps.
 

sx646522

Member
SX this is great information!

On the bellcurve for the dose factor vs relative plat response. how far to the right would you way i am. this question is asked in order to figure out how far im over the acceptable limit...

Thanks mate. :) Happy to help.

The DRC will be species and strain dependent. It will be a bit harder on a more light-sensitive one like Blueberry or Williams Wonder than - let's say - Skunk#1, for example...and, ANY strain is going to have a hard time with the amount of light you're using.

I'd say you're on the far end of the curve and rapidly sliding down the slope on the right side. Best to apply the brakes now--!

My reasoning behind additional wattage, i wanted more penetration into an already tight and tall area. i anticipated the square foot to be crowded with stalks from the scrog. maybe this was my ultimate undoing...

Don't worry so much about the penetration when using ScrOG. Even with the smaller cabs I was running, I could get ~2oz+/sq ft with my old NLxBB clones. That'd average out to ~5-6oz+ with a 150w HPS.

If you know your strain and time your ScrOG right, there won't be much growth that doesn't get decent light. A modification I'd sometimes do is to also light the canopy from beneath using tube FL's (CFLs, - not so efficient). Get yourself a small (a single tube is sufficient) PL-L and suspend it facing up underneath (you need proper spacing between plants to do this). Does a nice job of firming up those popcorn buds - provided you've got 1) good airflow (mold sucks), and 2) everything else is dialed in (i.e. good nutes in a hydroponic system, and LESS light above!)

On a related note - the last harvest taken down sunday is dried and weighed. 56.1 grams this time around...I figure if i dont see a serious increase in yeild without rot i will turn my attention to the lights and lowering (this sounds very wrong still) my total watts to see if it helps.

Good work! Don't think about it too much, just reduce your light density and you will see results.

Too much of ANYTHING is bad. A person can die from a water overdose just as with Tylenol or some vitamins. Just because there's a wider tolerance for certain things doesn't mean they're necessarily good for us. Plants are exactly the same way.

:gday:

-SX
 

hazydreams

Active member
Well Ive started the cab up again. This time im growing out two in the flowerign room to get an over all yeild from the system. Im thinking with last harvest @ 56 grams, its not out of the question to see over a quarter pound from a 24"x12" space. ill have some pictures tomorrow night of the haze clones. They have dropped roots from the net pots and are cooking along nicely. The temp in the flowering res is kept at a constant 65* via the Hydrofarm 1/10th hp chiller. The clones were topped @ one week in and i'm almost ready for a res change.

Clones were started in 700ppm of Ionic Flower and Cal mag.

After the res change i will up the dose to about 850-900 ppm of the nutrients and watch them explode. Im going to switch the cycle in two weeks and let them grow up into the screen. last time i let them grow up into the screen then switched and paid dearly in stretch. i will monitor it closely as sativas are a pain in the ass micro style.


HD :dance013:
 

hazydreams

Active member
Well as Promised here is the start of the run for Max Yeild.

picture.php


picture.php


picture.php


Edit: Root Porn

picture.php


picture.php


The clones have taken nicely along to their new digs. as you can see they have been topped and are in the process of giving me more branches!

Water was drained and refilled with fresh tap water, ambient ppm is ~175ppm to start.

220 ML Aquasheild
160 ML Ionic Flower
60 ML Cal Mag

End PPM: 899

PH 6.0

+3ml PH down

PH ~ 5.8

That should be good. im going to watch closely for the burst in growth and start LST-ing immediately. once the tops are large enough ill top once more then add the screen to them and hit the timer for the real show to start.
 
Last edited:

hazydreams

Active member
Lookin good, nice and green!!!

thanks GIG!

I think I'm showing a little Cal/mag deficiency so i upped the dose of cal mag by 20 ML. you can jsut see it in the above photos, ill try to get some better shots of it up soon. really its confined to the lower leaves, slightly yellow tips with a few spots of necrosis. New growth looks dark green and healthy tho! :good:
 
Top