What's new
  • Happy Birthday ICMag! Been 20 years since Gypsy Nirvana created the forum! We are celebrating with a 4/20 Giveaway and by launching a new Patreon tier called "420club". You can read more here.
  • Important notice: ICMag's T.O.U. has been updated. Please review it here. For your convenience, it is also available in the main forum menu, under 'Quick Links"!

$31.00 Speed Dryer

ogrefugee

Official Tree Taster
Veteran

EDIT: BEFORE YOU BURN DOWN YOUR HOUSE REMEMBER YOUR DC ADAPTER MUST MATCH UP TO YOUR FAN'S SPECIFICATIONS. The voltage must be exactly the same and the amperage (amps) on the dc adapter must be equal too or higher than your fans

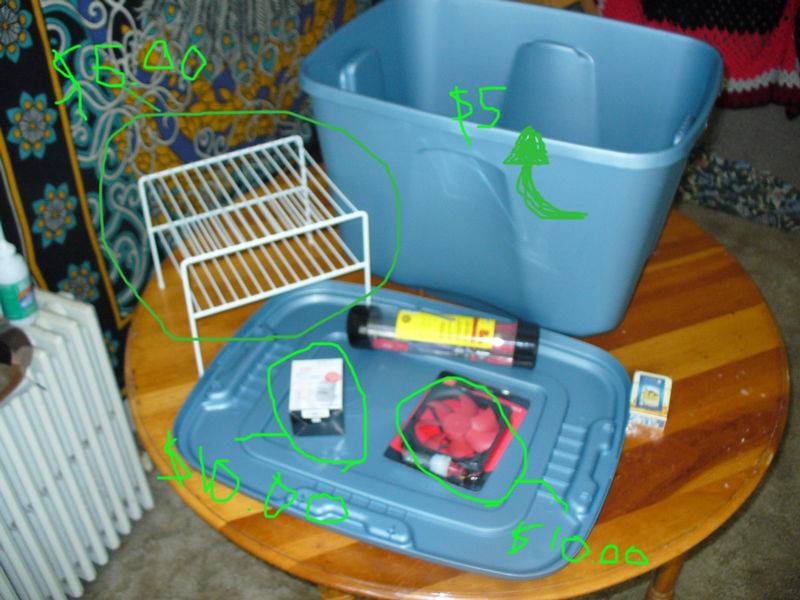
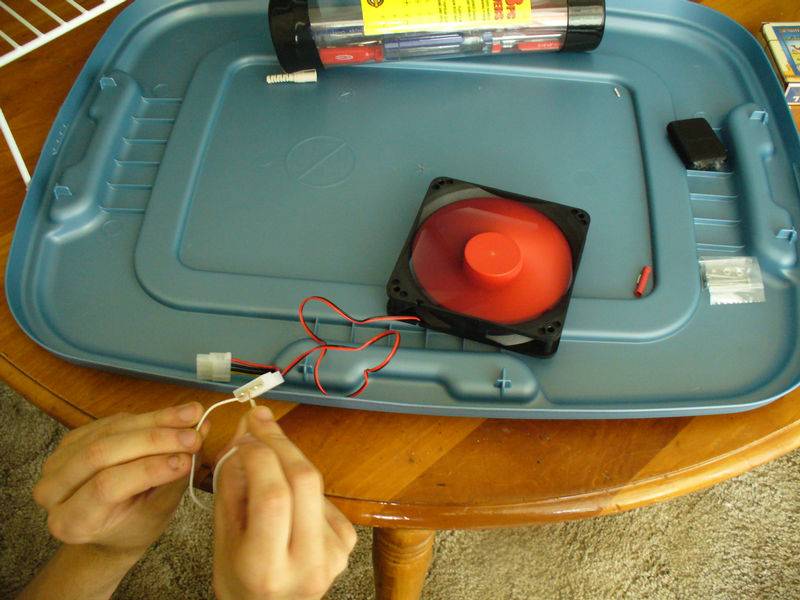
Ok here's the list of materials:
18 Gallon container (K-Mart, $5.00 on sale)
2 Level Tray (Martha Stewart Collection, K-Mart, $6.00 MSRP)
78 CFM 12v DC 180mA Computer Fan (Radioshack, $10)
12v AC to DC Converter, 500mA (Radioshack, $10)

Tools:
Screw Driver
Pliers
20awg Wire Connectors (2)
Glue Gun (or caulk)


Ok here we go:
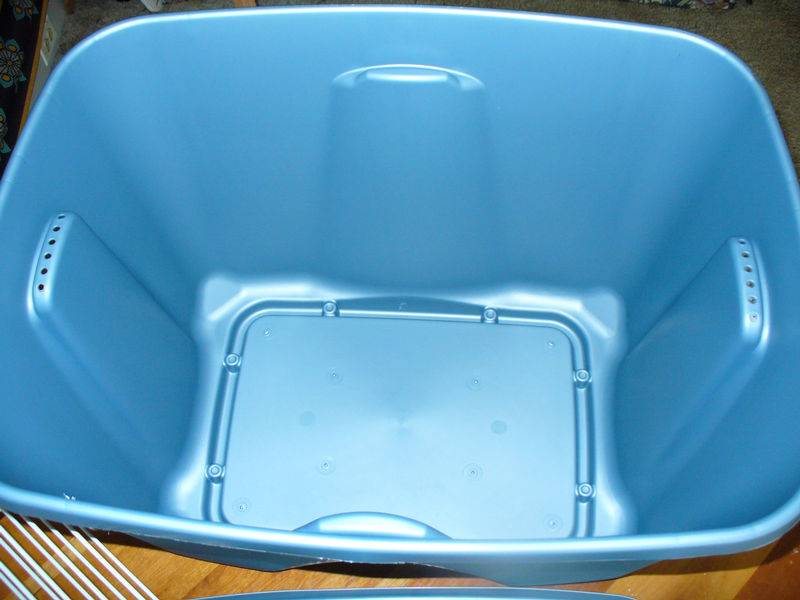
So have a look in your container and figure out where you are going to mount your fan. This is what mine looks like


Next take a look at the wiring come out for you fan. It has v-slot jacks that you are going to have to take off. Note that only red and black wires are coming out of the fan, then it is split to v-slot specification.


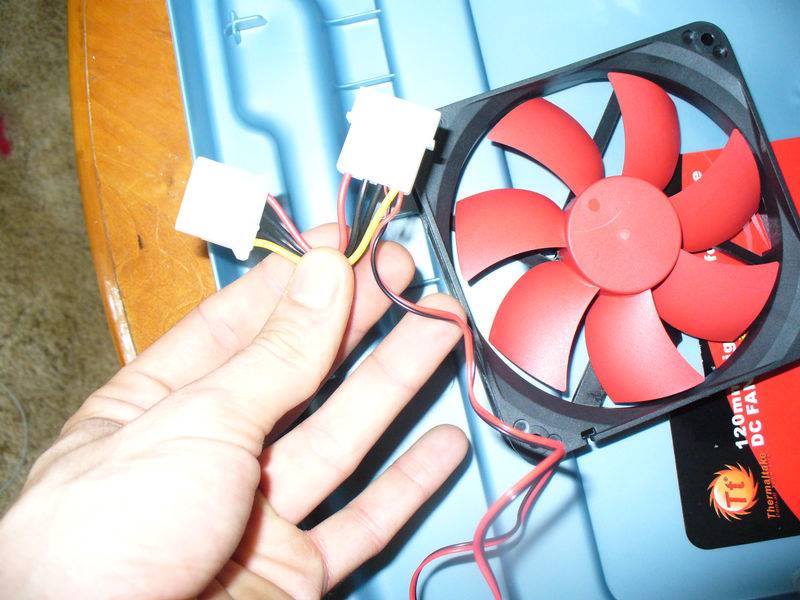
Grab your 12v dc adapter and cut off the jack at the end. Split the wires apart and strip the ends. before you plug it in check the wiring harness on your fan and see what pins lead to the black and red wires coming out of the fan. On mine they share pins with a black and yellow wire.

these are the pins you will be leading the wires from the dc adapter.

Now test your fan by touching the matching colored wires to each other. don't worry if you accidentally touch black-red/black-red instead of black-black/red-red, it will work either way.


Tada! now we know that our fan works!
Next step is to trace where you will be mounting your fan


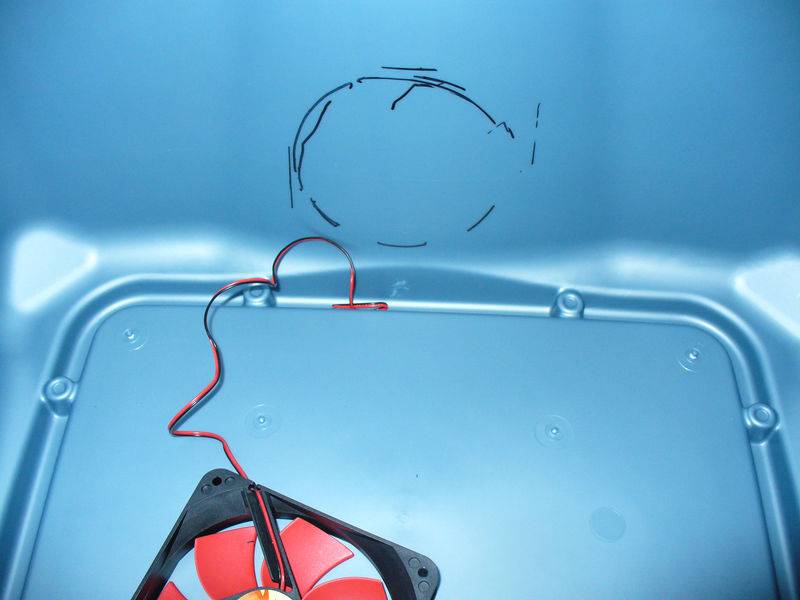
Cut out a hole to roughly match the size of your fan and tap holes for the screws. Mount your fan and lead the wires through the large hole to the outside of your box. I mounted mine so the air is moving out of the box, but i suppose you could make it an intake if you like. You can tap a seperate hole for your wires, but i opted not to. It should look something like this:


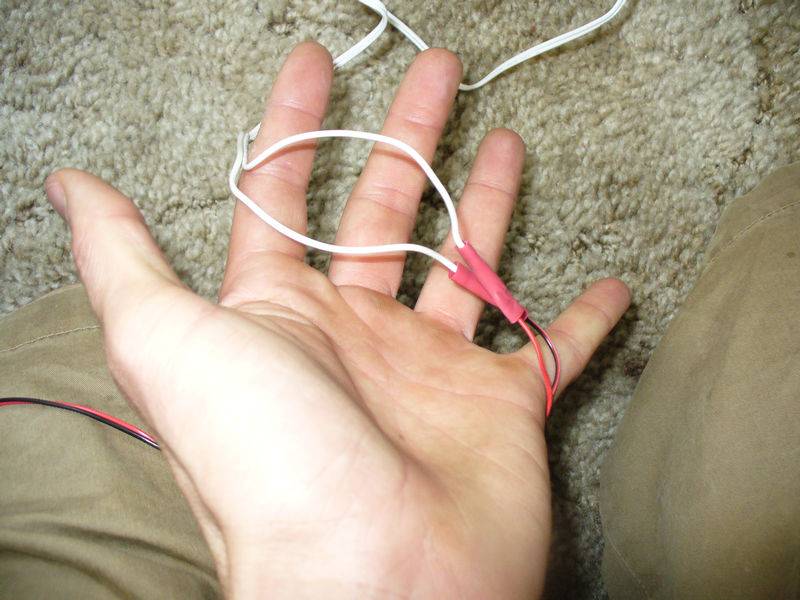
Next up, Cut off the wiring harness of your fan power cable, leaving only the black and white wires coming from the fan itself. I recommend you leave your self as much length as possible. Use some crimping connectors, tap, heatshrink tubing, or anything else that safely connects your wires. I used crimpers. It should look something like this:


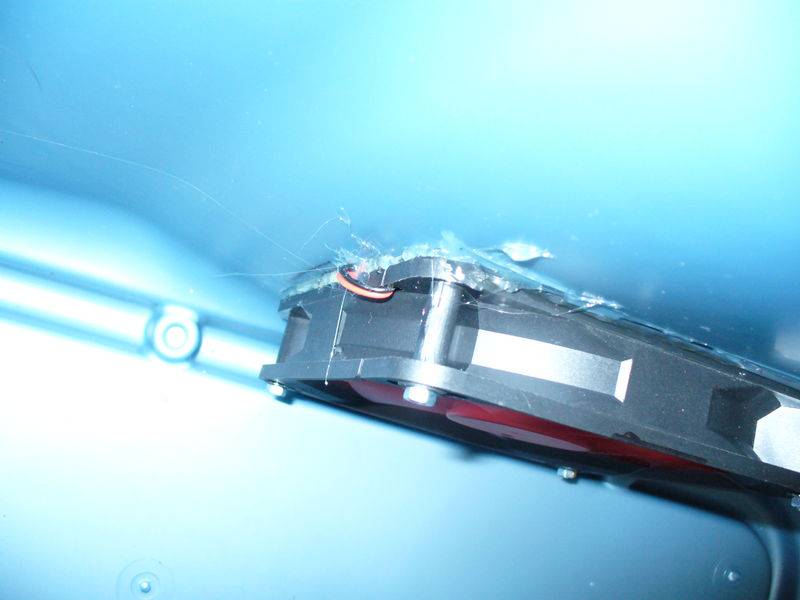
Now take your hot glue and run beads along the edges of your fan creating an air tight mount.


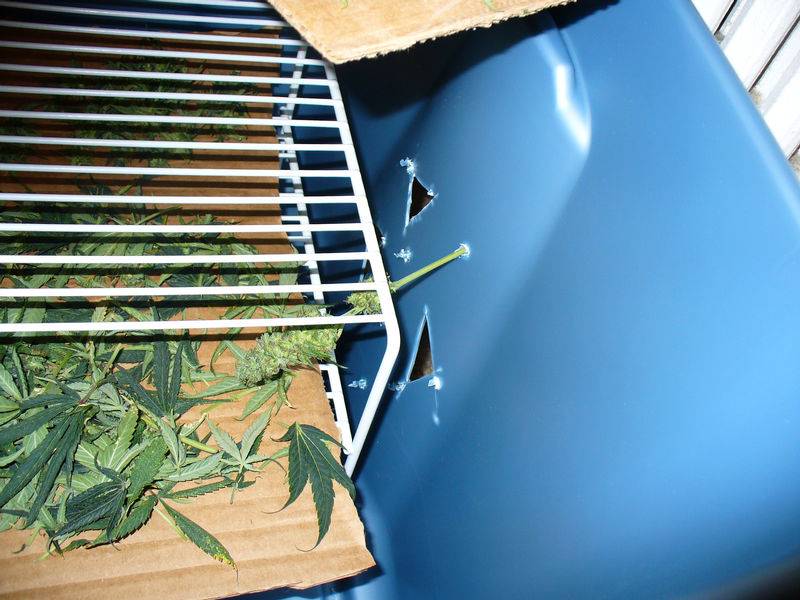
Now, i dont know if you will need to do this or not, depending on your fan and box size, but i had to add some intake holes because when the lid was put on it slowed the fan down... which meens the fan was being stressed and would eventually start creating heat. Not pretty but they work


Put in your rack, stand back, and be proud of your creation! this is what mine looks like all said and done:


You can use different rack styles too, add in dehumidifiers and carbon filters, and create ducting, but i don't really have any issues that would be solved by these additions.

I hope you like it, i won't be testing it out for another 2-3weeks, but i am sure it will be quicker than straight up hanging.
 
Last edited:
G

Guest

very kool. the guys who make the dryer box are gonna be pissed. Another home made stand back and be proud moment!!! good job.
 
G

Guest

the thumbs up, is the best!! a classic thumbs up.Are you a thumbs up person? I allways find my self giving the thumbs up all the time more than others, :wave:
 

ogrefugee

Official Tree Taster
Veteran
yep, check out my other posts :)

lol if you zoom in on that last picture you can see that my fingernail is starting to grow back. I smashed it with a 12lb hand sledgehammer 2.5 months ago...

just figured i'd let you all know that.


oh yea, to all you trolls stopping in:
light and heat are the two worst things while you are drying your buds... they degraded thc, break down flavor, and generally make your shit harsh and weak. this is a no light no heat method. and unless you can give me some concrete proof that the rate at which water leaves affects taste w/o any light or excessive heat, then do me a favor and don't post. i'm not getting into it and i won't reply.

and fuck your negative feedback bs, if your gunna do it leave a name pussy!
 
Last edited:

Teadaemon

Member
That looks to be just the idea I need.

I dried my last grow hanging from strings in my flowering cab with the light off and fan running 24/7, which worked very well (all stems were snappable after 7 days, IIRC) but won't be possible this time as I'll have plants in there for the next crop already. :cool:

I may well build something based on this design, though my preference would be for two fans, one pulling air in near the bottom and one exhausting near the top. I think that would lead to much better airflow through the system and allow the use of smaller, quieter fans (important to me as I grow in my bedroom). I'd also probably still try to hang the bud vertically from strings rather than place it on racks, mainly because I'm paranoid about but rot whilst drying after losing most of a harvest last year, but also because potentially it's a more efficient use of space.

Hmmm... I was planning to build myself a new computer desk, one of these could very easily be built into it.

Oh well, as Dennis Leary put it: "Marijuana doesn't lead to harder drugs, it leads to DIY."
 

ogrefugee

Official Tree Taster
Veteran
go for it dude! post pics!

i just wanted something for only 2 plants at a time (which is how i run my cycle) and with the intake on the opposite side of the exhaust air flow should be adequit. also keep in mind there is such thing as too fast...
 

Latitude18

Member
very cool

very cool

... I'll be make'n one for sure ... can use just about any tub , paint it if needed , and add scrubbers for a clean dry out ... if you need to mask smell i can see this work'n out very well , and cheep. Good Idea OG

As I was think'n about it , use could use this design and improve on it. Think about have'n one tub in another seperated with a layer of activated carbon , or kitty litter crystals, and some properly placed holes and screens. setting the smaller tub threw the top of the larger lid ... that would Make OG's idea into a cheep smell free stealth drying box

Thanks for Share'n that Idea with us OG ,,,I'll be getting some tubs ASAP
 

ogrefugee

Official Tree Taster
Veteran
well, to be honest the idea isn't mine, i've seen pictures and ads about this, probably even a walkthrough on og. but i was looking for directions and couldn't find any so i just figured it out myself. now hopefully i can save a couple of my fellow ic'ers the hassle.

originally i was going to hang them in the box, but it would be a couple more steps. this is the first version of it (i'm sure that box will look a lot different after a couple rounds of testing) but i decided to KISS.
 

ogrefugee

Official Tree Taster
Veteran
thanks for all the positive rep people! i KNEW everyone here wasn't a self serving asshole! i'm glad i could contribute!
 

ColoraDro

Active member
haha Og i just choped my plants and have 2 pc fans hanging in the closet with em just going buckwild lets see if my portable version works :lurk:
 

ogrefugee

Official Tree Taster
Veteran
^lol

/begin pissing contest

my dryer is soooo much better than anything you could ever concieve. mine is obviously the pinnacle of drying technology!
/end pissing contest

:D jk
 

gsxxer

Member
replace that computer fan with one of these http://www.happygirl.ca/mini_filters.htm and that takes care of the smell!...

unless you already have a carbon scrubber, but doesnt really attach to a computer fan well, so this little device takes care of that problem.

seems like its perfect for a little dryer box fan, thats what i first thought when i saw it.

the original design from overgrow (forgot who)...had a carbon scrubber in the bottom of the tub, put multiple drying screens over that in levels and had a fan sucking through the scrubber and there were holes drilled in the top lid for air-intake.
 
Last edited:

sparobis

Active member
Veteran
great idea fella,
altho...im gonna try it but,im gonna hang my buds for 5 days first then....put them in the box after i hang them for 5 days or so...
ill try both ways....ill put a couple oz's in the box..put a couple oz's hanging
see which 1 works best?ill try anything.
never fails..every time i hang plants to dry i usually drop a plant trying to hang it or...
they fall after i hang them...lol so, just putting them on the racks would stop that mishaps..lol
anyways..im weeks away from harvesting my current grow..have plenty of time to make the box...i have 2 extra puter fans ...im going to try it!
great idea my man...keep up the good works! K++++ for your idea!
peace
sparo
 
I love your thread I don’t know much about drying racks so it is very informative. Does it affect the potency or the taste? What is a rough estimate of drying time? I also thought it would be a great way to quickly dry Water Cured bud. Thanks you very much for this thread!
 

ogrefugee

Official Tree Taster
Veteran
Threw in about ~1 oz of trim and popcorn buds right off the plant, we'll see how long it takes to dry
 

Latest posts

Latest posts

Top