What's new
  • Happy Birthday ICMag! Been 20 years since Gypsy Nirvana created the forum! We are celebrating with a 4/20 Giveaway and by launching a new Patreon tier called "420club". You can read more here.
  • Important notice: ICMag's T.O.U. has been updated. Please review it here. For your convenience, it is also available in the main forum menu, under 'Quick Links"!

Help me DIY a Tumbler

Cameltom

Member
Twats up guys.
I want a bad ass tumbler. Not as bad ass as the APE 2.0. This is a diy
I have been looking at allot of tumblers and they all seem over priced. the APE 2.0 is 500, bubble bags tumbler is 350 and theres another i saw for 135 it looked like a toy.
All the diy threads i have come a crossed have looked super Ghetto
i have an idea of what i want.
i also have some questions
1.Should it be shaft driven or the rubber wheel that spins(the wait of the drum hold it on the rubber wheel?
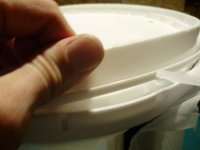
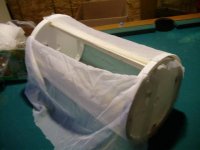
2.i dont want this too look ghetto, would plexy glass be ok as a window? i plan on using a bit of dry ice in the future.
3.what kind of wood should i use
4. what size motor should i use, and how fast should it spin? the APE spins crazy fast! i think if spun a bit slower it would take more time but you would get a better product?
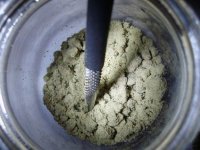
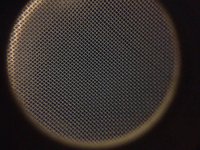
5. What size micron screen should i get to start with? Metal or fabric?
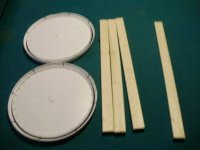
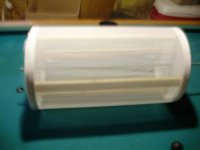
I think my drum is going to be 8 or 10 inches wide and a 20 inchs long.I want to fit a few Zs in there.
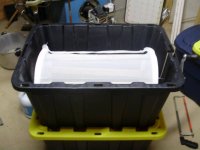
Should i build the box to the drum or the drum to the box?
Thank you CT
 

Cameltom

Member
here are my pics
 

Attachments

  • P2090029.jpg
    P2090029.jpg
    27.4 KB · Views: 41
  • P2090030.jpg
    P2090030.jpg
    27.5 KB · Views: 42
  • P2090031.jpg
    P2090031.jpg
    22.1 KB · Views: 37
  • P2090032.jpg
    P2090032.jpg
    28.5 KB · Views: 41
  • P2100038.jpg
    P2100038.jpg
    22.3 KB · Views: 35
  • P2100034.jpg
    P2100034.jpg
    24.8 KB · Views: 34
  • P2100035.jpg
    P2100035.jpg
    20.9 KB · Views: 38
  • P2090033.jpg
    P2090033.jpg
    32.4 KB · Views: 38
  • P2100039.jpg
    P2100039.jpg
    36.5 KB · Views: 43
Give us some details.Im very interested!!Dont leave us hanging.Glad i found the thread.thanks for coming back on to show results!
 

Cameltom

Member
Give us some details.Im very interested!!Dont leave us hanging.Glad i found the thread.thanks for coming back on to show results!
ok will do
materis
1.I went to the closest fabric store with a piece of my 220 work bag, so i could mach up some material for the screen. cheap 10 bucks
2. i got two 5gallon bucket lids and two 5 gallon buckets. 10 bucks
3. wood i had laying around my house. free
4.1 Threaded rod at 3ft fits 14mm nuts
4.2 shit load of nuts washers and lock washers that fits rod 7 bucks
5. The perfect tote... build your drum to match your tote,it is easier than trying to find a tote that matches your drum. mine was 10 buck
6. i had Velcro kickin around the house so thats free....
so im at 37 bucks
 

Cameltom

Member
1. i cut 4 pieces of wood to my desired size, so it would fit in the tote.

2. take gaskets out of 5 gal lids, and screw the wood into place on one lid then the other to create the frame of the drum.(on this step make sure the gasket side of the lid is facing out)
.... if i do this again, i will use threaded rod and nuts for the frame. i think it would have made it more solid.

3. drill a hole in center of each 5 gal lid just smaller than your rod. start threading the rod though. don't forget to add your nuts and washers that you want on the inside of the drum to hold it in place... you will be pissed later if you don't.

4. start putting your mesh screen on one of the 5 gal lids, just like you would to re-screen a screen frame. when you finish the first side put a line of gorilla glue on the gasket that will hold it together for the tightening, witch is step 6. wait 24 hours for glue to dry.

5. flip her over and do the other side, with no glue this time.

6. Now cut off the rim that seals a 5 gal bucket. now be very careful putting this on it will tighten your screen, but if your not careful it will rip it.... you could probably do this with step 4, however i didnt think of it till i was past it

7. find a piece of wood you want your seam on, and cut it so you can put your Velcro on it. so let it overlap an inch or two... no gaps you dont want shake in your hash...
now the drum should be complete

8. Get your tote make the required measurements so your drum wont rub on the bottom... keep in mind you probably want to cut a piece of plastic or glass to put at the bottom, for collecting ease.
now drill one hole and cut out the side that you want your handle on... so you can put one side in then drop it in place.

9. put your nuts and washers on and your handle(i had one kicking around the pad, im sure its easy to makeshift one) and bam your done

this spins insanely smooth for a diy... i am impresses and so are all my friends that have seen it.
 
Im auto mechanic so i love cheap diys!!going to make something similar soon i will share the results.I dont have enough bud to play with yet..
 

Cameltom

Member
Im auto mechanic so i love cheap diys!!going to make something similar soon i will share the results.I dont have enough bud to play with yet..

my friend thats and auto mechanic thought it was awesome. originally he was going to help me but he didnt have the time.
i would like to see it when your done
 

vostok

Active member
Veteran
Good Post what motor did you settle on ....? have you a pick of the screen material you bought ?
 

Cameltom

Member
Good Post what motor did you settle on ....? have you a pick of the screen material you bought ?

Thank you.
motor is me, its hand crank. lol.... wouldn't be hard to hook one up though... i do not have a pic of the screen, but i can take one in a bit
 
Id say the hand crank is the best part.One could easily fashion a pulley system with a motor and a potentiometer.Im gonna head to micheals and check the screens out.

I used to have a friend that had a picture frame with a screen.On the frame there where hinges to expose a glass mirror.It worked great and was fairly large.He would just break up the buds and lightly rub, mix them around.You could also do something as easy as a screen in a jar with a penny and a mirror.How much material did u use to get 7 ounces?
 

Cameltom

Member
You mean 7 grams, that was my first run. 5g was my second run. after that quality was too low for me... I used 2-3 0z of sugar leaf... This unit could easily fit a 1/2 lb in it.
 

Cameltom

Member
Good Post what motor did you settle on ....? have you a pick of the screen material you bought ?

here are the pics
i plan on re-screening to get better quality out of it.
 

Attachments

  • IMG_0309.jpg
    IMG_0309.jpg
    36.3 KB · Views: 45
  • IMG_0310.jpg
    IMG_0310.jpg
    75.3 KB · Views: 42

DunHav`nFun

Well-known member
The original DIY tumbler threads back in the day @ OG & CW had the units powered by BBQ rotisserie motors and spits....and....

Small rubber or heavier plastic balls were added to the containers of trim to fall , bounce , and beat the silk screen as it tumbled to help vibrate the trichs off the leftover plant material.....anyways....

Thoughts to ponder , and hey.......nuthin wrong with a lil hand crank tumble action goin on since it allows more volume of material to be processed at one setting , but.....

We always liked to use less material and pull more dry sift , or rather as much as possible without adding too much shake and green shit to the pile underneath , and the rotisserie motor could be left runnin while other shit was being done........

Peace.....DHF....:ying:.....
 
Top