
Two ounces potentially of dried bud off a plant flowered in a six ounce cup.
Two ounces.
You so humble eighths, lol.
Two ounces.
You so humble eighths, lol.
 ).).
).).Two ounces potentially of dried bud off a plant flowered in a six ounce cup.
Two ounces.
You so humble eighths, lol.


New Note 20
#254, i meant trichoderma
https://en.wikipedia.org/wiki/Trichoderma
root helping fungi.
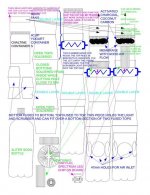
Dropped Cat, i am wondering if your Zamaldelica in yogurt cup can be done inside of greek yogurt containers soldered ends to ends to make `1ft tall chamber with a 10w LED chip at the top.
with a small enclosure and light containment and the ability to pull off the top to LST, it may be really economical for the yogurt cup challenge.
*if you take the 4 cup containers
tak two together top to top (open to open) by slowly tacking in the rims, keeping them even, going around
*then take two more, and making sure to have them alighned (maybe a hole in the center), use the soldering iron to melt through both layers where the bottoms meet, avoid the smoke/be outside and/or well ventilated and cut a circle, keeping as close to the rim as possible, to minimize lip (and light loss).
*one side of this will fit snuggly over the first piece formed.
*tack weld
(i meant to say continually tak in the side lips at a 90 degree angle, sufficient that it melts and merges the two layers, and move machine like fashion, along the perimeter. it will look like little lines pointing upwards after unless smeared)
one more container top to top of one side of the second piece.
this way, when it is fit snug on the first piece made, this new second piece (having three pieces) will have a top that is narrow/the bottom of a container.
*now take one more container and weld it bottom onto the bottom at the top. take another one and remove the bottom and set that into the one on the top. these two settled together can be trimmed at any height, the ease of doing the next step can be done by starting the weld from the bottom.
*get an ovaltine container, take the top off, take the solder tool and keeping the smoke away from your eyes (goggles) and nose if possible, do the same melt in and carve out of a circle with the rim barely there.
*now if one takes off the top, they can see to the bottom of the chamber.
*cut the bottom off the original container.
*take a 2 liter soda bottle with straight sides and cut off the top right before it starts to narrow.
* fit this over the bottom of the contraption. this can hold soil and the top part can be removed.
*the idea for the LED 10W COB is one of the full spectrum ones, mounted on a heatsink.
*the idea for the heatsink it to cool it with the draft from the scrubber fans above it.
*the idea is to fit the heatsinked LED into the bottom of the inverted cup area. the area itself is carved out and the led is held there by holding or wedging the heatsink somehow. the power wires are fed out an appropriate hole and sealed. the ovaltine container is fitted with a porous filter and coco carbon. two 80mm fans are glued/stacked together on top of the ovaltine top (80mm, also a small size JIF peanut butter container top has an 80mm top that fits well on the ovaltine top and can maybe be tightened better). the top is cored out prior.
*keeping the top from unscrewing is something i am unsure about (i think the fans spin counter clockwise so the torque should keep them tight) as well as standing the thing up straight (i'm sure it is not to difficult to keep it in place).
*some sort of inlet system or hole should be made in the two liter bottom, towards it's top.
if making three holes and wanting same inlet area, use 46-47mm holes.
((((pi40sqrd)/3)/pi)sqrroot)times two<< lookimg at that, i realized the pi can be left out, so just radius squared then divide by three then square root that thats the radius, then times that by two. its got a 23.09401077 which times two is 46.18802154 so i wrote 46-47mm. also the fans all have circles where the motors are so those areas should seemingly be removed from the air opening calculations in theory, but being that they are powered fans the inlet hole size is probably a function of their operaring specifications. i figure two Noctua NF-A8 fans have superb Static pressure and alright airflow (all while being super quit 17,7 dB(A), which is under the sound of rustling leaves according to here http://www.noisehelp.com/noise-level-chart.html)
noctua.at/main.php?show=productview&products_id=100&lng=en&set=1
i figure that kind of airflow and pressure is enough to pull enough air to cool the heatsink, power the scrubber, and exchange air for the plant. i don't know yet.
Dropped Cat, i got the idea when i saw your Zamaldelica in a yogurt cup and the LSTing (training {i had to learn what that meant somewhere once})
that you had done on it and i don't know if 10W is enough but i hacked part of this together (i mentioned measure the centering of the welds above...because i was a little off and after making a hole and patching a hole and....it is supremely sloppy and you can do better probably if you make sure it is measured twice and soldered once
i think this may work because 10W probably is not too hot, can be heatsunk well enough and if it is the full spectrum led COB, and contained, it may pack enough energy to grow a mini plant, a sativa Zamdelica, really efficiently.
a plus could be also for micro (or nano) breeding or isolation and if one is male, it is already contained. theoretically one can make a fleet of pods like this and manage them easily.
there are these micronized retro reflective particles for use in reflective clothing and painting and stuff on ebay. if the inside of these containers is already white, and given a coat of super glue spray or something and then these tiny particles are sprayed or shaken or somehow without getting them everywhere or inhaling them, gotten on the wall to set, and the outside is spray painted black while all fitted together (maybe with quick seal from Rust-Oleumwhick would maybe give it a good seal that can be recut with a razor blade) then it may be super awesome.
looking at the thing i cobbled together so far, i am reminded of a rocket ship and i like thinking about space travel (like actual space travel. and also getting high space travel too
i hope this helps alot
i error proofed, if i goofed please let me know


Sorry for the stupid question, but i don't understand rule 6.
I have to finish the cycle before 09/11/2015, but When i have to write the smoke report? after this date?
You can enter and finish ANY time between now and and thee 9th of November, but MUST be harvested with finished product pictures and smoke report by November 9th 2015.
any more questions?


Only question is on that photo where you show the base of your plant stem the soil/medium looks completely molded black on top and the base of the stem is deep green. Have any clue why that happened or has it happened in the pasted? Was it only during yogi cups it happened? Just wondering, got into my mind and couldn't figure out why. Thanks man.
Great job to everyone that finished their cups. Wish I could have a sample of each one lol. Eighths-n-Aces really blew it up once again, insane job man. 2-2 and a half ounces if quite nice. In-between 2 1000w lights correct? I forgot so much has happened in the past.
Only question is on that photo where you show the base of your plant stem the soil/medium looks completely molded black on top and the base of the stem is deep green. Have any clue why that happened or has it happened in the pasted? Was it only during yogi cups it happened? Just wondering, got into my mind and couldn't figure out why. Thanks man.
Update on my cups. Second day of flowering as I had to flip the tent. Hopefully next time I will be more prepared for the time frame of the contest. They are all receiving max doses of Advanced Nutrients with pure RO water 30 mins right before lights out. Only using A & B Ph Perfect coco, Carbo Load and Bud Ignite at the moment.
Bubba Kush x Hash Plant
View Image
Double Black
View Image
BogBubble
View Image
GTH #1 clone
View Image
White Widow
View Image

good to see this thread rolling again!
my clone has roots but air layering took longer than i thought it would (mostly because i fucked up and wasn't paying enough attention) and one worked. she's way bigger than i wanted but she's what i have to work with ....... here we go again
still hooked to mom
[URL="https://www.icmag.com/ic/picture.php?albumid=62047&pictureid=1479810&"]View Image[/URL]
i've been cutting through the stem a little more day by day. the volume she drinks from the rapid rooter has gone up a LOT in 72 hours so i know the roots are doing what roots do
[URL="https://www.icmag.com/ic/picture.php?albumid=62047&pictureid=1479811&"]View Image[/URL]
i'm just wondering if there are enough roots to do what they need to ....... but it's a little late to turn back now
[URL="https://www.icmag.com/ic/picture.php?albumid=62047&pictureid=1479813&"]View Image[/URL]
i pruned her, bent her over, chained her to the rack, turned the hose on her and got her to intensive care ....... now i guess i'll see what happens
[URL="https://www.icmag.com/ic/picture.php?albumid=62047&pictureid=1479815&"]View Image[/URL]
the I.C.U ..... or a big fuckin' humidity dome
[URL="https://www.icmag.com/ic/picture.php?albumid=62047&pictureid=1479808&"]View Image[/URL]
she's getting some rest in the I.C.U. now ....... never had a clone even close to this size before so this should be interesting. a friend who has air layered other things before says it will be just fine. i hope so.
as soon as she gets out of the dome and on her feet she'll hit the 12/12
Great job to everyone that finished their cups. Wish I could have a sample of each one lol. Eighths-n-Aces really blew it up once again, insane job man. 2-2 and a half ounces if quite nice. In-between 2 1000w lights correct? I forgot so much has happened in the past.
Only question is on that photo where you show the base of your plant stem the soil/medium looks completely molded black on top and the base of the stem is deep green. Have any clue why that happened or has it happened in the pasted? Was it only during yogi cups it happened? Just wondering, got into my mind and couldn't figure out why. Thanks man.
Update on my cups. Second day of flowering as I had to flip the tent. Hopefully next time I will be more prepared for the time frame of the contest. They are all receiving max doses of Advanced Nutrients with pure RO water 30 mins right before lights out. Only using A & B Ph Perfect coco, Carbo Load and Bud Ignite at the moment.
Bubba Kush x Hash Plant
View Image
Double Black
View Image
BogBubble
View Image
GTH #1 clone
View Image
White Widow
View Image


 explosive!
