Mr_Micro
Member
Hey again guys and gals, and welcome to my third documented grow show! 
While this grow will actually feature the 4th PC case growbox I've built, it's my third documented grow and "PC3" just sounded cool to me so that's the name I decided to go with for this thread.
The PC case growbox that will be used for this grow is a brand new one, since I unfortunately had to sell my beloved Nanomachine growbox a while back when I came upon some financial hard times. I do plan to build another Nanomachine style stealth growbox at some point the future, but I wanted to grow again sooner rather than later and my budget is a bit limited right now. So I decided to build a new growbox from spare parts and whatnot that I had laying around from previous PC case growbox builds. All in all I'm pretty pleased with the results... it's not anywhere near as stealthy as my old Nanomachine box, nor is it as clean looking (I did use a lot of epoxy and black duct tape on this project) but it is certainly the most powerful PC case I've ever built in all respects.
So enough talk, here's some pics and the lowdown on the basic construction of the new box that will be used for this grow


Box Specs
=======
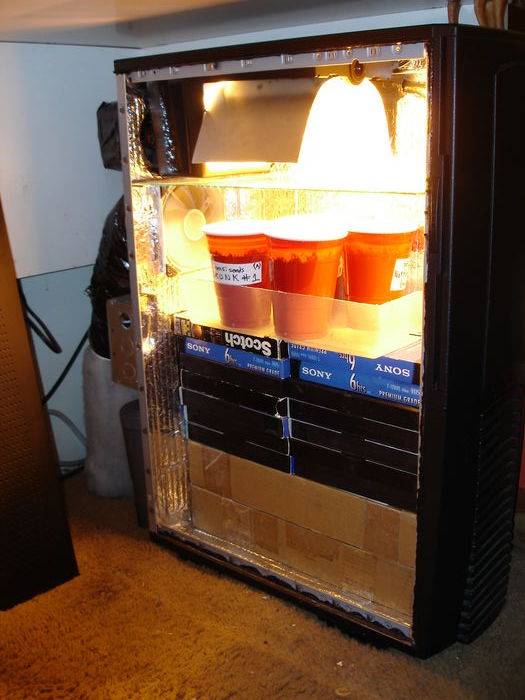
The PC case used is a ChenMing brand full server case that measures about 26" (H) x 8.1" (W) x 18" (L). It features a lockable door and front panel.
Lighting
======
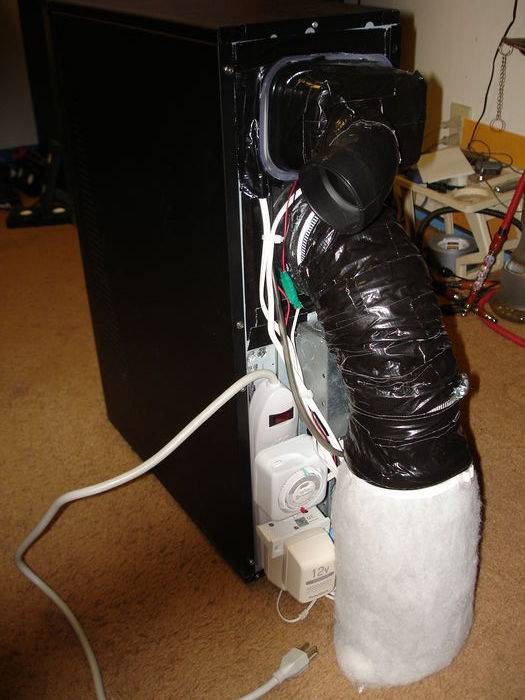
Lighting is supplied via a single 70 watt HPS that is hard mounted to the ceiling of the case. It has been remote ballasted for cooler operation and the ballast box can be seen mounted to the back of the PC case with a cord running to a timer on a power strip that is also mounted to the back of the case.
This will be another 12/12 straight from seed grow, so 12 hours on and 12 hours off every day from start to finish.
Reflectivity
========
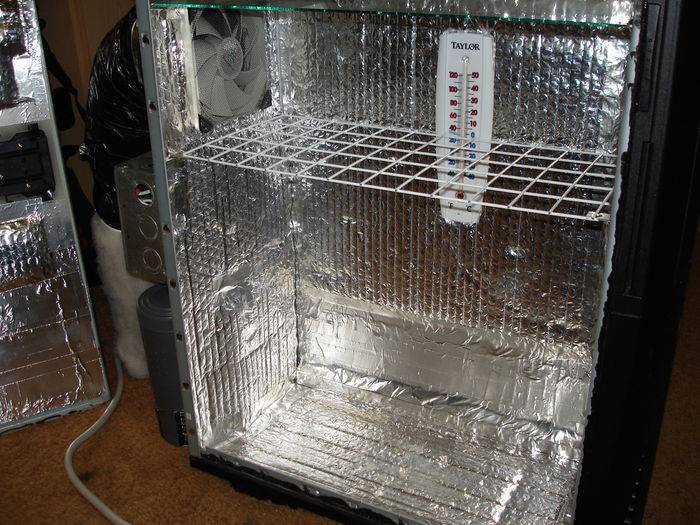
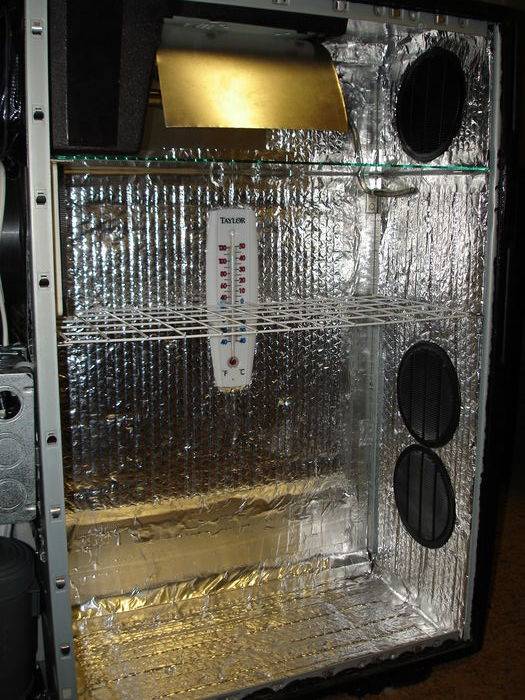
Like in all my PC case builds the walls, ceiling, and floor have been covered in Reflectix brand reflective insulation and reflective tape for it's reflectivity and ease of installation. This time though I made a simple reflector for the 70 watt HPS bulb by taking a sheet of aluminum from the hardware store, bending and cutting it to size with a regular old pair of scissors, and affixing it to the top of the HPS mount with a nut, bolt, and washer set.
Ventilation
=========
Air intake is supplied by three 4" darkroom midget louvers that let air in but prevent light from escaping. Two are installed towards the bottom of the case on the right hand side for the main growing section of the cab and one is installed at the very top of the case on the right side as well.
There is a 5/32" thick glass heat shield that has been cut to size and installed approximately 1.5" below the HPS bulb. With some shelf mounting brackets, epoxy, and reflective tape on the edges of the glass heat shield I have completely sealed off the upper light chamber from the lower growing chamber so that there is an air tight seal between the two chambers.
The exhaust in the lower growing portion of the cab is accomplished via 120mm 70-110 CFM adjustable PC fan. The adjustment knob for the fan speed has been wired to the front panel of the case, as seen in the picture above showing the front panel open.
The exhaust for the upper portion of the cab containing the HPS is a 80mm PC fan rated at 54 CFM (and a mere 24 dBA, so it's very quiet) that is mounted at the very back of the case behind the mount for the HPS bulb.
Both PC fans are wired to 12 volt DC adapaters from Radio Shack.
Odor Control
=========
For odor control I am using a Can Filter brand Can 705 filter that has been attached to a 4" flange and another flange has been mounted on the back of the case that attaches to the 120mm 110 CFM PC fan. It's connected to the case with a length of 4" dryer duct tubing that has been wrapped in a few layers of black duct tape to make it light proof and not stand out so much in the dark environment underneath my desk.
Light Proofing
=========
Light proofing has, as usual, been done using my favorite silicone caulk method. Just apply it in a small layer of black silicone caulk to the door frame (or any other part you want to light proof) and then put a very small layer of vaseline or similar petroleum jelly on the edges of the door that will be touching the caulk before you put the door back on. Then when the caulk sets it will form a light tight seal between the door and the frame of your cabinet.
After the caulk has had 24 hours to set you can remove the door and you'll notice that the caulk sticks nicely to the frame of your cab but will not stick to anything that had vaseline smeared on it, so it won't stick to your door. Then you just wipe off the vaseline, peel or cut away any excess caulk for a clean finish, and you're done!
It's certainly the most simple and 100% effective way I've ever found to light proof a cab.
Also, I constructed a simple and removable light trap for the exhaust fan for the upper light chamber by using a disposable rubbermaid tub, a 2" black plumbing elbow, and a lot of epoxy and duct tape. Here's a quick shot of the case running in a pitch black room to show how well this light proofing method works...

Not a spec of light escapes!
CO2
===
A constant flow of CO2 is supplied from one of these cheap and simple Nutrafin CO2 setups originally made for aquariums ---> http://www.aquariumguys.com/nutrafinco2.html
It's a simple matter of putting some sugar in the bottom of the canister, adding in the activator and stabilizer tablets along with some warm water, screw the cap back on and connect the 1/4" tubing to run it into your growbox. And voila! You have a constant flow of CO2 into your micro cab for 30 days. After 30 days just clean it out and refill it with sugar, water, and the activator and stabilizer tabs and you'll have another 30 days of CO2.
It's simple, cheap, and my yields in my PC case growboxes have always been substantially larger (at least 1/4 oz. bigger) when using this CO2 system when I did side by side comparisons of with CO2 and without. The CO2 output tube is placed on the top right side of the cab, just below the heat shield and directly across from the exhaust fan for the growing chamber. That way when the CO2 comes out of the tube the exhaust fan will suck it across to the other side of the case, and since CO2 is heavier than air the CO2 particles will fall down over the canopy (a ScrOG screen in my case) as the exhaust fan pulls it across the case.
Cheap, simple, and highly effective for PC case growboxes. You can see the CO2 canister mounted on the back of the case on the bottom right side.
Temperature
==========
The temps in this case vary a bit depending on how empty or full the case is, but it is always between 1°F and 5°F above ambient room temperature. And since the room temperature is usually around 75°F or so that means the PC case runs 76°F to 80°F at most. Quite good for a 70 watt HPS in such a small space I think!
Temps can be monitored with the thermometer mounted on the back wall of the case, placed directly where I think the canopy should be when the ScrOG screen fills up.
Training
======
Over the past few grows I've really fallen in love with the ScrOG method, as I find it much easier and less time consuming to work with than LST in confines of a PC case growbox. So I've once again chosen to use the ScrOG method of training in this grow. Even with 12/12 straight from seed plants will still likely outgrow the confines of a PC case growbox so this ScrOG screen should make my life much easier when the plants get bigger.
The screen is made of a metal towel rack purchased at Target that was cut down to the right size and shelf mounting brackets have been installed inside the case to hold the screen up. The screen is removable though, so it will be removed until the plants show sex, at which point the males will be removed, the ScrOG screen will be installed by attaching it to the mounting brackets with zip ties, and 2 (hopefully) females will be placed under the screen.
The Gear
=======


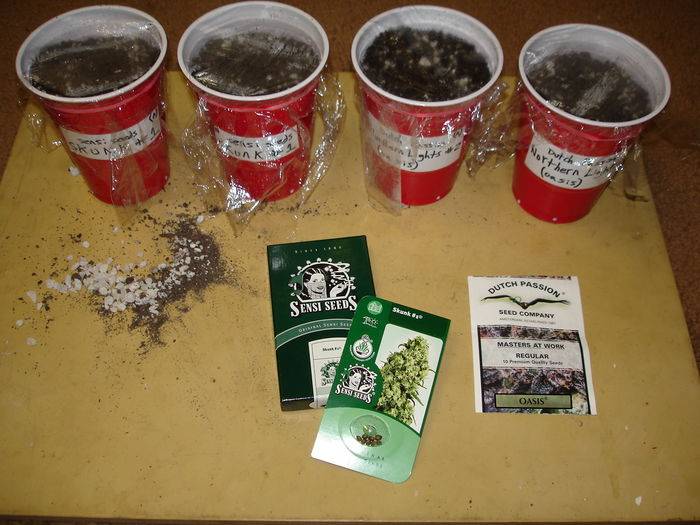
This grow will feature my long time favorite Sensi Seeds's Skunk #1 along with Dutch Passion Northern Lights #2 (Oasis).
I'm growing the Skunk #1 since it was always my favorite plant to grow and smoke (very easy to grow, uniform, massively trich coated, good yeild, great smell and taste, good mellow all around high, and just plain beautiful plants every time) and I'm trying the Dutch Passion NL #2 since I'm still searching for a overwhelmingly piney smelling Northern Lights like the locally grown one that rocked my world some 8 years ago. I've never forgotten that stuff and have been searching for a similar Northern Lights ever since, and after my big let down with Sensi Seeds NL (not a single seed germinated!) I'm gonna give Dutch Passion a try.
So yeah, for this grow I'll once again be sticking with the classic old school 80's-90's strains that I've always been a fan of
The Dirt On The Dirt
==============
Just like the title says, I'm doing this grow in soil with organic methods. But I'm a lazy man (so very very lazy) so I think I've come up with a very simple way to grow organically without too much effort.
The seeds are started in Rapid Rooter plugs placed in a soil mix that contains 3 parts Fox Farm Ocean Forest Soil, 1 part Perlite, and 1 tablespoon of dolmetic lime (for calcium and magnesium supplement as well as PH balancing) per gallon of soil.
The plants are started in 20 oz party cups with a few holes drilled in the bottom for drainage and once they show sex the females will be placed in 1/2 gallon 6" square containers. All containers have a 1/4" thick layer of aquarium gravel on the bottom to insure proper drainage.
Nutrients and Feeding
===============
For the first 3 weeks or so the plants will be fed with plain RO/UV filtered water that comes pre-balanced to a PH of 6.5 from the local food Co-Op. After that they will be given only PureBlend Pro Soil Formula at it's recommended dosage once every 3 or 4 waterings as needed. The only other nutrient supplement that will be used is organic blackstrap molasses at a ratio of 1 tablespoon per gallon of water which will only be used for the last few weeks of flowering.
And that's it! Very simple, very basic, and I think it should provide great results. No need to check the PH, no need for complex supplements, just easy and carefree organic... and that's the way I like it
Well, that about wraps it up for the intro!
As of now both of the Skunk #1 seeds have germinated and have been placed in their containers in the PC case (still waiting on the Northern Lights to germinate though).
This thread will be updated again with more pics once all seeds have germinated and sprouted, but in the meantime feel free to comment or ask questions if you have any and I'll answer them to the best of my ability.
Thanks a lot for taking the time to look at my new grow show and I'll be looking forward to sharing the next 3 months of growing with all you fine folks here at the IC Mag forums!
Until next time, stay safe and grow smart my friends!
While this grow will actually feature the 4th PC case growbox I've built, it's my third documented grow and "PC3" just sounded cool to me so that's the name I decided to go with for this thread.
The PC case growbox that will be used for this grow is a brand new one, since I unfortunately had to sell my beloved Nanomachine growbox a while back when I came upon some financial hard times. I do plan to build another Nanomachine style stealth growbox at some point the future, but I wanted to grow again sooner rather than later and my budget is a bit limited right now. So I decided to build a new growbox from spare parts and whatnot that I had laying around from previous PC case growbox builds. All in all I'm pretty pleased with the results... it's not anywhere near as stealthy as my old Nanomachine box, nor is it as clean looking (I did use a lot of epoxy and black duct tape on this project) but it is certainly the most powerful PC case I've ever built in all respects.
So enough talk, here's some pics and the lowdown on the basic construction of the new box that will be used for this grow


Box Specs
=======
The PC case used is a ChenMing brand full server case that measures about 26" (H) x 8.1" (W) x 18" (L). It features a lockable door and front panel.
Lighting
======
Lighting is supplied via a single 70 watt HPS that is hard mounted to the ceiling of the case. It has been remote ballasted for cooler operation and the ballast box can be seen mounted to the back of the PC case with a cord running to a timer on a power strip that is also mounted to the back of the case.
This will be another 12/12 straight from seed grow, so 12 hours on and 12 hours off every day from start to finish.
Reflectivity
========
Like in all my PC case builds the walls, ceiling, and floor have been covered in Reflectix brand reflective insulation and reflective tape for it's reflectivity and ease of installation. This time though I made a simple reflector for the 70 watt HPS bulb by taking a sheet of aluminum from the hardware store, bending and cutting it to size with a regular old pair of scissors, and affixing it to the top of the HPS mount with a nut, bolt, and washer set.
Ventilation
=========
Air intake is supplied by three 4" darkroom midget louvers that let air in but prevent light from escaping. Two are installed towards the bottom of the case on the right hand side for the main growing section of the cab and one is installed at the very top of the case on the right side as well.
There is a 5/32" thick glass heat shield that has been cut to size and installed approximately 1.5" below the HPS bulb. With some shelf mounting brackets, epoxy, and reflective tape on the edges of the glass heat shield I have completely sealed off the upper light chamber from the lower growing chamber so that there is an air tight seal between the two chambers.
The exhaust in the lower growing portion of the cab is accomplished via 120mm 70-110 CFM adjustable PC fan. The adjustment knob for the fan speed has been wired to the front panel of the case, as seen in the picture above showing the front panel open.
The exhaust for the upper portion of the cab containing the HPS is a 80mm PC fan rated at 54 CFM (and a mere 24 dBA, so it's very quiet) that is mounted at the very back of the case behind the mount for the HPS bulb.
Both PC fans are wired to 12 volt DC adapaters from Radio Shack.
Odor Control
=========
For odor control I am using a Can Filter brand Can 705 filter that has been attached to a 4" flange and another flange has been mounted on the back of the case that attaches to the 120mm 110 CFM PC fan. It's connected to the case with a length of 4" dryer duct tubing that has been wrapped in a few layers of black duct tape to make it light proof and not stand out so much in the dark environment underneath my desk.
Light Proofing
=========
Light proofing has, as usual, been done using my favorite silicone caulk method. Just apply it in a small layer of black silicone caulk to the door frame (or any other part you want to light proof) and then put a very small layer of vaseline or similar petroleum jelly on the edges of the door that will be touching the caulk before you put the door back on. Then when the caulk sets it will form a light tight seal between the door and the frame of your cabinet.
After the caulk has had 24 hours to set you can remove the door and you'll notice that the caulk sticks nicely to the frame of your cab but will not stick to anything that had vaseline smeared on it, so it won't stick to your door. Then you just wipe off the vaseline, peel or cut away any excess caulk for a clean finish, and you're done!
It's certainly the most simple and 100% effective way I've ever found to light proof a cab.
Also, I constructed a simple and removable light trap for the exhaust fan for the upper light chamber by using a disposable rubbermaid tub, a 2" black plumbing elbow, and a lot of epoxy and duct tape. Here's a quick shot of the case running in a pitch black room to show how well this light proofing method works...

Not a spec of light escapes!
CO2
===
A constant flow of CO2 is supplied from one of these cheap and simple Nutrafin CO2 setups originally made for aquariums ---> http://www.aquariumguys.com/nutrafinco2.html
It's a simple matter of putting some sugar in the bottom of the canister, adding in the activator and stabilizer tablets along with some warm water, screw the cap back on and connect the 1/4" tubing to run it into your growbox. And voila! You have a constant flow of CO2 into your micro cab for 30 days. After 30 days just clean it out and refill it with sugar, water, and the activator and stabilizer tabs and you'll have another 30 days of CO2.
It's simple, cheap, and my yields in my PC case growboxes have always been substantially larger (at least 1/4 oz. bigger) when using this CO2 system when I did side by side comparisons of with CO2 and without. The CO2 output tube is placed on the top right side of the cab, just below the heat shield and directly across from the exhaust fan for the growing chamber. That way when the CO2 comes out of the tube the exhaust fan will suck it across to the other side of the case, and since CO2 is heavier than air the CO2 particles will fall down over the canopy (a ScrOG screen in my case) as the exhaust fan pulls it across the case.
Cheap, simple, and highly effective for PC case growboxes. You can see the CO2 canister mounted on the back of the case on the bottom right side.
Temperature
==========
The temps in this case vary a bit depending on how empty or full the case is, but it is always between 1°F and 5°F above ambient room temperature. And since the room temperature is usually around 75°F or so that means the PC case runs 76°F to 80°F at most. Quite good for a 70 watt HPS in such a small space I think!
Temps can be monitored with the thermometer mounted on the back wall of the case, placed directly where I think the canopy should be when the ScrOG screen fills up.
Training
======
Over the past few grows I've really fallen in love with the ScrOG method, as I find it much easier and less time consuming to work with than LST in confines of a PC case growbox. So I've once again chosen to use the ScrOG method of training in this grow. Even with 12/12 straight from seed plants will still likely outgrow the confines of a PC case growbox so this ScrOG screen should make my life much easier when the plants get bigger.
The screen is made of a metal towel rack purchased at Target that was cut down to the right size and shelf mounting brackets have been installed inside the case to hold the screen up. The screen is removable though, so it will be removed until the plants show sex, at which point the males will be removed, the ScrOG screen will be installed by attaching it to the mounting brackets with zip ties, and 2 (hopefully) females will be placed under the screen.
The Gear
=======
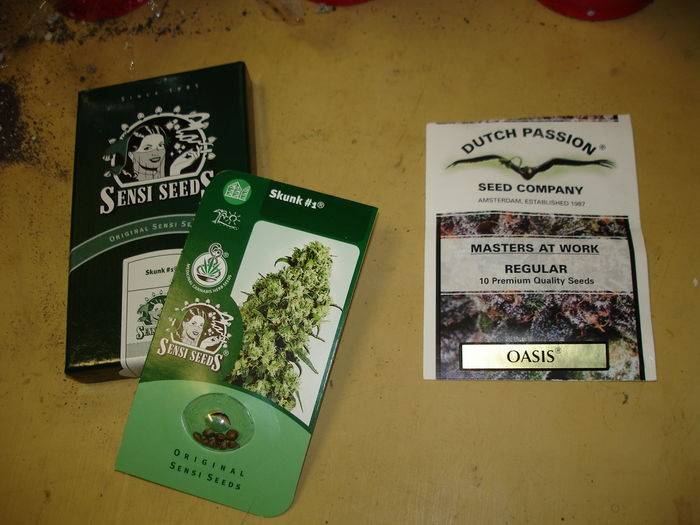

This grow will feature my long time favorite Sensi Seeds's Skunk #1 along with Dutch Passion Northern Lights #2 (Oasis).
I'm growing the Skunk #1 since it was always my favorite plant to grow and smoke (very easy to grow, uniform, massively trich coated, good yeild, great smell and taste, good mellow all around high, and just plain beautiful plants every time) and I'm trying the Dutch Passion NL #2 since I'm still searching for a overwhelmingly piney smelling Northern Lights like the locally grown one that rocked my world some 8 years ago. I've never forgotten that stuff and have been searching for a similar Northern Lights ever since, and after my big let down with Sensi Seeds NL (not a single seed germinated!) I'm gonna give Dutch Passion a try.
So yeah, for this grow I'll once again be sticking with the classic old school 80's-90's strains that I've always been a fan of
The Dirt On The Dirt
==============
Just like the title says, I'm doing this grow in soil with organic methods. But I'm a lazy man (so very very lazy) so I think I've come up with a very simple way to grow organically without too much effort.
The seeds are started in Rapid Rooter plugs placed in a soil mix that contains 3 parts Fox Farm Ocean Forest Soil, 1 part Perlite, and 1 tablespoon of dolmetic lime (for calcium and magnesium supplement as well as PH balancing) per gallon of soil.
The plants are started in 20 oz party cups with a few holes drilled in the bottom for drainage and once they show sex the females will be placed in 1/2 gallon 6" square containers. All containers have a 1/4" thick layer of aquarium gravel on the bottom to insure proper drainage.
Nutrients and Feeding
===============
For the first 3 weeks or so the plants will be fed with plain RO/UV filtered water that comes pre-balanced to a PH of 6.5 from the local food Co-Op. After that they will be given only PureBlend Pro Soil Formula at it's recommended dosage once every 3 or 4 waterings as needed. The only other nutrient supplement that will be used is organic blackstrap molasses at a ratio of 1 tablespoon per gallon of water which will only be used for the last few weeks of flowering.
And that's it! Very simple, very basic, and I think it should provide great results. No need to check the PH, no need for complex supplements, just easy and carefree organic... and that's the way I like it
Well, that about wraps it up for the intro!
As of now both of the Skunk #1 seeds have germinated and have been placed in their containers in the PC case (still waiting on the Northern Lights to germinate though).
This thread will be updated again with more pics once all seeds have germinated and sprouted, but in the meantime feel free to comment or ask questions if you have any and I'll answer them to the best of my ability.
Thanks a lot for taking the time to look at my new grow show and I'll be looking forward to sharing the next 3 months of growing with all you fine folks here at the IC Mag forums!
Until next time, stay safe and grow smart my friends!
Last edited:


 But yeah, my only concern with this case is that someone might eventually see the back and be like "what the hell!?". But I rarely ever have visitors (maybe a few times a year at most) and I'm thinking of building an addition onto my desk out of some fiberboard and painting it white. A sort of upside down "L" shape that would just look like an extension of the desk and would fit over the stuff coming out from the back of the PC case to keep it hidden. Gimme a week or two on this and I'm sure I'll get around to it.