What's new
  • Happy Birthday ICMag! Been 20 years since Gypsy Nirvana created the forum! We are celebrating with a 4/20 Giveaway and by launching a new Patreon tier called "420club". You can read more here.
  • Important notice: ICMag's T.O.U. has been updated. Please review it here. For your convenience, it is also available in the main forum menu, under 'Quick Links"!

plans 4 carbon scrubber

BennyBlanco

Can It All Be So Simple!
Veteran
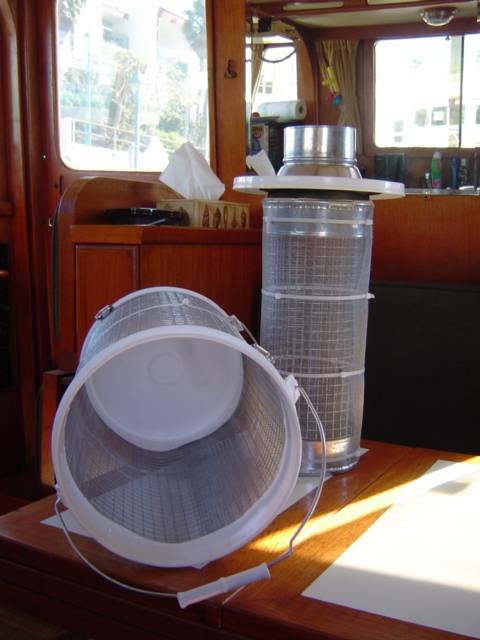
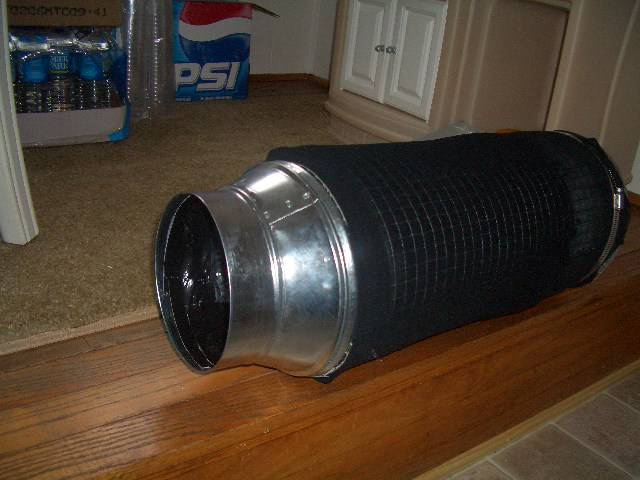
can sombody give me a link on how to build ones of these...or explain it to me...I really need to do somthing about this smell...if you sit on my upstairs couch all you smell is good tree....I got peeps comin over this weekend and my girl is threating to trow them out....Im really short on money so buying one is not an optipon for my 265 cfm blower with 6 inch flange
 
Last edited:
G

Guest

they are very easy to make...I can give you some pointers and maybe even a walk-thru if you want, I made my own...
 

Jnugg

Active member
Veteran
I've got the details on making one but no pics.Mybe someone else has the pics to go with it.

DIY Pro-Style Compact Carbon Filter/Scrubber >$50


Yet another addition to the family of DIY carbon filter designs.
I modeled this after the expensive professional filter. It's very simple and easy to build. The only tools required are a screw driver and some wire cutters or snips of some kind.
All the materials were just under $50, here's the rundown:
Hardware cloth ~ $6 (the steel, not the plastic. in the fencing section)
6" & 8" duct caps ~ $4 (one each)
6" duct collar ~ $2
6" x 8" duct reducer ~ $3
Hose clamps ~ $6 (two 6" clamps and four 4" clamps)
Three 28oz jars of Activated Carbon ~ $20 (from the petstore)
Small package of Poly-fill ~ $1.50 (from wal-mart)
Two packages(or two-pair) Extra Queen size black panty hose ~ $2

Round that all up to $45


Ok. First to build the "core", get the hardware cloth out and wrap it around the 6" cap (for sizing, I suppose you could measure instead), and snip. Leave a few inches to overlap to strengthen the seem.
Be sure to snip so as to not leave a row of points, that will undoubtedly poke the shit out of you, not to mention it'll rip the panty hose.
Once the HC is snipped and wrapped around the cap, use a 6" hose clamp to clamp it down. Do the exact same thing on the other end but using the 6" collar - put the crimped end of the collar inside the core, leaving the tabbed end outward.
Cut the legs off a pair of panty hose and stretch each one over the capped ind of the core, stretching them and covering the entire core with two layers.


So that's the core, it's finished. Oh yeah, I added a 3rd hose clamp in the middle of the core for additonal structural integrity, though it's not necessary.

Next, take the collar-end of the core and set it into the 6" x 8" reducer as shown. Flip it over and tape the collar to the inside of the reducer. I used aluminum tape, but a good quality duct tape should do just as well. Fill in the space between the collar and the core with Poly-fill (batting or anyting of that noture will work just as well).
Once you have that done, it's time to fix the HC to the 8" reducer. Place the 8" cap in the opposite end of the HC for spacing and structure.
Form the HC around the reducer, just as it was done with the 6", and clamp it down using two 4" hose clamp together-running into each other. I couldn't find 8" hose clamps, so I put two 4" together.

Now take the panty-part of the hose, the waste band and whatnot, and stretch it over the outside of the HC. Repeat with the other pair, so you have two layers.

Now for the exciting part, fill it in with the carbon You may need to hold the core at first to keep the spacing even. This will give you a continuous 1" layer of carbon. Perfect.

Leave an inch or two of space and fill in with the Poly-fill.
*Not* At first I built it using the full 24" of the HC, after filling it in with carbon, I was left with about 6" not filled, so I snipped the HC rolls to a couple inches above the carbon line.

Now replace the 8" end-cap, clamp it down, and you're done
To refill, simply loosen the clamp on the 8" end cap, remove the cap, dump the carbon, re-fill, replace cap.


In my bloom room, I'm running a Hurrican 6" 307 cfm in-line. I have it T'd, one line pulling from the sealed, air-cooled hood (which pulls non-stinky air from outside the room through it), and the other line running to the filter. So the filter is actually "underpowered", but that's fine as it allows for slower, more even flow of the stinky air over the carbon. The open design of this filter creates minimal air-flow restriction.

This guy works like a champ, the stinky-ass air that was being blown into the backyard no longer smells at all.
 
G

Guest

that looks just like the directions I followed, and it came out nice...good luck, if you need any help jus let us know...
 

Guest423

Active member
Veteran
does anyone have the pics or can they try to get them back? i like the DIY's but i know it would be easier for beginners to have pics they can follow...it made it easier on all of us following the pics.

peace
 
G

Guest

i didn't use pics...those pics were worthless...the duy didn't even do it right in the pics!!!! follow directions...it's SUPER EASY
 

BennyBlanco

Can It All Be So Simple!
Veteran
Nice ......thanks..So the end product looks like a can filter/ carbon scrubber that are for sale on ebay and what not....just so I can get an idea of what it look likes
 
Last edited:
G

Guest

yes, it should look just a carbon filter that you buy from the dro store...here is an idea of what it should look like...only difference is that where it's black matting, yours will be white (if you use the walmart polyfil)


Last edited:

BennyBlanco

Can It All Be So Simple!
Veteran
What else is hardware cloth used for? If I cant get it can I use somthing else? I went to home depot and they said they didnt have it...well I realy didnt know what i was looking for
 

Jnugg

Active member
Veteran
Hardware cloth can be found at any home depot or Lowes Home Improvemnt stores.

You want the galvanized steel type and 1/4" spacing.
 

bilgeweed

Member
There have been many DIY plans for carbon scrubbers posted here as well as other sites but little information in sizing the unit or the amount of carbon one should use in relation to your fan's cfm. In studying the specifications of 'factory built" scrubbers I found that most use a carbon layer of 2" or more thick. I imagine the thickness of carbon and the height affect the static pressure that is placed on the fan. The can-filter site states that all of their models have a layer between 2- 2 5/8" and put about 180 pascals (.72 in) of static pressure on the fan. When you looks at the specs of the in-line fans you will see that this indeed reduces the CFM considerably. This is something you must keep in mind when sizing your DIY unit. I can only assume that a less thick layer will not produce such a high static pressure on the fan but their must be a relationship between carbon thickness- height ect. One does not want to suck the air thru the filter too fast or the odors will not be scrubbed. What happens to a unit that is "over built" - as in a 1" layer but very tall ? I don't know.

Many of the DIY plans use a 8" outer cylinder with a 6" inner cylinder. This
leaves you with a 1" layer of carbon. Is this sufficient. I don't know. Adjusting the height of the scrubber may be the key.

I built one this week for my small grow/ 120 cfm Fantech and tried to size it the best I could. I ended up using 2 gal buckets with lids on the top and bottom and a 6" inner cylinder. The 2 gal bucket have a dia. 9" so I now
have a 1.5" layer of carbon which may be better than just 1" as in most DIY
plans - we have to see. I also think that finding the right carbon is a huge
factor in the effectiveness and longevity of the filter. Again- we will see.

Here are a few pics.

Material list
2- 2 gal buckets
1- 4" to 6"
1- 6" cap
1/2" hardware cloth
alum. window screen
misc hose clamps
small strip of rubber stripping (seals my top to inner cyl.)

about 8-9 lbs of carbon will be needed and I will cover the outside
with some type of filter material

Later
bilgeweed


wickedpete66

Active member
I built that scrubber too a couple of years ago, it ended up costing me about 75.00. I just bought a can 33 filter from mdhydro for 99.00 and the can 33 is way bettermade and has a lot more carbon. I would never make another one again difference in cost an labor isnt worth it
 
G

Guest

i wouldnt' really know, but i can see where he's coming from...I spent about $75 on my scrubber, if I could get one for 99 I probably would...
 

Latest posts

Latest posts

Top