
Hi all!
This is Helis, writing in to share something with the community, hopefully to inspire some and get a little feedback along the way.
Last summer I was approached by a patient-friend who needed a contained growspace. I designed and built one for him and got the tick... So I started reading more, and designing a cabinet to provide the ideal amount of medicine for my own personal use. I am not extremely well-experienced in cannabis cultivation (though I have read plenty and have viewed some grows, I have never grown myself) but I have been growing herbs and veggies indoors and out for years now, and I do know what a plant likes in terms of atmosphere and environment. After lots of SketchUp versions of cabinets based on others (NGB, Anti, Pipedream, Tick, Thundurkle, Pontiac, Redgreen, Dr Bud to name a few) and based on the first one I built, I settled on a solution for my own growspace.
Shortly thereafter my plans were interrupted by a last-minute move. After finally settling in a secure location, I went back to designing a cabinet not just based on what I needed but what fit in with my new space. I may be medical, I may be in a state with lax cultivation laws, I may live on my own, but stealth is something important regardless. I didn’t want a big black tent anywhere but I wanted enough space to provide me with what I need to get by.
Design
After analyzing my space, and my cannabis intake habits, I decided I needed a growspace that fit the following credentials:
- Designed for Perpetual MicroSOG
≤2.5 sq. ft. Flowering space
≥24 Plants in 20oz Gatorade Bottles or similar
Should be able to hold ≥10gal Rubbermaid (for future E&F expansion)
6 plants/2 weeks, 3 plants/week
Assuming 5g/plantlet (a beginner level estimate?) then 15g/week or 30g/2 weeks... 2oz/month, perfect.
- Flowering, Clone/Mom, Utility, and Drying Rooms needed
- Separated lights in Flowering for heat (post-build, decided to separate Clone/Mom lights as well)
- Built-in ventilation & carbon scrubber (self-contained design)
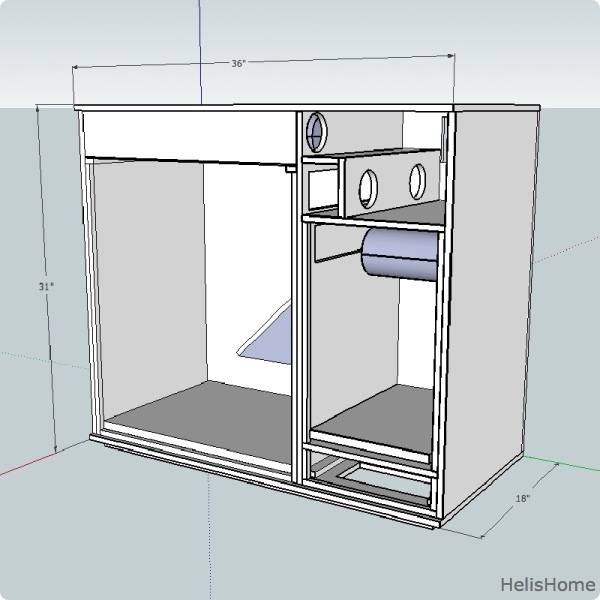
- Max (rough) dimensions 36” l x 18” w x 32” h
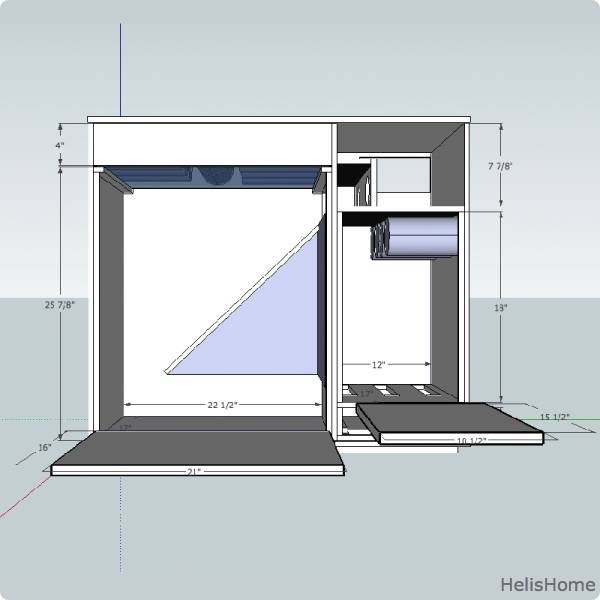
After countless more revisions based upon my available space, I ended up on the following design, something I call the HelisHome Cabinet
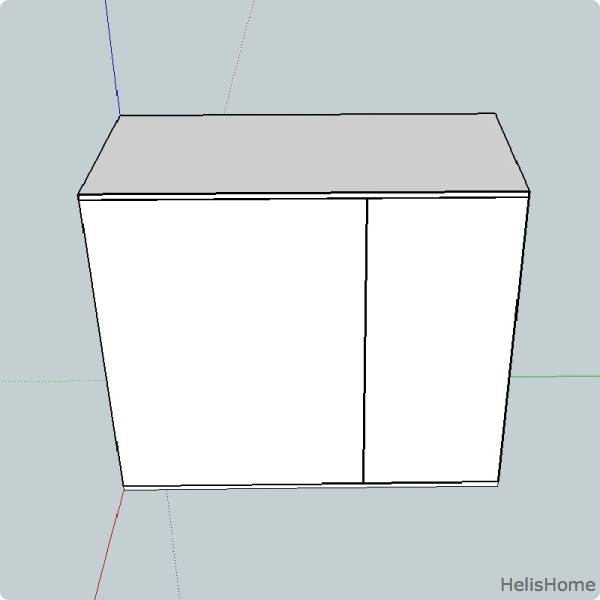
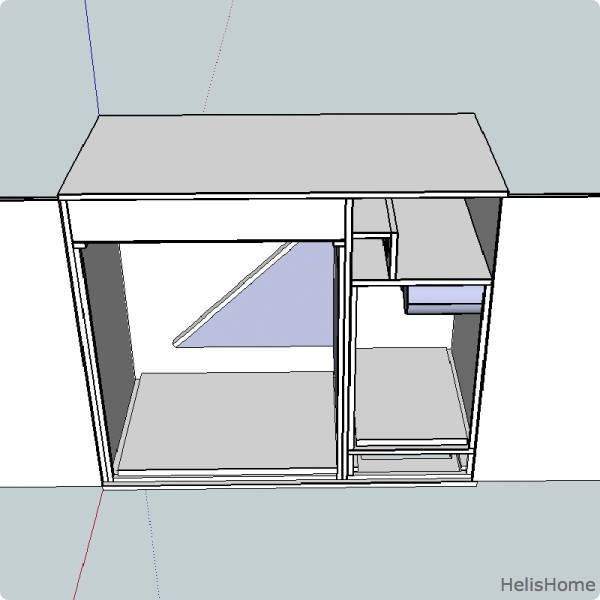
This cabinet met all my needs and has the following dimensions:
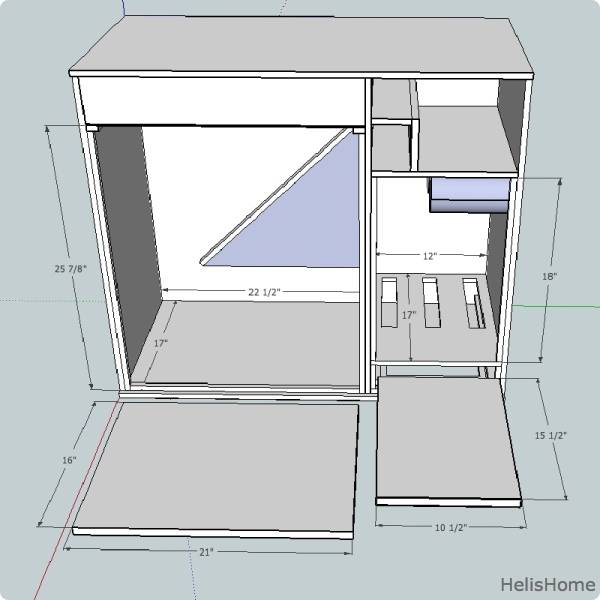
Flower Room: 22.5” x 17” x 25 7/8”
Veg/Mom/Clone Room: 12” x 17” x 18”
Utility Room: 12” x 17” x 7 7/8”
“Lightspace”: 22.5” x 17” x 4”
Drying Room: 12” x 17” x 3”
Here is a graphic with all the (important) dimensions included:
First let me say that this cabinet is still incomplete... I have run into fan, cooling, and power issues since firing it up and as such it is in a constant state of “updating.” I’ll break down the facts and figures into Lighting, Electricity, Airflow, Odor Control, Medium and Nutrients. This will be followed by a cost analysis as well so that the at-home grower can see how cheap a self-supplying system can be. Then Cabinet pictures!
Lighting
Mom/Clone room (18/6) is designed for 4 x 26w 6500k 1750 lu CFL lamps, which breaks down to:
104w / 1.42 sq. ft. = 73.24w / sq. ft.
7000 lu / 1.42 sq. ft. = 4929.58 lu / sq. ft.
Flowering room (12/12) is designed for 5-9 bulbs of a mix of 42w 2700k 2700 lu CFL bulbs and 26w 2700k 1700 lu CFLs
Currently flowering room is lit by 4 x 42w and 4 x 26w bulbs, which breaks down to:
272w / 2.65 sq. ft. = 102.64w / sq. ft.
17600 lu / 2.65 sq. ft. = 6641.51 lu / sq. ft.
This is roughly what Dr. Bud had in his 2ft cabinet... I will likely put in 1-2 more 42w bulbs soon, replacing 2 of the 26w bulbs. Adding one more 42w bulb would bring the lu / sq. ft. up to 7660...
I have considered PL-L lighting but already owned most of the bulbs and sockets for this project... However I am very interested in them as a future upgrade (same to be said of 90w, 120w LED lamps, looking towards the heat of summer).
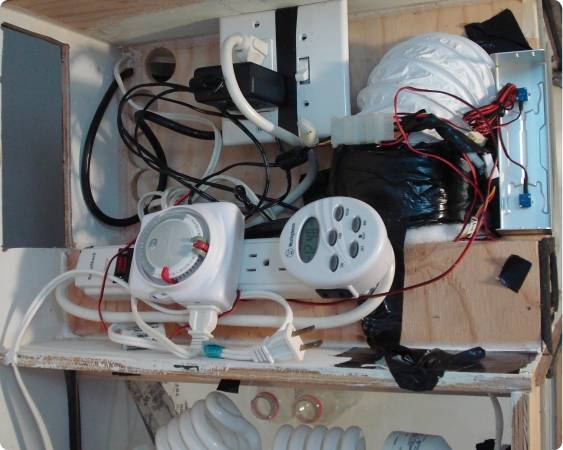
Electricity
Power for the fans is intended to be supplied by a MicroATX computer power supply. However 1 week into running this cabinet my PSU shorted out, so I am in a state of purgatory while I wait for a new one and more fans...
Anyway, there is a 25’ 16ga cable running out of the utility room, down through the veg and drying rooms and out the bottom of the cabinet. The cable ends at a handybox in the utility room which has 2 outlets and one switch. Again these are parts I had around the home, I would like to move this to a GFCI outlet and possibly get rid of the switch.
A power strip goes into the handy box with the lights plugged into it and the fans running off the other handy box outlet.
I would like to end up with the computer PSU running off one outlet and one outlet devoted to lights. Pumps and other business would go on a power strip connected to a third (of four) outlets.
Even at max pull this cabinet doesn’t touch 0.5 kW (closer to 400w all powered up) so I am not worried about overdrawing on any of the above power connections.
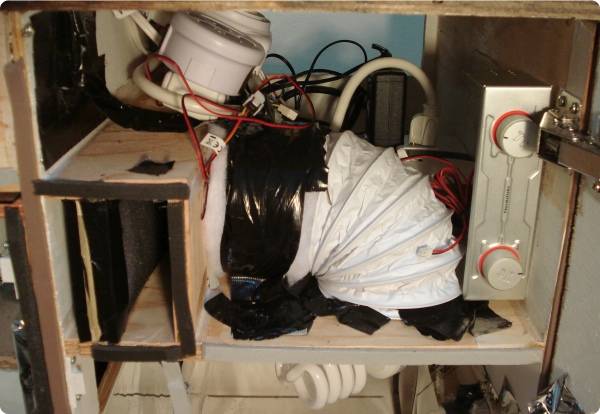
Airflow
The cab is designed to have fans in the following spots: Two “inline” 80mm fans (4 fans total) pulling through the carbon scrubber, one 80mm fan pushing through the flower lights, and one 80mm fan pushing through the veg lights. As I had some fans laying around and then broke some I’m short of what I need. However what I would like to do with this is end up with two 80mm inlines pushing individually through the veg and flower lights respectively. However the ducting for this would take up most of my utility room...
Currently the air comes up through the air filter below the drying room (inside the cabinet), up through the veg room and through the light/air baffles (I would like to install one of ScrubNinja’s angular baffles as I could cut down on the size of the walls and the baffles inside them) into the flower room. Air gets pushed around by a 120mm silent fan on half power and then through a carbon scrubber and out the one inline fan I have set up, which is ducted to the flower lights.
My cabinet stays around 84° F during the lights on and 62° F during lights off... I have a hard time dropping daytime temps below 75° F even with the carbon scrubber removed. I have attributed this to the lights getting air, but not enough air. So as part of my shopping list I not only have 2 more 80mm fans for the cabinet airflow but 2 silent 80mm fans to install in the lights as well.
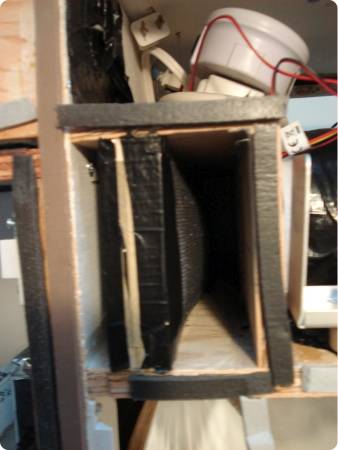
Odor Control
The carbon scrubber is comprised of a wood frame 1” thick with polyfill and screen taped to both sides (couldn’t find my staple gun) and carbon packed to hell in between. I removed the filter a day ago to check on why it wasn’t working and the tape had come off. To remedy this, I will be building a thinner frame (1/2”) and rebuilding the filter, this time using my staple gun... I find that Renuzit air fresheners work very well and are cheap as shit.
Medium
Eventually clones will be put in 18oz Solo, 20oz Gatorade/Soda, 22oz Rockstar, or 33oz Smartwater bottles, all cut as Hempy Cups and using Hydroton as a medium. The “ideal cup” will be a search for later.
Right now 21 plants were started in coco pucks and then vegged out one month in 20oz Gatorade Hempys, 16 of them with 2” of hydroton at the bottom and all perlite on top and 5 of them is all-Hydroton (minus the coco puck of course). Of all these plants, most got rootbound (as expected). Those that were rootbound are now bogged/transplanted in 32oz Gatorade Hempys or 18oz Solo Hempys both with Hydroton. I should mention that I have decided on all-hydroton from here on out as I find the all-Hydroton babies just as happy as those in perlite & I find perlite to be messy with little benefit. I am not into mess. Also all of these are being done as an experiment, as I have a lot of the same strain growing and would like to see what works and also use what I have.
Also some plants have been started 12/12 from seed to see how they do in 20oz cups... I am not worried about yield, I am looking for Moms! Then I will worry about maximizing my weight...
I have also built a E&F table that fits in the flower room perfectly and only takes up 5” of useable height. Add that to the 5-6” of cup height and I still have 14 7/8” - 15 7/8” growing height before the lights. However I will be waiting until I am in all-clones to use this for a few reasons. The pump I was using for the system does not allow me to use inlet tubing, and thus needs more “base height” of water to operate. This will be solved by buying a new & bigger pump when the time comes. Also, the E&F tray part of the system was blocking off my light/air walls, killing airflow. When an angular light vent is installed part of these walls will be removed and the E&F system should fit just fine (and allow me to leave the box unattended for a week). Lastly I would like to wait before I “kill off” the 5” of height that the E&F system takes until I am starting from clone and able to control finish height.
All plants have been & will be hand watered for this grow cycle. I must say this is my first time using the Hempy method of passive hydro (I’ve done non-cannabis DWC, Aero, E&F, Wicking-Passive Hydro...) and I am very much enjoying it. I water each cup until I spy a little runoff, every day until I see roots at the bottom then every other day or as they need it. If I move to 33oz SmartWater bottles I may be able to scoot the 2” high hole up an inch or so. I believe there to be leniency, after all, the DalaiHempy’s method was meant to be applied to 5gal buckets...
Nutrients
I will be using the GH Flora series in the Lucas Formula... I plan to use additives as well in later plant cycle. These additives being:
Flora Blend (though now that I own it I will likely make my own in the future, though the price isn’t steep)
Floralicious Plus (considered FulMag, Liquid Karma, other hum/fulv blends but would like to stick with GH)
Homemade “Sweet” (FloraNectar and Sweet were considered but were rejected when I read people’s reviews and thought about price, but then I came upon THESE THREADS and tweaked it for myself)
I was originally using vinegar for pH down (old habit) but have recently switched to lemon juice concentrate for at least my cannabis... Hopefully with the addition of Floralicious Plus to this grow I won’t even have to use it as often. I do not find a need for pH up in any of my growing systems (I use tap water... 190 µs/133 PPM.7/95 PPM.5 and a pH of ~7.5-7.7). I also do not see a need for RO water as I would just be adding things back anyway... I drink my tap, my girls can too.
Cost Analysis for HelisHome Cabinet
Cabinet $179
Plans - $000 - Self-Designed
(2) 4'x8'x1/2" - $060 - Home Depot
Flat White Paint - $008 - Home Depot
Electrical Box - $017 - Home Depot
Weather Stripping - $005 - Home Depot
Tot Loks - $020 - Home Depot
Hinges - $010 - Home Depot
Register Vent - $008 - Lowes
Air Filter $008 - Home Depot
Glass Plate - $010 - Home Depot
Lexan Sheet - $008 - Home Depot
Mylar - $025 - Hydroponics Store
Foamcore - $000 - Found
Tools $036
Silicone Caulk - $008 - Home Depot
Paint Supplies - $008 - Home Depot
Glass Cutter - $010 - Home Depot
Hole Saw Set (1" - 5") - $010 - Harbor Freight
Lighting + Electrics $110
(4) 26w 6500K @ 1750Lu - $012 - Wal Mart
(4) 26w 2700K @ 1700Lu - $007 - Wal Mart
(4) 42w 2700K @ 2700Lu - $040 - Target
13w Green CFL - $005 - Lowes
(7) Sockets - $021 - Lowes
(5) Y-adapters - $010 - Lowes
Outlet-Socket Adapter - $002 - Lowes
(2) Extension Cords - $003 - Lowes
(2) 24hr Timers - $010 - Target
Airflow $023
Wall Wart - $000 - Found
(3) Thermaltake Smart Fan II - $023 - Newegg/Found
Scrubber $005
Frame (Wood) - $000 - Found
Mesh Screen - $000 - Found
Polyfill - $000 - Found
Carbon - $005 - Wal Mart
Medium (Hempy) $030
20 oz Bottles (Gatorade) - $015 - Grocery/Found
Hydroton - $012 - Hydro Store
Perlite (Miracle Gro) - $003 - Home Depot
Cloning $019
Air Pump - $005 - Wal Mart
Air Stone - $004 - Wal Mart
Air Tubing - $003 - Wal Mart
Clear Tupperware - $002 - Wal Mart
TakeRoot - $005 - Wal Mart
Nutrients $041
GH Flora Micro - $015 - Hydro Store
(2) GH Flora Bloom - $026 - Hydro Store
Testing/Mixing $036
EC Meter - $025 - eBay
PH Testing Kit - $006 - Wal Mart
Pool Thermometer - $002 - Wal Mart
5 Gal Bucket - $002 - Home Depot
PH Down (Lemon Concentrate) - $001 - Grocery
----------------------------------------------------
Total $495*
*This is without nutrient additives and the E&F table as they are not “necessary” to the grow system. Also I believe in making things, recycling, and finding whatever I can be it in my own home or in the trash - this is why a lot of things cost nothing and were “found.” Urban areas and wealthier suburbs are a haven for useful things in the trash, so are schools and universities near semester’s end.
The Cabinet
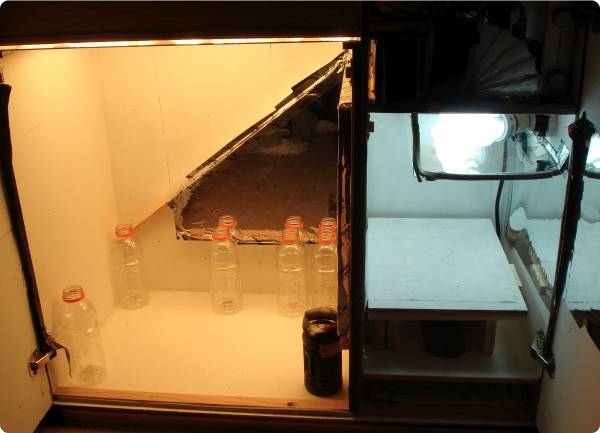
All lit up
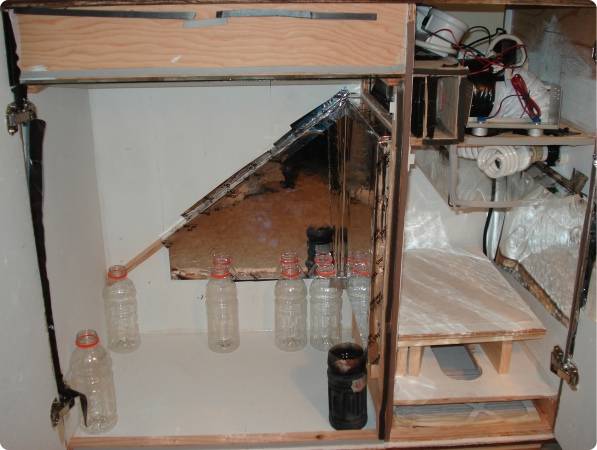
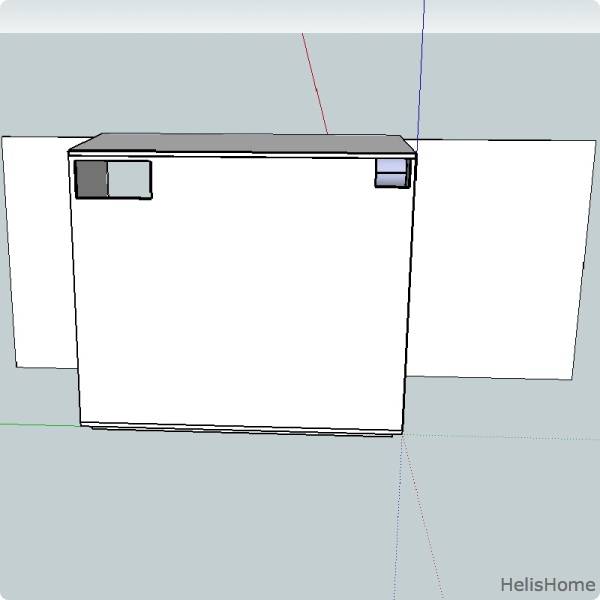
Cab overview

View from inside the Flower room with Mom/Clone lights on
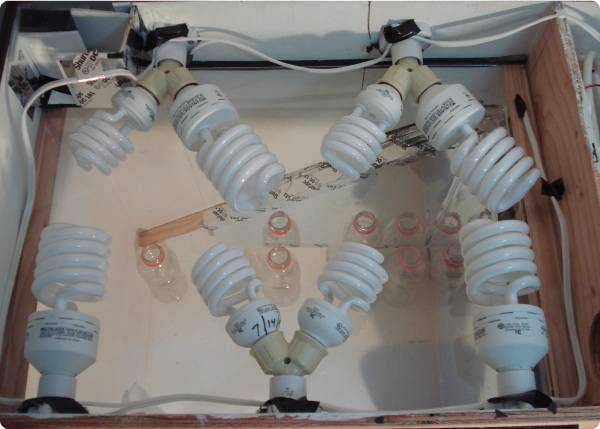
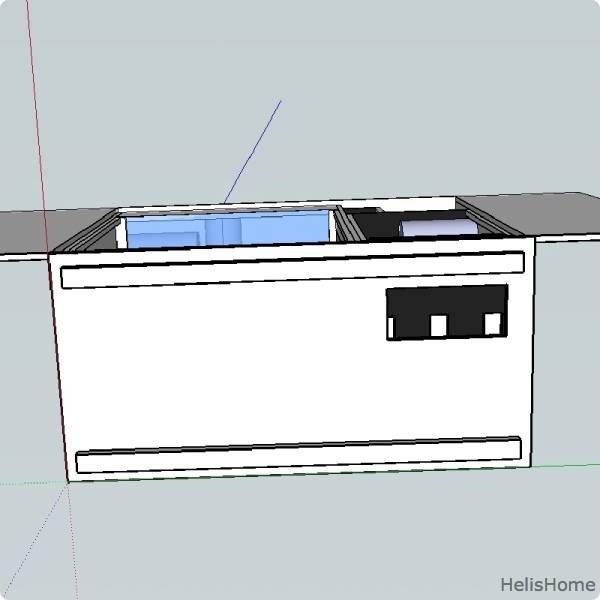
Lights off - top view
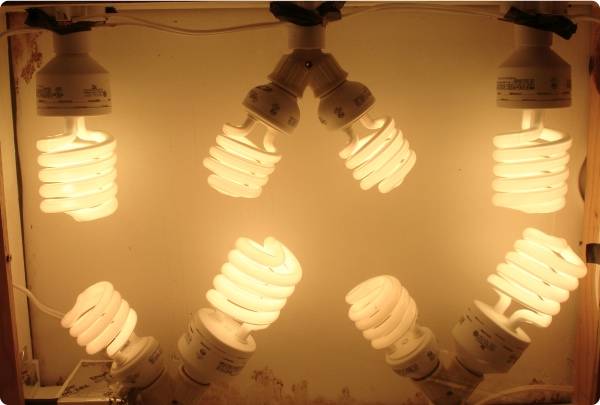
Lights on (sans mylar)
Flower room all lit up (sans mylar)
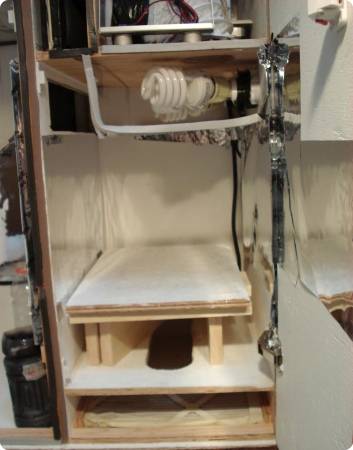
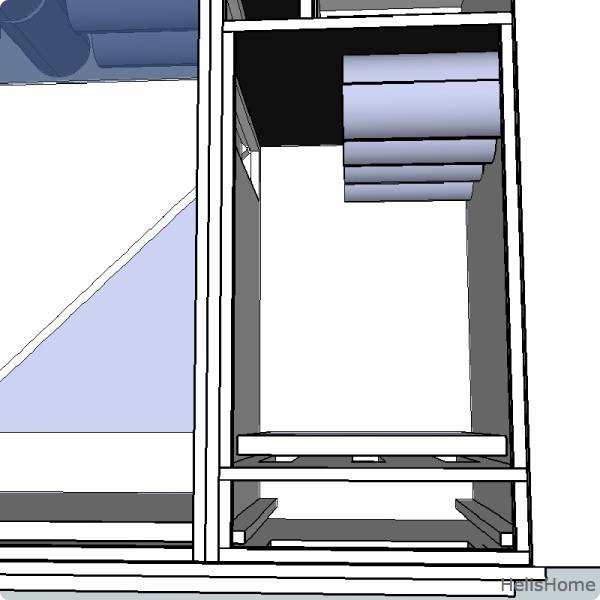
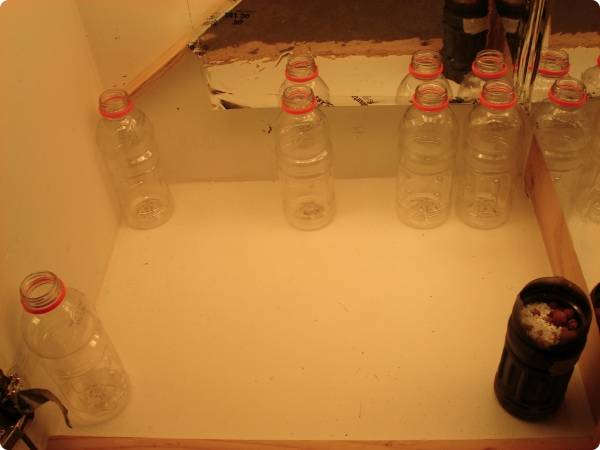
Mom/Clone room with drying/air filter room below it
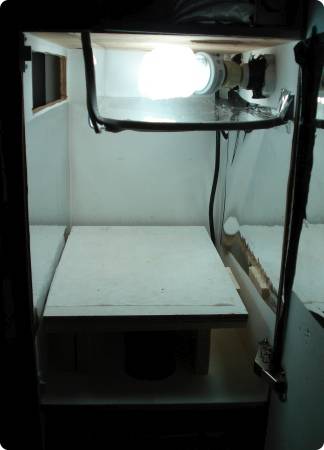
Mom/Clone room all lit up with “drawer” on stilts
That’s it for now, I will put up more soon as my first cycle is well underway (day 7 of 12/12) and I’d like to keep you all updated
Any questions or feedback, fire away!
Helis
This is Helis, writing in to share something with the community, hopefully to inspire some and get a little feedback along the way.
Last summer I was approached by a patient-friend who needed a contained growspace. I designed and built one for him and got the tick... So I started reading more, and designing a cabinet to provide the ideal amount of medicine for my own personal use. I am not extremely well-experienced in cannabis cultivation (though I have read plenty and have viewed some grows, I have never grown myself) but I have been growing herbs and veggies indoors and out for years now, and I do know what a plant likes in terms of atmosphere and environment. After lots of SketchUp versions of cabinets based on others (NGB, Anti, Pipedream, Tick, Thundurkle, Pontiac, Redgreen, Dr Bud to name a few) and based on the first one I built, I settled on a solution for my own growspace.
Shortly thereafter my plans were interrupted by a last-minute move. After finally settling in a secure location, I went back to designing a cabinet not just based on what I needed but what fit in with my new space. I may be medical, I may be in a state with lax cultivation laws, I may live on my own, but stealth is something important regardless. I didn’t want a big black tent anywhere but I wanted enough space to provide me with what I need to get by.
Design
After analyzing my space, and my cannabis intake habits, I decided I needed a growspace that fit the following credentials:
- Designed for Perpetual MicroSOG
≤2.5 sq. ft. Flowering space
≥24 Plants in 20oz Gatorade Bottles or similar
Should be able to hold ≥10gal Rubbermaid (for future E&F expansion)
6 plants/2 weeks, 3 plants/week
Assuming 5g/plantlet (a beginner level estimate?) then 15g/week or 30g/2 weeks... 2oz/month, perfect.
- Flowering, Clone/Mom, Utility, and Drying Rooms needed
- Separated lights in Flowering for heat (post-build, decided to separate Clone/Mom lights as well)
- Built-in ventilation & carbon scrubber (self-contained design)
- Max (rough) dimensions 36” l x 18” w x 32” h
After countless more revisions based upon my available space, I ended up on the following design, something I call the HelisHome Cabinet
This cabinet met all my needs and has the following dimensions:
Flower Room: 22.5” x 17” x 25 7/8”
Veg/Mom/Clone Room: 12” x 17” x 18”
Utility Room: 12” x 17” x 7 7/8”
“Lightspace”: 22.5” x 17” x 4”
Drying Room: 12” x 17” x 3”
Here is a graphic with all the (important) dimensions included:
First let me say that this cabinet is still incomplete... I have run into fan, cooling, and power issues since firing it up and as such it is in a constant state of “updating.” I’ll break down the facts and figures into Lighting, Electricity, Airflow, Odor Control, Medium and Nutrients. This will be followed by a cost analysis as well so that the at-home grower can see how cheap a self-supplying system can be. Then Cabinet pictures!
Lighting
Mom/Clone room (18/6) is designed for 4 x 26w 6500k 1750 lu CFL lamps, which breaks down to:
104w / 1.42 sq. ft. = 73.24w / sq. ft.
7000 lu / 1.42 sq. ft. = 4929.58 lu / sq. ft.
Flowering room (12/12) is designed for 5-9 bulbs of a mix of 42w 2700k 2700 lu CFL bulbs and 26w 2700k 1700 lu CFLs
Currently flowering room is lit by 4 x 42w and 4 x 26w bulbs, which breaks down to:
272w / 2.65 sq. ft. = 102.64w / sq. ft.
17600 lu / 2.65 sq. ft. = 6641.51 lu / sq. ft.
This is roughly what Dr. Bud had in his 2ft cabinet... I will likely put in 1-2 more 42w bulbs soon, replacing 2 of the 26w bulbs. Adding one more 42w bulb would bring the lu / sq. ft. up to 7660...
I have considered PL-L lighting but already owned most of the bulbs and sockets for this project... However I am very interested in them as a future upgrade (same to be said of 90w, 120w LED lamps, looking towards the heat of summer).
Electricity
Power for the fans is intended to be supplied by a MicroATX computer power supply. However 1 week into running this cabinet my PSU shorted out, so I am in a state of purgatory while I wait for a new one and more fans...
Anyway, there is a 25’ 16ga cable running out of the utility room, down through the veg and drying rooms and out the bottom of the cabinet. The cable ends at a handybox in the utility room which has 2 outlets and one switch. Again these are parts I had around the home, I would like to move this to a GFCI outlet and possibly get rid of the switch.
A power strip goes into the handy box with the lights plugged into it and the fans running off the other handy box outlet.
I would like to end up with the computer PSU running off one outlet and one outlet devoted to lights. Pumps and other business would go on a power strip connected to a third (of four) outlets.
Even at max pull this cabinet doesn’t touch 0.5 kW (closer to 400w all powered up) so I am not worried about overdrawing on any of the above power connections.
Airflow
The cab is designed to have fans in the following spots: Two “inline” 80mm fans (4 fans total) pulling through the carbon scrubber, one 80mm fan pushing through the flower lights, and one 80mm fan pushing through the veg lights. As I had some fans laying around and then broke some I’m short of what I need. However what I would like to do with this is end up with two 80mm inlines pushing individually through the veg and flower lights respectively. However the ducting for this would take up most of my utility room...
Currently the air comes up through the air filter below the drying room (inside the cabinet), up through the veg room and through the light/air baffles (I would like to install one of ScrubNinja’s angular baffles as I could cut down on the size of the walls and the baffles inside them) into the flower room. Air gets pushed around by a 120mm silent fan on half power and then through a carbon scrubber and out the one inline fan I have set up, which is ducted to the flower lights.
My cabinet stays around 84° F during the lights on and 62° F during lights off... I have a hard time dropping daytime temps below 75° F even with the carbon scrubber removed. I have attributed this to the lights getting air, but not enough air. So as part of my shopping list I not only have 2 more 80mm fans for the cabinet airflow but 2 silent 80mm fans to install in the lights as well.
Odor Control
The carbon scrubber is comprised of a wood frame 1” thick with polyfill and screen taped to both sides (couldn’t find my staple gun) and carbon packed to hell in between. I removed the filter a day ago to check on why it wasn’t working and the tape had come off. To remedy this, I will be building a thinner frame (1/2”) and rebuilding the filter, this time using my staple gun... I find that Renuzit air fresheners work very well and are cheap as shit.
Medium
Eventually clones will be put in 18oz Solo, 20oz Gatorade/Soda, 22oz Rockstar, or 33oz Smartwater bottles, all cut as Hempy Cups and using Hydroton as a medium. The “ideal cup” will be a search for later.
Right now 21 plants were started in coco pucks and then vegged out one month in 20oz Gatorade Hempys, 16 of them with 2” of hydroton at the bottom and all perlite on top and 5 of them is all-Hydroton (minus the coco puck of course). Of all these plants, most got rootbound (as expected). Those that were rootbound are now bogged/transplanted in 32oz Gatorade Hempys or 18oz Solo Hempys both with Hydroton. I should mention that I have decided on all-hydroton from here on out as I find the all-Hydroton babies just as happy as those in perlite & I find perlite to be messy with little benefit. I am not into mess. Also all of these are being done as an experiment, as I have a lot of the same strain growing and would like to see what works and also use what I have.
Also some plants have been started 12/12 from seed to see how they do in 20oz cups... I am not worried about yield, I am looking for Moms! Then I will worry about maximizing my weight...
I have also built a E&F table that fits in the flower room perfectly and only takes up 5” of useable height. Add that to the 5-6” of cup height and I still have 14 7/8” - 15 7/8” growing height before the lights. However I will be waiting until I am in all-clones to use this for a few reasons. The pump I was using for the system does not allow me to use inlet tubing, and thus needs more “base height” of water to operate. This will be solved by buying a new & bigger pump when the time comes. Also, the E&F tray part of the system was blocking off my light/air walls, killing airflow. When an angular light vent is installed part of these walls will be removed and the E&F system should fit just fine (and allow me to leave the box unattended for a week). Lastly I would like to wait before I “kill off” the 5” of height that the E&F system takes until I am starting from clone and able to control finish height.
All plants have been & will be hand watered for this grow cycle. I must say this is my first time using the Hempy method of passive hydro (I’ve done non-cannabis DWC, Aero, E&F, Wicking-Passive Hydro...) and I am very much enjoying it. I water each cup until I spy a little runoff, every day until I see roots at the bottom then every other day or as they need it. If I move to 33oz SmartWater bottles I may be able to scoot the 2” high hole up an inch or so. I believe there to be leniency, after all, the DalaiHempy’s method was meant to be applied to 5gal buckets...
Nutrients
I will be using the GH Flora series in the Lucas Formula... I plan to use additives as well in later plant cycle. These additives being:
Flora Blend (though now that I own it I will likely make my own in the future, though the price isn’t steep)
Floralicious Plus (considered FulMag, Liquid Karma, other hum/fulv blends but would like to stick with GH)
Homemade “Sweet” (FloraNectar and Sweet were considered but were rejected when I read people’s reviews and thought about price, but then I came upon THESE THREADS and tweaked it for myself)
I was originally using vinegar for pH down (old habit) but have recently switched to lemon juice concentrate for at least my cannabis... Hopefully with the addition of Floralicious Plus to this grow I won’t even have to use it as often. I do not find a need for pH up in any of my growing systems (I use tap water... 190 µs/133 PPM.7/95 PPM.5 and a pH of ~7.5-7.7). I also do not see a need for RO water as I would just be adding things back anyway... I drink my tap, my girls can too.
Cost Analysis for HelisHome Cabinet
Cabinet $179
Plans - $000 - Self-Designed
(2) 4'x8'x1/2" - $060 - Home Depot
Flat White Paint - $008 - Home Depot
Electrical Box - $017 - Home Depot
Weather Stripping - $005 - Home Depot
Tot Loks - $020 - Home Depot
Hinges - $010 - Home Depot
Register Vent - $008 - Lowes
Air Filter $008 - Home Depot
Glass Plate - $010 - Home Depot
Lexan Sheet - $008 - Home Depot
Mylar - $025 - Hydroponics Store
Foamcore - $000 - Found
Tools $036
Silicone Caulk - $008 - Home Depot
Paint Supplies - $008 - Home Depot
Glass Cutter - $010 - Home Depot
Hole Saw Set (1" - 5") - $010 - Harbor Freight
Lighting + Electrics $110
(4) 26w 6500K @ 1750Lu - $012 - Wal Mart
(4) 26w 2700K @ 1700Lu - $007 - Wal Mart
(4) 42w 2700K @ 2700Lu - $040 - Target
13w Green CFL - $005 - Lowes
(7) Sockets - $021 - Lowes
(5) Y-adapters - $010 - Lowes
Outlet-Socket Adapter - $002 - Lowes
(2) Extension Cords - $003 - Lowes
(2) 24hr Timers - $010 - Target
Airflow $023
Wall Wart - $000 - Found
(3) Thermaltake Smart Fan II - $023 - Newegg/Found
Scrubber $005
Frame (Wood) - $000 - Found
Mesh Screen - $000 - Found
Polyfill - $000 - Found
Carbon - $005 - Wal Mart
Medium (Hempy) $030
20 oz Bottles (Gatorade) - $015 - Grocery/Found
Hydroton - $012 - Hydro Store
Perlite (Miracle Gro) - $003 - Home Depot
Cloning $019
Air Pump - $005 - Wal Mart
Air Stone - $004 - Wal Mart
Air Tubing - $003 - Wal Mart
Clear Tupperware - $002 - Wal Mart
TakeRoot - $005 - Wal Mart
Nutrients $041
GH Flora Micro - $015 - Hydro Store
(2) GH Flora Bloom - $026 - Hydro Store
Testing/Mixing $036
EC Meter - $025 - eBay
PH Testing Kit - $006 - Wal Mart
Pool Thermometer - $002 - Wal Mart
5 Gal Bucket - $002 - Home Depot
PH Down (Lemon Concentrate) - $001 - Grocery
----------------------------------------------------
Total $495*
*This is without nutrient additives and the E&F table as they are not “necessary” to the grow system. Also I believe in making things, recycling, and finding whatever I can be it in my own home or in the trash - this is why a lot of things cost nothing and were “found.” Urban areas and wealthier suburbs are a haven for useful things in the trash, so are schools and universities near semester’s end.
The Cabinet
All lit up
Cab overview
View from inside the Flower room with Mom/Clone lights on
Lights off - top view
Lights on (sans mylar)
Flower room all lit up (sans mylar)
Mom/Clone room with drying/air filter room below it
Mom/Clone room all lit up with “drawer” on stilts
That’s it for now, I will put up more soon as my first cycle is well underway (day 7 of 12/12) and I’d like to keep you all updated
Any questions or feedback, fire away!
Helis
Last edited:


 of the community on... Pictures will illustrate & they'll be up in my next post.
 and stroll through the first month in my cabinet.
 that naughty little pubescent boy out of my all-girls school. I don't like to kill plants in view of other plants

