What's new
  • Happy Birthday ICMag! Been 20 years since Gypsy Nirvana created the forum! We are celebrating with a 4/20 Giveaway and by launching a new Patreon tier called "420club". You can read more here.
  • Important notice: ICMag's T.O.U. has been updated. Please review it here. For your convenience, it is also available in the main forum menu, under 'Quick Links"!

The Stealth Dresser grow: in the making.

So I've been waiting for state to legalize my medicine and now avail. I refuse to outright break the law yet I must uphold my own ethics in treating myself when my government fails me. I've given them over 5 years since my surgery to figure it out medical legalization-wise, but no avail.

Now this situation brought me to the next challenge: where to grow and how large of a grow?

1) I figure between ~4 ounces per harvest is fair as I don't currently suffer the awful pains I did post surgery. So a small time grow will do.

2) With limited closets I need somewhere to put nice formal clothes on hanger.. That won't do. And it is too unstealthy and impractical to tell everyone who ever enters my room that the closet is magically broken despite it looking fine. "just don't open it" that doesn't work.

3) I could do outdoors... meh it's actually as much work as indoors if you can't easily access outdoor areas with woods areas.. scratch that.

ANSWER: Stealth Dresser grow!!!!~`1` woooo!

Okay. Here is the start.
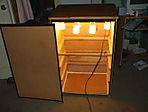
4-drawer dresser that stands at about 3 and 3/4 feet tall.

Picage below and more to come, as it is in process.


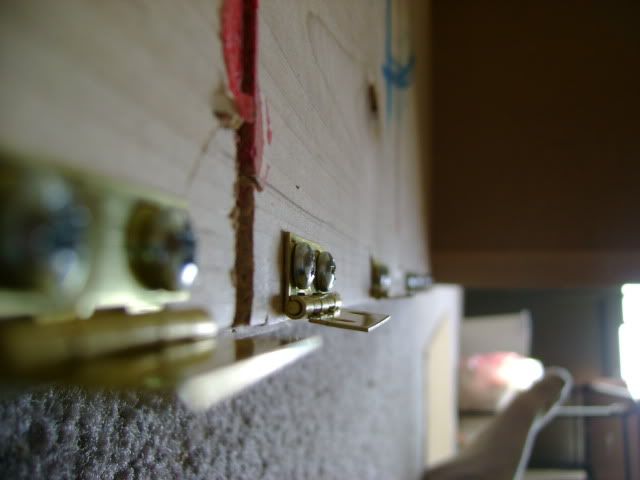
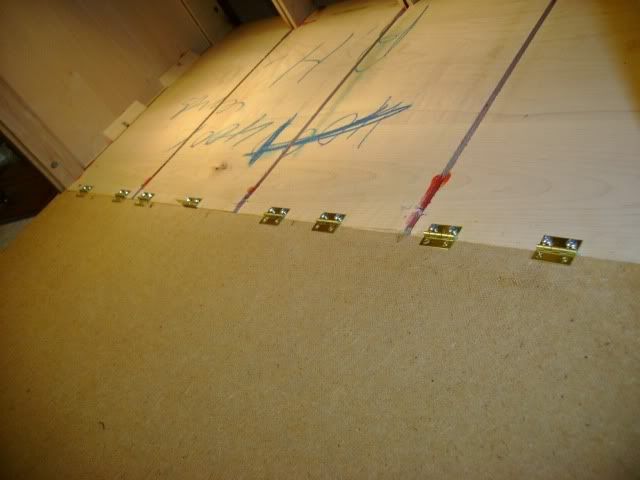
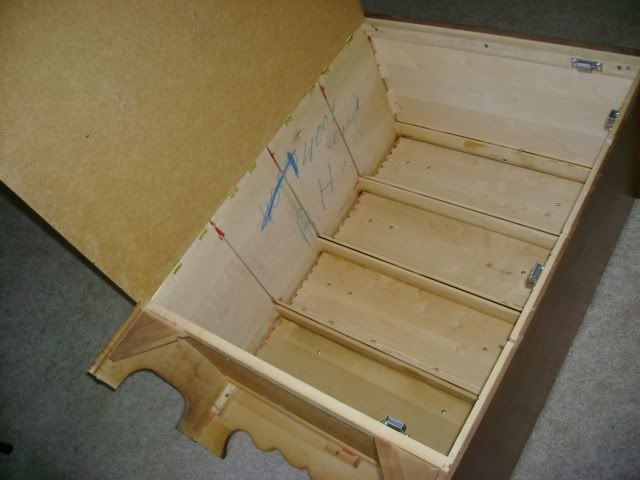
So here: I've taken out the drawers, set them aside. Taken off the back (thin low-density-fiber board around 1/4 inch thick which was held on by staples.. Unfortunately the staples were too far into the LDF board so it was pulled and some small holes were made.).. Much inspection was done after this picture was taken.
DSC01154.jpg


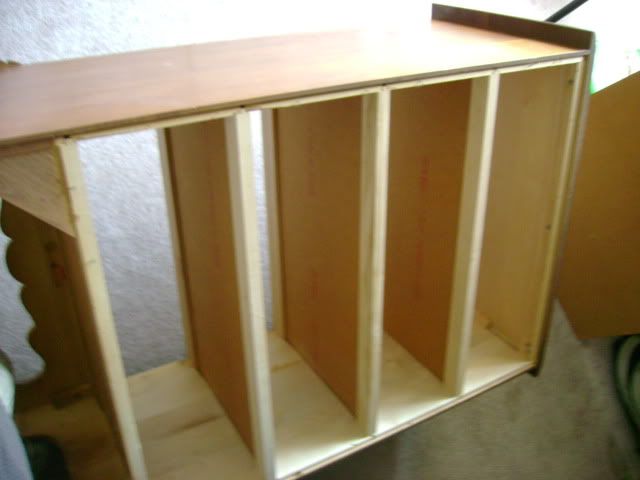
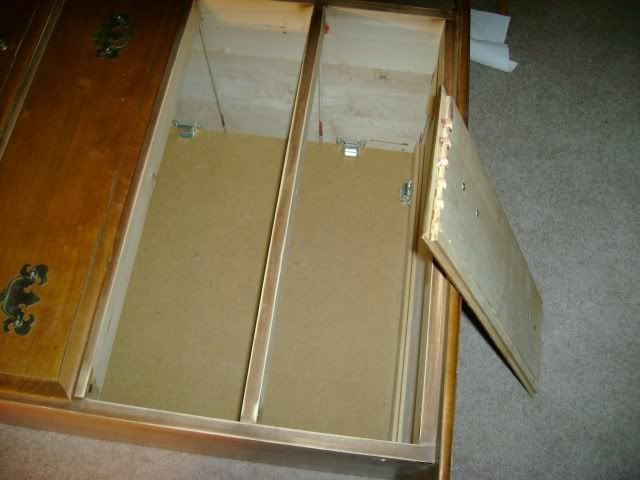
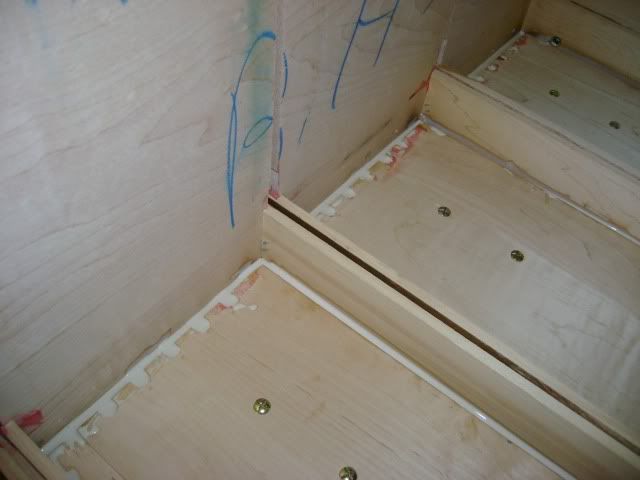
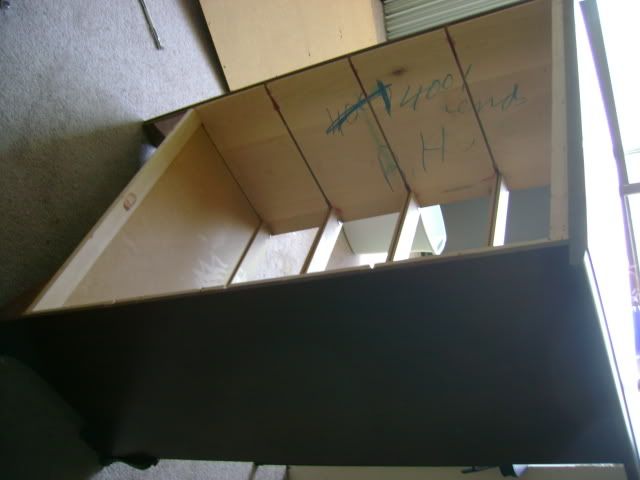
Next is the stripping of the interiors. There were 3 pullouts that I'm actually going to keep. You can see this picture does not have the ones that are present in the first... this will help me with not having to lower the light as much.. I can just slide in a flat board at the desired height out of the 3 different heights(only when theyre seedlings and young of course.. when getting bigger Ill just lower the light)

DSC01155.jpg


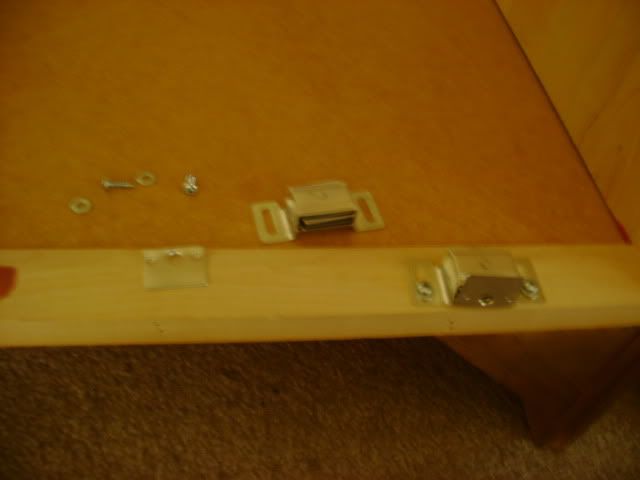
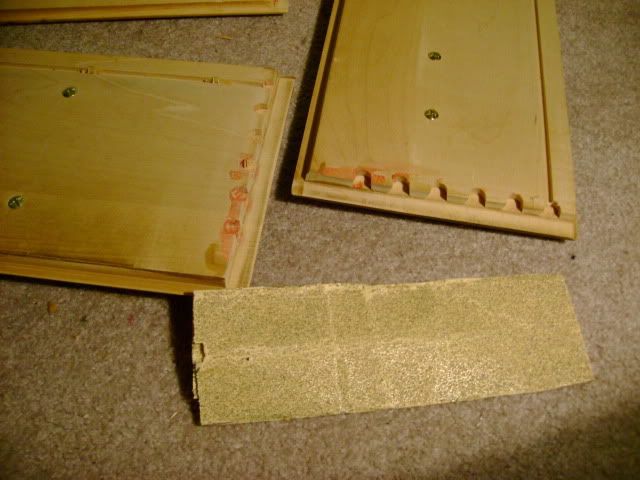
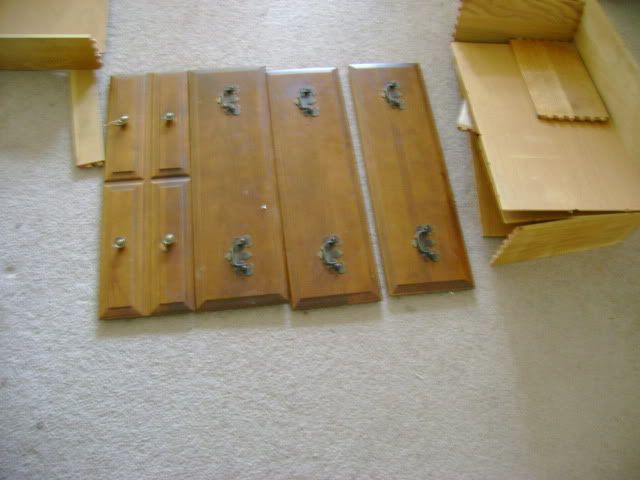
Here you can see the back of the drawers removed. The fronts will soon be glued onto the drawer to give the appearance of functional drawers. (the back will be used for opening and closing)

DSC01156.jpg
 
Here hinges were added to re-attach the Low density fiber back of the dresser. I put 8-10 of these on here to ensure the back doesnt fall off. These will allow the back LDF board (which will spent its time against a wall somewhere) to be the only access to the inside of the dresser. It will hinge on one side and magnet latch on the other

DSC01158.jpg


This should work good in combination with magnet latches which ill put on shortly
 
Looking good Sativa. Are you planning on flat white paint or mylar for reflectivity? What kind of lighting are you planning, cfl or hid? this is what I worked out inside my dresser. Good luck and just yell if you have a question. I'll be tagging this one. Check out pontiacs stelth dresser for some good ideas.
 
Looking good Sativa. Are you planning on flat white paint or mylar for reflectivity? What kind of lighting are you planning, cfl or hid? this is what I worked out inside my dresser. Good luck and just yell if you have a question. I'll be tagging this one. Check out pontiacs stelth dresser for some good ideas.

Thanks for coming by DresserDweller, stay as long as youd like this may take a while :drum:

I'm going to be using mylar, no white paint. I'm still trying to figure out an easy adhesive to bond mylar instead of taping it up.. but we'll see.

I'm planning on HID. At first I wanted a 250 watter, but after seeing some of the 150 HPS grows on here, I'm going with a 150 HPS.

I still have to figure out ventilation though... that's the toughest part of my small space here!

Pontiacs stealth dresser was onethread I saw a year or two back long before I joined this forum and was an inspiration to me long before I came here.. it never really resonated into real life until a while back I helped my buddy.

I actually have pictures of a friends smalltime drawer I help him make some time before I put this one i'm doing now into work

Nothing unusual about my buddys room.
drawer.jpg


Uh oh, Something special there :p
inside.jpg


He was doing a 3x 26 watt CFL setup inside his drawer with 1 plant that did okay.

My dresser will have room for 2 plants LST'd well and a 150 or even a 250 if I feel crazy about what's going on here :joint:
 
Okay back to the dresser,

We can now put on the magnetic latches

DSC01160.jpg


these are relatively cheap ones.. Maybe I shouldve gone more expensive.. but if we need to upgrade it must be soon... before the grow starts.

the front drawers are removed and the small edges are sanded to ensure the glue will hold a tight bond with the front of the dresser, which is also sanded.

DSC01161.jpg
 
It's starting to take shape. Now we can start to let imagination take form on how the interior will be

Here we see the hinges completed (latched onto both the interior of the dresser and to the back piece which will swing open upon a slight tug from the magnetic latches. This will be the only entrance to the drawer )
hingesdone.jpg


These hinges were a pain in the :moon:
It wasnt the part about screwing them into the basewall of the dresser, but the part of making sure theyre all straight with eachother, and also getting them screwed into the LDF board was so difficult (the screws wouldnt go in at first/ have to keep putting the screw back on the screwdriver/ blah!)

Next we can see the front of the dresser. Each drawer edge was sanded down, along with the front of the dresser to ensure glue gets a good hold. We can see the inside and the back wall with hinges when it is closed. These front panels will be glued into place never to be removed again! (hopefully not by accident and someone tugging too hard thinking they open. -.-)
gluing.jpg


Here is a shot of the second layer of glue that went on the inside wall of the dresser-drawer-fronts.
I'll be adding more layers once that dries (and thinking of more ways to ensure those drawers stay in place since wood glue may not be the best thing to solely rely on.)

secondglue.jpg


And here is where we can let our imagination take hold and the ideas flow!
I picture a 150 HPS in the top there with mylar-ed walls and some plants!

What do you see?
fromtheback.jpg


Thanks for stopping in!
 

Hydro-Soil

Active member
Veteran
Looking Great! Cabs are awesome :D

I was noticing you're going with a 150w HPS and wanted to ask if you'd purchased it yet? The reason being is I'm looking for more DIY guys to pimp the remote ballast lamps I like so much. Trying to get as many people to use them so we can increase demand for them and hopefully get them into more local stores.

Do a search for PL-L (The 55w lamps I use) and you'll see a few grows. You'll definitely spend less on cooling efforts as they don't put out the infra-red heat like HPS does. I use a cheap 50cfm bathroom fart fan to cool a 220w setup of 4 lamps. :D

I'm looking forward to seeing whatever you end up choosing. :D
 
Nice cab!!
Thanks DonkeyPunch! It's still in the making so check back to see it after some more working on it!

Looking Great! Cabs are awesome :D

I was noticing you're going with a 150w HPS and wanted to ask if you'd purchased it yet? The reason being is I'm looking for more DIY guys to pimp the remote ballast lamps I like so much. Trying to get as many people to use them so we can increase demand for them and hopefully get them into more local stores.

Do a search for PL-L (The 55w lamps I use) and you'll see a few grows. You'll definitely spend less on cooling efforts as they don't put out the infra-red heat like HPS does. I use a cheap 50cfm bathroom fart fan to cool a 220w setup of 4 lamps. :D

Hey Hydro, it's good to have an experienced person throwing their bit at me!
I have not picked out/bought my lamp and lighting yet, the 150 is just an idea of what i've wanted to do as it is readily available to me and prewired

I'm going to start reading a little more into these CFL PL-L's but I'm a dud when it comes to electric wiring with A/C.. Also this is my weak point for fans.. I'm trying to find an inexpensive smalltime fan that is prewired (50-100 cfm and ideally under 100 bucks) to three prong outlet.. Maybe they make these CFL pl-l's prewired? A couple of my friends have had a couple grows with the twirley CFLs and had decent-good results (usually the 23 or 26 watters) so I'm not hesitant to get a CFL setup if It will be cheaper and beneficial to my setup. Another reason I was leaning toward the 150 HPS is ease of raising and lowering.. If I have a couple different CFLs it would be more difficult I think.. (I don't have a drill to mount them into a piece of wood or anything like that.. for this whole dresser I've used auto-hole-drilling-screws that are a pain in my wahoo)

Do you have a good beginners page on the bit?
 

Hydro-Soil

Active member
Veteran
I'm going to start reading a little more into these CFL PL-L's but I'm a dud when it comes to electric wiring with A/C..

It's actually VERY simple if you use the Fulham Workhorse ballasts. The most difficult thing people are running into is buying the sockets and clips online. HTGSupply has their Compact T5 setups of 2 55w lamps. I don't know if their reflector will fit in your cab though.

My ballast was simple and my sig has a guide on how I did it.
Black/white wires go to the lampcord-plug.
Red wires go to each lamp, yellow comes from each lamp.

Simple :D

Sorry they're not more available like they are in Spain, I'm hoping that having people ask about them will help get them stocked here. :D
 
Nice cab bro! I have one similar in size to this that i used to run a new wave 4 bulb,2 foot T5 unit in. I'm thinking of firing it up again for a clone veg chamber. Mine doesn't have the same kind of door on the back though as i found it and it was in rough shape. I just applied velcro around the back and selaed it up with B&W poly. As for airflow, I mounted 3 evenly spaced 3" computer fans flush with the floor.(mounted from underneath,drawing air up into the cab. these are metal 120v AC fans i found @ the source.) Lined the inside with B&W poly and mounted a 6" 120v/AC metal PC fan in the upper left corner(if looking from back) flush with the back "door" if you will. All corner and seams sealed and airtight. Also screwed 4 pieces of 1"X1" evenly spaced across the bottom so that i could lay a sheet of acrylic and create a tiny space between the dresser floor and where the plants sit. Drill the acrylic with tons of tiny holes to let air pass through(never got to that part. got the acrylic and never drilled it lol ) Hope this may help with ventilation. Other than that i had a little clip fan in there to move air around. I may have to take pics since i'm known to be lacking in the explanation department. Keep up the stellar work

EDIT Because of the intake fans being on the bottom and the dresser having a space between the bedroom floor and the fans, this allows me to place it over the central air vents on the floor of the room on hot days.

Nugz
 
F

fully baked

I'll be along for the ride. I'm in the process of building one too...

250w hps vertical scrog is the gameplan... Same deal as yours, 4 drawer dresser.


Great work on the door too. Every time I try and put together a well sealed door, it never works out just the way I planned. So I've taken the twinkie bus route and gone with velcro on the back instead...

Best of luck,
FB
 

MeTa4

Member
Make sure your intake is twice the size of your exhaust. Find the numbers for how many lumens per sq ft, and watts per sq ft , If you do the math and have the right ventilation you can squeeze a 250 in there.
 
Sorry they're not more available like they are in Spain, I'm hoping that having people ask about them will help get them stocked here.

Gahh, I was wondering why I've never seen them in stores. I'll look into them anyway.. It looks like you've had good success with them judging by that cindy crop you had.

Mine doesn't have the same kind of door on the back though as i found it and it was in rough shape. I just applied velcro around the back and selaed it up with B&W poly. As for airflow, I mounted 3 evenly spaced 3" computer fans flush with the floor.(mounted from underneath,drawing air up into the cab. these are metal 120v AC fans i found @ the source.) Lined the inside with B&W poly and mounted a 6" 120v/AC metal PC fan in the upper left corner(if looking from back) flush with the back "door" if you will. All corner and seams sealed and airtight.

Ah, yes my back door is lacking in the light-leak department. I've already brainstormed up about 3 different ways I'm going to handle it. In all reality Velcro would have been 10 times easier to install and probably more stealthy since I have screw nubs on the back of my dresser.

how did you plug the computer fans in??? Local stores have cheap computer fans here (i cant find any with actual vent fans unless I want to spent 150+ dollars!!) but they all plug into computer motherboards or something. What did you do to convert them? Please share. And did you get them online?

Good job on keeping it airtight. My ideas range from putting mini-draft stoppers into each corner, to getting thin rubber strips and ultra gluing and duct taping them on each corner, or just making a mess with duct tape.

I think the draft-blocker things (you know the ones you put under a door) are the best option and I'll probably follow suit with something using those.. but I'll first wander local hardware stores in search of the magic material that could solve my light leak/air leak problem.

I'll be along for the ride. I'm in the process of building one too...

250w hps vertical scrog is the gameplan... Same deal as yours, 4 drawer dresser.

Great work on the door too. Every time I try and put together a well sealed door, it never works out just the way I planned. So I've taken the twinkie bus route and gone with velcro on the back instead...

Best of luck,
FB
awesome fully baked.. Thanks for stopping by. Feel free to link up to your dresser work on this thread! I'm open to all other peoples projects too! It's just a shame we all have to keep our lovely ladies in hiding in todays world. I'm looking into scrogging actually.. I plan on LSTing to keep a flat canopy and I'm not really aware of benefits of scrogging vs plain LST.. Thanks on the door.. velcro could actually work better though IMHO after seeing how much time I really spent on all the little screws and how I have decent gap (light leak) between the back board and dresser where the hinges are. I have some ideas as I just listed above that should take care of it.. we'll see though.

Your cab looks great, I envy your carpentry skills =)

Thanks MeTa4, It was all simple stuff I did though! Anything here could be easily done by you or the next guy.. maybe and I emphasize maybe I have good ability to envision what to make when I see something out of wood, I have done some woodwork in the past!

If you really think any of it is commendable though feel free to ask me details/what I'm going to do/what I did do/why I did anything/constructive crtiticism/etc! All comments are welcome

I just did a measurement of width and depth (25" by 14") and figured it's 2.4 square feet. Height is 31" (all internal meaurements) I don't really think I need a 250 watter with some mylar and keeping the light close I think 150 would do me more than enough light! Reason is i'm planning on doing some pretty heavy LST so that I keep a flat canopy. That way I can keep the 150 within 6-10 inches of my tops at all times if the temps are right. The 250 would be overkill I'm pretty sure, and I don't really have the money, nor the space in my growbox to setup a large fan... (if i had a 250 I would need all the room for bigger plants instead of large fans :p )

maybe this chart will help
1063931-Foot-Candle%20Chart%20HPS%20New%20Done.jpg
 
F

fully baked

LST will allow the plants to be more mobile for sure. So taking them in and out of the cab is much easier than with a scrog. They become quite difficult to move once you add in that screen...

But the screen allows an even canopy with a little less work than the LST. I think it boils down to a choice between mobility and the even-ness of your canopy. As far as the vertical scrog, this is an experiment for me too... :nanana:

My use of a 250 is simply because thats the only HPS I have lying around and I'm getting a little tired of the CFL's. I want my big beautiful colas again!! Ventilation will definitely be heavy duty, and I would imagine you would be more than fine with the 150...

I'll make sure to keep you updated once I get back to work on my cab... Work on it has stalled for a bit while I swim and frolic in the summertime sun...

Cheers,
FB

Good stuff FB. How big of colas are you talking? I'm considering doing 6 x 26 watt twirley CFL bulbs in here all horizontal, but it's up in the air depending on if I can find or figure out cheap fan system. If not then it's 150 HPS with an inline fan all the way..
I just don't even think I need an HID..
 
F

fully baked

Check my sig if you want an idea of what CFL's can do. I used 7 23w in a cab that I ran to flower, so surprisingly similar to what you are looking at. It was a bit smaller than the dresser, but CFL's can produce nice size nugs. HPS just does it a lot better IME....

Averaged around an ounce per plant and I could fit 3 in the cab, LST'd continuously. Definitely a viable option. I only had to vent with 2 (qty) - 4" inline duct fans I had lying around. Like 20 bucks a pop, CFL's keep the ventilation costs down for sure...

A sample from under the CFL's... That was one of my nicer colas and ran around 8 inches.


Hydro - I've ben following your PL-L C99 grow. They look wonderful, and PL-L may be the new superior CFL. Keep doing what your doing, cause making growing even easier just helps overgrow the system... I'll be watching.

Cheers,
FB
 

Latest posts

Latest posts

Top